Technology for Promotion at the Los Angeles Auto Show

The 2017 Los Angeles Auto Show is underway this week. The cars are the stars, but you can read about them elsewhere. Instead, here are some of the interesting technology installed on the show floor.


There were two venues that featured the Microsoft HoloLens. I had been interested by this augmented reality headset and was happy this was a chance to try them myself.

Hololens 1 - Nissan

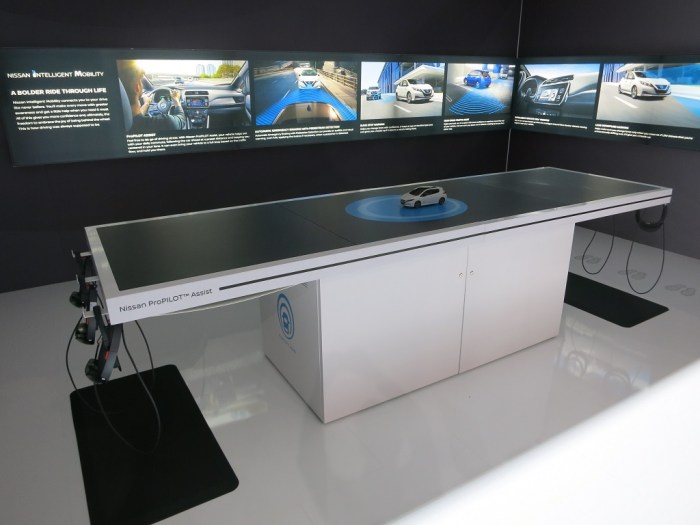
Nissan chose to use HoloLens to showcase their driving assist technologies. Up to six people (three front, three rear) can put on a HoloLens and look at the little toy Nissan on the table. Each of wearer sees an interactive environment projected around the toy car to illustrate how various features assist the driver. It’s possible to walk a bit to check different perspectives, but movement was limited because the HoloLens units were tethered to the table.

I felt this presentation underutilized HoloLens. It didn’t feel significantly superior to what you can accomplish with a cell phone, Pokemon-Go style.

Hololens 2 - Petersen

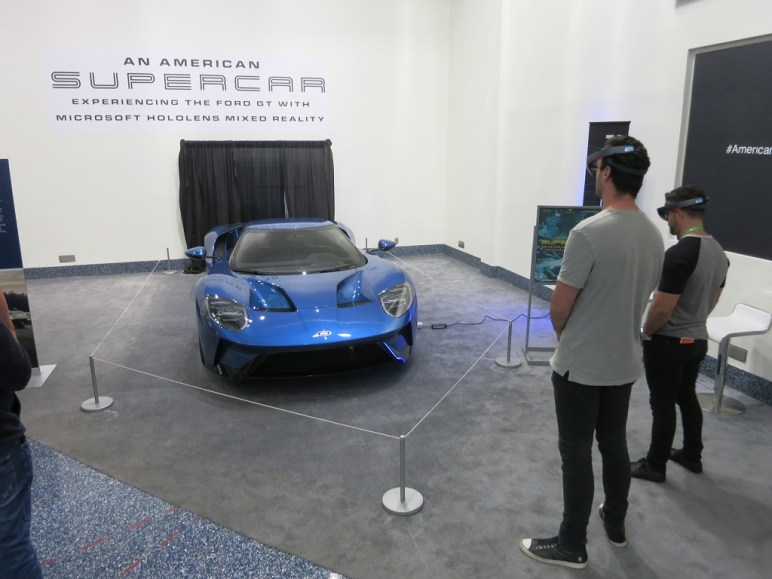
The other HoloLens exhibit was actually an exhibit at the Petersen Automotive Museum that they’ve brought to the auto show floor. The program is not interactive, but the user can walk around and check out views from different perspectives as the narrated presentation proceeded.

The best part was when they started illustrating airflow over and through the insides of the physical 2017 Ford GT in front of us. It’s quite informative to be able to move your head around to get a better feel of where the airflow is moving. Especially the X-Ray view of airflow through and under the car.

This was a much better demonstration of what’s possible with the superior precision and response rate of HoloLens tracking.


Several booth displays had some sort of virtual reality equipment. It is interesting that none of them were used to showcase any kind of driving. Just the opposite – most of them were there to showcase autonomous vehicle technology, a.k.a. the lack of driving.

VR 1 - Ford motion couch

Ford brought this motion-controlled couch with four seats, each of which can seat somebody with a Google Cardboard-style headset to experience riding in a Ford autonomous vehicle.

VR 2 - Volvo

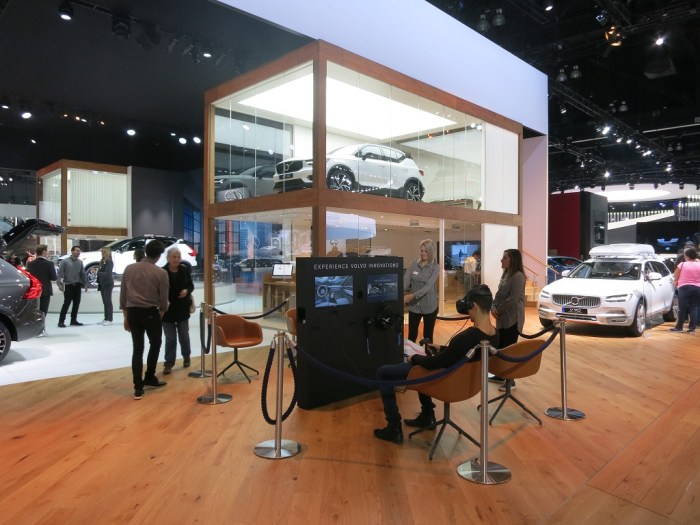
Volvo brought in four Vive headsets to illustrate their safety technologies, much as Nissan did with Hololens. One random technical point of interest: I only found a single location beacon in the installation. Vive usually needs two beacons. I wonder where the other beacon was or if they’ve managed to do without the second.

VR 3 - Infiniti

Infiniti’s VR experience takes the guest on a virtual ride in the QX50. The most novel part of the program was the beginning, where parts of the SUV flew through space and assembled themselves around the viewer into a QX50.

VR 4 - VW

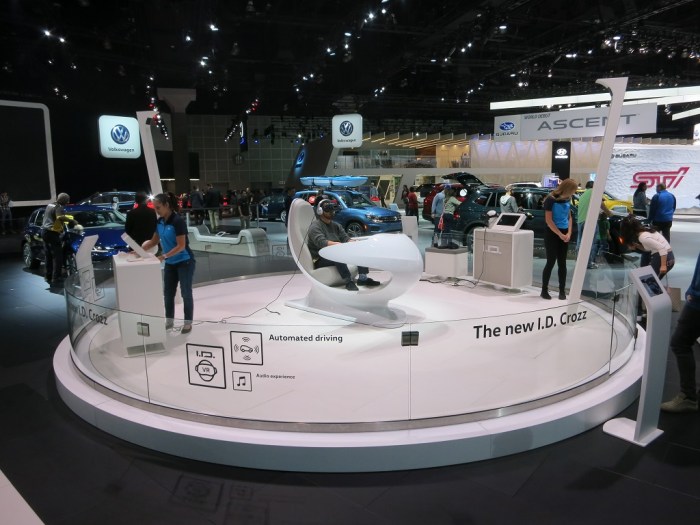
In contrast to the compact seating of the Volvo booth, VW put up this huge glass ring to give their I.D. Crozz VR ride plenty of elbow room. The guest seemed to stay seated through the whole experience so it’s not clear why this amount of room was necessary.

VR 5 - Nissan

I’m sure Nissan paid a lot of money for their Star Wars license for car promotion. And they were not afraid to use it! Liberally customized Nissans modeled after various Star Wars properties were on display. Their pavilion included this “Droid Repair Bay” VR activity. It looked so cool I almost didn’t wonder what it had to do with cars.


None of the AR or VR experiences featured any actual driving. For that, there were plenty of old-fashioned driving simulators on display.

Driving Sim 1 - Forza

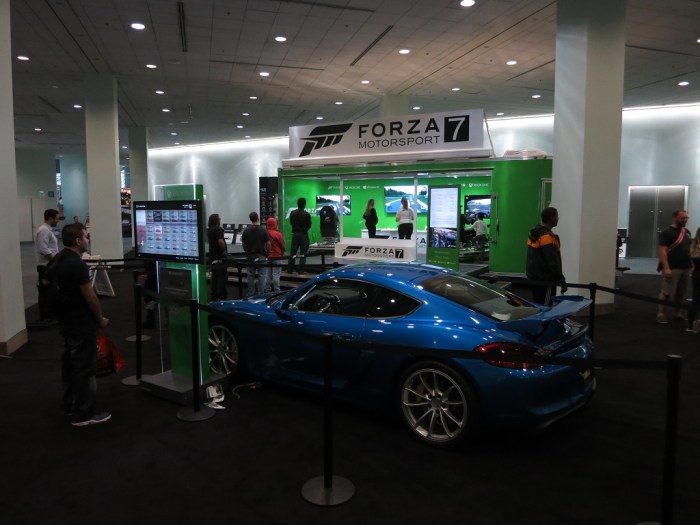
Forza Motorsports are here to promote… themselves! I have Forza at home so didn’t bother to spend time playing it here.

Driving Sim 2 - Hyundai

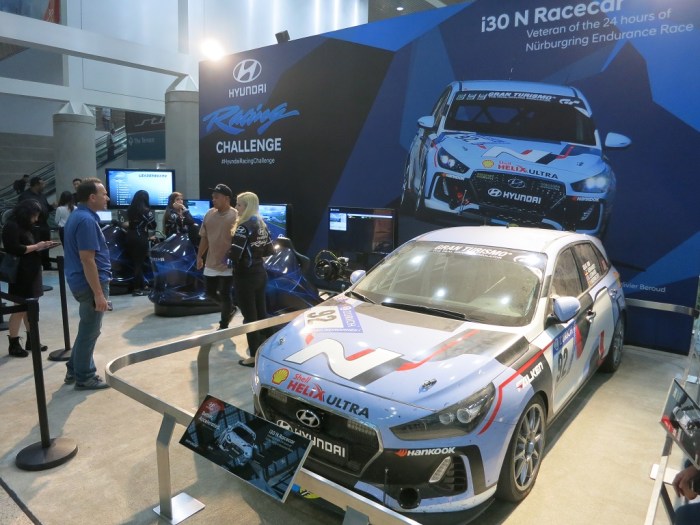
Hyundai Racing had a four-seat configuration. What caught my eye is that they’re using Forza for the driving experience but the race car is sponsored by Gran Turismo. (See banner on top of the windshield.) Hmm…

Driving Sim 3 - Demon

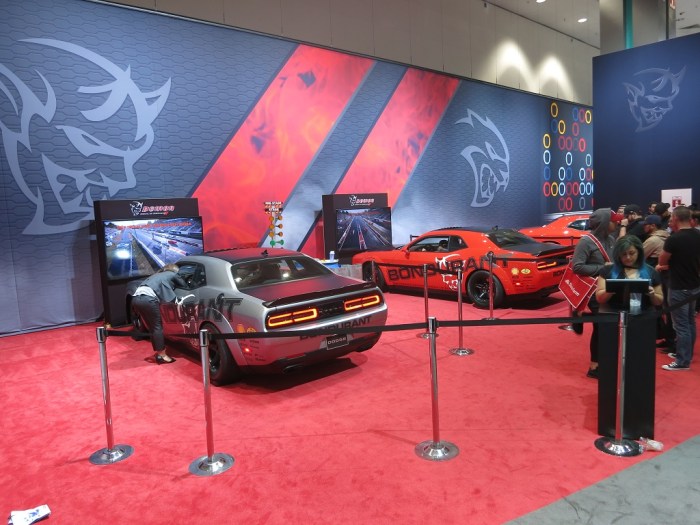
Not all the driving sims were about the race track; the simulator set up in the Dodge pavilion lets people try their hands at drag racing. A fitting way to promote their drag strip focused Dodge Demon.

Driving Sim 4 - Ford

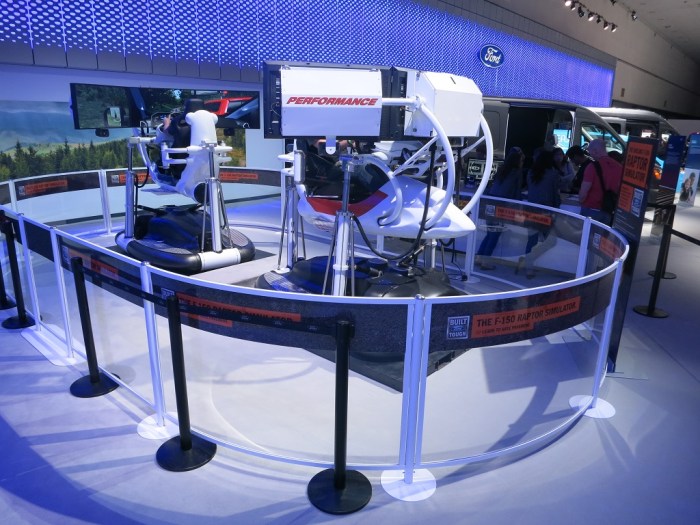
Ford brought in a full-motion driving simulator to promote the off-road focused F-150 Raptor. The hydraulic cylinders simulate the rough and tumble of racing head-to-head (back-to-back?) through a dirt track.


All good marketing companies have worked to think up ways to build customer connection through social media. There were plenty of photo booths present for people to post company-sponsored images to their social media. Two stood out for their novelty.

Selfie 1 - Honda

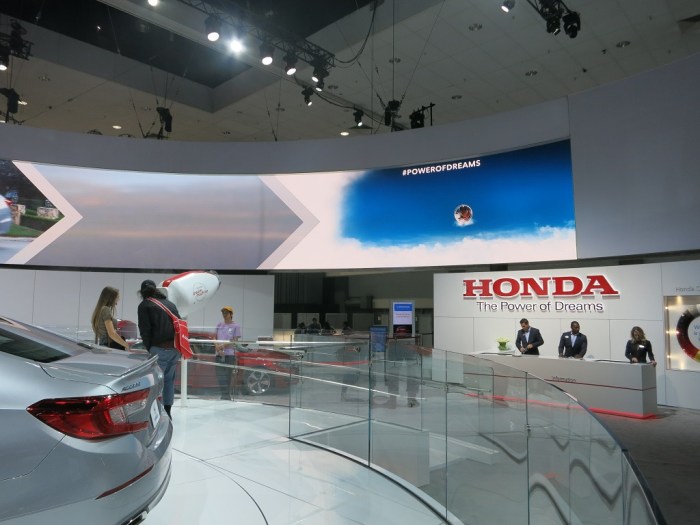
Honda’s “Dream Machine” is a selfie cam mounted in a little pivoting pod at floor level. After the person takes the picture, they press a trigger and a smoke ring puffs out of the pod towards the big screen, “sending” the picture to be displayed on the big screen.

Selfie 2 - Toyota

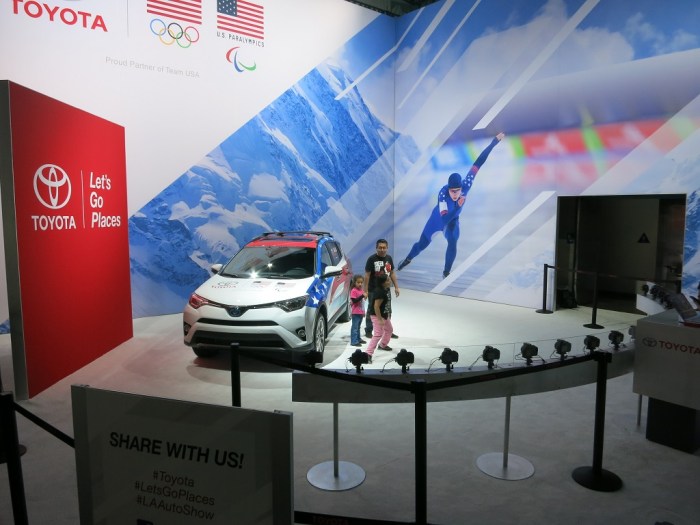
Toyota brought an array of cameras that all takes a picture at the same time, so the guest receives an animated GIF of them in Matrix-style “bullet-time”.

Acer Aspire Switch Runs Windows 10 (Fall Creator’s Update)

After Secure Boot discouraged me from putting a Linux variant on the recently revived Acer SW5-012 (Aspire Switch 10) convertible laptop, I tried to replace the existing Windows 8 installation (locked with passwords I don’t have) with the latest Windows 10.

The first thing to check is to look in the BIOS and verify the CPU is not a member of the ill-fated Intel Clover Trail series, whose support was dropped. Fortunately, the machine uses a newer CPU so I can try installing Windows 10 Fall Creator’s Update. I had an installation USB flash drive built with Microsoft’s Media Creation Tool.

I needed an USB OTG cable to start the installation. Once in progress, I deleted the existing Windows 8 system partition (~20 GB) and the recovery image partition (~7 GB), leaving the remaining two system partitions intact before proceeding.

When Windows 10 initially came up, there were significant problems with hardware support. The touchscreen didn’t work, there was no sound, and the machine was ignorant of its own battery charge level. Fortunately all of these hardware issues were resolved by downloading and running the “Platform Drivers Installer” from Acer’s support site.

After the driver situation was sorted out I started poking around elsewhere on the system and found a happy surprise on Windows licensing. Since I couldn’t get into the Windows 8 installation, I couldn’t perform a Windows upgrade. Because I performed a system wipe, I thought I lost the Windows license on this machine. But I was wrong! I don’t know exactly what happened, but when I went to look at the computer’s information, it claims “Windows is Activated.”

The sticker on the bottom of the machine says it came with Windows 8 Pro. The new Windows 10 installation activated itself as Windows 10 Home. It is technically a step down from Pro to Home but I am not going to complain at the unexpectedly functional Windows license.

The machine outperformed my expectations. It handily outperformed my other computers with Intel Atom processors. I think the key part is its 2GB of RAM, double the 1GB RAM of the other Atom machines. The machine is surprisingly usable relative to its Atom peers.

Some credit is due to Acer for building a low-end computer in 2014 that is still capable on the software of 2017 (almost 2018.)

[UPDATE: I figured out Windows 10 activates itself on Windows 8 machines.]

Acer Aspire Switch is Linux Unfriendly

Now that the hardware of an Acer SW5-012 (Aspire Switch 10) is back up and running, the focus turns to software. Windows 8 is installed but locked with passwords I don’t have. I didn’t care much for Windows 8 anyway, and whatever data exists is not mine to recover. So – a clean wipe is in order.

As with the Latitude X1, my first thought was to turn this little old machine into an almost-Chromebook with Neverware CloudReady. And just like with the Latitude X1, the attempt was foiled. The Latitude X1 was too old and did not support some processor features required by CloudReady. The Acer problem is just the opposite – the hardware is too new and deliberately blocks the installation.

The blocking mechanism is Secure Boot, which according to its own web site is a “security standard developed by members of the PC industry to help make sure that a device boots using only software that is trusted by the Original Equipment Manufacturer.” I would describe it with different terms. Either way, trying to install CloudReady – or a Linux distribution – results in the error screen “Secure Boot Error”.

Intentional or not, this puts the Acer in a bad state. It gets stuck neither fully on nor off, the screen dark but burning battery power and making itself warm. I had to disassemble the computer again to pull the battery from the main circuit board in order to reboot the machine.

In theory Secure Boot can be disabled, but various efforts by other people on the internet indicated this isn’t straightforward. I certainly had no better luck when I tried it: I can see the menu option, and I could change it from black on white (disabled) to white on gray (enabled) by creating an admin password, but I couldn’t figure out how to actually change the Secure Boot mode out of “Standard”.

Acer Secure Boot Menu

And it might not even be worth the effort, as forum traffic indicates there is very poor Linux driver support for this class of hardware. Probably related to the secure boot barrier but either way I’m giving up. I’ll stay with Windows on this machine.

No AC Adapter, No Problem! Alternate Power Source for an Acer Aspire Switch.

Once I was done gawking the clever magnetic attachment mechanism of the Acer SW5-012, it’s time to get back to trying to get it to run. The machine was able to power up on its remaining battery power for a little bit, but now it needs more juice. Since I was given this computer in nonfunctional “as-is” state, the AC power adapter was not part of the package.

Disinclined to spend any money on this machine, but willing to spend time, I went online to look for information about the AC adapter. Unfortunately there appeared to have been several similar but different computers sold under the “Acer Aspire Switch 10” name. And while it’s unclear if all of them use the same AC power adapter, the adapters were consistently stated to be an unit that outputs 12V DC.

This is great news as I have many ways to deliver 12V DC among my collection of tools and parts. But I have no plugs on hand that fits the existing power socket. I examined the power connector to the motherboard and saw four wires. A continuity check confirmed that it’s a simple positive terminal and ground terminal, with a pair of wires electrically connected for each. None of the wires are electrically distinct from power, so I don’t have to worry about data handshaking signals that are involved in charging certain other laptops.

Armed with this information, I removed the existing 12V power socket and the associated bracket. I cut the wire connecting the socket to the motherboard and soldered a JST RCY connector in its place.

Acer JST RCY adaptation

This type of connector is popular with remote-control aircraft and frequently used to carry roughly 12 volts (3-cell lithium rechargeable battery) at up to 3 amps. I reassembled the tablet, connected a 12V power source, and was reassured by illumination of the charging activity light. After a few hours, the tablet was charged up and ready to go again. Success!


Functional Simplicity of the “Acer Smart Hinge”

Yesterday’s post was about trying to bring an Acer SW5-012 back to life, which was fortunately as easy as reseating a ribbon cable. One of the reasons I was so eager to crack that thing open was my fascination with its hinge attachment mechanism. This was one of the “convertible” machines launched in the Windows 8 era and evolution of the category continued to this day with computers like the Microsoft Surface Book.

The hinge attachment/release mechanism for the Surface Book featured precisely machined components and electronics to control a wire of memory alloy. This Acer is a much cheaper machine so its nifty connector must also be simpler. Before I pried it open, I mentally tried to figure out how I would design such a mechanism.

At the time I thought the battery was flat, so I excluded any electronics in the design. It had to work without power, which made me think about magnets. A few small magnets to detect when the base is close to the screen, and pull against some spring-loaded arms to hold the thing together. When I pull on the screen, the force overcomes the springs to releases the arms.

Once I popped off the back cover of the computer, I could check my design against the answer and… well, I got the magnets part right even though it was based on a false premise (the battery was not flat like I thought.) And all the spring-loaded arms and clips and levers? Unnecessary complexity. I knew it had to be simpler than the Surface Book mechanism, but it was far simpler than what I imagined.

The actual mechanism consisted of magnets and… that’s it. Just some very cleverly placed magnets. When the screen is installed on the base, the magnets attract like we expect them to do, holding things together.

Acer Hinge Engaged

So what happens when we lift the screen away from the base? What’s causing that mechanical “click” sound?

When the base is lifted, the magnets in the screen is pulled away from the magnets in the base. Lacking the strong attraction, the magnets in the screen searched for the next best thing and finds a few metal plates slightly recessed into the cavity. The “click” is the magnet moving from the no-longer-there base magnet to the metal plate. When the magnets are attached to this inner metal plate, they are a few millimeters away from the edge of the unit but that’s far enough to keep it from picking up errant metal bits (paperclips, staples, etc.) while it is in tablet mode.

Acer Hinge Released

When the screen is reinstalled on the base, the screen magnet leave the metal plate in favor of the magnet in the base, making another “click”.

The Acer manual called it the “Acer Smart Hinge” and I agree it’s very smart – on the part of the people who designed it. Its simplicity lends to lower manufacturing cost and also to its reliability – no springs to break, no latch to wear out.

I am impressed.

Acer Aspire Disabled By Loose Cable.

I recently received an old Acer Aspire Switch 10 computer that no longer ran: there was no response when pushing the power button. The most obvious hypothesis is that the batteries are flat and need to be charged. Unfortunately, my gift of the computer did not include its matching AC power adapter.

If I was confident that was the only issue, I would go out and buy a power adapter. But I didn’t know if there were more serious problems in this machine and didn’t want to throw money at an unknown quantity. Besides, I received this computer on the premise that I wanted to take it apart for fun, so that’s exactly what I’m going to do.

Putting its serial number into Acer’s support site told me the model number (SW5-012) and part number (NT.L4TAA.018), but no service manual. I’m spoiled by Dell who usually releases a service manual detailing how to take apart and service a computer. Apparently Acer does not follow the practice.

There were no obvious external fasteners I could loosen, so I started prying at the visible seams to see if I could release plastic clips. Once I had three loose, the remainder (~25 in all) easily popped off in sequence.

My target was the battery module which I planned to remove and charge directly. Removing the battery required removing several pieces of tape. Some of these pieces of tape were applied over connectors, presumably to help the cables stay in place. One of these cables traversed the length of the battery so I had to remove the tape and the cable to free the battery. After I carefully peeled off the tape, I reached out to disconnect the cable and… it fell off freely.

Hmm, that wasn’t supposed to happen.

This cable connects the motherboard on one side of the machine to a small circuit board on the other side. The small circuit board hosts the Windows button, the volume up/down buttons, the headphone jack, and… the power button. If this cable was disconnected, it would explain why pushing the power button had no response.

Acer Power Ribbon

Since the battery was accessible now, I checked its voltage: 4.01V. Comfortably above the ~3.7V nominal voltage of a lithium-ion battery so the problem with this computer was not a dead battery. Maybe it’s the loose cable I just came across? I reinstalled the cable and pushed the power button again.

And… it’s alive!

Hands-On Fun for Kids at DTLA Mini Maker Faire

Today was the DTLA Mini Maker Faire (DTLA = downtown Los Angeles) and I went to see who the event would draw. I know there’s plenty of maker activity in the greater Los Angeles area, but it’s such a big area hindered by world-famous traffic congestion that it’s rare for everyone with common interest to gather together in one place. Any group of like-minded people are likely to congregate within several local clusters versus one big Los Angeles group. A call out to gather should be interesting to see.

Entrance

I was not disappointed! Groups came from all across Los Angeles basin and I saw many interesting things I didn’t know existed. The event took place in the downtown Los Angeles Public Library during regular hours. Maker Faire exhibits were tucked into various rooms scattered throughout the library adding a scavenger hunt into the experience.

My favorite part was seeing so many booths offering hands-on activity for young children to play with. I had expected grown-ups showing off their hobbies, since that’s what I had read about other Maker Faires in the past. I certainly got that, but I was more amused watching little kids engrossed in their own activities so this post is focused on the little ones.


The loudest booth in the courtyard is definitely the reDiscover Center booth. They had a basic woodworking shop set up and kids were building things with real woodworking tools (not plastic pretend tools) under adult supervision.

reDiscover

At the other end of the courtyard, SGVLUG (San Gabriel Valley Linux User’s Group) had multiple activities but the most popular was where kids were given old computer hard drives and the tools to take them apart. It looked like hard drive platters were being extracted to become Christmas tree ornaments.

SGVLUG

MatterHackers is a 3D-printing retailer within driving distance, but not close enough for me to have made a visit yet. They had a Ultimaker 3 running, but more interestingly, they had two 3D-printing pens set up for kids to freehand their own plastic creations.

MatterHackers

HexLab Makerspace came prepared with laser-cut wood kits of dinosaurs. But they didn’t just hand them out to kids for assembly – they also had paint set out for kids to color their dinosaurs and staffers offered encouragement to the children creating their own masterpieces.

Hexlab

The scattered nature of the event meant some attractions were harder to find than others, which is unfortunate. Getting to the auditorium required walking through a few uninviting-looking hallways that probably caused it to be overlooked by many. Those who entered could see robots for the FIRST robotics competition set up on stage. Kids could get in line to drive one of them on stage.

FIRST driving
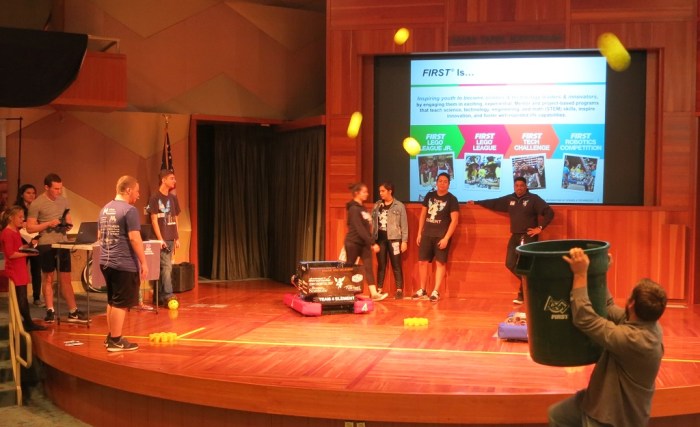
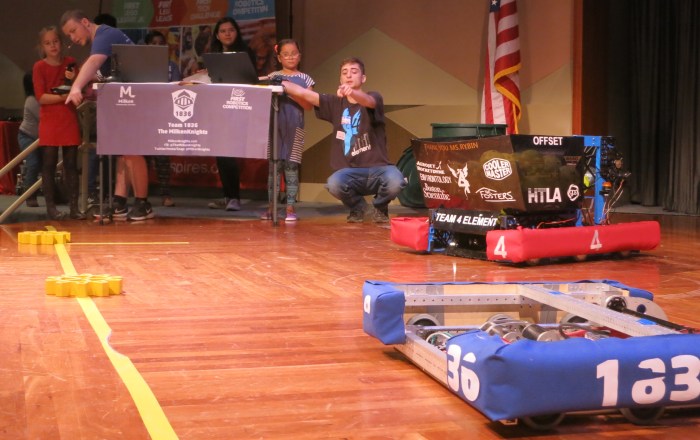
One of the robots is built to launch balls into the air, a task required in one particular competition. This robot gets all the attention whenever they demonstrated the ball launch mechanism.

FIRST firing


This event had fun for tinkers young and old alike. It has made me much more interested in attending more Maker Faires.

Fusion 360 Script Engine Uses Python Version 3

One of the differences between Python 2 and 3 was changing print from a statement to a function. This means a Python beginner like myself immediately runs into the breaking change trying to print “Hello World!” to the console. (print "Hello World!" versus print("Hello World!")) It sets the tone pretty clearly up front: when working with Python, developers need to know which version they’re writing for.

Which is why I was very puzzled when I searched for this information in the Autodesk documentation and came up empty-handed. The most obvious place in my mind would be the “Python Specific Issues” page of the user’s manual, but it wasn’t mentioned there. Searching various other combinations of terms – on and off Autodesk’s web site – failed to find a straightforward answer. Given the relatively young age of Fusion 360’s Python scripting support, I would expect them to use Python 3 but I wanted confirmation.

Well, if I can’t find it in documentation, there’s always looking at the code itself. And a tiny baby step beyond the simple boilerplate script generated by Fusion 360. It’s not quite printing “Hello World” but it’s almost that simple.

First I imported the Python sys module for querying system parameters.

import sys

Then I changed the boilerplate message box output string to include the version number.

ui.messageBox("We're running on Python " + str(sys.version_info.major), "Version detection")

Executing the script confirms the scripting engine is running Python 3.

F360Python3

Once the web search engines index this post, people who have this question in the future will know the answer just by reading the title of this post on the search results. They won’t even need to click on the link to read this page.

(This really simple bit of code is almost not worth committing to Github… but it’s a slow day so it was pushed up to be publicly available.)