AI Generated Rover Mascot Has Room for Improvement

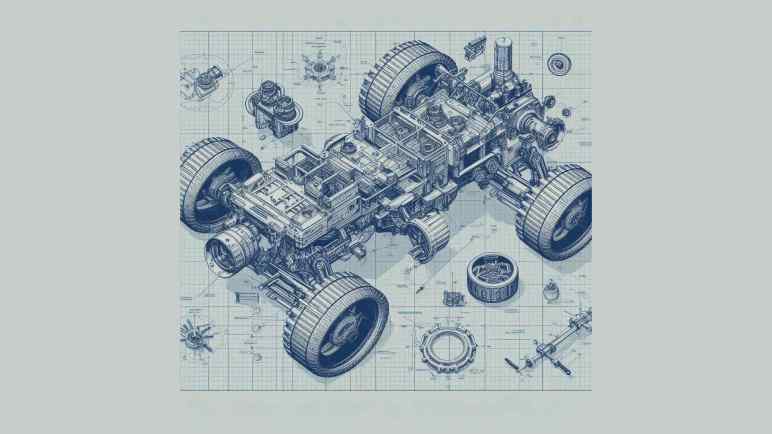
In the short time we’ve had usable generative AI systems, they’ve quickly evolved from “obviously nonsense but there is an outline of an idea” to “superficially fine but nonsense beyond the surface”. Asking an image generator to design a rover has improved from a jumble of pixels to something that looks superficially like a machine but upon closer inspection couldn’t possibly work. These systems are evolving rapidly, so I’ll check back in a few months to see what progress they’ve made.

In the meantime, today’s systems may be usable if I ignore mechanical functionality and focus on appearance. For this second round, I’m asking Microsoft Bing Image Creator (powered by OpenAI DALL-E) to design a cute mascot for the Sawppy project, hoping for something like the mascot for the Mars 2020 rover naming contest. I gave it the prompt:

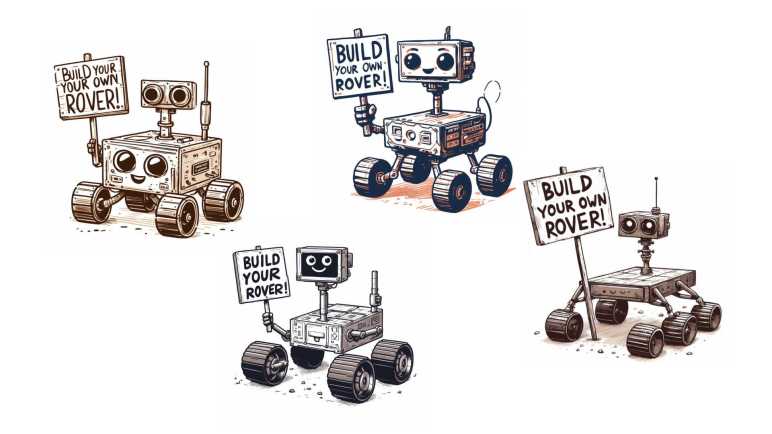
Mars rover with a rectangular smiling head and six wheels holding a sign that says “Build Your Own Rover!” in hand-drawn cartoon style on a white background.

And here are the results:

Contestant #1 comes across as a little creepy because it seems to have two faces: one in front of the body and another on top of the mast. It’s got only four wheels instead of the six I asked for.

Contestant #2 at least has only a single face, and a friendlier-looking one, but again it has only four wheels and the suspension linkages are missing entirely leaving the body to float in midair. Mars has gravity so this won’t work. The sign also skipped the word “own” for some reason, though if that was the only flaw, it’s something easily fixable in a photo editor.

Contestant #3 has a single face and a sign with all the words. Still only four wheels, but at least they’re connected with mechanical-looking linkages instead of a cartoon arc or missing entirely.

The good news with contestant #4 is that it has more than four wheels. The bad news is that it has five. I guess the AI judged this to be a fair compromise between four and six wheels? Only three of these wheels have visible suspension linkages, and they’re connected to the outside of the wheel instead of the center. Perhaps the AI had landing struts and pads in mind, and mistakenly thought replacing the pads with wheels would work equally well. An additional data point is that “five wheels” and “attached to tires” problems also came up for another rover design drawn as a result of Quinn Morley’s prompt. (See yesterday’s post.) This is not an accident… something in DALL-E is intentionally doing this, but why?

I was going to critique this entry for lacking a smile, until I noticed there are little arcs on the front of the body. That’s the wrong distance from the eyes on top of the mast to be a smiling face, but I guess it was satisfactory for an AI “does it have a smiling mouth Yes/No” checklist.


Looking at these as a group, I noticed they’re all drawn at the same three-quarter view angle in an orthographic projection with almost no perspective distortion. (Head of #3 and maybe #1 had perspective sides.) That was not part of my prompt and I’m curious if that is typical of “hand-drawn cartoon style”.

I like telling the generative engine to draw in cartoon style because it reduces a lot of visual noise and mitigates the uncanny valley effect of generators getting little details wrong. I think I’ll start with “cartoon style” for my image generator sessions unless I have a reason otherwise.

I also noticed all of these rovers have a boxy body on top of wheels and a boxy head on top of a mast, so it understood that much of the robots sent to Mars. But its training set must be dominated by vehicles on Earth, or at least that’s my hypothesis for its obsession with four wheels instead of the six I asked for.

None of these images are good enough to be the new Sawppy project mascot, but they’re very close. I’ll try again later. Bing beat Google to the punch on this one, but Google is working on an answer. Adobe also has a limited free tier for their Adobe Firefly product. I’m confident there will be more options in a few months. This was a fun distraction and good enough to let my brain think up a solution to my recent circuit board analysis problem.

AI Generated Rovers Not Mechanically Sound (Yet)

Taking a break from exploring electronics, I went to the to-do list and picked off the item “look into generative AI”. This particular story started several years ago when GitHub user @johndpope opened a GitHub issue on my Sawppy repository advocating for a Lexan body shell. Aesthetics is not my focus for Sawppy but I’m glad to see others are thinking about cosmetic enhancements. In a recent update, @johndpope added a large number of images generated by Stable Diffusion. They’re really… something. If there’s potential here, I really have to squint to see them. For the most part these images generated by Stable Diffusion were not mechanically sound. Or even mechanically feasible. Or even sane. It’s a patchwork of bits I recognize, assembled into a surrealistic dream that reminds me of Salvador Dali paintings.

(Image credit: Stable Diffusion from @johndpope prompt)

What’s going on here? An Ars Technica article about Stable Diffusion running on Apple Silicon had put a note in the back of my mind, and after seeing @johndpope updates I thought I would look into it further. I do own an Apple MacBook Air with a M1 Apple Silicon processor appropriate for the links in that Ars Technica article, but it is my understanding my gaming PC’s NVIDIA RTX 2070 GPU would be faster still. So I followed instructions on this @AUTOMATIC1111 GitHub repository to run Stable Diffusion locally on my machine.

My experiment results were no better than what @johndpope had posted. Jumbles of things, nothing very coherent, and the occasional misshapen nightmare fuel. Other tools like Midjourney and OpenAI’s DALL-E were supposed to be better, but they were commercial offerings not available for running locally and I didn’t feel like this experiment was worth handing over my credit card. Then I read Microsoft had licensed DALL-E for Bing Image Creator. No credit card necessary, just a Microsoft account. Well, I have that!

To see if things have gotten better, I headed over and here’s the most sane result from the prompt: “mechanical diagram of a six-wheel mars rover in blueprint style

(Image credit: Bing Image Creator from my prompt)

This is better looking than what I got out of local Stable Diffusion. (And ironically less Dali-like, given the DALL-E name.) But it is clearly weak on sound mechanical design concepts starting with the fact I asked for six wheels and got only four. Symmetry is not a well understood concept, either, as these four wheels are visibly misaligned relative to each other along orthographic axes. And there are random parts scattered around, what’s up with that? And finally, it seemed to have ignored the “Mars” part of my prompt as this creation shows no indication of adaptations for a Martian operating environment.

I tried a few variations on my prompt and my impression of this tool is to lean into its tendency for mechanical nonsense and get designs packed with greeble, because it’s certainly got plenty of visual noise. But I certainly can’t use it for anything that can function mechanically. To be fair, mechanical design is not the focus of such image generators. Plus, this field is still evolving rapidly so in a few months things might be very different. But at least for today, image generation AI pose no threat to mechanical engineering jobs.

A short while later I got another idea: instead of trying to make it do something mechanical, how about an abstract cartoon rover mascot?


[UPDATE]: In the comments, Quinn Morley got an interesting looking rover from the prompt “SAWPPY the rover, with six wheels and a body made of glass instead of metal, on Mars.

(Image credit: Bing Image Creator from Quinn Morley’s prompt)

At first glance, this looks really good!

But upon closer inspection, I noticed the suspension linkages are attached to tires instead of hubs, and there seem to be only five wheels instead of the six specified. Something about this particular combination of flaws is appealing to DALL-E’s inscrutable brain because it also showed up in my cartoon mascot experiment.

LEGO Technic NASA Mars Rover Perseverance (42158)

One of my many back-burner projects is a micro Sawppy: a smaller 3D-printed motorized Mars rover model with a target parts cost under $100. Well, the LEGO group has joined the chat with their $100 NASA Mars Rover Perseverance kit number 42158. This is more complex and expensive than their earlier rover (Curiosity rover #21104), but less than what serious fanatics have created. As someone who grew up playing with LEGO and a fan of Mars rovers, I had to get one.

This product is in the Technic line, which goes beyond cosmetic appearance by incorporating mechanical features. The front of the box depicts a wheel raised by a boulder, implying a functioning rocker-bogie suspension.

The back of the box shows four-wheel steering, with alignment for turning-in-place and for driving in an arc. It also advertises some level of arm articulation. It’ll be very interesting to see how that’s implemented. I opened the box and got to work. Window-shoppers can download the assembly instruction PDF to see all the details without spending money.

I was not surprised to find the wheels were custom pieces unique to this kit.

Also unique to this kit were a few decal stickers.

Construction started with fairly standard Technic fare. The first thing that really made me think “Huh, haven’t seen that before” were these angled shafts. Usually, universal joints were used only for vehicle models with suspensions and had to transmit power through range of suspension motion. This is the first time I recall seeing them used for an interior non-articulating joint.

The first completed bit of rover suspension was the differential bar on top of the rover. A stout triple-beam unit to handle the load. It got me excited to seeing the rest of rocker-bogie suspension implemented in LEGO.

I was surprised to find the rover instrument mast could be built in the stowed travel configuration. No such feature for the rocker-bogie, though, which is fixed in the deployed position. I have ambition to give micro Sawppy a rocker deploy pivot but that’ll take development effort I have yet to invest.

A little over four hours later, I completed assembly of the kit. It’s pretty cool and absolutely recognizable as Perseverance rover with little buddy Ingenuity. The robot arm articulation geartrain turned out to actuate only the shoulder joint, elbow and wrist joints are posed manually.

As is typical for LEGO, a few extra copies of easy-to-lose pieces are included. If one goes missing, we can still complete the kit.

The cover art boulder is no lie: rocker-bogie suspension geometry is fully functional.

It was also, unfortunately, quite flexible. LEGO pieces have small gaps between them so we can snap them together and take them apart. These small gaps, combined with the natural flexibility of ABS plastic, resulted in a pretty floppy suspension that splayed out as it squatted. On the upside, I’ve determined the real thing built with carbon-fiber and titanium is also pretty floppy so all good.

A similar problem hampered the corner steering mechanism as well. It’s a pretty clever design switching between “center steering” and “arc travel” modes with a single lever in the middle of rover body. But transmitting steering motion all the way out to the corners meant many linkages, each adding their own tiny bit of play. As a result, steering angles for the four corner wheels are more suggestions than commands. But still, pretty cool.

I enjoyed assembling and playing with this kit. LEGO assembly instructions, using techniques polished over decades, were excellent as always. I aspire to one day make Sawppy assembly instructions as clear as LEGO assembly instructions. However, the instructions only describe one thing. The beauty of LEGO is that it enables building countless other ideas of my imagination. It did that very well, until I got into 3D printing.

Window Shopping: GMKtec NucBox3 Mini PC

A Newegg advertisement sent me down a rabbit hole of tiny little desktop PCs with full x86-64 processors. I knew about Intel’s NUC, but I hadn’t realized there was an entire product ecosystem of such small form factor machines built by other manufacturers. The one that originally caught my attention was distributed by several different companies under different names, I haven’t figured out who made it. But that exploration took me to GMKtec which is either their manufacturer, or a distributor with a sizable collection of similar products built by different manufacturers. The product that originally caught my attention is listed as their “NucBox5” (company website listing and Amazon link *) but I actually found their “NucBox3” (company website listing and Amazon link *) to be a more interesting candidate for my Sawppy Rover’s ROS brain. Both products have a Gigabit Ethernet wired networking port that I demand for resistance against RF interference, but beyond that, their respective designs differ wildly:

First the bad news: the NucBox 3 has an older CPU, the Celeron J4125 instead of the Celeron N5105. But comparing them side-by-side, it looks like I’d be giving up less than 10% of peak CPU performance. There is a huge (~50%) drop in GPU performance, but that doesn’t matter to Sawppy because most of the time its brain wouldn’t even have a screen attached.

A longer list of good stuff balances out the slower CPU:

  • RAM on the NucBox 3 is a commodity DDR4 laptop memory module. That can be easily upgraded if needed, unlike the soldered-in memory on the NucBox 5.
  • They both use M.2 SSDs for storage, but the NucBox 3 accommodates popular 2280 form factor instead of a less common 2245 size used by NucBox 5.
  • The SSD advantage was possible because NucBox 3 has a different shape: is wider and deeper than a NucBox 5, but not as tall. Designed for installation on a VESA 100×100 mount, it will be easier to bolt onto a rover chassis.
  • Officially, NucBox 3 is a fan-less passively cooled machine whereas the NucBox 5 has a tiny little cooling fan inside. (Which I expect to be loud, as tiny cooling fans tend to be.) Given that these are both 10W chips, I doubt NucBox 3 has a more effective cooling solution, I think it is more likely that the design just lets the chip heat up and throttle itself to stay within thermal limits. This would restrict its performance in stock form, but it also means it’ll be easy for me to hack up a quiet cooling solution if necessary.
  • NucBox 5 accepts power via USB-C, which is getting easier and easier to work with. I foresaw no problems integrating it with battery power onboard a Sawppy rover. But the NucBox 3 has a generic 5.5mm barrel jack for DC input power, and I think that’ll be even easier.

A NucBox3 costs roughly 80% of a NucBox5 for >90% of the performance, plus all of the designed tradeoff listed above are (I feel) advantages in favor of the NucBox3. I’m sold! I placed an order (*) and look forward to playing with it once it arrives.


(*) Disclosure: As an Amazon Associate I earn from qualifying purchases.

Window Shopping: Mystery Mini PC of Many Names

An interesting item came to my attention via Newegg marketing mailing list for discounts: an amazingly tiny Windows PC. My attention was captured by listing picture showing its collection of hardware ports. Knowing the size of an Ethernet port and HDMI port we can infer this is an itty-bitty thing. Newegg’s specific sale item was generically named “Mini PC” with an asking price of $200. I’m not entirely sure the thing is real: all the images look perfect enough I couldn’t tell if they’re 3D renderings or a highly retouched product photos.

I looked at the other listings by the same vendor “JOHNKANG” and saw several other generically named devices ranging from laptops to external monitors. There were no other similar products, so I think JOHNKANG is a distributor and not the manufacturer of this palm-sized wonder. If JOHNKANG is a US distributor for such merchandise, I guessed they probably have an Amazon listing as well. Sure enough, they have it listed on Amazon also at $200(*) at time of writing. Unlike the Newegg listing, the Amazon listing included this exploded-view diagram showing internals and capabilities.

That’s… pretty darned good for $200! With an Intel Celeron N5105 processor, I see a machine roughly equivalent to capabilities of a budget laptop but without the keyboard, screen, or battery. Storage size is serviceable at 256GB and can be swapped out with another M.2 SSD, though in a less common 2242 format which is shorter than the popular 2280. Its 8GB of RAM are soldered and not easily expandable, but 8GB is more than sufficient for this price point.

A few features distinguish this tiny PC from equivalent-priced laptops, starting with its dual HDMI port where laptops only have one. That might be important for certain uses, but I’m more interested in its wired Gigabit Ethernet port and that it runs on USB-C power input. This machine appears to check off all of my requirements for a candidate Sawppy Rover brain. It’s a pretty good candidate for running ROS slotting just below an Intel NUC in capability but compensates for that with a lower price and smaller physical size. Heck, at this size it is starting to compete with Raspberry Pi and might even fit in a Micro Sawppy.

I found no make or model number listed, which is consistent with a distributor that really doesn’t want us to comparison shop against anyone else who might be distributing the same product for less money. If I want hard details, I might have to buy one and look over the hardware for hints as to who built it. Still, searching for “Mini PC” and “MiniPC” with N5105 CPU found this eBay listing of a used unit with Rateyuso branding. Then I found this AliExpress listing with ZX01 as model name. That AliExpress listing is a mess, showing pictures of several other different mini PCs. Not confidence inspiring and definitely turned me off of buying from that vendor. However, the “ZX01” model name was useful because it led me to this page, which linked to a Kickstarter project that has apparently been taken down due to intellectual property dispute.

Performing an image search using the suspiciously perfect picture/render found the GMKtec Nucbox5(*) which appears to be the same product but with “GMKtec” stamped on top. Looking at the Amazon storefront for GMKtec (*) I see many other small form factor PCs without any family resemblance between their industrial designs. My hypothesis is that GMKtec is a distributor as well, but they have built up a collection of products from different manufacturers and that’s why they all look different. I thought this was encouraging. It implies experience and knowledge with the ecosystem of tiny PCs, offering a breadth of products each making a different tradeoff. I looked over their roster and found one more to my taste.


(*) Disclosure: As an Amazon Associate I earn from qualifying purchases.

AS7341 as Non-Destructive Sawppy Sensor

One of the reasons I became interested in AS7341 multi-spectral sensor was the fact it was an affordable and nondestructive instrument with an approximate analogue on real Mars rovers. I have been keeping a watch for interesting instruments that I might install on board Sawppy to emulate the rolling science laboratory nature of its Martian inspirations. During a visit to DTLA Maker Faire 2019, Sawppy had the opportunity to ferry around an air quality sensor courtesy of people from the South Coast Air Quality Management District. That was interesting but not representative of real Mars rovers as Mars did not having much of air to monitor quality of.

The most interesting and fatally flawed idea was to give Sawppy a variation of Curiosity’s ChemCam or the Perserverance SuperCam successor. As cool as rover space lasers might be, a rock-vaporizing laser on a rover that drives near human children seems like an extremely bad idea.

A similar idea was to mount a small Dremel tool on board Sawppy’s yet-to-be-built robot arm. This is a Mars rover tradition started by the MER (Mars Exploration Rover) twins Spirit and Opportunity. Whose robot arms held a Rock Abrasion Tool (RAT) to cut through rock surfaces in order to evaluate rock composition within. Curiosity rover has a drill, and Perseverance rover expands on that for rock core sampling. A motorized cutting bit is somewhat less dangerous than a vaporization laser, but still seemed like a bad idea.

Eliminating those ideas left the following candidate sensors:

There are several spectrometers aboard each of the rovers designed to look for different things. This spectrometer onboard Curiosity rover analyzed atmospheric composition. This one lives at the end of Perseverance rover robot arm. Maybe an AS7341 can act as a simplified stand-in for certain Mars rover spectrometers?


(*) Disclosure: As an Amazon Associate I earn from qualifying purchases.

Sawppy Dreams of Collaborative CAD

While putting together my presentation for the Space episode of Hangout and Nerdout, it occurred to me that I would be presenting Sawppy to an audience with a wide variety of backgrounds and would know many things I did not. Towards the end of the deck, I put in a slide asking for pointers to collaborative CAD tools. During the presentation I ended up skipping that slide because I got too excited blabbing about Sawppy and went over my 10 minute time limit. Fortunately, I had an opportunity to bring it up again during the Q&A afterwards when I was asked about user contributions.

The reality is that right now it that I don’t have an easy workflow for accepting contributions. I’ve been able to accept a few contributions in the form of edits for Sawppy assembly documentation. Two years ago, I wrote a series of blog posts about what I’d like to have in Sawppy documentation workflow. I posed my wish list to the audience of a Write the Docs LA meetup, and they were helpful in pointers to things I could investigate, but I never got as far as putting anything into practice.

And that was just for written word documentation. Accepting contributions in the form of CAD updates is a whole other ball of wax. Sawppy was designed in Onshape, a powerful web-based CAD system marketed to SolidWorks CAD professionals. I was entranced by the possibility that even $200 Chromebooks can be full power CAD workstations. Onshape has always had a free tier for makers, but that free tier is not their business focus and would occasionally disappear from Onshape website. As of this writing, Onshape free tier is back on their product list but that could change again in the future. When I started Sawppy, Onshape was a startup. They have since been acquired by PTC and free tier has a history of disappearing after startups are acquired.

Even if free Onshape tier remains available, it will always be limited to a subset of professional tier functionality. Which is unfortunate, because some of that would be useful for Sawppy to become a community-developed project. (To be clear, this is not limited to Onshape. Other products like Autodesk Fusion 360 similarly restrict their free tier capabilities.)

Sawppy dreams of a free CAD workflow with the following collaborative capabilities:

  • Tweak: Let people make minor changes without commitment of setting up and learning a full CAD workflow. For Sawppy, it would be very useful to make small adjustment to diameter of holes intended for heat-set inserts. Alex Glow brought up Thingiverse’s Customizer tool, which is an implementation of this concept but only applicable to objects designed in OpenSCAD.
  • Branch: Git style capability to create branches and merge changes back to main branch. (*)
  • Fork: GitHub style capability to let anyone fork a repository, make their changes, and create a pull request to propose merging their changes back to the original repository.
  • Diff: To evaluate those merges, we’d need to be able to visually compare the difference. CAD interchange formats like IGES and STEP use text files that would work within Git, but they are not designed to be human-readable. I would not be able to visualize the physical difference by looking at text changes in those file formats. Code-based CAD solutions like OpenSCAD are better in this regard, but it would be ideal to have a 3D view to compare changes. (*)
  • Review: Building on the previous bullet, we’d need to be able to annotate that view in order to have discussion before accepting a merge. Comments like “Why was this part lengthened?” or “Please change this fastener to M3x10mm.” This process would be analogous to a GitHub code review. Jinger Zeng brought up Wikifactory’s CAD Rooms capability, which at first glance looks very promising and worth further investigation.
  • Verify: automated software tests can be a part of verifying a pull request’s code changes. I don’t know if this concept has migrated to the professional CAD world. I would love to have automated checks to find problems without actually printing and building a rover.
    • I want to know if multiple physical parts are occupying the same space. (I think this is called “clash analysis” in professional CAD.) At a basic level it’ll check just the parts as they sit (and that alone would be valuable) but it’d also be nice to check for mechanical interference through entire range of motion of all joints.
    • Physical simulation to verify nothing has disconnected or hovering unsupported in space.
    • Mechanical simulation to verify all parts are still thick enough to support their intended loads.
    • Many more ideas! My imagination can run pretty far in this direction.
  • Document: And looping back to the earlier series about written documentation, CAD changes could require updating documentation to ensure information does not go stale and out of sync. For Sawppy documentation right now I have to remember to make updates manually. This is an error-prone process that has caused headaches for other rover builders as they read instructions that made no sense because I only remembered to update one place and forgot another. Computers should be able to help with the following tasks:
    • Update the construction BOM (Bill of Materials) to reflect CAD changes. (*)
    • Update illustrative figures in documentation by generating new CAD renderings.
    • Flag associated text for “is this still accurate” manual review to ensure they are not overlooked.

I don’t expect Onshape, Fusion 360, etc. to make this level of functionality freely available to makers. At this point my best hope is to find like-minded people who have done this kind of work in the open-source world. Failing that, I would have to learn an open-source CAD tool like FreeCAD and try to extend it. This will be a huge project far bigger than Sawppy itself!


(*) This exists in professional tier of Onshape, but not at the free tier.

Sawppy at Space-Themed Episode of Hangout & NERDOUT

Roughly twenty-four hours from now, around December 15th, 2022 7PM Eastern time (4PM Pacific) I should be starting a chat with several other makers on a space-themed episode of Hackster.io/Make Hangout & NERDOUT. I will be one of three guest nerds invited to talk about their space-themed projects. Sawppy the Rover will be my topic for a ten-minute presentation, alongside similar presentation by the other guests. Then it’ll be an open Q&A where people can ask questions of the presenters (and presenters ask questions of each other!)

Sawppy has been a great adventure and it will be a challenge to compress the full story down to ten minutes, but I’ll give it my best shot. There’ll be a bit of Sawppy’s past, some of rover present, and a look towards the future. The Q&A session will be very informative at telling me which aspects of Sawppy catches people’s interest. Or if one or both of the other two presentations turn out to be more interesting to the audience, that’ll tell me something too!

Hackster.io landing page for the event: https://www.hackster.io/news/hangout-nerdout-ep-4-on-december-15th-goes-out-into-space-b633c0b485e8

The rudimentary PowerPoint slide deck I created for this event is publicly visible here: “20221215 Hangout Nerdout

Links shared over chat during the event (for all presenters, not just Sawppy): https://www.one-tab.com/page/OINy1FRqQiKasbZWUjtaww

The Zoom Events session was recorded, and I believe the intent is for it to be published at some point in the future. When that happens, I will see if I can embed the video here.

Replace node-static with serve-static for ESP32 Sawppy Development

One of the optional middleware modules maintained by the Expressjs team is express.static, which can handle serving static assets like HTML, CSS, and images. It was used in code examples for Codecademy’s Learn Express course, and I made a mental note to investigate further after class. I thought it might help me with a problem I already had on hand, and it did!

When I started writing code for a micro Sawppy rover running on an ESP32, I wanted to be able to iterate on client-side code without having to reflash an ESP32. So as an educational test run of Node.js, I wrote a JavaScript counterpart to the code I wrote (in C/C++) for running on ESP32. While they are two different codebases, I intended for the HTTP interface to be identical and indistinguishable by the HTML/CSS/JavaScript client code I wrote. Most of this server-side work was focused around websocket, but I also needed to serve some static files. I looked on nodejs.org and found “How to serve static files” in their knowledge base. That page gave an example using the node-static module, which I copied for my project.

Things were fine for a while, but then I started getting messages from the Github Dependabot nagging me to fix a critical security flaw in my repository due to its use of a library called minimist. It was an indirect dependency I picked up by using node-static, so I figured it’ll be fixed after I pick up an update to node-static. But that update never came. As of this writing, the node-static package on NPM hadn’t been updated for four years. I see updates made on the GitHub repository, but for whatever reason NPM hasn’t picked that up and thus its registry remains outdated.

The good news is that my code isn’t deployed on an internet-facing server. This Node.js server is only for local development of my ESP32 Sawppy client-side browser code, which vastly minimizes the window of vulnerability. But still, I don’t like running known vulnerable code, even if it is only accessible from my own computer and only while I’m working on ESP32 Sawppy code. I want to get this fixed somehow.

After I got nginx set up as a local web server, I thought maybe I could switch to using nginx to serve these static files too. But there’s a hitch: a websocket connection starts as a HTTP request for an upgrade to websocket. So the HTTP server must interoperate with the websocket server for a smooth handover. It’s possible to set this up with nginx, but the instructions to do so is above my current nginx skill level. To keep this simple I need to stay within Node.js.

Which brought me back to Express and its express.static file server. I thought maybe I could fire up an Express app, use just this express.static middleware, and almost nothing else of Express. It’s overkill but it’s not stupid if it works. I just had to figure out how it would handover to my websocket code. Reading Express documentation for express.static, I saw it was built on top of a NPM module called serve-static, and was delighted to learn it can be used independent of Express! Their README included an example: Serve files with vanilla node.js http server and this was exactly what I needed. By using the same Node.js http module, my websocket upgrade handover code will work in exactly the same way. At the end, switching from node-static to serve-static was nearly a direct replacement requiring minimal code edit. And after removing node-static from my package.json, GitHub dependabot was happy and closed out my security issue. I will be free from nagging messages, at least until the next security concern. That might be serious if I had deployed to be internet accessible, but the odds of that just dropped.

Sawppy Rover Battery Voltage Monitor

Trying to debug a mobile web page without any debug support — no syntax error, no line number, not even console.log() — was extremely frustrating and quite draining. After that experience I was ready for a break from rover work. But before I take that break, I wanted to at least attempt to use the voltage-monitoring provision I wired in to this draft of my Sawppy Rover ESP32 control board.

I encountered a few more mysteries of ESP32 ADC while doing so. I initially set the ADC attenuation at 2.5db, which should have given me a range spanning 1.1V which fits nicely with my 10:1 voltage divider. But the raw ADC values were far below where I thought they should be. My voltmeter read 0.6V on the pin after the divider, which should have been a little more than 2048 out of the ADC’s 12-bit resolution. (0-4095) Instead I got values closer to 1350 and I didn’t understand why yet.

Another mystery was working to convert that value to a voltage reading. I had thought the conversion would be straightforward: look at the raw ADC value, measure the actual voltage with my trusty Fluke meter, and divide them to obtain a conversion coefficient. But I found that the ratio between raw ADC value and voltage measured by the meter was not consistent across the voltage range. The coefficient I calculated from a 5V USB input voltage was different from the coefficient calculated from 7.4V of my 2-cell LiPo battery pack. This was a surprise.

To solve this problem correctly, I should consult Espressif ESP32 ADC documentation on their factory ADC calibration values and how to leverage that work into a more precise value. But what I have today is good enough to roughly monitor battery level. I wanted to keep going and get the rest of the basic infrastructure set up before I ran out of motivation to work on this code.

The small bit of ADC conversion code posted a message containing calculated voltage to a FreeRTOS queue, where multiple tasks can make use of that information. I updated the HTTP server code to peek at values on that queue, and send it to the user interface via websocket in the form of a JSON string. The ESP32 HTTP server sent real data, the Node.js stub server only sent a placeholder value. Sawppy’s browser-side JavaScript was then modified to listen to that message, parse that JSON string, and print that data on the status bar.

With these changes, I could monitor battery voltage level from my touchscreen control. This is enough for the moment. I have a few tasks for the future, using this voltage reading at a few other places. Starting with these two:

  1. If the voltage drops below a certain level, the rover should stop. Or at least use a “limp mode” that runs slower, in order to avoid an ESP32 brownout.
  2. I want the motor control PWM frequency to dynamically adjust according to the battery voltage, with the goal to maintain consistent output voltage to the motors. For example, a command for full speed should always output 6V to the motors. If the battery is drained down to 6V, the PWM frequency would be 100%. If the battery is full, the PWM frequency would be lower than 100% even at “full speed” in order to avoid burning out the motor.

I’ll add those features in a future Sawppy brain coding sprint. Software development will go on pause while I live with the feature set I’ve got on hand for a while. Besides, sometimes you don’t even need the features I already have.

[Code for this project is publicly available on GitHub]

Windows Phone Debug Tools Rode Into Sunset

Organizing and commenting code for my Sawppy Rover ESP32 control project had two sides: the server-side code running on the ESP32 and the client-side code running in a web browser. The MIT license text and general comments went well, but when I tried to improve error handling, I ran into a serious problem with the old Internet Explorer browser built into Windows Phone 8.1: I have no debugging tools.

My only indication was that the page failed to load and all I saw was a blank screen. There were no error messages displayed onscreen, and unlike desktop browsers I couldn’t even look at what’s been printed to console.log(). Just a blank nothing. I backtracked through my code changes and eventually traced it down to a bit of error handling code I added to the JavaScript file.

try {
  // Do potentially problematic thing
} catch {
  // Use alternate approach instead
}

This worked in desktop browsers, this was also accepted in my modern Android phone’s Chrome browser, but it was treated as an error in Internet Explorer. Even though I didn’t care about the specific error thrown, IE didn’t permit omitting the specifier. The following syntax was required:

try {
  // Do potentially problematic thing
} catch(err) {
  // Use alternate approach instead
}

This code change was not, in itself, a big deal. But it took an hour of trial-and-error to find the location of the error (no feedback = no line number!) and figure out what the browser would tolerate. During this time I was operating blind with only a binary “blank screen or not” as my feedback mechanism. I need better tools if I am to tackle more challenging JavaScript programming on Windows Phone IE.

Unfortunately, almost all of the debugging resources for Windows Phone platform have disappeared. Microsoft’s own Visual Studio IDE — formerly the home of Windows Phone app development — don’t even mention the platform at all in its “Mobile Development” feature page. A promising resource titled Diagnosing Mobile Website Issues on Windows Phone 8.1 with Visual Studio (published in 2014) said to best tool to use is the Windows Phone emulator because it was easier. Avoiding all the hoops one must jump through to put a physical Windows Phone device in developer mode for debugging. Today it’s not just a matter of “easier” since the latter is outright impossible: the Windows Phone developer portal has been shut down and I can no longer put any of my devices into developer mode.

But perhaps they’re both equally impossible, as the Windows Phone emulator is no longer an option for installation in Visual Studio 2019. A search for related pages led me to Mobile Apps & Sites with ASP.NET (published in 2011) whose section had a promising link “Simulate Popular Mobile Devices for Testing“. But that link is no longer valid, clicking it merely redirects back to the Mobile Apps & Sites with ASP.NET page. Many search boxes later, I eventually found what claims to be the Windows Phone emulator as a standalone download. I did not try to download or install it because at that point I was no longer interested.

I aborted my intention to organize my browser JavaScript code. Right now everything sits as peers at top-level and globally accessible. I had intended to reorganize the code into three classes: One handles drawing, one handles user input (pointer events), and the third handles server communications (websocket). However It looks like Internet Explorer never supported the official JavaScript class mechanism. I can probably hack up something similar, JavaScript is flexible like that. People have been hacking up class-like constructs in JS long before the official keyword was adopted. But to do that I need debugging tools for when I run into inevitable problems. Doing it without even the ability to see syntax errors or console.log() is masochistic self-punishment and I am not interested in inflicting that upon myself. No debug tool, no reorganization. I will add comments but the code structure will stay as-is.

This frustrating debugging session sapped my enthusiasm for working on Sawppy rover ESP32 control code. But before I go work on something else for a change of pace, I wanted to get a basic voltage monitoring system up and running.

[Code for this project is publicly available on GitHub]

Cleaning Up And Commenting Sawppy Rover ESP32 Code

The rover is now up and running on its own, independent of my home network. I felt this was a good time to pause feature development of Sawppy ESP32 control software. From an user experience viewpoint, this software is already in better shape than my SGVHAK rover software. Several of the biggest problems I’ve discovered since our local rovers started running have been solved. I feel pretty good about taking this rover out to play. More confident, in fact, than rovers running my earlier software.

Before I turn my attention elsewhere, though, I need to pay off some technical debt in the areas of code organization and code commenting. I know if I don’t do it now, it’ll never happen. Especially the comments! I’m very likely to forget if I don’t write them down now while they’re fresh in my mind. The code organization needed to be tamed because there were a lot of haphazard edits as I experimented and learned how to do things in two new environment simultaneously: ESP32 and JavaScript. The haphazard nature was not necessarily out of negligence but out of ignorance as I had no idea what I was doing. Another factor was that I copied and pasted a lot of Espressif sample code (especially in the WiFi area) and I had instances of direct copied text “EXAMPLE” that needed to be removed.

I also spent time improving code robustness with error handling code paths. And if errors are not handled, they should at least be reported. I have many unhappy memories trying to debug some problem that made no sense, and eventually traced it to a failed API call upstream whose error code was never reported. Here I found Espressif’s own ESP_LOG AND ESP_ERROR_CHECK macros to be quite handy. Some were carried over directly from sample code. I’ve already started using ESP_ERROR_CHECK during experimentation, because again I didn’t have robust error handling in place at the time but I wanted to know immediately if something fails.

Since this was my first nontrivial ESP32 project, I don’t think it’s a good idea for anyone to use and copy my amateurish code. But if they want to, they should be allowed to. Thus another bulk edit added the MIT license prefix to all of my source files. Some of them had pieces copied from Espressif example, but those were released to public domain so I understand there would be no licensing conflict.

While adding error handling code, though, I wasted an hour to a minor code edit because I didn’t have debug tools.

[Code for this project is publicly available on GitHub]

Sawppy Rover Independence with ESP32 Access Point

I wanted to make sure I had good visual indication of control client disconnect before the next task on my micro Sawppy rover ESP32 brain: create its own little WiFi network. This is something I configured the Raspberry Pi to do on SGVHAK rover and Sawppy V1. (Before upgrading Sawppy to use a commercial router with 5GHz capability and much longer range.)

All of my development to date have been done with the ESP32 logged on to my home network. This helps with my debugging, but if I take this rover away from home, I obviously won’t have my home network. I need to activate this ESP32’s ability to act as its own WiFi access point, a task I had expected to be more complex than setting up the ESP32 as a client (station mode) but I was wrong. The Espressif example code for software-based access point (softAP) mode was actually shorter than its station mode counterpart!

It’s shorter because it was missing a lot of the functionality I had expected to see. My previous experience with ESP32 acting as its own access point had been with products like Pixelblaze, but what I saw was actually a separate WiFi manager module built on top of ESP32’s softAP foundation. That’s where the sophisticated capabilities like captive portal configuration are implemented.

This isn’t a big hinderance at the moment. I might not have automatic forwarding with captive portal, but it’s easy enough to remember to type in the default address for the ESP32 on its own network. (http://192.168.4.1) On the server side, I had to subscribe to a different event to start the HTTP server. In station mode, IP_EVENT_STA_GOT_IP signals that we’re connected to the access point and it has assigned an IP address. This doesn’t apply when the ESP32 is itself the access point. So instead I listen for a control client to connect with WIFI_EVENT_AP_STACONNECTED, and launch the HTTP server at that point. The two events are not analogous, but are close enough for the purpose micro rover control. Now it can roam without requiring my home WiFi network.

Sometime in the future I’ll investigate integrating one of those WiFi manager modules so Sawppy rover users can have the captive portal and all of those nice features. A quick round of web searching found this one by Tony Pottier, with evidence of several more out in circulation. These might be nice features to add later, but right now I should clean up the mess I have made.

[Code for this project is publicly accessible on GitHub.]

Make Disconnected Client Visually Obvious

Testing my server code to disconnect inactive websocket clients, I learned a behavior I hadn’t known before: when a browser tab is no longer the foreground tab, the page’s scripts continue running. This made sense in hindsight, because we need those scripts to run for certain features. Most web mail clients display the number of unread messages in their tab title, and if a new piece of mail arrived, that number couldn’t be updated unless scripts were allowed to run.

In my scenario, I wanted the opposite. If someone has put my Sawppy rover control page in the background, they are no longer driving and should vacate the position for another. I started looking for HTML DOM events that I could subscribe to and learn if my tab is no longer the foreground, but a few experiments with the “onblur” event didn’t function as I hoped they would. As a fallback I decided to take advantage of a side effect: modern browsers do keep running scripts for background tabs, but they do so at a much slower rate. I “just” have to shorten the timeout interval and that would disconnect clients running slowly just as it does for those who have lost network connection or stopped. This is fragile as it depends on unspecified browser behavior, but good enough for today.

When testing this, I noticed another problem: for the user, it’s not very evident when the server has disconnected from their control client. I have a little bit of text at the bottom saying “Disconnected” but when I’m testing and juggling multiple browsers I started wishing for something more visually obvious. I thought about blanking out the page completely but such a drastic change might be too disorienting for the user. For the best user experience I want an obvious sign but I don’t want to club them over the head with it! I decided to change the color of the touchpad to grayscale in the websocket.onclose handler. The user can see they’re still on the page they expected, but they can also clearly see something is different. This accomplishes my goal.

From an accessibility perspective, this isn’t great for color-blind users. It’ll be fine for certain types of color blindness like red-green color blindness, but not for fully color blind users because it’s all gray to them. Thus I do not see this behavior as replacement for the “Disconnect” text. That text still needs to be there for those who could not see the change in color. And knowing connected/disconnected status will become more important as the little rover wanders away from my home, away from the powerful standalone wireless access point, and have to become its own wireless access point.

[Code for this project is publicly available on GitHub.]

Detect and Disconnect Inactive Web Sockets

Constraining my Sawppy rover logic to only a single rover operator was good, but that code immediately exposed the next problem: a web socket on one side doesn’t always know when it has lost contact with the other end. When this happens to my ESP32 server on the rover, it means the rover doesn’t know its driver is gone. And thanks to the code I just added, it means nobody else can get into the driver’s seat, either.

This is a known failure mode for web sockets, and there’s a prescribed mechanism to deal with it: a web socket heart beat with the “ping” and “pong” control frames. Either end of a web socket can choose to send a ping. Upon receipt of this ping a web socket implementation is obligated to reply with a pong. Doing this on a regular basis lets us check to verify the connection is still alive.

I started writing code to send pings, but then I realized it’s not really necessary. The browser client is obligated to send steer and speed values on a regular basis, and that can serve as my heartbeat. I can set a timer each time the rover receives the steer and speed commands, and if it’s been too long since the last transmission, the rover can proactively terminate the web socket so another rover operator can assume command.

As usual I started with my Node.js server running on my desktop to explore the concept and get an idea of how it’s supposed to work. For JavaScript I start a timer with setTimeout() and every time I receive a client command I call refresh() on that timer to reset the clock. If the timer goes off, it’s been too long and I call terminate() on the web socket instance. Which I need to keep track of now, something I managed to avoid earlier.

Once I understood how it was supposed to work, I moved on to implementation on ESP32. For this task I chose to use a FreeRTOS software timer. With mostly the same semantics as in JavaScript. When a new web socket is accepted, I call xTimerStart(). Every time the rover receives a command, xTimerReset() is called. If a reset does not occur in time, I queue up a web socket control frame set to HTTPD_WS_TYPE_CLOSE to close up shop.

That code took care of the server side logic, but that left a problem on the client side: How can I make it obvious when the server has decided to quit listening to commands from a particular controller?

[Code for this project is publicly available on GitHub]

Sawppy Rover Driver Max Occupancy: One

Steering control precision was something I found lacking in my SGVHAK rover software project. This is my second effort at browser-based rover control and I added code to vary steering rate as a function of speed. Over the next few weeks (or more) I will see if it’s an overall improvement and see if it’s worth keeping. The next problem I wanted to solve with browser-based rover driving is that HTTP was designed to be completely stateless, and a mechanism to serve many clients. This doesn’t work so well for driving a vehicle, where we want to have only one driver at the wheel.

I didn’t know how to solve this problem with SGVHAK rover. Once I had an HTTP web server up and running, it would happily serve rover control UI to any number of clients. And it would happily accept and process HTTP POST submissions from any and all of those clients. In practice this means we can have multiple touchscreen phones all trying to drive the rover, and the rover ends up being very confused with conflicting messages coming in interleaved with each other. Steering servos would rapidly flick between multiple positions, and driving motors would rapidly change speeds. This causes hardware damage.

Switching from stateless HTTP POST to web sockets gave me a tool to solve this problem. Now the server side code can keep a reference to a specific web socket, and any additional attempts to set up a rover driving web socket can be rejected. This allows me to keep the number of rover drivers to at most one.

For my Node.js server, I didn’t even need to keep a global reference. The web socket server class maintains a list of clients, and I can check the number of clients. The trickier part for me was figuring out how to reject additional sockets. I looked fruitlessly in the web socket server for a while, because the answer is actually a little bit upstream: The HTTP server has an “upgrade” event that I can subscribe to, and it is called whenever a web socket client request upgrading from HTTP GET to websocket. This is the location where I can reject the connection if there was already an existing client. With the Node.js server configured to test the scenario on my development desktop, I found a few bugs in my client-side browser code. Once it worked I could continue to my ESP32 code.

For my ESP32 server, it means tracking two things: an identifier for the HTTP server (httpd_handle_t) and a socket descriptor. Together those two values uniquely identify a websocket. The URI handler I registered to handle websocket upgrade requests is given an instance of httpd_req_t. Using that, I can obtain both parts of an unique identifier and compare them against future calls into the URI handler. I process requests if the server handle and socket descriptor matches, and reject them if they don’t. With this code in place, only a single driver is commanding a rover at any given time. But this code also immediately exposed another problem: how to detect if that single driver is gone?

[Code for this project is publicly available on GitHub.]

Variable Steering on Sawppy ESP32 HTML Control

It’s great to see my ESP32-based HTML control scheme for Sawppy rover up and running end-to-end. However, the code to get this far is an extremely rough first draft. I still have a lot of refinement work ahead. The first thing I wanted to tackle was control precision while the little rover is running at high speed. My Spektrum radio gave me extremely precise control over steering angle, but my touchscreen control was comparatively crude. Instead of going in the direction I want, it would dart too far one way, I would over-correct and it dart the other way, and repeat. I noticed this problem with my HTML touch joystick control pad with SGVHAK rover and Sawppy V1 rover, but they were larger rovers that travelled slower so the problem wasn’t as bad. A little hyperactive rover with a much shorter wheelbase suffers far more from twitchy steering. So while it was something I just tolerated on the larger rovers, it became a priority to address on the little one.

I implemented the first idea that came to mind: make the steering range variable as a function of speed. I hope this would feel intuitive relative to everyday cars, since we perform tight turns at low speed and learn to keep steering gentle at higher speeds. The caveat is that it wouldn’t be implemented the same way. In our cars the steering ratio remains constant no matter the speed, we just learn to be gentle and not yank the wheel about on the highway. Now I am going to vary the control ratio and this might be confusing. When car manufacturers started exploring variable-ratio power steering racks on their cars, some early implementations made customers unhappy.

Back to my little rover. The initial implementation mapped the left-right position of my joystick pad directly to a particular turning radius, no matter what speed the rover is travelling. My first experiment is to modify that so the steering ratio would drop and turning radius would widen as speed increased. Meaning it would be very hard to maintain a specific turning radius while varying the speed, but that’s not something I see as a rover driving pattern anyway so maybe it’s OK for that to be difficult.

After I implement the variable ratio, at top speed (joystick pad at the top edge) the left-right steering range is only a fraction of maximum. This allows me to fine-tune rover heading as it runs, and I don’t have to worry about suddenly throwing the rover into a sharp U-turn by accident. This part worked well, but it is tricky to drive the rover while slowly accelerating since steering angle changes as I accelerate. It’s possible this would prove to be a problem worse than the original one I set out to solve, I don’t know yet. I’ll drive with this variable ratio mechanism in place for a while and see how it goes. I’ll also make sure only one person is driving.

[Code for this project is publicly available on GitHub]

Micro Sawppy Beta 3 Running With HTML Control

After I established websocket communication between an ESP32 server and a phone browser JavaScript client, I needed to translate that data into my rover’s joystick command message modeled after ROS joy_msg. For HTML control, I decided to send data as JSON. This is not the most bandwidth-efficient format. In theory I could encode everything into binary with two signed 8-bit integers. One byte for speed and one byte for steering is all I really need. However I have ambition for more complex communication in the future, thus JSON’s tolerance for extra fields has merit from the perspective of forward compatibility.

Of course, that meant I had to parse my simple JSON on the ESP32 server. The first rule of writing my own parser is: DON’T. It’s a recurring theme in software development: every time someone thinks “Oh I can just whip up a quick parser and it’ll be fine” they have been wrong. Fortunately Espressif packaged the open source cJSON library in ESP-IDF and it is as easy as adding #include "cJSON.h" to pull it into my project. Using it to extract steering and speed input data from my JSON, I could translate that into a joy_msg data structure for posting to the joystick queue. And the little rover is up and running on HTML control!

The biggest advantage of using ESP32’s WiFi capability to turn my old Nokia Lumia 920 phone into a handheld controller is cost. Most people I know already have a touchscreen phone with a browser, many of whom actually own several with older retired phones gathering dust in a drawer somewhere. Certainly I do! And yeah I also have a Spektrum ground radio transmitter/receiver combo gathering dust, but that is far less typical.

Of course, there are tradeoffs. A real radio control transmitter unit has highly sensitive inputs and tactile feedback. It’s much easier to control my rover precisely when I have a large physical wheel to turn and a centering spring providing resistance depending on how far off center I am. I have some ideas on how to update the browser interface to make control more precise, but a touchscreen will never have the spring-loaded feedback. Having used a RC transmitter a few days before bringing up my HTML touch pad, I can really feel the difference in control precision. I understand why a lot of Sawppy rover builders went through the effort of adapting their RC gear to their rovers. It’s a tradeoff between cost and performance, and I want to leave both options open so each builder can decide what’s best for themselves. But that doesn’t mean I shouldn’t try to improve my HTML control precision.

[Code for this project is publicly available on GitHub.]

Shiny New ESP32 WebSocket Support

My ESP32 development board is now configured to act as HTTP server sending static files stored in SPIFFS. But my browser scripts trying to talk to the server via websocket would fail, so it’s time to implement that feature. When I did my initial research for technologies I could use in this project, there was a brief panic because I found a section in Espressif documentation for for websocket client, but there wasn’t a counterpart for websocket server! How can this be? A little more digging found that websocket server was part of the HTTP Server component and I felt confident enough to proceed.

That confident might have been a little misplaced. I wouldn’t have felt as confident if I had known websocket support was added very recently. According to GitHub it was introduced to ESP-IDF main branch on November 12, 2020. As a new feature, it was not enabled by default. I had to turn it on in my project with the CONFIG_HTTPD_WS_SUPPORT parameter, which was something I could update using the menuconfig tool.

Side note: since menuconfig was designed to run in a command prompt, using it from inside Visual Studio Code PlatformIO extension is a little different due to input handling of arrow keys. The workaround is that J and K can be used in place of up/down arrow keys.

Attempting to duplicate what I had running in my Node.js placeholder counterpart, I found one limitation with ESP32 websocket support: Using Node.js I could bind HTTP and WS protocols both to root URI, but this ESP32 stack requires a different URI for different protocols. This shouldn’t be a big deal to accommodate in my project but it does mean the ESP32 can’t be expected to emulate arbitrary websocket server configurations.

I also stumbled across a problem in example code, which calls httpd_ws_recv_frame with zero to get length, then allocating the appropriate sized buffer before calling it again to actually fetch data. Unfortunately it doesn’t work for me, the call fails with ESP_ERR_INVALID_SIZE instead of returning filled structure with length. My workaround is to reuse the same large buffer I allocated to serve HTML. I think I’ve tracked this down to a version mismatch. The “call with zero to get length” feature was only added recently. Apparently my version of ESP-IDF isn’t recent enough to have that feature in order to run the example code. Ah, the joys of running close to the leading edge. Still, teething problems of young APIs aside, it was enough to get my rover up and running.

[Code for this project is publicly available on GitHub.]

ESP32 HTTP Was Easy But Sending Files Need SPIFFS

I got my ESP32 on my local home WiFi network, but it doesn’t respond to anything yet. The next step is to write code so it could act as a static web server, sending files stored in ESP32 flash memory to clients requesting them via HTTP GET. The good news is that setting up a HTTP server was really easy, and I quickly got it up and running to serve a “Hello World” string hard-coded in my ESP32 source code.

I briefly considered calling this situation good enough and move on. I could embed my HTML/CSS/JavaScript files as hard-coded strings inside my C files. But doing so meant reviewing those files to make sure they don’t have conflicts with C string syntax, and that’s something I’d have to do every time I wanted to update any of those files. This is quite clumsy. What I really want is to keep those files to be served over HTTP separate from my C code, so that they could be updated independently of code and I don’t have to review them for C string incompatibility.

Doing this requires carving out a portion of an ESP32’s flash memory storage for a simple file storage system called SPIFFS. Allocation of flash storage is declared in a partition file, which is a list of comma-separated values (CSV) of partition information like size, offset, and assigned purpose. PlatformIO ESP-IDF project template includes a default partition file but it had no provision for a SPIFFS partition. I need to add one to my project to override that default. I found an example partition file as my starting point, copying it into my project and making only minor changes. (I didn’t need quite as large of a SPIFFS partition.) If I were using ESP-IDF directly, I believe I would use the menuconfig tool to point to my partition file. But as I’m using ESP-IDF indirectly via PlatformIO, I specified my partition file location using a parameter in the platformio.ini configuration file.

Once I have a partition, I need to put my files in it. Apparently it’s not as simple as using a USB flash drive, I have to build the entire data partition (like building a disk image for a PC) and upload the whole thing. There are ESP-IDF command line tools to build SPIFFS partition, I decided to go with PlatformIO route by specifying the platformio.ini parameter data-dir. I could point it at my Node.js working directory, which is great because that meant I only had one copy of these files in my code repository. Eliminating the task of keeping multiple copies in sync. From the PlatformIO UI I could then use “Platform/Build Filesystem Image” followed by “Platform/Upload Filesystem Image”. I haven’t figured out if this is necessarily separate from code update or if there’s a way to do both at the same time.

Putting files in SPIFFS isn’t useful until I have code to read those files. I followed the links to Espressif code example for reading and writing to SPIFFS. And ugh… I haven’t had to deal with old school C file input/output API in quite some time. I briefly considered the effort to keep things memory efficient by breaking these file I/O actions up into small pieces, but I don’t need that kind of sophistication just yet. In order to simplify code, and because I have RAM to spare at the moment, I allocated a large buffer so all the operations to read from SPIFFS and send via HTTP can be done in a single pass. Which worked well for sending data to the control client, but now I need to listen to control commands coming back.

[Code for this project is publicly available on GitHub.]