One Month of Google Pixel

When my Nexus 5X was rendered unusable by my negligence at the swimming pool, I needed to order a replacement phone. Since I want to stay on the Google Fi service, my device options were limited. Fortunately, I had been interested in the Google Pixel as soon as it was released and thought I’d wait for its price to drop or until I couldn’t wait any longer. With the death of the Nexus 5X, the latter scenario has come to pass. (And as of this writing, the Pixel prices just dropped as well.)

Some remarks from my first month living with a Google Pixel:

Camera: One of the much-touted features upon the launch of the Pixel was its camera. And it is indeed quite excellent! A huge step forward relative to every cell phone I’ve owned… except for its immediate predecessor. In my usage, the Pixel camera was only a minor improvement from the already-excellent camera of the Nexus 5X.

Exterior: Another touted feature is the aluminum body that tries very hard not to be a direct copy of an iPhone. This does not suit my personal taste: I prefer my phone bodies to be plastic which has more give than metal. Every phone I’ve owned to date are plastic-bodied and their corners all show the times when they’ve been dropped, bounced back, and only left with a tiny mark. Aluminum does not flex like that. If I should drop this phone, the aluminum will bend and stay bent instead of bouncing back. So this aluminum body phone became my first phone with a protective case (*). What’s the point of fancy aluminum if I have to wrap it in plastic anyway?

Pixel Launcher: The Pixel OS is mostly stock Android with a few changes. The Pixel Launcher is the most visible since that’s what the user sees all the time. I appreciate most of the changes but I didn’t care for the weather taking up the top row of the home screen and displacing 5 icon positions. Knowing the weather is nice, but it’s not worth giving up an entire row of 5 icons I could have placed there.

Performance: On paper the Pixel should vastly outperform the 5X. In my daily usage the difference is noticeable but not earth-shattering. Another incremental improvement.

Daydream VR: The performance advances are more significant when running Google’s new mobile VR effort, Daydream. It is much superior to Google Cardboard from the first moment I put on the headset and grabbed the remote. But it also comes at significantly higher cost. Is the cost worth it? Not at the moment – the Daydream app ecosystem is still thin, but I’m optimistically looking forward to more.

Storage: I had the 16GB edition of Nexus 5X, and over its lifetime it received two major Android releases, each larger than the last. Towards the end it was quite a struggle to stay within 16GB. The smallest Google Pixel starts at 32GB, in my view a tacit admission of Android’s weight gain.

Summary: If I knew a month ago what I know now, I would have ordered a refurbished 32GB Nexus 5X instead of a new Google Pixel.


(*) Disclosure: As an Amazon Associate I earn from qualifying purchases.

Water Damaged Nexus 5X Screen

The water-damaged Nexus 5X is somewhat functional again after cleaning off the swimming pool water chemicals, but suffers from a severe battery drain turning precious power into heat. This makes the phone unusable as a phone: it can only last an hour or two on battery, and being so hard on the battery raises worry of battery failure. Not “is the battery going to be flat?” kind, the really bad “is it going to burst into flames?” kind of worry. Before I put the phone aside (with battery disconnected) one final post about the screen assembly.

The screen is in bad shape even if the rest of the phone had fully recovered. The screen is legible and the touchscreen still works, but there are a lot of visually distracting marks left by liquid intrusion.

Liquid Screen.jpg

The big blotches in the center act like a bits of liquid still trapped in a gap. The size of the blotch changes depending on the pressure on the screen. I hope it evaporates in time, though I’m sure it’ll leave even more marks as it does. In contrast, the diagonal streaks do not respond to pressure and are likely residue left by drying liquid.

The obvious answer is to separate the touch digitizer layer from the display panel so I could clean the gap in between them. Unfortunately, even though the Nexus 5X is relatively easy to repair, this specific part is not repair-friendly. There are no more fasteners to access – the front of the phone, including the touch digitizer and the screen, appear to be a single bonded assembly.

Replacement assemblies are available online for $50-$60 dollars, which is a significant percentage of the $200-$250 asking price of a refurbished Nexus 5X. Even if the rest of the phone had recovered, I would have thought long and hard about spending that much money just for cosmetic concerns on a backup phone. And given the battery issue, the decision is clear to just leave it as is.

Nexus 5X, Hand Warmer

Power drain
Red rectangle marks the problematic hot area.

I’ve been pleasantly surprised at how far I was able to revive a Nexus 5X soaked in a public swimming pool for 30 minutes, but I think I’ve reached my limit.

All the phone functions I tested had worked, but using the phone for more than an hour uncovered a serious problem: something related to battery power management is very ill.

The first symptom was heat: the phone got far hotter than it used to, and trying to run the phone while plugged in to the charger resulted in a lot of heat and not a lot of increase in charge level.

I shut the phone down, unplugged it, and set it aside to wait for it to cool. It remained warm for many hours and never cooled. When I turned the phone back on briefly to check, I see the battery charge level has dropped dramatically. Something was draining battery power and turning it into heat even when the phone was turned off.

I knew most phones had two charging programs: One while the phone is on, running under the main operating system. And a second while the phone is off, run by a very minimal piece of code. I’ve already tried the first without success, so I turned off the phone and tried the second. Fortunately this was able to charge the battery though the phone still got pretty toasty.

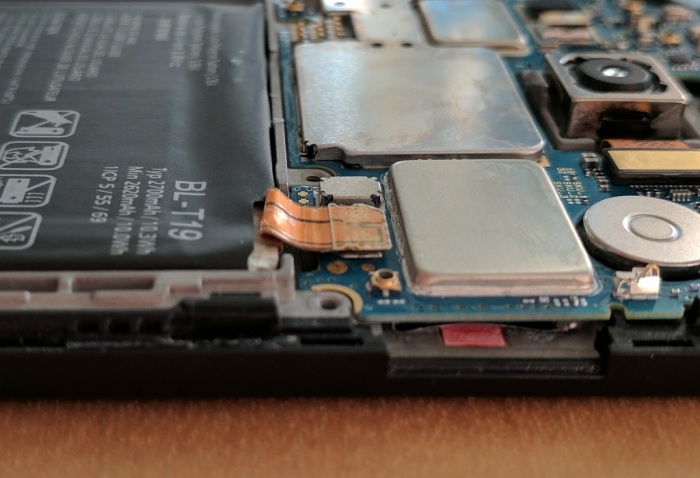
After the battery was charged again, I disconnected the battery. Only then was the phone able to cool off. When I reconnected the battery, it was quickly obvious the heat source is under one of the pieces of metal shielding, marked in the picture by a red rectangle. I don’t know how to remove that metal shield without destroying the components underneath.

Two hypothesis are open: (1) this circuit was damaged earlier trying to run a ruined battery, or (2) the shield isn’t as watertight as it looks: there’s a lot of pool water chemicals in there corroding parts. Either way, it is beyond my current ability to address, so I have to stop here.

I can’t use this as a phone for more than an hour or two on battery. And I can’t store it with the battery connected because of the drain. So I’m going to disconnect the battery and put it aside in the hope I’ll have better ideas later.

Nexus 5X Reassembly after Cleaning

The Amazon Prime truck has delivered the aftermarket replacement battery and a syringe of thermal compound, so it’s time to put the phone back together.

The first order of business is applying a dollop of thermal compound on the frame where it accepts heat transferred from the CPU. Previously, there was a piece of pliable tape sitting in this square depression in the frame, but it was damaged by the alcohol and removed. The gray compound is intended for DIY PC builders to be applied between their computer CPU and its associated HSF (heat sink + fan) assembly. It is designed to bridge only a very small gap, since the CPU and the heat sink of a desktop PC are in physical contact and this compound only needed to fill the remaining tiny air gaps. Here it is asked to bridge a much large gap of almost 1 mm with no physical contact between parts.

Thermal compound

The reassembly went smoothly until I installed the aftermarket battery and found the connector cable is too long by a few millimeters. It is a large distance in the tight confines of a cell phone’s guts. Looking on the bright side, I guess it is better to have a connector cable that’s too long rather than too short.

Too long

With the connector plugged in to the appropriate location on the main circuit board, the cable is bent at an angle that won’t fit under the rest of the phone.

Bent

As much as I hated to do it, I pressed down the cable and made a sharp fold in it. This is a recipe for metal fatigue and the cable won’t last long if I keep doing this. Well, at least the battery is cheap.

Folded

Folding the battery cable allowed the rest of the pieces to be fully reassembled. The phone can power on and launch into Android, so the basics look OK and clear the way for more testing. Let’s see if the phone works well enough to justify replacing the screen assembly.

Powering Up the Waterlogged Nexus 5X

After waiting overnight for the re-cleaned parts to dry, I reassembled the phone and pressed power. The lack of response was no surprise. I then plugged the phone into the charger and was very encouraged to see the screen light up with the depleted battery icon. This tells me the some of the phone made it through the ordeal in at least partial working order.

But after a few hours, the situation did not improve. So I took the phone apart again to take a closer look at the battery. When I first took the phone apart to soak in distilled water, I measured the voltage across the connector terminals and got 3.0 volts. It was lower than healthy for a lithium battery but not necessarily fatal. I measured it now – after charging for several hours – and it read zero.

So, that’s not good.

I thought the battery cell might be dead, so I got another one to test my hypothesis. I wanted the connector from the existing battery so I cut apart the plastic wrap to extract it. I was surprised to find that there’s a tiny circuit board inside. I’m not sure what that circuit board does… but looking at its current condition, it’s not doing that job anymore. Since I didn’t know it was there, it didn’t receive the water + alcohol cleaning treatment received by the rest of the phone electronics. It has been under attack by swimming pool chemicals for the past few days.

Battery Board Toast

Well, I wanted the connector, and now I can access the connector. Let’s use it to wire up the lithium cell straight up. There were four soldering contacts on the connector, two with large conductors and two with small conductors. The two large ones were helpfully labeled “V+” and “V-” so that’s how I soldered the lithium cell.

Battery hackAnd it worked! This setup was sufficient to get into the Android OS. Now that the screen is showing more than the “depleted battery” icon, I could see that it was damaged in this adventure. Thankfully it was still legible, and the touchscreen still worked, so I could run the phone for about 40 minutes. Long enough to access the multi-factor authentication app so I could transfer my MFA security to another phone.

Since the phone appears to be running, I ordered a proper replacement battery. I don’t know if the corroded battery circuit board did anything bad to the rest of the phone. The charging circuit may have been damaged trying to charge a zero volt battery for hours. I’m going to see how the phone works with the replacement battery before spending money to address the damaged screen.

Drying Nexus 5X Off From Swim

My Nexus 5X phone took a 30-minute swim in a pool due to my negligence. It was unsurprisingly dark when retrieved from the pool. I’ve already ordered a replacement phone but I was curious: could it be brought back to life?

The first order of business was water removal. A public swimming pool has all sorts of chemicals unfriendly to electronics. The first thing I found upon return to home was a jug of distilled water originally intended for the car’s battery. Good enough for a starting point, I left the phone soaking in distilled water while I went online to read up on Nexus 5X disassembly on iFixit.

The information is promising – by modern phone standards, this model is very easy to disassemble and repair. Following the instructions, I disassembled the phone into its major components, performed a second round of rinsing, and laid the parts out to dry.

Disassembled

After drying overnight, it was obvious soaking in distilled water was not enough. There were enough chemicals remaining to leave a white residue on many surfaces and corrosion began eating many components. Here’s a close-up picture of the SIM slot and a few of the surrounding components. The brown stuff building up in the lower-right is especially worrisome.

Soak in Distilled

If gentle soak in distilled water wasn’t enough, it’s time to step things up. Isopropyl alcohol is easily available as a first aid disinfectant though at a lower concentration than ideal. First aid rubbing alcohol is 70% alcohol and electronics cleaning usually specifies alcohol content of 90% or higher. Since time is of the essence, the first aid stuff will have to do. Once the parts are soaking, I also ran a small plastic bristle brush over the surfaces to dislodge any remaining pool chemical and the corrosion that is accessible.

It’s not clear if the alcohol or the brushing was more useful, or if they were both required, but things look much better after the alcohol dried off overnight.

Alcohol and Brush

Some printed numbers were erased by the alcohol, which I wasn’t worried about. Some adhesives were dissolved by the alcohol, and I’m worried about the tape that used to sit over the CPU. I will need a replacement heat conductor to help transfer heat generated by the CPU to the chassis frame for dissipation.