Shade for the Garage Door Opener

blindersAll modern garage door openers have a safety feature: a small light beam to detect objects that might be in the way. Most of the time this feature is unobtrusive working in the background for my safety.

Occasionally, though, the sun would be at an angle that blinds the beam receiver. When the sensor is blinded, the garage door opener defaults to safety and behaves as if there was an obstruction in the door. Great for safety, not great for actually getting the door closed. What we needed was a sunshade.

The tolerance requirements were very relaxed relatively to the other projects. I didn’t even need the precision of a caliper, a ruler was enough to get me in the right ballpark.

I rotated the shape 90 degrees, so that it faced down, to enable easier printing. By doing this the shape could support itself as the 3D printer built up the layers, no need to waste material printing supports. Aligning the object in this manner also resulted in a cleaner inner surface for the tube.

At the time of this project, my 3D printer was loaded with transparent filament. I decided to perform a test print even though a translucent shade would be counterproductive to the goal of shading light. I thought I’d make a few test prints and iterate to the final design as my 3D projects usually do, and load a different filament for the final print.

My plan was foiled by the realization it fit and worked right off the bat. Even though the end result is not opaque to light, I suspect it breaks up enough of the sunlight. If the transparency ever becomes a problem, I can always spray paint the exterior of the object.

Good enough! I declared the project complete and moved on to the next thing on the to-do list.

Update: I’ve printed and installed an opaque replacement.

img_5099

Worn AA Batteries Get a Second Life

battery-tray-exploded-view
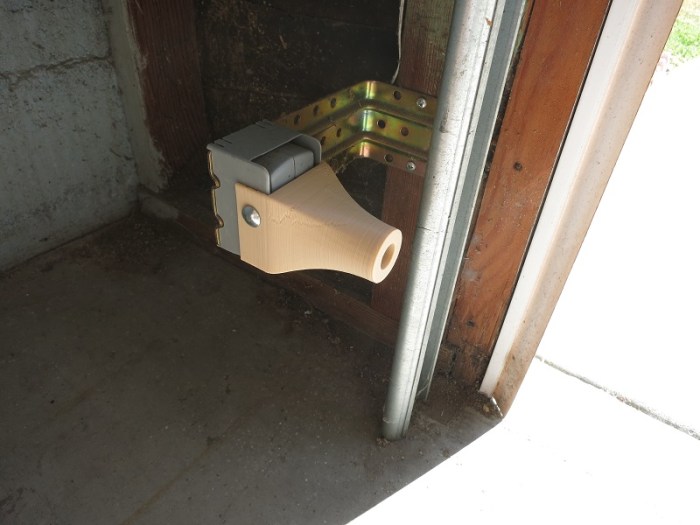
The “Duck light” project earlier was a lot of fun, crafting an object to be lit with a little LED tea light. I liked the result so much I kept it lit around the clock, which led to the obvious next problem: battery life.

These lights came with a standard CR2032 lithium battery good for 2-3 days of continuous use. Replacement batteries can be found for less than a dollar, but that’s almost as much as the cost of the entire light! I embarked on a project: find a better way to keep my lights glowing.

Online search found some basic details on CR2032. The full power voltage is 3 volts, conveniently a multiple of the ubiquitous AA battery’s 1.5 volt. More interesting, however, is that the quoted minimum voltage is 2 volts. Most AA-powered devices would stop working well before an AA battery drops to 1 volt, which implies that a “spent” AA would still deliver sufficient power for the tea light LED.

With this research in hand, I proceeded to design and 3D-print a small battery tray as simply and inexpensively as possible. Normally an AA battery tray has metal springs to push against the negative end of the battery. My project takes advantage of the fact the 3D printed plastic is flexible, and print a curved arch to provide this holding force.

I need something at each end of the tray to complete the circuit. One end is easy: I pulled the LED component out of the tea light base and used pliers to shape the wires into a Y shape to connect the battery terminals. At the other end, I used a piece of aluminum foil from the kitchen. Normally this is a bad idea because a thin foil of aluminum can’t carry much current, but it should be fine given the extremely low power flow of the LED.

To make the base more presentable, add a cosmetic shell to cover the battery tray and provide support for whatever we want to keep lit, and voila! A small lighted base for any purpose.

I had a pair of AA batteries that had been in my Xbox One wireless controller. I received “battery level low” errors for about a week before the controller refused to turn on at all. Yet these batteries were still powerful enough to light up the LED and keep them lit for many days.

A cheery light powered by batteries that would have otherwise been thrown away. Success!

aa-battery-base


Geometry Fun with Onshape Loft

300x170
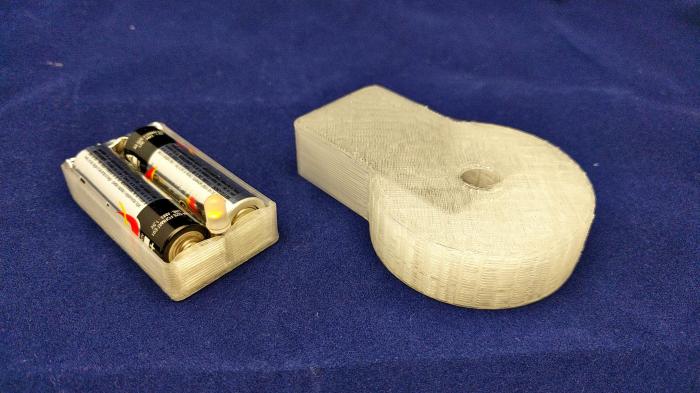
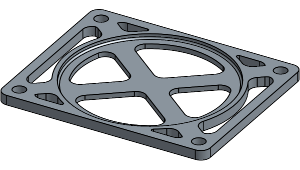
Further exploring Onshape’s geometry tools, I started playing with the loft command. This command allows me to select two 2D shapes and Onshape will calculate a volume that spans the two shapes.

It is fairly limited in what it can extrapolate, the shapes need to be fairly similar for this to work. Circle to oval? OK. Circle to polygon? Problems.

I’m sure the feature is only designed to handle things like generate an adapter part to mate one shape to another. It’s not for artistic things. That is more in the domain of a 3D sculpting tool and not CAD.

Still, there’s some room for entertainment, especially since these lofted volumes can then be fed into the boolean operations tool. The picture above is one such result. The exterior of the shape is a square lofted with an identical square that has been rotated 45 degrees. The interior is a very similar operation, but the squares were rotated in the opposite direction. Subtracting one from the other results in the cut-out shape above. The corner of the inner square, rising in an opposite direction, cuts the edge of the outer square.

Not that this is functional or useful in any way, but it is a fun exploration of three dimensional geometries.

loft

Duck Light

Duck light
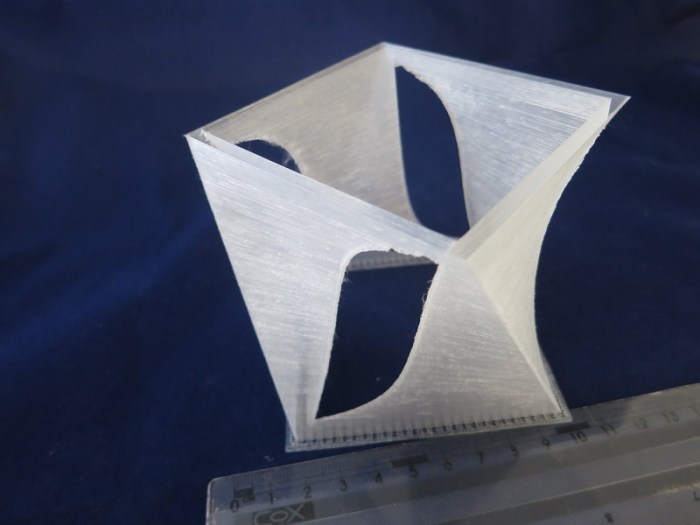
And now for something with aesthetics as its primary function: A duck light. I started with the battery-powered LED lights imitating little tea light candles. These lights are widely available at very low cost from discount stores and dollar stores. My local 99-cent store sold a pair of lights for 99 cents.

The lights consist of the functional base, incorporating the battery, the switch, and the LED. It sits under the cosmetic shell, which is a cylinder pretending to be a candle with an unconvincing imitation flame above it. A little prying action should be sufficient to separate the shell from the base.

The unremarkable cosmetic shell can go in the trash. Then measure the diameter of the remaining base. Use that as a starting point: Go into Onshape and design a custom shell for that base.

My custom shell project started with a surface that describes a variant of the popular bathtub toy duck. It was not difficult to import the surface data into Onshape, but making use of the shape turned out to be more difficult than anticipated. Onshape surface manipulation tools aren’t robust enough (yet?) to deal with arbitrary surfaces imported from elsewhere. In theory I can use the “thicken” command to turn the surface into a solid, but it and many related operations fail with a generic error message.

After some trial and error I found that the split operation works: Define a large rectangular solid, position it over the duck surface, and split the solid block into two: the duck and its negative. After deleting the negative, I have a solid duck shape.

In theory I can use the Onshape “hollow” tool to hollow out the duck shape, but again I was stymied by the error messages. To work around this problem, I started crafting shapes to manually carve out the interior. It didn’t take terribly long to hollow out the bulk of the duck this way.

After sending the hollowed-out duck to my 3D printer, I was able to mate it with the LED light base and now I have a custom duck-shaped tea light!

duck

Sesame Oil & Chili Oil Holder

Sesame oil and chili oil bottle holder
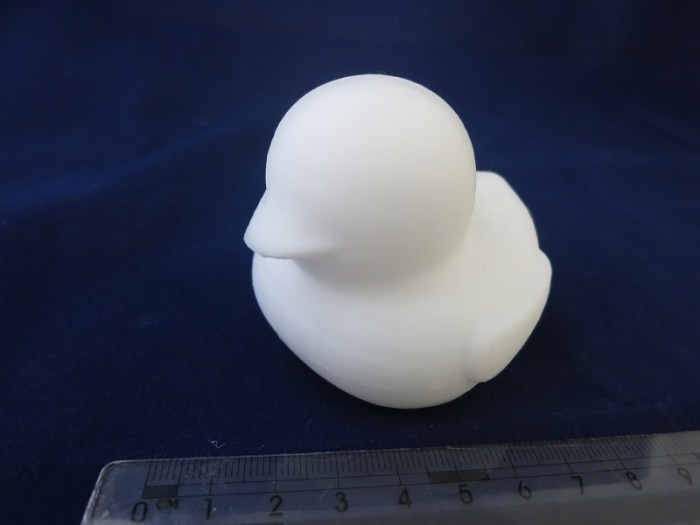
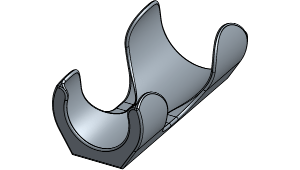
The next problem to solve in the kitchen are a pair of oil bottles – sesame oil and chili oil. Conveniently, they are from the same company so they have the same sized bottles. Inconveniently, they stand taller than other items in the kitchen cabinet, blocking views to the back and easily topple over as I reach for nearby items.

I decided it’d be good to have them on the door instead. Pull them out of the clutter. The easy way to do this is to have a shelf on the door. Unfortunately, tall bottles make this complicated: the shelf needs to be deep enough so that the bottles don’t topple over when I open the door, yet not so deep to make the bottles inconvenient to access.

My solution is to start with a shallow and accessible bottom shelf. Above the center of gravity, the bottle will be held by a flexible clip. The clip needs to be strong enough to keep the bottle from toppling when the door is opened while able to give and release the bottle when I want to pull it free. 3D printed plastic can handle the flexibility part, no problem, but the durability is a question mark. The weakest part of a FDM printed part are between the layers. When something breaks it’s almost always at the layer boundary. It’s important to make sure that the design accounts for the strengths and limitations of the manufacturing technique. We accomplish the goal by arranging the features to avoid the sharp corners that magnify the stress of flexing.

Fortunately Onshape has plenty of tools to round out corners and edges. With the help of those tools and some creative intersection across orthogonal axis, the resulting shape looks more fluid and organic than it actually is. I’m pleasantly surprised at how well the appearance looks especially since I was strictly focused on functionality.

oil

Condiment Shelf Project

Condiment Shelf
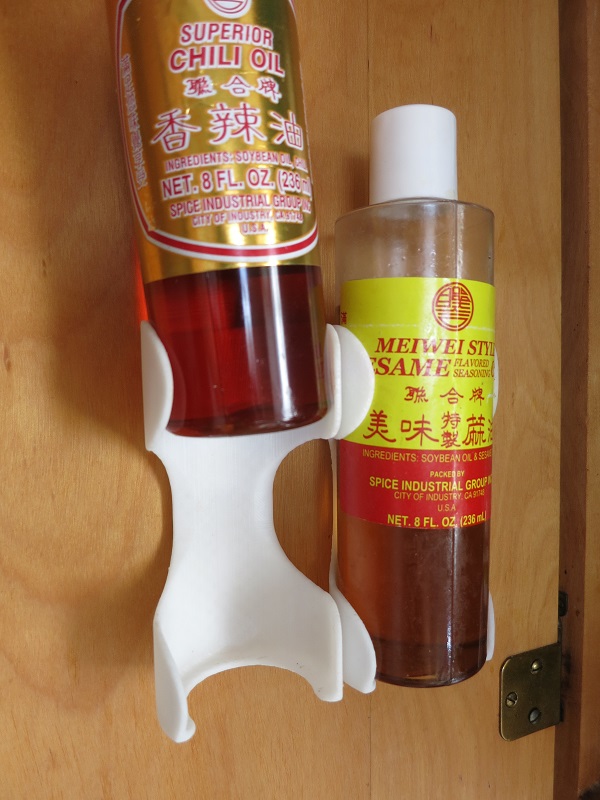
After being duly humbled by the complexity of the planetary gears project, I decided to back off a bit and tackle something simpler. While cooking in the kitchen, inspiration struck as I poked around in the cabinets looking for the condiments I wanted: let’s organize this thing.

This is a problem space ideally suited for 3D printing: Low-volume problem solving. Everybody’s kitchen layout is different, starting from the cabinet dimensions to the selection of spices and condiments to how much a person uses each spice in their preferred meals.

Naturally, I quickly dropped into the rabbit hole of devising a grand master plan to completely organize the kitchen cabinets. It took a while before I reminded myself: “Hey, remember when we decided to do something smaller and simpler?”

Right, that. Let’s get back to that.

The first item with immediate usefulness is a way to keep the sugar and salt containers in a way that keeps them accessible, standing above the fray of the other little jars and bottles. The few initial versions focused on building stack-able jar cubicles, but that ran into problems as the dimensions approach the maximum print size of my little printer.

Retreating yet further, I decided the vertical dimension support can be accomplished via some threaded rods and nuts I can buy at Home Depot. I only need to deal with the horizontal dimension – the shelf itself. The threaded rods are the vertical posts, they go through the small holes in each corner of the shelf. The shelf is then held in a particular position by the nuts on each of the rods.

Successfully reducing the problem down to basics gave me a small shelf that is quick to print and solves the problem. No more time-consuming huge cubes, just a small slice of plastic. It’s simple, it’s fast, it works.

If you also want to organize jars 9 cm in diameter, you can find this item in the Onshape public document library under the title “Condiment Shelf”

stack

3D Printed Planetary Gear

Planetary Gear ToyAfter getting the 3D printer settings dialed in, successfully printing small test objects, I decided to tackle a real project. Move beyond printing static shapes and make a multi-part machine.

In hindsight, that was too big of a step, but I didn’t know until I tried it.

The project of choice was to make a simple planetary gear toy. Such objects are in no short supply on Thingiverse, of course, with a huge spectrum of size and complexity. But I wanted to practice making my own end-to-end.

Why planetary gear? Because of all the basic mechanical machines out there, I was never able to build a planetary gear in LEGO. There was never a LEGO Technic inside-out gear for the annular ring in a planetary gear set.

The first obstacle was actually a surprise – I couldn’t find the gear tool in Onshape. I had expected the basic involute gear to be somewhere in the standard toolbox and found nothing in the documentation.

A search on Onshape forums determined that I was not blind – the feature is absent from the basic set. It was, however, available as a “custom feature” published as a public document by an Onshape staffer. Onshape has its own internal programming language called FeatureScript and a spur gear generator was available as a demo of the language. I’ll have to look at FeatureScript in more depth later, but for now I have my gear tool.

The first print didn’t work, as expected. The parts didn’t fit together at all. This is the point where I had to face the fact consumer 3D printers are still far short of professional machining tools in terms of precision. In my specific case, the extruded plastic “squished out” sideways so every dimension along the horizontal (X&Y) axis are too big.

I assumed this wasn’t a new problem so started researching. Eventually I found that some slicer software have the ability to compensate for this particular trait of FDM printers. Cura called theirs the “Horizontal Expansion” parameter. Unfortunately, I had to abandon the Cura 15.04.2 I had been using and restart with Cura 2.1.2 in order to gain that capability.

With some tweaking of the horizontal expansion parameter, I got my printed planetary gear to mesh and turn like I wanted. At least I found success! But that still took way more time and effort than I had originally bargained for.

Moral of the story: Building small scale precision machinery is beyond easy reach of consumer 3D printers. I might come back to this again, but in the immediate future, I’ll stick with simpler shapes and build 3D printing experience that way.

In the meantime, my project is a public document on Onshape. Search for its title “Planetary Gear Toy.”

planetaryruler

Starting Small with 3D Printing

OctagonTest
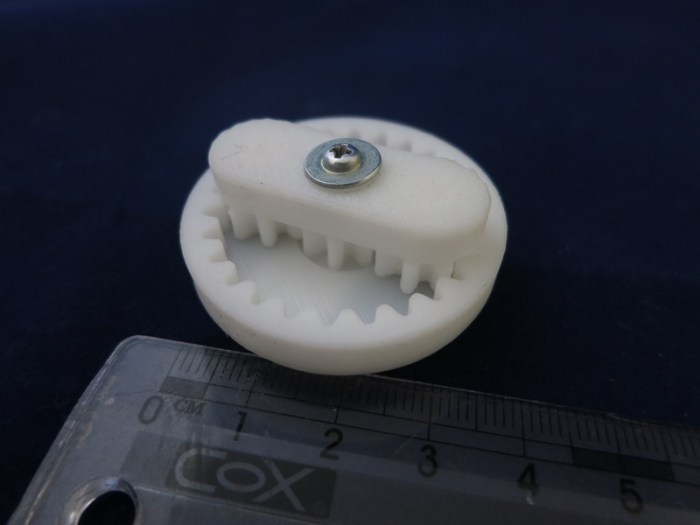
The current state of the art in consumer home 2D laser printer is that I can expect perfect prints immediately. Take it out of the box, load paper, load toner cartridge, hit print, and out pops a crisp printout.

The current state of the art in consumer home 3D printing is not anywhere near that level of maturity. It took several days of experimentation and many failed prints before I had something that was charitably described as passable.

Example #1: With a laser printer toner cartridge, the user doesn’t need to care about the chemical composition of the toner or the physical attributes of the powder within. The 3D printer counterpart is the plastic filament, and today the user has to know a lot. The user can choose the category of plastic (ABS? PLA? etc.) but the precise chemical composition varies from brand to brand. The user has to adjust the printing temperature to match the plastic. The user also has to keep an eye on the filament diameter because it may vary from the nominal quoted dimension, which impacts the volume of filament being fed into the extruder and thus print quality.

Example #2: With a laser printer paper tray, the user doesn’t need to care about the texture or the thickness of the paper. The 3D printer counterpart is the print bed, and today the user has to know a lot. The bed has to be level relative to the print head movement plane and also spaced appropriately for that important first layer. If it is a heated bed, the user has to specify the proper temperature for the plastic filament. The surface of the print bed has to strike a balance of adhesion. If the extruded plastic can’t adhere well enough, the part would detach mid-print and ruin everything. If it adheres too tightly, the resulting print would be hard to remove from the printer, possibly damaging the printer if you force it.

Because of those and many other variables, it is wise to start with something simple. Something small and fast to print so I can quickly iterate between test prints. Yet complex enough to show if the printer is doing a good job or not hitting the desired dimensions and holding tolerances.

For this, I created a small octagonal solid in Onshape(*). It has straight edges – both aligned with printer axis and not. Two round surfaces, and several horizontal surfaces. One or more features would go bad when the print settings aren’t ideal.

Print, fail, adjust, repeat.


(*) available as a public Onshape document. Log in to Onshape and search under public documents for the name “Octagon test piece”

Onshape Notes

onshape_logo_mediumWhen getting started with 3D printing, it’s easy enough to pull some nifty things from sites like Thingiverse and print them out. But I quickly got bored of that – the reason I got a 3D printer is to turn ideas in my head into reality, not somebody else’s ideas.

There are lots of options to create digital 3D objects, the one I started with is Onshape. It is a completely web-based CAD system with the ambition to take on the big professional engineering CAD systems. I chose it mainly because it ties into another of my interests: learning how web-based applications are replacing traditional desktop applications. CAD has been one of the cornerstones of expensive desktop machines crunching numbers as professional engineering workstations. Can Onshape (& peers) transform that world? I don’t know, but I want to see how well it works (or, potentially, not) first hand while having fun.

Fortunately they’re very friendly to hobbyists like myself:

  1. Their subscription plan has a free tier specifically for hobbyists and makers. The storage space is limited and you can only keep a few things private. So the scale and complexity of free projects are restricted, but all Onshape functionality is identical. This was important because a few other CAD solutions restrict functionality at the lower cost tiers… functionality such as export to STL. If I can’t export to 3D print, that would defeat the point of the exercise.
  2. There is an extensive self-training resources section. A free service isn’t much good if I have to fork out a fortune to learn how to use it. With Onshape, I don’t have to.
  3. There is an online community around the tool. Onshape is new and still has quirks and idiosyncrasies. (Well, to be fair, all software do.) With the help of other like minded people on the forums, I don’t have to reinvent the wheel and solve all problems by myself.

After spending a few days in the training section, I was able to create simple things in Onshape. As I started getting fancier, I started running into problems that need digging into the documentation and/or the online forums. As I learn more about Onshape I’m increasingly impressed with what they’ve done and what they’re planning to do.

It’s a fun and functional tool. Highly recommended.

Cura Notes

CuralogoA critical part of a 3D printing workflow is the slicer software. It translates the theoretical mathematical representation of the STL format into printer-specific commands of the G-code format.

Monoprice recommended Cura as the slicing software for the printer I bought, even including a copy of version 15.04.2 on the microSD card bundled with the printer. I went to the website to find the latest version, and found that Cura had completely revamped the entire UI with new version numbers. Do I go with the older generation or the new hotness?

Given that I am in completely new territory, I decided to stick with known quantity of the recommended product. That was a good call, because setting up for the Monoprice printer was much easier in the old software. With all its faults, the old software was able to get me started and let me learn about the basics of 3D printing parameters. And wow, there are a lot of parameters to learn.

The slicer software highlighted how non-standardized the 3D printing world is. I knew that the printers have a great deal of variation – a natural thing in a rapidly-evolving field – but it’s a bit intimidating to get started. I hadn’t known that the plastic feed was barely standardized. There are basic classifications of the plastic type, yes, but the formulations differ from one brand to another which affects the proper printing temperature. Even the physical diameter of the filament can vary. My printer uses nominally 1.75mm diameter filament, but the spool of filament I’m printing is actually closer to 1.79mm. This is significant enough of a volume difference to impact proper feed speed of the plastic stock. Just one example among many things I learned first hand.

I stuck with the old version of Cura (15.04.2) until I had a compelling reason to move to the latest version (2.1.2) of the new revamped series. That reason was the “Horizontal Expansion” parameter, available only on the new version. I needed it to compensate for 3D printer behavior, so I switched over. It was far more difficult to set up for the Monoprice printer, but thanks to the time spent learning on the old, I was able to get far enough to start printing with the new software.

I don’t know how well Cura stacks up among its peers in the slicing software world, as I haven’t used the others. I know it still feels like hobbyist software, missing a lot of polish I’d expect of a paid product.

However, it’s working well enough for me to learn and experiment, and that’s all I ask.


Entering the World of 3D Printing

153651And now for something completely different… I got a 3D printer! I’ve been keeping an eye on the field for years, and I knew it was only a matter of time before the price point drops to a point where I can no longer resist.

The Monoprice Select Mini 3D Printer (Item #153651) is their entry-level offering at $199. For an entry-level item, it has an impressive array of features. All the basics plus some not-so-basic features like a heated build bed. At the standard price it was already quite tempting. When Monoprice threw a 4th of July sale that cuts 20% off the price of any Monoprice-branded item… I could no longer resist.

As advertised, it came completely built and almost ready to go: the build bed levelling had to be double-checked because that can easily shift in transit, and indeed I had to make a few minor adjustments before it was level. It came with a micro-SD card with a G-code file ready to go, plus a short sample of PLA filament. I was up and printing within half an hour – very impressive!

The only complaint is that their sample filament is too short to actually complete the sample print job on the microSD card. If you look at the picture above (from Monoprice web site) it’s in the middle of printing the same object, and it is stopped at around the same point as the filament running out. I’m not sure if that’s a coincidence or intentional. In any case, I couldn’t complete the print until I got more filament to feed the machine.

Now I’m learning all the basics of tweaking a 3D printer. Temperature, speed, all that good stuff. It also means I need to learn some new tools. A 3D design program (I’m looking at Onshape, but there are many others) and a slicer to turn the 3D design into a G-code file (Monoprice recommended Cura for this printer.)

My Ruby on Rails education has been seriously sidetracked by this adventure, but it’ll be fun!

“Ruby on Rails Tutorial” notes

RailsTutorial-cover-webTowards the end of the Getting Started with Rails guide, there was a link to the Ruby on Rails Tutorial. I had missed it the first time I went through the Getting Started guide, but when I reviewed the guide a second time (things made a lot more sense) I noticed and decided to check it out.

I’m very glad that I did!

For the most part, this book (available as paper edition, but the author had made it freely readable online on the web site) was exactly what I had hoped to find for Ruby on Rails. The book went through the process of making a Rails app three times, in exactly the progression I wanted:

First pass: A simple “hello world” that does nothing much but lets the student experience all the standard overhead around creating and deploying a Rails app. It’s barely a Rails lesson at all: it’s really a lesson for learning the surrounding infrastructure before digging into the meat of learning Rails.

Second pass: A simple “toy app” that does a lot… but the student is rushed through without understanding what’s going on behind the scene. It’s really a demonstration of what’s possible via Rails helpers & scaffolding and less about learning Rails. It reminds me of what the Codecademy Ruby on Rails “class” was like. A lot of incomprehensible fancy flash. However, unlike Codecademy which left me asking “now what?” Rails Tutorial follows up.

Third pass: Over 80% of the book is spent building the “sample app.” Starting from a site that can serve a few static pages and grows, bit by bit, into a mini clone of Twitter. It had creation and maintenance of user accounts, authentication, posting 140-character messages, following & un-following users, all the core bits we associate with Twitter. (Which, the author asserted, was also originally built using Ruby on Rails.)

The Codecademy Rails class left me confused and feeling like I’ve wasted my time. (About a day.)

The Rails Guides left me with a basic level of comprehension of what goes on in a Rails app. My time (About half a week) is well spent, but I didn’t feel like I could build anything on my own yet.

After the Ruby on Rails Tutorial (which took me over a week) I feel like I have all the basic tools I need to start playing in the Rails playground. I feel like I have an idea how to get started, how to experiment, understand what the experiment does behind the scenes, and debug whatever goes wrong while I experiment.

And with that, it’s time to practice using my new tools: Let’s build something!

Cache is King

15Puzzle

C is an old familiar friend, so it is not part of my “new toolbox” push, but I went back to it for a bit of refresher for old time’s sake. The exercise is also an old friend – solving the 15-puzzle. The sliding tile puzzle is a problem space that I studied a lot in college looking for interesting things around heuristic search.

For nostalgia’s sake, I rewrote a textbook puzzle solver in C using the iterative-deepening A* (IDA*) algorithm employing the Manhattan Distance heuristic. It rubbed off some rust and also let me see how much faster modern computers are. It used to be: most puzzles would take minutes, and the worst case would take over a week. Now most puzzles are solved in seconds, and the worst case topped out at “merely” few tens of hours.

Looking to further improve performance, I looked online for advances in heuristics research since the time I graduated and found several. I decided to implement one of them named “Walking Distance” by the person credited with devising it, Ken’ichiro Takahashi.

From the perspective of algorithmic effectiveness, Walking Distance is a tremendous improvement over Manhattan Distance. It is a far more accurate estimate of solution length. Solving the sliding tile puzzle with the Walking Distance eliminated over 90% of duplicated work within IDA*.

On paper, then, Walking Distance should be many orders of magnitude faster… but my implementation was not. Surprised, I dug into what’s going on and I think I know the answer: CPU cache. The Manhattan Distance algorithm and lookup table all would easily fit within the 256kb L2 cache of my Intel microprocessor. (It might even fit in L1.) The Walking Distance data structures would not fit and would spill into the much-slower L3 cache. (Or possibly even main memory.) It also takes more logical operations to perform a table lookup with Walking Distance, but I believe that is less important than the location of the lookup table themselves.

In any case: with my implementation and running on my computer, it takes about 225 processor cycles to examine a node with Manhattan Distance. In contrast, a Walking Distance node averages over 81 thousand cycles. That’s 363 times longer!

Fortunately, the author was not blind to this. While building the Walking Distance lookup table, Takahashi also built a table that tracks how one lookup state transitions to another in response to a tile move. This meant we perform the full Walking Distance calculation only on startup. After the initial calculation, the updates are very fast using the transition link table, effectively a cache of Walking Distance computation.

Takahashi also incorporated the Inversion Distance heuristic as support. Sometimes the inversion count is higher than the walking distance, and we can use whichever is higher. Like walking distance, there’s also a set of optimization so the updates are faster than a full calculation.

Lastly, I realized that I neglected to compile with the most aggressive optimization settings. With it, the Manhattan Distance implementation dropped from ~225 cycles down to ~75 cycles per node.

Walking Distance was much more drastic. By implementing lookup into the transition table cache, the per-node average dropped from 81 thousand cycles to ~207 cycles per node. With fully optimized code, that dropped further to ~52 cycles per node. Fewer cycles per node, and only having to explore < 10% of the nodes, makes Walking Distance a huge winner over Manhattan Distance. One test case that took tens of hours with Manhattan Distance takes tens of minutes with Walking Distance.

That was a fun exercise in low level C programming, a good change of pace from the high-level web tools.

For the curious, the code for this exercise is up on Github, under the /C/ subdirectory.

Codecademy “Learn Sass” notes

SasslogoWhile learning Ruby on Rails, one of the things I put on my “look into this later” list was Sass. I knew it was related to CSS but didn’t know the details, I just noticed when the Rails generator created a controller, it created a .scss file under the stylesheets directory.

So when I received email from Codecademy notifying me that they have a new class on Sass… the “look into this later” became “let’s look into it now”.

Unlike Ruby on Rails, Sass is not a huge complicated system. It solves a fairly specific set of problems typical of CSS growing unwieldy as it grows with a project. It introduces some very nice concepts to keep CSS information organized. After banging my head on lots of walls with Ruby on Rails, it is refreshing to tackle a smaller-scope project and be able to understand what’s going on. The Codecademy format is well suited to teach a smaller scoped concept like Sass.

I was also mildly amused to learn that Sass is apparently written in Ruby. I don’t think it particularly matters what the implementation was, but it’s amusing to me to see Ruby applied in an entirely different way from Rails. The bonus is that, if I should try to debug or extend Sass myself, I wouldn’t be starting from scratch looking over its source code.

Being a fresh course, the Codecademy class had a few minor problems that still need to get ironed out. The flashcard example was supposed to flip on mouse hover… it never did anything for me. Too bad, because I think the effect would have been interesting.

I haven’t gotten far enough with Rails to think about making my web app pretty, but when I do, I know how to keep my style sheets manageable with Sass.

Codecademy PHP notes

elephpant

I just zipped through the PHP course in the Codecademy “Language Skills” section.

As is typical of beginner-friendly Codecademy language skill courses, it starts from the beginning with variables, flow control, etc. If the student is already aware of such basic concepts, this can get very tiresome.

This PHP class flew through basic topics. This is great for experienced programmers already familiar with the concepts and just wanted to see how PHP differs from the other languages. The downside is that, if a student is truly a beginner, they wouldn’t have received much help and would probably be lost.

I thought the class would get into more difficult topics, or areas specific to PHP and web development and… it didn’t. After covering the basics of declaring classes and class inheritance, the class stops. Even though the introduction mentioned that PHP web apps can contact databases and other server-side resources, this class didn’t cover any of the meat-and-potato of writing web applications with PHP.

Overall, the class is a superficial skimming of the surface for PHP. Good for somebody who just wants to see a quick view of PHP basics, and I appreciated it for that, but bad for somebody who actually wants to figure out how to do useful things with PHP.

I’ll have to look elsewhere for that.

Loopiness

Unrelated to the skimpy curriculum is a problem with the interactive learning development environment. In other Codecademy courses, the student writes the code and presses a button for it to be executed and evaluated. In this class, evaluation is constantly happening before the button is pressed. The upside is that feedback for errors are instant, no waiting until the end. The downside is that it’s easy to make it go into an infinite loop.

Example: If this was the goal:

$abc = 1;

while ($abc < 10)

Just before we type “<10” the state would be:

$abc = 1;

while ($abc)

Which is an infinite loop that sends the evaluation code spinning uselessly. So when the student actually presses the button later, the gear just spins.

Workaround: copy the newly-typed code into the clipboard, hit refresh on the browser to reset and reload the page, then paste the code in.

Minor Derailment Due To Infrastructure

One of the reasons I put Node.js education on hold and started with Ruby on Rails is because of my existing account at Dreamhost. Their least expensive shared hosting plan does not support Node.js applications. It does support Ruby on Rails, PHP, and a few others, so I started learning about Ruby on Rails instead.

The officially supported version of Ruby (and associated Ruby on Rails) is very old, but their customer support wiki assured me it could be updated via RVM. However, it wasn’t until I paid money and got into the control panel did I learn RVM is not supported on their shared hosting plan.

RVM Requires VPS

At this point I feel like the victim of a bait-and-switch…

So if I want to work with a non-ancient version of Ruby on Rails (and I do) I must upgrade to a different plan. Their dedicated server option is out of the question due to expense, so it’s a choice between their managed Virtual Private Server option or a raw virtual machine via DreamCompute.

In either case, I didn’t need to pause my study of Node.js because it’d work on these more expensive plans. Still, Ruby is a much more pleasant language than JavaScript. And Rails is a much better integrated stack than the free-wheeling Node.js. So it wasn’t all loss.

Before I plunk down more money, though, I think I should look into PHP. It was one of the alternatives to Ruby when I learned NodeJS wasn’t supported on Dreamhost shared hosting. It is the server-side technology available to Dreamhost shared hosting, fully managed and kept up to date. Or at least I think it is! Maybe I’ll learn differently as I get into it… again.

Dreamhost offers a 97-day satisfaction guarantee. I can probably use that to get off of shared hosting and move on to VPS. It’s also a chance find out if their customer service department is any good.

UPDATE 1: Dreamhost allowed me to cancel my hosting plan and refunded my money, zero fuss. Two clicks on the web control panel (plus two more to confirm) and the refund was done. This is pretty fantastic.

UPDATE 2: I found Heroku, a PaaS service that caters to developers working in Rails and other related web technologies. (It started with Ruby on Rails then expanded from there.) For trial and experimentation purposes, there is a free tier of Heroku I can use, and I shall.

RailGuides on Active Record

rails_guides_logo

There’s not a whole lot to say about the individual courses, so I’m going to cram a few into a single post here.

  • Active Record Basics: A good overview of Active Record, expanding upon the concepts introduced during the Getting Started guide. As a Rails novice, the conventions around naming and schema are fascinating. The goal is clearly “do what the user meant” and the magic sure looks impressive up front. But I know from experience, when the magic fails and the user has to deal with the raw guts, it might be unpleasant.
  • Active Record Migrations: This is where I started feeling like I could use more guidance. It feels like the intended audience is already well versed in database concepts… which I am not.
  • Active Record Validations: This one feels like a fairly straightforward view of doing data checks using Ruby code instead of SQL. It even goes into some detail on when you’d want to use Ruby vs. directly in the database. (Not that I necessarily understood all of it…)
  • Active Record Callbacks: Life cycle of an Active Record and when/where I can place some code of my own to look at the latest data. I don’t think this will really sink in until I see a situation where I need it.
  • Active Record Associations: I started getting in over my head here. I think I would do better if I knew more about designing database schema, but I did not. As a result the associations feel like a toolbox full of tools I don’t know how to use on problems.
  • Active Record Query Interface: If somebody can think in SQL, this section will explain how Rails features are mapped to SQL queries behind the scenes and vice versa. Sadly I’m too rusty in SQL for this section to be particularly enlightening.

For me, the general theme here is: Good, except the parts that expect me to have more SQL database knowledge than I actually do. I plan to come back and review this information later, but between now and then, I think it’d be a good idea to brush up on my SQL.

RailsGuides “Testing Rails Applications” notes

rails_guides_logo

In professional software development, the adage is “If it hasn’t been tested, it doesn’t work.” It’s easy to write some code that I believe does what I want… it might even pass a few smoke tests. But if it hasn’t been examined with some rigor, it is worthless. Time and time again test suites proved their value by exposing problems in my code. With their help I knew what I need to fix to make things better.

Yet with all this importance, testing techniques and methodologies are rarely covered – or even mentioned – in most curriculum on software development. This is why I was most surprised to find the section Testing Rails Applications on the list of RailsGuides.

I’m still too much of a Rails beginner to understand all of the information in the lesson, so I would definitely have to come back later, but it is enough for me to get a rough idea of the capabilities of the built-in testing framework.

I was most amused to see that the built-in creation scripts for Rails models and controllers would create the test scripts at the same time it created the code. A not-so-subtle reminder for the developer to go and write some tests. At this point, the source code files and the test files are both sitting empty and ready to go. We could start writing the source code – but we could have just as easily started writing the test files first.

Write the test, see it fail, write the code, see it pass.

At least that’s the theory of test-driven development. I don’t know if I’ll approach Rails development in this manner, but I do appreciate how Rails removes so much of the barriers to entry.

RailsGuides “Securing Rails Applications” notes

rails_guides_logo

As I enter the world of web development, I’m very wary of the security pitfalls of the domain. It is a completely different set of security threats than what I used to worry about. Different attack vectors that need to be defended against or mitigated with different techniques.

I had known about the Open Web Application Security Project (OWASP) but I can’t say I’ve reached proficiency understanding all the concepts there. At this point I can articulate most of the concepts listed in the OWASP Top 10 list. If I come across a description of an attack using one of these top 10 techniques, I can follow along with the description.

But that is far far short of the skill level where I can spot the security issues ahead of time. That is yet to come. With expectations set suitably low, I went through the Securing Rails Applications RailGuide to see how much I can understand. And surprisingly… quite a lot! Whoever wrote this guide was able to explain a lot of these issues in a way I can understand. I really appreciate the effort they put into breaking the problems down.

With every exploit, the guide also describes some mitigation for Rails applications. Not knowing a whole lot about Rails just yet, most of the mitigation descriptions made little sense. So while I understood more than I thought I would, I’d still have to come back again.

Right now I have no confidence that I can tell a secure Rails app from an insecure one. There’s a whole lot of very clever people trying to find ways to break security boundaries. Whenever I read about an exploit, I usually end up shaking my head “I never would have thought to try that.”

Since there’s no way to guard against a problem you never thought of, I need to build up my web programming toolbox. I want to get from “I never would have thought to try that” to “ah, that’s a clever thing to try” to “no problem, I’m pretty sure I’ve taken care of it.”

One step at a time.

RailsGuides “Getting Started with Rails” notes

rails_guides_logo

It is my opinion that RailGuides’ Getting Started with Rails is a far superior educational resource than the Codecademy class on Rails which I did not care for at all.

The only thing I can say in favor of the Codecademy edition is the completely browser-based Codecademy learning environment. To run through the Codecademy tutorial mystery show, one only needs a browser. RailGuide has no patience to set up a virtual machine for you. It wants the reader to set up their own fully functional Ruby environment to follow along. (Don’t worry, instructions are right up front in Section 1.) If people are just surveying the technology, this may be more than they are willing to do. But those who are serious about getting their hands dirty will want it anyway, so I didn’t see that as a barrier.

Getting Started with Rails does a far better job of describing what Rails is, what it does, and the components that the students will be activating in the lesson. It explained the directory structure. It explained the relationship of the view and the model and the controller. It explained how the database relates to the model. On and on, tons of info I failed to get out of Codecademy.

The best part was when the class went into partial forms. (Codecademy didn’t cover the topic at all.) First the student did it the hard way, then the student is instructed on how to clean up after themselves and simplify the structure with partials. See the original – then work the magic yourself – makes for superior comprehension.

Ruby on Rails is a big complex machine and there’s still lots to learn. Like routing… the link_to routes are still magic to me. But I feel like I have a solid foundation now, which I didn’t feel before.

Onward to more Rails adventures…