Acer Aspire Switch is Linux Unfriendly

Now that the hardware of an Acer SW5-012 (Aspire Switch 10) is back up and running, the focus turns to software. Windows 8 is installed but locked with passwords I don’t have. I didn’t care much for Windows 8 anyway, and whatever data exists is not mine to recover. So – a clean wipe is in order.

As with the Latitude X1, my first thought was to turn this little old machine into an almost-Chromebook with Neverware CloudReady. And just like with the Latitude X1, the attempt was foiled. The Latitude X1 was too old and did not support some processor features required by CloudReady. The Acer problem is just the opposite – the hardware is too new and deliberately blocks the installation.

The blocking mechanism is Secure Boot, which according to its own web site is a “security standard developed by members of the PC industry to help make sure that a device boots using only software that is trusted by the Original Equipment Manufacturer.” I would describe it with different terms. Either way, trying to install CloudReady – or a Linux distribution – results in the error screen “Secure Boot Error”.

Intentional or not, this puts the Acer in a bad state. It gets stuck neither fully on nor off, the screen dark but burning battery power and making itself warm. I had to disassemble the computer again to pull the battery from the main circuit board in order to reboot the machine.

In theory Secure Boot can be disabled, but various efforts by other people on the internet indicated this isn’t straightforward. I certainly had no better luck when I tried it: I can see the menu option, and I could change it from black on white (disabled) to white on gray (enabled) by creating an admin password, but I couldn’t figure out how to actually change the Secure Boot mode out of “Standard”.

Acer Secure Boot Menu

And it might not even be worth the effort, as forum traffic indicates there is very poor Linux driver support for this class of hardware. Probably related to the secure boot barrier but either way I’m giving up. I’ll stay with Windows on this machine.

Dell Latitude X1: A 2005 Laptop Tries To Fit In 2017

I thought it might be fun to try to get the twelve-year-old Dell Latitude X1 laptop up and running. My expectations were not high, but when I looked over the hardware specs I found the out-of-date hardware surprisingly within reason to run current software.

The computer came with Windows XP, which is long out of service. The previous owner of this laptop switched to running Ubuntu 11. Since that’s far out of date as well and I had no login information anyway, a clean wipe is in order.

I thought I’d jump straight to the latest Ubuntu 17.10, but was unable to find a 32-bit installer. The lack of a 32-bit installer turns out to be an intentional omission, part of Ubuntu’s plans to phase out 32-bit support. So I installed an older version (16.04 LTS) which did have a 32-bit installer, and upgraded from there. The resulting system was quite sluggish. After using it a bit, I decided part of the problem was the spinning-platter hard drive but there’s also the old graphics chip struggling to handle the visual effects of a modern OS.

To isolate the latter, I installed Ubuntu MATE, a variant of Ubuntu with the MATE desktop. MATE is a simpler alternative which is supposed to run better on lower-end hardware. That part was true – after installing Ubuntu MATE, the Latitude X1 didn’t spend as much chugging through graphical transitions. But the overall experience was still slow – the spinning platter hard drive remains a significant influence on performance.

Switching to MATE would have made a larger difference if I had a larger screen (or multiple monitors) running multiple windows. But since the Latitude X1 screen was so small, I only have one window at a time running full-screen, reducing the influence of the desktop environment.

The Latitude X1’s performance on modern software is held back by the spinning-platter hard drive. Which led to the next idea: can we upgrade the hard drive to a SSD? I have a few old SSDs available for such a project.

Dell always publishes excellent manuals for working with their machines. They also keep them online and available, even for twelve-year old machines. So getting to the hard drive was no problem. As soon as the hard drive was visible, though, I knew I was in trouble. The drive is much smaller than the standard laptop hard drive.

HDD18HDD35

Even if the SSD could physically fit, it did not have the correct data interface. The interface connector is unlike anything I’ve seen in a laptop hard drive. The closest thing I can recall is a CompactFlash connector.

HDD18Plug

The label on the drive proclaims itself to be a Toshiba MK3006GAL. Sadly, unlike Dell, Toshiba does not keep documentation online for old hardware. I remain ignorant of the details and industry specification for this specific hard drive interface and form factor. Maybe it is rare enough that there would be no SSD upgrade possible at all. Since I was not planning to spend money on this project, though, the details are irrelevant. This old computer will stick with its old spinning platter hard drive.


If I had to make a prediction 12 years ago about how well the Latitude X1 would hold up to the years, I probably would have predicted the CPU speed as the largest bottleneck, followed by the quantity of RAM. I would not have guessed that the growth of cheap tablets would demand that operating systems continue to run on a 1 gigahertz processor and within 1 gigabyte of RAM.

I also would not have guessed that solid state drives would have dropped in price and become such a cost-effective boost to overall system performance. The hard drive turned out to be the most significant sign of age in this twelve-year-old laptop.

Dell Latitude X1 is Almost a Teenager

Today’s new toy is actually an old toy: a Dell Latitude X1 ultra-portable laptop that was originally released in early 2005. The fact that it is still running twelve years later is fairly impressive. I was once skeptical of the price premium Dell charged over their consumer product line, but I’ve seen enough consumer Dell die off while their business Dell counterparts kept trucking to change my mind. While I still might not choose to pay that premium, I now believe the price difference buys a more durable product.

Or perhaps the credit should go to Samsung? When I searched for reviews of this old laptop, I found this review which claimed the laptop is a rebadged Samsung Q30. The article even helpfully included a picture of the Q30 so we can see cosmetic similarities (and the differences.)

There are dings and dents from over a decade of service, but aside from the expected degradation in battery capacity, the machine seems to be running much as it did over a decade ago. I booted it up to verify that it could still do so (Looks like the previous owner installed Ubuntu 11) before I started digging into the hardware.

Looking into the BIOS, I find the processor is an Intel Pentium M ULV 733, a 32-bit single-core low-power processor running at a modest 1.1 GHz. It is definitely out of date in the current age of 64-bit multi-core multi-gigahertz CPUs but we might still be able to work with it.

There is 1.2 gigabytes of RAM, an unusual amount that I’m sure it was quite a luxurious amount in its day. Not so much today, but not as bad as it could have been. In the days of Windows Vista there was an expectation that computer memory baseline would keep moving up, 2 then 4 then 8 gigabytes and beyond, but it hasn’t panned out that way. Demand emerged to run on lower-end hardware so recent builds of Linux and Windows 10 both included provisions to run on inexpensive tablets with 1 gigabyte or less of RAM.

The same break in the capacity trend also applied to storage. This machine has only a 30 gigabyte hard drive, and hard drive capacity have grown to multiple terabytes within the past decade. But the advent of solid-state storage plus the desire for inexpensive tablets with modest storage meant operating systems had to stay slim.

All the remaining accessories follow the same trend – definitely out of date but surprisingly still within the realm of relevance. A screen with resolution of 1280×768, Bluetooth and Wi-Fi, Ethernet and USB, SD card reader, all the trappings expected of a modern laptop.

There are a few amusing anachronisms: a CompactFlash reader in addition to the SD reader. There is no HDMI video out port – just VGA. And the best one of all – a telephone jack for dial-up modem connectivity.

LatitudeX1Modem


Microchip “Curiosity” Development Board and its Zero Ohm Resistors

When I purchased my batch of PIC16F18345 chips, Microchip offered 20% discount off standard price for its corresponding Curiosity development board (DM164137). I thought it might be interesting and added it to my order, but I hadn’t pulled it out of its packaging until today.

Today’s motivation is the mTouch button built onto the board. As part of my investigation into projects I might tackle with the Hackaday Superconference 2017 camera badge, I found that the capacitive touch capabilities of the MCU is unused and thought it might be interesting to tie it into the rest of the camera badge. Before I try to fabricate my own touch sensors, I thought it’d be a good idea to orient myself with an existing mTouch implementation. Enter the Curiosity board.

Looking over the board itself and the schematics on the user’s guide, I noticed a generous scattering of zero ohm surface-mount resistors. If I had seen zero ohm resistors in isolation, I would have been completely mystified. Many electronics beginner like myself see a zero ohm resistors as something that does nothing, take up space, and there’s no point. For those beginners, a web search would have led them to this StackExchange thread, possibly the Wikipedia article, or maybe the Hackaday post.

Curiosity Zero OhmsBut I was not introduced to them in isolation – I saw them on the Curiosity board and in this context their purpose was immediately obvious: a link between pins on the PIC socket and the peripheral options built on that board. If I wanted to change which pins connected to which peripherals, I would not have to cut traces on the circuit board, I just had to un-solder the zero ohm resistor. Then I can change the connection on the board by soldering to the empty through-holes placed on the PCB for that purpose.

This was an illuminating “Oh that makes sense!” introduction to zero ohm resistors.

Reading the PIC32MX1XX Datasheet As A PIC16F18345 User

A review of the Hackaday Superconference 2017 “camera badge” hardware provided adequate orientation but no lightning strike of project inspiration. Today I did find the project page for last year’s Supercon badge as well as a summary page of some things people have created with the 2016 badge. People have done some really cool things with that badge serving as foundation. I’m feeling intimidated but also determined to keep trying to see what I can devise.

Today’s tactic: Dive into the data sheet for the Microchip control unit at the heart of the 2017 badge, the PIC32MX170F256D. No matter what else happens, it would be good to have an overview of what the chip can and can’t do. I was also hoping that a review of the data sheet will unveil something about the chip that would inspire a project. Since I’ve already read the PIC16F18345 data sheet back-to-back, I hoped the familiarity with Microchip conventions will give me a head start.

The first surprise was the size (length) of the data sheet. Only 344 pages when the much simpler PIC16F18345 chip had a 491 page document. It didn’t take long for me to figure out why, since every feature section started the same way: a disclaimer that the data sheet was only the summary and tells me I need to do more reading if I want the details.

OnlyASummary

Well, that explains the size! For my purposes today, it’s no big deal. In fact it is helpful since the summaries mean I don’t have to press “Page Down” as often.

There are some comfortable commonality with the PIC16F18345 I’m familiar with: Timers and comparators. Digital I/O and analog input (ADC.) Communication via SPI, I2C, UART. And all these peripheral modules are mapped into a memory space so everything is accessed via memory reads and writes. And finally: a big focus on power management.

There are some differences that I might miss in the PIC32MX1XX:

  • PWM seems to have gone missing, unless there is a much more advanced component that can serve similar purposes but I don’t recognize it as such.
  • I/O pins are much less powerful. The PIC16F can handle up to 50mA on any single I/O pin and up to 250mA total. The PIC32MX can only handle 15mA per pin with 200mA total.
  • Narrower voltage range: Unlike the super flexible and relaxed PIC16F that is happy to run with anything from 2.3V to 5.5V, the PIC32MX prefers to stay within 2.3V to 3.6V. The maximum is listed as 4.0V, so it might be dicey to run this thing on a single rechargeable lithium cell – the nominal voltage is 3.7V but a fully charged cell might be up to 4.2V.

The PIC32MX uses a different instruction set (MIPS32 M4K) and that’s no surprise. I expect to be mostly isolated from this fact by writing in C and letting the XC compiler worry about the instruction set. The PIC32MX also requires more support circuitry. Whereas the PIC16F can literally connect directly to a battery and it’ll start running. Again I’m mostly isolated in this case because the camera badge is already built for me and all the support components are already on board.

And now, on to the things that might be interesting. I started with the title description: “32-bit Microcontrollers (up to 256 KB Flash and 64 KB SRAM) with Audio and Graphics Interfaces, USB, and Advanced Analog

The first thing to catch my eye: USB, backed by this promising-sounding bullet point on the cover page: “USB 2.0-compliant Full-speed OTG controller“. USB OTG would let us plug-in USB peripherals and greatly expand the possibilities of what we can do. Alas, my hopes were dashed when page 2 clarified that USB OTG is only on the PIC32MX2XX series and absent on the PIC32MX1XX we have on the camera badge. So that’s out.

The “Advanced Analog Features” bullet items seem to mostly center around support for capacitive touch sensing, mostly around their “mTouch” design. Since their reference implementation involves copper traces and plates on a printed circuit board, that won’t be directly applicable to me. But perhaps this type of support circuitry can be hacked into something fun.

I have yet to explore the world of audio electronics, so sadly the audio interface features are mostly gibberish to me. I had higher hopes for the “Graphics Interfaces” side of that claim and… I came up empty-handed. There’s nothing that obviously said “graphics” to me on the feature set. The closest thing I can find is the PMP (Parallel Master Port) peripheral which is good for talking to display panels, and is indeed already employed on the camera badge to drive the 128×128 OLED screen.

So in the category of “stuff that the chip can do, but isn’t already being used” the best candidate at the moment is the analog circuitry to support capacitive touch. Since I don’t have time for a OSH Park PCB, it’ll have to be something creative. Perhaps something as primitive as taping down loops of wire to cardboard or 3D-printed plastic parts.

The gears in the brain keep churning…


Supercon 2017 Badge – Hardware Orientation

Today was spent getting orientated on the hardware components making up the camera badge for Supercon 2017. The starting point is the project documentation’s “hardware description” page, which gave a basic overview that helps me decide where I want to dig deeper.

2413581507673490011

The CMOS sensor at the heart of the OV9650 camera module claims to support up to 1280×1024 resolution, which isn’t bad for such an inexpensive component. The sample image posted on the project file section, however, is only 128×96 resolution. It’s not immediately clear where >99% of the pixels disappeared to or how feasible it’d be to bring them back.

Perhaps that resolution was chosen to match the OLED screen, which has 128×128 pixels of resolution controlled by a SSD1351 chip. If this is the case, and more pixels can be captured from the camera with minimal effort, that opens up project ideas such as having the little screen pan across a larger image. (a.k.a. the Ken Burns effect.)

We have multiple tiers of storage that makes different capacity/speed trade-offs. First we have some space for data on the PIC itself, then we have a Microchip 23LC1024 serial RAM, and finally a microSD card.

There’s an LIS2HH12 accelerometer on board which might enable some cool projects, though I’m struggling to think up one that captures my fancy. Maybe in a bit.

The chip that orchestrates all of this is a PIC32MX170F256D. Fortunately for me, I already had the tools on hand to develop for it thanks to my time playing with the PIC16F18345. They’re very different chips, but since they’re both from Microchip I would write code to both using the same MPLAB X IDE albeit with different C compiler underneath: XC8 vs XC32. The PIC32 is set up to run a .hex file off the microSD card, so it’s not necessary to have a PIC programmer. But if I need to flash at a more direct level, the board has headers to connect the same PICkit 3 programmer I use for the PIC16F18345.

All in all, a decent set of hardware. Now I just need to think of a really cool project to do with it all.

Supercon Badge – Initial Exploration

Supercon 2017 is coming up soon and I now have a ticket to attend. Part of the fun is the badge which, unlike SIGGRAPH or WestTec, is not a printed piece of paper. In the case of Supercon (and a few similar conferences) it is actually a circuit board with some functionality. The Supercon 2017 badge is a very minimal low resolution digital camera. Why would we want such a thing when most of us carry cell phones with far superior cameras? Because it is only the start: conference attendees are invited (expected?) to use it as a starting point and build something cool.

Which means I have only about 10 days to do my homework – what would I build with the badge? As a first-time attendee I’m not sure what to expect. Last year I saw brief glimpses of the badge under construction, but I didn’t see any of the projects built by conference attendees.

Well, with any project, the first step is to look for documentation. The official source of information is, naturally, the camera badge’s own project page on Hackaday.io. I felt intimidated on first look: my own adventures in electronics hardware hasn’t covered anything to do with cameras, OLED panels, or the like. About the only thing I am vaguely familiar with is the microcontroller at the heart of the device. It is a Microchip PIC, though from their PIC32 series which is higher-end and more capable than the PIC16F chips I had been playing with.

Fortunately, it uses the same MPLAB X IDE for development. I had to download and install the XC32 compiler corresponding to the PIC32 chip, but that was relatively easy. After changing the path separators from the author’s Windows machine (‘\’) to the Ubuntu I’m working on (‘/’) the project builds successfully.

That’s a good start. The next step is to go digging through the code base and look for something interesting for me to do.

cambadgebuild


A 3D-Printed Enclosure to Take My LED Project On The Go

For the Connect Week event put on by Innovate Pasadena, the Hackaday LA group is hosting the “Bring-A-Hack” event where attendees are encouraged to bring projects (in any stage of completion) for show and discussion. Since I’ve been building my LTC-4627JR driver board as a learning project, I wanted to bring it in for show-and-tell.

Now I could just bring the assembled circuit board and pass it around as an inert object, but what fun would that be? I wanted to bring in something that shows it doing something, and provide some way for people to interact with the whole contraption. Looking at my parts on hand, it seemed easiest to rebuild my thermometer test project. I can have a simple Python program run on the Raspberry Pi, reading temperature from the Tux-Lab Si7021 breakout board, and sending it out to my display. That makes 3 circuit boards, plus they’ll need portable power. I will enlist my Amazon purchases: the 3-cell lithium ion battery pack protected by a S-8254A IC, and the MP1584 buck converter to translate the battery pack’s power into Raspberry Pi friendly voltage.

They present a logistics challenge. There are many parts and while it’s fine to just connect them with wires on my work table, it’s too unwieldy to carry on the Gold Line to Pasadena. I’m going to need some kind of enclosure to carry the whole thing.

To Fusion 360 we go! I just needed a simple enclosure so it was pretty fast to draw up. The bottom tray is for power: it holds the battery cells, their protection board, and the buck converter to 5 volt output. The upper tray holds the Raspberry Pi. The lid of the tray holds my custom LED circuit board, and a few clamps holds it all together. The clamps should be easily removable so I could disassemble the box to show people what’s inside.

ShowandTellBox

I had originally intended to mount the Si7021 breakout board as well, but ended up deciding it would be more fun to have it dangling out for people to play with it. Here are the layers without the clamps, so they can be taken apart and show off the insides.

IMG_5273

And here’s the “travel configuration”, with clamps holding the pieces together.

IMG_5274

This setup worked well. I was able to carry it in my backpack without worrying about tangling up or shorting out wires. Once I arrived, the project was fairly well received and lots of people had fun playing with the thermometer.

PIC Controller for LTC-4627JR LED Now Accepts Strings

Now that our circuit board from OSH Park is populated and running, it’s time to evolve the PIC code beyond displaying a test pattern. The objective of the exercise all along was to display data sent to the unit over I²C, but the exact details of what to send hasn’t been finalized.

Stage 1: Raw Bits

This was the easiest and so was the first thing we implemented. It is the lowest-level way to communicate between the host and the display. The host sends data in the form of raw bytes. Each bit in a byte correspond to the 8 segments in a single digit. The host sending 4 bytes will fill 4 digits. We send that byte directly out to PORT C on the PIC micro controller, which are connected to 8 segments of a LED digit.

This method is powerful in the sense it allows the host to display arbitrary patterns. But it is terribly unfriendly to use. The program running on the host has to tailored to the implementation details of our display: the host has to know which bit corresponds to which segment, and whether a bit value of 0 or 1 corresponds to light or dark. Which means if the user wants to swap out to a different display, they would have to rewrite the host code.

This system served its purpose to prove we could light the LED, but it is not a good way forward.

Stage 2: Hexadecimal Decode

In this system, the bytes sent by the host is decoded into their hexadecimal representation and displayed on screen. Since a hexadecimal digit represents 4 bits, the host sending 2 bytes (16 bits) will fill the 4 digits. This is actually a pretty useful mode in certain debugging operations where we do want to see those values. However, it is very difficult to represent human-friendly information this way. We’re also unable to make full use of the LTC-4627JR this way: there’s no way to represent the decimal point or the colon in the middle.

Since it is useful for machine-level (not human-readable) data debugging, we might want to retain this capability in the form of a special mode later. In the meantime, let’s move on.

Stage 3: Binary-Coded (Hexa)Decimal

The next evolution resembled binary-coded decimal system, which separated out each digit to its own byte. This makes the host program easier to write because each character can be treated individually instead of having to pack 2 characters into the upper/lower 4-bits of a byte. Unfortunately it also shares the limitation that we couldn’t represent the decimal point or the colon.


Which brings us to the latest approach:

Stage 4: String

Since most computer operations that result in human-readable information end up with the string data format, we’re going to try using that as our I²C protocol. It is established, well-understood, and a piece of cake to use from high-level programming languages like Python. The downside is that it is much more verbose. The character sequence to light up all the LED is 8.8.:8.'8. which requires 10 bytes to represent. This is a five-fold increase in bandwidth relative to the 2 byte hexadecimal decode. Will this added bandwidth cause problems? I don’t know yet, we’ll find out.

But for now, we have a very user-friendly interface. Sending the string “79.2F” resulted in the picture attached to this post. The easy interface also enabled a very short example program.

(The project discussed in this blog post is publicly available on Github)

IMG_5272


Qt Quick with PyQt5 on Raspberry Pi

QtLogoThe prime motivation for me to go through Qt licensing documentation and installing Qt Creator IDE was to explore the new UI infrastructure introduced in Qt 5 under the umbrella of “Qt Quick“. As far as I can tell, this is an entirely different system for creating user interface of a Qt application. Built with modern ideas such as OpenGL graphics acceleration for animation effects and UI layout declared with a text-based markup language QML (probably stands for Qt Markup Language.)

Up to this point my experience with building graphics user interface in Qt was with the QWidget-based infrastructure, which has a long lineage in past editions of Qt. Qt Quick is new for Qt5 and seem to share nothing in common with QWidget other than both a part of Qt5. Now that I’ve had a bit of QWidget UI work under my belt I wanted to see what Qt Quick has to offer. And this starts with a smoke test to make sure I could run Qt Quick in the environments I care about: Python and Raspberry Pi.

Step 1: Qt Creator IDE Default Boilerplate.

Once the Qt Creator IDE was up and running, I followed the Qt Quick tutorial to create a bare bones boilerplate Qt Quick application. Even without any changes to the startup boilerplate, it reported error messages complaining of missing modules. Reading the error message, I looked at the output of apt list qml-module-qtquick* and installed the ones that sound right. (From memory:qml-module-qtquick2qml-module-qtquick-controls2, qml-module-qtquick-templates2, and qml-module-qtquick-layouts)

QML CPP

Once the boilerplate successfully launched, I switched languages…

Step 2: PyQt5

The next goal is to get it up and running on Python via PyQt5. The PyQt5 documentation claimed support for QML but the example on the introductory page doesn’t quite line up with the Qt Creator boilerplate code. Looking at the Qt Creator boilerplate main.cpp for reference, I translated the application launch code into main.py. This required sudo apt install python3-pyqt5.qtquick in addition to the python3-pyqt5 I already had. (If there are additional dependencies I forgot about, look for them in the output of apt list python3-pyqt5*)

QML PyQt

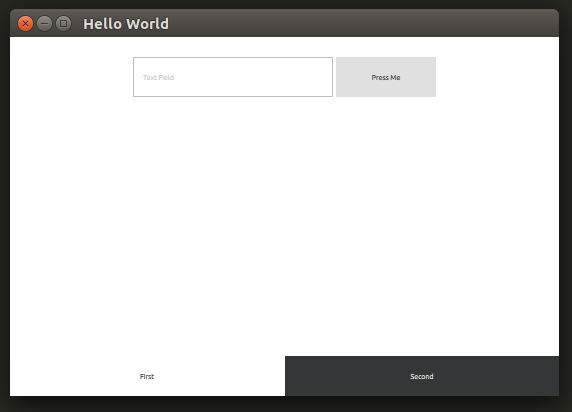
Once that was done, the application launched successfully on my Ubuntu desktop machine, albeit with visual appearance very different from the C++ version. That’s good enough for now, so I pushed these changes up to Github and switched platforms…

Step 3: Raspberry Pi (Ubuntu mate)

I pulled the project git repository to my Raspberry Pi running Ubuntu Mate and tried to run the project. After installing the required packages, I got stuck. My QML’s import QtQuick 2.7 failed with error module "QtQuick" version 2.7 is not installed The obvious implication is that the version of QtQuick in qml-module-qtquick2 was too old, but I couldn’t figure out how to verify version number is indeed the problem or if it’s a configuration issue elsewhere in the system.

Searching on the web, I found somebody on stackoverflow.com stuck in the same place. As of this writing, no solution had been posted. I wish I was good enough to figure out what’s going on and contribute intelligently to the discussion!

I don’t have a full grasp of what goes on in the world of repositories ran by various Debian-based distributions, but I could see URLs flying by on-screen and I remembered that Ubuntu Mate pulled from different repositories than Raspbian. I switched to Raspbian to give that a shot…

Step 4: Raspberry Pi (Raspbian Stretch)

After repeating the process on the latest Raspbian, the Qt Quick QML test application launches. Hooray! Whether it was some configuration issue or out of date binaries we don’t know yet for sure, but it does run.

That’s the good news. Now the bad news: it launches with the error:

JIT is disabled for QML. Property bindings and animations will be very slow. Visit https://wiki.qt.io/V4 to learn about possible solutions for your platform.

And indeed, the transition between “First” and “Second” tabs were slow. Looking on the page that it pointed to, it looks like the V4 JavaScript engine used by Qt for QML applications does not have JIT compilation for Raspberry Pi’s ARM chip. That’s a shame.

For now, this excludes Qt Quick as a candidate for writing modern responsive user interfaces for Raspberry Pi applications. If I want to stick with Qt and Python, I’m better off writing Qt interfaces in the old school QWidget style. We’ll keep an eye on this – maybe they’ll add JIT support for Raspberry Pi in the future.


(The source code related to this blog post are publicly available on Github.)
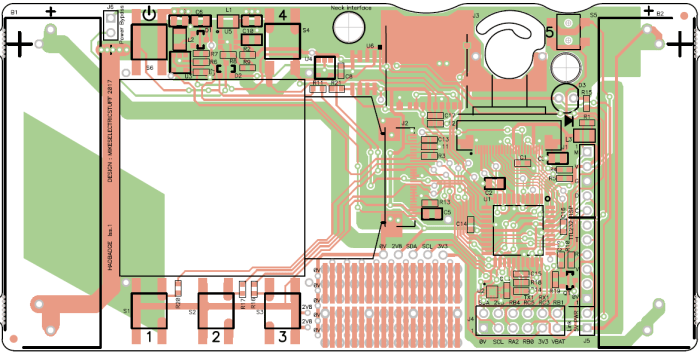
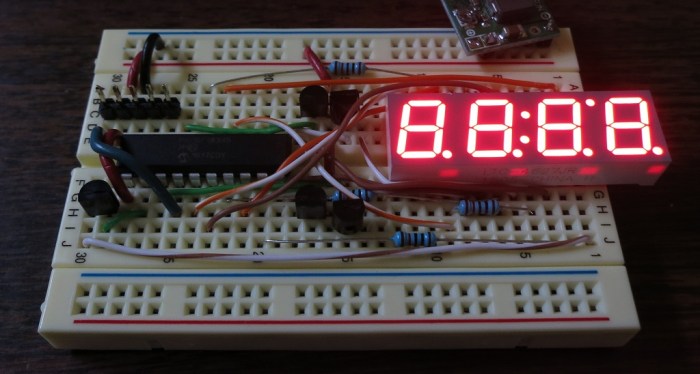
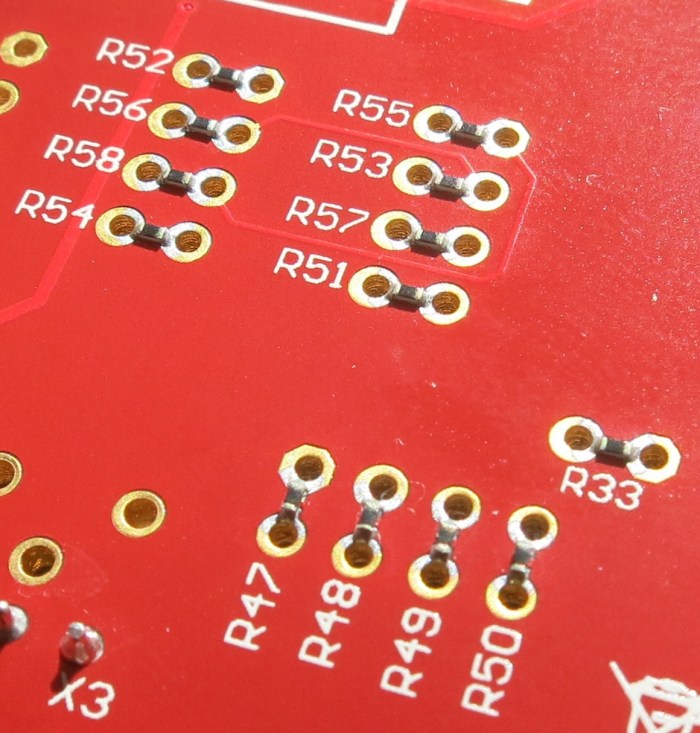
First OSH Park Order Arrived

My first KiCad project was sent to OSH Park almost two weeks ago, and my digital design is now back in my hands in physical form. It is really quite exciting to hold in my hands a circuit board I designed. Three copies of it, in fact, as per usual OSH Park practice.

The first order of business is to check for simple mistakes. I pulled out my multimeter to verify that I have good connection between all the VCC pins to the VCC plane, and similarly all the ground pins are connected to the ground plane. Then I brought up my design in KiCad and checked continuity for the pins I designated. I don’t know if I exhaustively checked them all, but a large portion were verified.

Once I’m satisfied my design has been faithfully produced by KiCad, it was time to pull out the soldering iron. I thought I’d do some incremental tests – solder a subset of components to verify the subset of LEDs light up correctly – but I was eager to see it all light up so I went ahead and populated the whole board. The legs of the 2N2222A transistors in their TO-92 package were closer together than I’m used to in my soldering projects, but other than that challenge it was all simple and straightforward soldering.

Populated LED board

And finally, the moment of truth. I was working in Tux-Lab and a bunch of nearby guys gathered around to see me power up the board for the first time.

<drum roll>

It’s alive! The test pattern already programmed into the PIC started cycling through the LED display. This success is a great confidence-builder. I had fully expected to find problems with the board that I would have to fix in KiCad and send back to OSH Park for another set of circuit boards to be produced. The only problem I encountered was the PICkit 3 does not fit nicely alongside the power connector. I could make it work by making them wedge together at an angle. Neither were happy with it but it should be relatively rare to have the programmer attached.

Well, I guess break time from PIC software is over – I no longer have an excuse to play with other projects. The task of writing my I²C driver routine for this display is back on the to-do list.

Raspberry Pi Pin Initial States are a Consideration For Machine Control

As an intermediate step towards controlling the thermoforming machine with the Raspberry Pi, we populated a breadboard with some components we planned to use. A Raspberry Pi could only source a total of 50mA of power across all the IO pins, so we had it switch circuits on/off via opto-isolators that required far less current to activate. We started by using these opto-isolators to control power to LEDs. Just to see how it works and make sure nothing unexpected occurs before we start hooking up bigger things.

This proved to be wise, as it exposed some Raspberry Pi behavior we did not expect. When the Pi was powered-up, some of the LEDs glowed dimly. They’re not full bright, but they’re definitely not dark, either. Once the control program starts up and all pins are initialized to off, they go dark as expected. But there’s something going on between initial power-on and when the control program starts running.

This was important to chase down because we don’t want the machine relay to close when we’re not expecting them to close. Even worse if it occurs while the system is powering up and components are not yet in known good states. Making this an important consideration in designing our system.

A bit of web searching confirmed this startup behavior was noticed and investigated by a lot of people looking at various parts of the system. The answer was most succinctly answered by a post on the Raspberry Pi subsection of StackExchange: In the peripherals manual for the BCM2835 chip at the core of the Raspberry Pi, the power-on initial states are explicitly stated: All IO pins are configured to be input and not output. Furthermore, pins 0-8 are set with pull-up to 3.3V and pins 9-27 are pulled-down to 0V.

Looking back on the breadboard, we could confirm the explanation matches the observed behavior. The dimly lit LEDs were controlled by opto-isolators that were, in turn, connected to Raspberry Pi pins 5 and 6. None of the other isolators were controlled by pins in the 0-8 range. Since opto-isolators required so little current to operate, the weak pull-up on a pin set to input was sufficient to partially activate the circuit.

Once the cause was determined the solution was simple: move all output control out of the 0-8 range of pins. These pins would be fine for input, so the task of reading the position of a limit switch was moved to pin 5.

The resulting breadboard is visible in the attached image, and the code was changed to match the new pin assignments in this commit. After these changes, we observed no partially lit LEDs which also hopefully means no unexpected relay activity when we hook it up to the machine.

IMG_5266

Setting Up Raspberry Pi GPIO Pins For Device Control

A rough draft of the thermoformer touchscreen control panel application, witting in Python with the Qt UI framework, is now up and running. Now it is time to see how it works controlling some physical hardware. We’re going to build up to this in steps on the way towards actually controlling the thermoform machine. The first step is to have the Pi light up some LEDs as commanded by the control panel application.

I had been playing with a Microchip PIC16F18456 earlier, which can drive LEDs effortlessly. Each pin can handle 50mA which is more than enough to drive LEDs as they typically require no more than 20mA each. I had assumed the Pi would be even more capable with its onboard voltage regulators, but I thought it’d be better to check just to be safe. I’m glad I did! It turns out the pins on the Raspberry Pi has significantly lower power capability than the pins on the PIC16F18345.

The consensus on the Raspberry Pi forums says the limit is 16mA per pin, and 50mA total across all pins. A bunch of LEDs would quickly exceed the 50mA total cap. Given this, we’re going to take two baby steps at once.

We’ve known we couldn’t drive the thermoforming machine directly with Pi. And even if we could, a direct connection is not the best idea. The plan had always called for the use of opto-isolators to keep some separation between the delicate low-power circuitry on the Raspberry Pi chip and the high-power components of the machine. I just didn’t expect that bright LEDs to qualify as “high power” in this context. But since they are, we’re going to use opto-isolators to build the LED proof of concept.

The current design for the control has 9 outputs to relays, and 1 input from a limit switch. For the outputs we’re starting with the Vishay 4N32 chip to see how they work. For input, we wanted a chip that works in the reverse direction, and we’re starting with the Toshiba TLP2200. With the help of a Raspberry Pi I/O breakout board we could hook everything up on a breadboard for the first test.

IMG_5266

Learning Timers: Qt QTimer and Python threading.Timer

QtLogoWhen I interfaced my PyQt application to the Raspberry Pi GPIO pins, I ran into a classic problem: the need to perform input debouncing. The classic solution is to have the software wait a bit before deciding whether the input change is noise to be ignored or not. A simple concept, but “wait a bit” can get complicated in the world of GUI programming. When writing simple programs, we can probably get away with a literal wait by “going to sleep” for a little bit. But we don’t have that luxury in the world of GUI programming – going to sleep would freeze everything in the program. In general, users do not appreciate their UI becoming frozen and unresponsive.

Python LogoThe solution: a timer. In a Windows application, the programmer can use the operating system timer and do their “after waiting a bit” tasks in response to the WM_TIMER message. I went looking for the Qt equivalent and found several timer-related features. QTimer, QBasicTimer, and QObject::startTimer(). Thankfully, the documentation also provided an overview describing how they differ. For debounce purposes, the most fitting mechanism is a single-shot timer.

Unfortunately, when I tried to use it, I received an error message telling me I could only use Qt timer objects from code launched with QThread. Which apparently wasn’t the case with code running under the context of a QWidget within a QApplication.

I had hoped the Qt timers, working off of the QApplication event queue, would stay on the UI thread. But it appears they have to have their own QThread. I could put in more time to figure out how to get Qt timers to work, but I decided to turn to Python library instead. If I have to deal with multi-threading issues anyway, there’s no reason to avoid Python’s Timer object in the threading library.

It does mean I had to review my code to make sure it would be correct even if called from multiple threads. Since the important state are the status of the GPIO pins, they are handled by the pigpio library and the code in my app should be fairly safe. I do set a flag to avoid creating multiple Timer objects in the case of input bounce. If I cared about making sure I only ever create a single Timer, this flag should be protected against cross-thread access. But reviewing the code I decided it was OK if a few Timer ends up being created – the final result of reading the GPIO pin should still be the same even in the case of multiple Timers doing duplicate work.

(The project discussed in this blog post is publicly available on Github.)

Qt + Python = GUI for Raspberry Pi Project

Since the mission of the Raspberry Pi foundation is to “put the power of digital making into the hands of people all over the world” there is no shortage of options for programming the Pi. We have at our disposal many choices in programming languages, each with multiple application frameworks, and a large community of Raspberry Pi users for support.

QtLogoFeeling overwhelmed with options, I chose the one that best lines up with my long-term goal of getting up and running on ROS. The ROS plug-in architecture for operator GUI is rqt, based on Qt. And like much of ROS, the user has the option of working with rqt in either C++ or Python. Since I had started dabbling with ROS in Python before getting distracted, I thought the combination of Qt and Python would be a good direction to go.Python Logo

The Qt framework itself is aimed at C++ developers, and its documentation is written accordingly. Fortunately there are translation layers (language bindings) for Python. The one that seems to be the most mature is PyQt with a long list of resources, books, and online tutorials.

The next decision to make is which version to start learning. Browsing through the resources, it looks like Qt 4 is the mainstream version and Qt 5 is the new shiny. Since ROS is still in the midst of transitioning from Python 2 to Python 3, I assume rqt would be relatively old school as well. No matter which one I choose, there’ll be differences I have to tackle whenever I get around to diving deep into ROS. On the assumption that the latest and greatest versions are also the most polished (an assumption based on how Python 3 cleaned up a lot of architectural messiness of Python 2) I thought I’d start learning with the latest releases and make adjustments later as I need to.

So: Qt 5 and Python 3 it is, with the help of PyQt5 binding. Which is easily installed on a Raspbian Stretch system by installing the packages “pyqt5-dev” and “pyqt5-dev-tools”.

Placed First OSH Park Order

After several revisions – including several PCB layouts that were restarted from scratch – I’ve learned a lot about using KiCad.  I don’t know for sure it’s all going to work, but I feel confident enough to make the first revision of my board. If it comes back and the board doesn’t work, I’ll have new lessons to learn. Or if it does, I celebrate!

Off to OSH park!

They have a very KiCad-friendly pipeline that accepts the PCB data file directly, no file conversion or data export necessary. I was worried about file format compatibility since I am running the latest nightly build and OSH Park only officially supports the most recent stable build. Some people have reported issues, but in my case it seemed to have gone through successfully.

The OSH Park verification screen is a great confidence builder. They took my file and generated these images for me to look over. This is awesome! I can clearly tell that it is my design and it generally looks fine. The resolution is a little lower than I would have liked. It is starting to be difficult to make out individual traces on my board, it would obviously be impossible to do so on a large complex board. But I assume detailed checks are not the point, we just need to verify we haven’t uploaded the wrong board and that nothing’s fundamentally broken in OSH Park’s interpretation of it.

OSH Park Verify

Upon checkout I was surprised that two Teensy boards were available as add-ons to my purchase. I don’t know why the circuit board fabrication shop is selling their own edition of the Teensy board, but since I had been thinking about buying one to play with anyway, it was an easy impulse buy to add a Teensy LC to the basket.

And now I wait. The board should arrive in two weeks and I won’t know what I need to fix in KiCad until I get the board and put it to (in)action. This puts a hold on the PIC micro controller hardware side of the project, and I can turn my attention to something else for a while.

(The work described in this blog post are publicly available on Github.)

A Beginner Learns PCB Routing is Hard

Drawing up the circuit diagram/schematic was a new thing, but I got through it with minimal headaches and was feeling pretty good about using KiCad. After I was done with the first draft, I moved on to route all the connections to be placed on the printed circuit board (PCB). Doing this, I get firsthand experience that wire routing is a hard problem.

The first few connections were easy, but then it got progressively more difficult as I struggled to find a route for the later connections. The center of the board inevitably became a traffic jam and I started having to go around the jam. Every track that go around the outside perimeter of the PCB is a surrender that I couldn’t find a better way.

In addition to the traces going around the outside perimeter, another way to quantify my frustration with my circuit is the number of tracks in the KiCad PCB file. This is a number easily readable in the text format save file.

Fortunately, it doesn’t cost anything to learn by doing, redoing, and repeat.

The first attempt was a hopeless mess and I had to abort before I could connect everything. Here is version 2, where everything is actually connected with almost 200 tracks and multiple traces that go around the perimeter in a last-ditch effort.

LTC-4627JR I2C PCB v2

Version 3 changed the layout of the components in an attempt to make routing simpler. Moved the LEDs to the top, etc. It felt cleaner but is still quite a mess. I managed to avoid long traces that went around the left and right perimeters, but I still needed several at the bottom perimeter. And the track count didn’t improve by much – still just under 200.

PCB Route v3

Version 4 had the same basic layout as version 3 but I’ve learned to recognize a few signs of upcoming problems and could work to avoid them. The result had a further reduction in tracks, almost a 10% cut down to under 180. Plus I needed even fewer perimeter rescue paths.

PCB 4

The English language has the colloquialism “Paint yourself into a corner” and this is a very similar thing – it’s very easy to route yourself into a situation with no way out. I wish I could condense the lessons I learned into a summary here, but so far it’s just a lot of trial-and-error. Try something until I run into an obstacle, then try to figure out how to get out of this mess.

At this point the only words of wisdom I could offer is – dive in and try. It won’t work, but you’ll learn. Try and try again until you get good enough to get to a point where everything is connected, however inelegant it might be, and keep iterating to improve from there.

(The work described in this blog post are publicly available on Github.)

KiCad Circuit Diagram Schematic Editor (Eeschema) Amateur Hour

The KiCad Getting Started guide only covers the basics, but it’s enough to let the user embark on exploratory adventures to learn the rest of the tool piece by piece. I know I don’t have the knowledge and experience to do a good job at circuit design, but I’m a believer that such knowledge and experience is built up by learning from mistakes. So: let’s dive right in and try to implement the circuit board for my LTC-4627JR driver project and see what we learn.

The circuit diagram portion was relatively straightforward. Most of the lessons in the Getting Started guide applies, up to and including how to build a custom component for my schematic because the LTC-4627JR was not in the KiCad standard library. Somebody had built a library of components that included the LTC-4627JR, and made it available on Github. But this is a learning exercise and I wanted to learn how to do it myself.

The PIC16F18345 was not actually in the KiCad library, but a sibling part PIC16F18344 was available with a 20-pin DIP footprint, which is what I want right now. However, the eventual goal is to go to the surface mount version of the part and I hope I’ll be able to find another substitute with the same 20-pin SMD footprint.

There was no specific KiCad part for the 2N2222 transistor, but there are generic NPN transistors and I think that’s good enough. I was puzzled by the large number of options until I figured out they were different combination of a transistor’s pins. The three pins were labelled in order of pin number. So the variant tagged “BEC” has the base on pin 1, emitter on pin 2, and collector on pin 3. The “BCE” variant has the latter two pin swapped, etc. Looking at my 2N2222, I decided to use the EBC variant because that’s the order I see in the Wikipedia article.

The resistors were straightforward, as were the two I/O headers on the board. A four-pin connector for power, ground, and the 2 I²C wires. The five-pin connector is for the PICkit 3 to perform in-circuit programming.

From looking over schematics in the past, I got the distinct feeling of a stylistic convention for laying things out. Much like there are conventions for software source code. But a gut feel is not enough – I needed help from somebody to concretely spell out the rules. A web search for “circuit diagram conventions” pointed me to this article on Electronics StackExchange.

Armed with the list of conventions and a few hours to bump my head in KiCad, I got a passable basic schematic.

LTC-4627 I2C schematic

(The work described in this blog post are publicly available on Github.)

LED Practice Exercise May Have Niche Market

I set out to program a PIC to implement an I²C-controlled 4-digit 7-segment LED display because I thought it would be a decently nontrivial practice project to help me learn. I had fully expected it to end up duplicating the functionality of a commercially available product that does it better for a fraction of the price.

Now that my project is in a decently functional state, I went looking for that commercial product to see what else I can try to imitate for the sake of practice. I was surprised that nothing immediately stood out as both “does it better” and “fraction of the price”.

The first item I found was sold by Adafruit. They have an I²C LED display “backpack” in various colors. Here’s the green version, as one example. The driver chip they used is the MAX7219, which I found curious because the data sheet for the chip does not mention I²C communication. Another curious item is that the complete kit – including populated circuit board and LED – has a list price of $9.95 but if I want to buy the MAX7219 by itself from Adafruit it costs the same $9.95. Digi-Key sells the chip for around the same price. I doubt Adafruit get their circuit board and LED for free, so there’s something else I’m missing.

But I couldn’t have used that chip anyway. The MAX7219 is for driving a display unit with common cathode, and LTC-4627JR is a common anode unit. Also, Maxim is telling people to migrate their designs to the MAX6950, which seems to be a surface-mount only chip with no DIP form factor available.

Looking over Sparkfun catalog I found a similar product, but theirs is controlled by an ATMega328 chip. In fact, it is a baby Arduino complete with the Arduino bootloader. This is closer to what I’ve built, but I think the PIC is a simpler and less expensive chip to perform the task which may mean a small niche below the Sparkfun unit.

All this hints at the possibility my project might actually find an audience as a product. If I were to go ahead with this, I would test the market by putting it up on Tindie. It’s a marketplace that seems to cater to the right audience and there doesn’t seem to be a direct competitor product at the moment.

Well, that was unexpected. I might as well keep going and see how far I can take this.

IMG_5255

MPLAB Xpress vs. MPLAB X: Git Source Control

MPLab Xpress IDE LogoI loved the promise of MPLAB Xpress that someday I can do all my PIC development in the cloud. Even in today’s limited form, as long as I stay within certain boundaries I was able to work on PIC programming on a Raspberry Pi! But one downside of keeping the project sources up on Microchip’s servers is that they don’t currently offer any kind of source code version control. I understand why they might not prioritize it for the hobbyist crowd getting started in PIC programming, but version control is something I’ve grown used to having in my software development toolbox. And I occasionally miss being able to review and rewind certain things, even in the relatively simple beginner’s PIC projects that I’ve worked on to date.

MPLAB X logoSo after I inadvertently damaged my MPLAB Xpress Evaluation Board, I decided to graduate to using PIC chips directly without an evaluation board. This meant programming the chip using a PICkit 3 instead of the USB storage-based programmer on the evaluation board. And lastly – it also means leaving the web browser-based MPLAB Xpress and moving over to the NetBeans-based MPLAB X IDE installed and executed locally. One result is that the project files are now on my computer, which means I can bring git into the picture!

Obviously git can handle the C source files that I will be working with. What’s less obvious are the other data files in a MPLAB X project. What is worth tracking in version control, and what are easily regenerated as needed? Such information are usually described in a .gitignore file, but Github’s .gitignore collection does not include one for working in MPLAB X.

Fortunately, the MPLAB community has assembled one and it looks OK to me at first glance. I first dipped my toes using a project that was already complete, pushing it up to Github for archiving the sources. It also allowed me to test that all critical information is preserved, by deleting the directory and “git clone” anew to verify MPLAB X is happy with everything and didn’t complain about files missing from the project.

The second trial run incorporated git from the start, tracking changes along the way so I could see what was boilerplate generated by the tools and separate them from the (quite trivial) code I actually wrote. This test is also successful.

And now, trial run number three: take all the 7-segment LED control code I’ve been working on in MPLAB Xpress and translating them into a MPLAB X project in a way that tracks all the individual tasks along the way.