After reviewing RX-8 owner forums, I feel I have a good idea how to tackle my project: swap out my 2004 Mazda RX-8’s factory navigation system LCD screen for a modern wireless CarPlay/Android Auto receiver. The first order of business is to extract that existing factory navigation LCD assembly, which required taking apart many pieces of interior trim. Such extensive disassembly was needed because Mazda designed the center console as a series of overlapping pieces. Each one had to be removed to uncover fasteners for the next one.

The first step was easy: unscrew my manual transmission shift knob. (I have no idea what this looks like for RX-8 with automatic transmission.)

Upper console panel surrounding the shifter is held only by clips, so it can be loosened by careful prying. No screwdriver necessary. Once loosened, I unplugged three electrical connectors: the navigation control panel, and seat warmer switches for driver’s side and passenger side seats.

A salute to the Mazda engineers who put in extra effort to make it extremely difficult to mix up the driver-side and passenger-side seat warmer controls. Not only are they differentiated by color (black for driver’s side and white for passenger side) they are also physically keyed differently. The driver’s side had two shallow channels, the passenger side had one deep channel and one blocked channel.

Now we can access the two screws holding the ashtray panel in place.

There are three electrical connections to the ashtray panel. One for the cigarette lighter socket, one to illuminate that socket, and one to illuminate the tray. I could not extract the tray illumination assembly, but I eventually figured out it was much easier to remove the bulb.

With the ashtray panel out of the way, we can access two screws holding the center panel (with audio and HVAC controls) in place.

Before we can slide the audio head unit + HVAC controls module out, we have to take a side detour to the driver’s side footwell. Just under the steering column is a plastic panel held by clips, and behind it a metal bracket held by these four screws.

Then we can stick our head down there. Looking towards the center console, we can see a single 10mm bolt in the side of the audio head unit that must be removed. Don’t get distracted by the two nuts. Theyare much more easily accessible but will not help with this task.

Once that bolt is removed, I pulled on the panel to release four clips at these marked locations. Because this panel is glossy black, I was wary about using prying tools and didn’t use them. This was a mistake: in order to loosen the top two clips, I pulled too hard on the glossy panel and damaged it. (Though I wouldn’t realize it until later.)

Once loosened, I reached my hand behind this panel to unplug all the electrical connectors. From top to bottom:
- Connector to the LED status screen.
- Small round AM/FM antenna connector.
- Large rectangular connector for power, speakers, etc.
- Beefy connector directly behind the fan speed knob, presumably for fan motor.
- Smaller connector, presumably for remainder of HVAC controls.

After extracting the audio/HVAC panel, I could access two screws holding the center ventilator grille.

Once that’s removed, I could finally access the two screws holding the navigation LCD unit panel.

Beyond those two screws, the panel is held by copious clips all around. Loosening them allowed access to unplug three electrical connectors from the navigation LCD unit:
- Beefy grounding cable
- Power and communication with the navigation computer between the rear seats.
- Center console control panel that sat just behind the shifter.

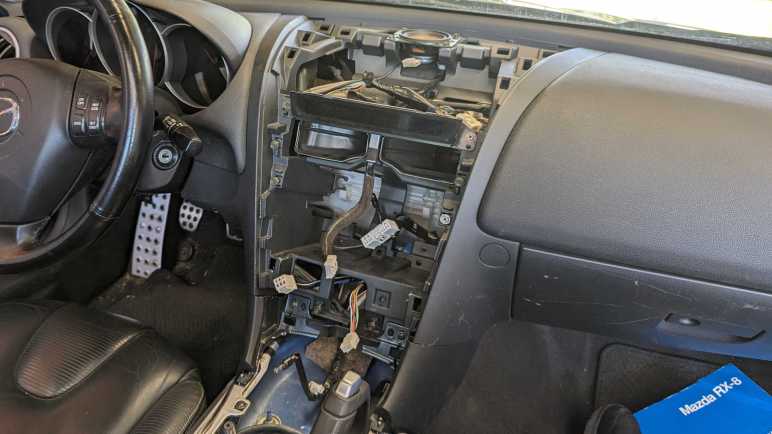
The navigation LCD assembly is now freed.

A view of the cavity formerly hosting said assembly. This view also shows location for all the clips.

Someone more familiar with this system might be able to remove the navigation LCD panel without fully disassembling everything as I did. For example, in hindsight the shifter surround panel could probably move enough to allow access to ashtray panel screws without disconnecting seat warmer and navigation control panel connectors. But I didn’t know that at the time, and I was curious to see what’s behind these panels.
Next, the newly freed navigation LCD assembly is moved to a more comfortable work area for further disassembly.
