Hackaday Badge Nyan Cat Needs A Diet

Now I’ve got Nyan Cat animation running while playing a simplified adaptation of the Nyan Cat music on my Hackaday Belgrade 2018 badge. I started writing run-length encoding on Friday, had a crash course in reading sheet music on Saturday, and by end of Sunday I had music and animation loop running together. This is roughly the same timespan that will be available to people putting their own projects on Hackaday Superconference 2018 badge, I just had the opportunity to do it a week ahead of time.

The original intent was twofold: One, to give myself some hands-on familiarity with the badge code base and two, have Nyan Cat project code available for other badge hackers as reference. I originally planned to have Nyan Cat up on Github for people to look at, but with this success my ambition grew: can this musical pop tart cat be part of the default badge firmware?

The greatest constraint on badge firmware is available space. Before I started this exploration, I hacked and slashed a bunch of features to make things lightweight, but if Nyan Cat is to be on the basic badge, it must coexist with all those features I had cut. And there isn’t enough free space for >30 kilobytes of Nyan Cat.

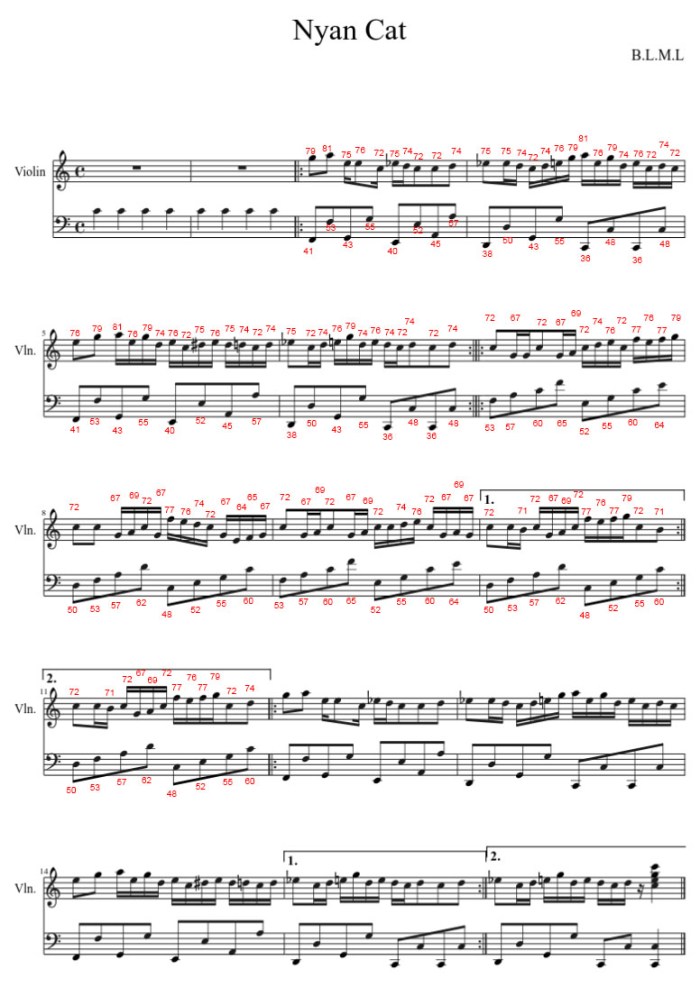
The majority of that space were consumed by run-length encoded animation frames, so that’s an obvious place to start. Code – both on encoding and decoding – most easily accommodates even power-of-two reductions. Nyan Cat is a blocky little kitty and should preserve well in downscaling from full resolution (320×240) to half (160×120), quarter (80×60), and eighth (40×30.) Here they are displayed in their pixel dimensions.

PoptartcatPixel

And here they are with pixels scaled up to fill a 320×240 screen, as it would on the badge.

PoptartcatScaled

There is visible degradation from full to half resolution, but not terrible. Nyan Cat starts getting pretty blocky at quarter resolution, but still recognizable. Eighth resolution is not usable.

So it looks like quarter scale is the sweet spot to target. This reduces the animation data from over 32 kilobytes to a little over 8 kilobytes. The music data and the program to bring it all together adds roughly another 2 kilobytes. It’s a good start but there is still room for improvement.

(Cross-posted to Hackaday.io)

Hackaday Badge Nyan Cat: Playing the Music And Animation

I found Nyan Cat song sheet music transcribed by a musescore.com contributer and translated it into scientific pitch notation used by the Hackaday Belgrade 2018 badge for use on its successor, the Hackaday Superconference 2018 badge. Now I have to figure out how to actually play it.

The first reference was the “play” button on musescore.com. When playing the song, the web page also highlights the current measure being played. This information may be obvious to experienced musicians, but super helpful to newcomers like myself trying to decipher sheet music. With this highlight tool, I could see which measures are played and the patterns in which they repeat to build the Nyan Cat song.

The second reference was the existing “mario” song on the badge, which showed one way to organize a song in code. Each measure is in its own array, and music playback consists of making calls to play measures in a particular sequence. I built on top of this idea and built another array nyancat_measures[] around them for convenient indexing. Then a separate array nyancat_sequence[] was created to track the order in which to play the measures. Playing the song would then be a matter of walking the sequence array in order and play each indexed measure as we go.

And finally – it’s time to put the sights and sounds together! The Nyan Cat badge app runs in a tight infinite loop checking the time via the millis() API. The video playback speed is controlled by one variable time_for_next_frame tracking the time for the next frame, and now music playback will be tracked with time_for_audio_update.

Is this perfect? No.

Unpacking and rendering a frame of animation takes a few tens of milliseconds. Occasionally this overlaps with a desired music start time, causing a note to end up playing a touch too long. The converse is also true – if music processing is underway at a desired animation frame time, there will be a brief animation glitch.

But it’s good enough for a badge hack.

NyanCatMusic-V

(Cross-posted to Hackaday.io)

Hackaday Badge Nyan Cat: Reading the Music

The Hackaday Belgrade 2018 badge (and its successor, the Hackaday Superconference 2018 badge) has a simple audio system driving a speaker with up to three simultaneous tones. In order to give the Nyan Cat animation an appropriate soundtrack, I’d need to reduce its YouTube soundtrack to a few simple notes. Fortunately, people who are more knowledgeable about music have already done the work and shared them in sheet music format.

But there was a big problem: neither [amybaldwindev] or I knew how to read music.

We did what anyone would do in this day and age: search for “How to read sheet music” and read the first link. For the purpose of this specific project, I was not concerned with understanding the notes on the staff as I only needed to match them up against the reference chart on the badge music page. The duration of each note, however, proved more challenging. On several occasions we thought a note sounded wrong but it turned out just to be their duration

We started with a piano adaptation, but several attempts at translating it to badge music format failed to create something that sounded like Nyan Cat. Eventually we switched to this version – intended for violin – whose translated result running on the badge sounded like we were on the right track.

NyanCatMusic-V

(Cross-posted to Hackaday.io)

Hackaday Badge Nyan Cat: Finding the Music

poptartcat320240I’m quite happy I got the Nyan Cat animation up and running on my Hackaday Belgrade 2018 badge, in preparation for putting it on my Hackaday Superconference 2018 badge. But the Nyan Cat experience is not complete without the catchy cutesy music. That music was an important reason for choosing Nyan Cat as the project.

Since Nyan Cat is an YouTube sensation, the obvious search for music information started with YouTube. Quite a few people have translated the music into piano and while a lot of notes go by very quickly, the simplified versions of Nyan Cat music seem to require no more than 2 keys at any given time.

This can be translated to fit on the badge, using two voices and one voice to spare. It leaves the door open to reuse the third audio timer for some other task.

It wouldn’t be hard to translate the piano keys from the YouTube video. Tedious, but not hard. Fortunately there are internet resources other than YouTube. A search turned up the web site musescore.com full of songs in sheet music format. Each of which was contributed by an user on the site and, given Nyan Cat’s internet fame, it was not a surprise that there were multiple takes on translating the catch tune into sheet music format.

This is an excellent place to start.

(Cross-posted to Hackaday.io)

Hackaday Badge Nyan Cat: Simplicity Pays Off

poptartcat320240I’m adapting the Nyan Cat animation to the Hackaday Belgrade 2018 badge (close predecessor to the Hackaday Superconference 2018 badge) and I chose to simplify the animated GIF data to a simple run-length encoding. RLE doesn’t compress as much as GIF, but it makes the decode algorithm simple. A simple algorithm takes up little program memory on the PIC32, and more importantly, it takes up less of my time coding and debugging. The latter is quite important when I’m trying to do something within the timeframe of a single weekend, as most Supercon badge hackers do.

The simplicity paid off when I wrote the code – just a few lines and only a few variables – and ran it on my Belgrade badge. The first test only decoded part of the first frame. I was actually quite surprised when the face of a cartoon cat looked back at me from the badge LCD! It is rare when a chunk of code works immediately on the first try.

After the first partial frame was proven to work, I extended the for() loop to the entire image, then I wrote an infinite loop to cycle through all 12 frames of the animation. I made the design decision for code simplicity and it paid off tremendously. Drastically reducing the time spent on implementation and (quite unexpectedly) completely eliminated the time spent on debugging.

If I had tried to port a GIF decode library I’m certain I would have needed to spend more time getting the code to compile and run on the badge, and it would not have been fun to debug if anything should go wrong.

This project’s progress is publicly visible on Github.

(Cross-posted to Hackaday.io)

Hackaday Badge Nyan Cat: Run Length Encode Is Good Enough To Proceed

poptartcat320240At first glance, converting the Nyan Cat animated GIF to a run length encoded image doesn’t make a lot of sense: I’d need to decode the GIF at some point anyway, why go through the effort?

The key point is that the conversion process can be done on a desktop PC, with far more powerful and user-friendly tools. Yes, I could have done the work to port a GIF library to the PIC32 chip running the Hackaday Superconference 2018 badge, but on a desktop computer I could fire up Python, “from PIL import Image“, and be off and running manipulating a decoded GIF image sequence.

Once I got over the (small) hump of initial learning, it was easy to write a Python script to do everything I wanted to do to the image:

  1. Downscale from original 400×400 resolution to 320×320
  2. Crop off the top and bottom to obtain a 320×240 image
  3. Perform run-length encoding of resulting image.
  4. Output encoded bytes.

In step 4, the output comes in the form of text: specifically, C source code. Each encoded image is a static C array declaration that I could copy and paste into MPLAB X for storage into PIC32 program memory.

I had hoped the simple GIF would compress well with run length encoding, and the first results were quite promising: a little over 2 kilobytes for the first frame, and there are 12 frames in total implying the neighborhood of 24-28 kilobytes.

The original Nyan Cat GIF takes up 30 kilobytes. Granted, it is higher resolution and different aspect ratio, but this is going to make the PIC32 side programming far FAR easier. Which not only makes it easier for me to write, but also for others to read and understand in a little demo. I’m willing to trade a bit of space for those benefits.

(The Python script used for Nyan Cat encoding lives in this minimal Github repository.)

(Cross-posted to Hackaday.io)

Hackaday Badge Nyan Cat: GIF or Not?

With the decision to adapt Nyan Cat to the Hackaday Belgrade 2018 badge (as preparation for the Hackaday Superconference 2018 badge) it’s time to get down to some implementation details. Obviously we start with the cat – the original animated GIF is widely available. Can we use the file as-is?

poptartcat320240Looking at the GIF, it was drawn at 400×400 resolution. The badge LCD has a native resolution of 320×240, so the aspect ratio is wrong and the resolution is lower. In Photoshop I tried cropping the animation to see how that looked. I didn’t miss the cropped starry sky but I do miss the cropped rainbow trail. So let’s scale instead of crop.

The next question is: what file format? Do we stick with original GIF or something else? Raw bitmaps are out of the question. They would consume far too much valuable real estate on the badge. Rendering GIF would require porting a GIF decode library. When I was looking around for projects that decode GIF on a PIC32, I found the XORYA project which used libnsgif.

Looking over libnsgif dependencies, at first glance everything looks doable on the badge. This library was built to be part of the larger NetSurf project but it has abstraction layers that helps make badge adaptation easier. It looks like work, but a manageable amount of work.

But while it would be instructive to port an existing library for use, I lean towards doing something simpler to keep the demo approachable. So before I tackle the task of porting a GIF library, I wanted to evaluate run-length encoding. It is is the easiest compression algorithm available, making for code that is easy to read and understand. And this particular animation – with large horizontal streaks of the same color – seems ideally suited to the approach.

(Cross-posted to Hackaday.io)

Hackaday Badge Project: Nyan Cat

OK, enough probing and learning and experimenting with the Hackaday Belgrade 2018 badge, it’s about time I start writing something that I can put on its successor Hackaday Supercon 2018 badge. What to do?

For the purposes of a badge demo, it should explore areas of badge programming that aren’t already present in existing badge firmware. Because that’s what “demo” means – a demonstration.

I had been fascinated by the LCD module from the start, and the more I learn about it the more I feel it’s been under-utilized by existing badge code. In keeping with the retro computing theme, almost everything on the badge are text-based, leaving the graphics capabilities of the badge largely unused. The ideal project would flex those visual muscles.

Another point of novelty on the badge is the audio subsystem, consuming three of five timers, even more of the precious I/O pins on the chip, it’d be a shame to waste all those resources. I want to make it sing.

poptartcat320240So, what sights and sounds shall I present as a demonstration? A brainstorming session with [amybaldwindev] produced a list of candidates. The top candidate was Nyan Cat the famed YouTube star. Now, the badge won’t be able to play a YouTube video nor play its corresponding sound track. But the video’s source was a relatively simple animated GIF, and others have already done work to simplify the soundtrack.

Adapting an internet meme should make the result appealing to the Superconference audience. Making it an interesting technical demonstration project would almost end up being just a side bonus!

The only downside is that it doesn’t fit with the retro computing theme, but I can live with that.

(Cross-posted to Hackaday.io)

Hackaday Badge LCD Screen 4: Hunt for Speed Led To NES Project

Now that I have a better idea of programming against the LCD screen in the Hackaday Belgrade 2018 badge (similar to upcoming Hackaday Superconference 2018 badge) I went searching online for other people’s projects. The idea is that, with my newfound knowledge, I can better comprehend other projects.

Disappointingly, I wasn’t able to find many projects online, but the lack of quantity is made up by the quality of one extremely interesting project: someone tried to put a NES (Nintendo Entertainment System) emulator on the Belgrade badge. And a lot of the work went into increasing frame rate to be appropriate for Nintendo games.

My newfound knowledge turned out not to apply – the author has tore up major portions of the code base in order to fit in the arcade emulation layer. But reading the Github commits, I can tell that a major breakthrough was making use of a PIC32 feature called PMP (Parallel Master Port).

Microchip PIC32 PMP

Designed precisely to help interface with peripherals like a LCD screen, this peripheral can take over large data transfers (like sending data to a screen) without the CPU being directly involved as when running tft_fill_area() in disp.c. Looks like the performance advantage is twofold: first, PMP can update data and clock pins faster and more efficiently than doing it in CPU. And second, this frees up CPU to work on another task while PMP handles the transfer at the same time.

Further reading of work history indicated this person has also ran into screen tearing issues in the absence of VSYNC, and this problem was left to be solved later. And how did they create a buffer for PMP to transfer, when there isn’t enough for a full screen buffer? They didn’t use the full screen: the game only renders in a center rectangle subset of the screen.

I saw a burst of activity around Hackaday Belgrade in May, but activity stopped after June 4th. I’m inferring this has become an abandoned project.

Curious if I could take the project further, I cloned the repository, opened up the project in MPLAB X, and hit compile. And that’s when I found the final roadblock: as part of the hunt for performance, this person also changed code to require code optimization features of the paid version of PIC tools. I could not compile the project on my free tier.

Oh well, that was a fun detour, but I guess it’s time to get back to focusing on what I can actually use for Hackaday Superconference 2018.

Hackaday Badge LCD Screen 3: Establish Maximums

Examination of the LCD screen on the Hackaday Belgrade 2018 badge (predecessor to upcoming Hackaday Superconference 2018 badge) continues! Previous post highlighted some important tidbits from Reading The (Fine) Manual on components, now it’s time to get hands-on and get some experimental data. The default “user program” on the badge showcased a small bitmap operation that works one single pixel at a time. This is very inefficient and takes almost 2 seconds to fill the screen. I’m confident the badge can go faster, so let’s test how fast.

Maximum frame rate: ~80fps

Our tool for these tests is tft_fill_area() in disp.c. This function is used to fill a screen area with a single color, such as when clearing the screen. Looking at the code, we see it is sending 320 * 240 pixels of color data using a single fixed value. The fixed value means this is as fast as we’ll ever be able to fill the screen via existing interface configuration. Anything more complex will require computation that takes more time – and slower – than using a single fixed value.

A test program to cycle filling through all the RGB values shows that it takes about 3 seconds to traverse the 256 values of a single byte. 256 / 3 ~= 80 frames per second. Of course, frame rate for real tasks will be slower, but this isn’t bad at all and gives confidence it’ll be fine to stick with existing interface configuration. I’ve also confirmed visual artifacts from updating the screen so quickly without VSYNC. On a screen that’s supposed to be filled with a single color, we see diagonal rendering artifacts.

Hackaday Badge LCD Refresh Artifacts

Render-by-line frame rate: ~30fps

Since we don’t have enough memory for a full screen 32-bit buffer (and we don’t have VSYNC to make good use of it anyway) it’s time to scale down ambitions. Single pixel operations like the default demo program are too slow. So let’s go with a convenient middle ground between per-pixel and per-screen: operate at per-line level. A 32-bit buffer, for a single line of 320 pixels, would take only 1280 bytes (1.25 kilobyte). Well within our memory budget.

The test program will be doing a little bit of work, filling the line buffer with a pattern before sending the line to screen. It’ll also invoke the transmit overhead 240 times (once per line on screen) more than the single-screen operation, so I expected it to be slower. How much slower? It now takes about 8 seconds to run through 256 values of a single byte. 256 / 8 ~= 30 frames per second. This frame rate is more realistic, and still a decent speed for modest projects.

But some people will always push for faster. Has anyone applied that spirit of performance to the badge? Let’s look around the web…


Hackaday Badge LCD Screen 2: Documented Limitations

Now that I’ve completed my overview of the Hackaday Belgrade 2018 badge (which the upcoming Hackaday Superconference 2018 badge is very close to) it’s time to dig deeper. First topic for a deep dive: that LCD screen. In my earlier brief look, I only established that the screen is fully graphics capable and not restricted to text only. What kind of graphics can we do with this?

18-bit panel, accepts 24-bit color

First topic: color depth. The default badge firmware’s BASIC programming interface seems to allow only 16 colors which the documentation called “EGA colors”, see color_table[16] in disp.c. I was confident a modern LCD module has more than 4-bit color, and page 2 of the LCD module datasheet called itself a “262K color display.” That works out to 18 bits, so the panel native color depth is likely 6 bits red, 6 bits green, 6 bits blue. However, it is not limited to taking information in 18-bit color, the display can be configured to communicate at a wide range of bit depths. Looking in tft_fill_area() in disp.c, we can see the existing firmware is communicating in 24-bit color. 8 bits each for red, green, and blue.

Not enough memory for full 24-bit off-screen buffer

If we don’t want to change modes around on the fly, then, we’ll need to work with the panel in 24-bit color. Standard operating procedure is to draw using an off-screen buffer and, when the result is ready for display, send the buffer to screen in a single fast operation. A 24-bit off screen buffer is usually done with a 32-bit value representing each pixel with ARGB, even if we’re not using A(lpha) channel. 320 wide * 240 high * 32 bits = 300 kilobytes. Unfortunately, the datasheet for our PIC32 processor shows it only has a total of 128 kilobytes of memory, so the easy straightforward full screen buffer is out of the question. We’ll have to be more creative about this.

NHD-2.4-240320CF-CTXI LCD module wiring diagramNo VSYNC

But we wouldn’t have been able to make full use of an off screen buffer anyway. We need to send buffer data to screen at the right time. If we send while the screen is in the midst of drawing, there will be a visible tear as the old content is partially mixed with the new. The typical way to avoid this is to listen to a vertical synchronization signal (VSYNC) to know when to perform the update. And while the ST7789 controller on board the LCD module has provision to signal VSYNC, the LCD module does not expose VSYNC information. There may be some other way to avoid visual tearing, but it ain’t VSYNC.

These limitations, which are relatively typical of embedded electronics projects, are part of the fun of writing software for this class of hardware. Sure, it is a limitation, but it is also a challenge to be overcome, a puzzle to solve, and a change of pace from the luxury of desktop computers where such limitations are absent.


Hackaday Badge Firmware Diet

I now have a basic understanding of Hackaday Belgrade 2018 badge‘s internal subsystems and how they fit together. Now it’s time to start playing with the code. First to validate understanding before trying out some cool stuff.

When I’m in the early stages of experimentation and understanding, it’s good to make the try/learn/repeat loop as fast as possible. In the case of playing with badge firmware, flashing new builds of the firmware becomes the most time-consuming part of the loop. In order to speed up the fun I’m going to trim off parts of the project and make a lighter weight version of badge firmware.

My primary interest is in writing custom user programs in C. These programs utilize the same low-level infrastructure (font display, scan keyboard, etc) as the BASIC interpreter and Z80 emulator. Since I’m less interested in BASIC or Z80 at the moment, those are the biggest parts I can trim.

Begone, Z80

Begone, BASIC

I’m also trimming Tetris blocks-dropping game and the snake game. Not because they take up a great deal of room or time to compile, but just because they are well-defined chunks that I can easily remove.

Begone, snake

Begone, Tetris blocks.

Once the above parts have been trimmed, compile and build times dropped noticeably and flashing a new firmware now takes a fraction of the time.

I hadn’t set out to free up program space and memory, but they were happy side effects. Anyone working on user programs and feeling short on elbow room might consider doing what I did to free up space. Here’s what the MPLAB X dashboard shows for memory consumption after the trim:

Badge Firmware Trimmed

It is quite lean when compared against the default badge firmware:

Badge Firmware Full

If anyone else wants to look at my crude hack-and-slash job, it’s up on Github.


Hackaday Badge Expansion Header

The upper left corner of the Hackaday Belgrade 2018 badge is a series of standard 0.1″ pitch electric connection pins that serves as a portal to the world of hardware hacking projects. When the onboard peripherals aren’t enough, external accessories connect here.

Hackaday Badge Expansion Header

There’s also a less exotic use – the five pins on the left (RES / +V / GND / B0 / B1) serve as the firmware upgrade connection for the PIC32 processor. We connect a programmer (like the PICkit 3) to these five pins to reprogram the badge. But when the programmer is not connected, these pins can find secondary use in hardware hacks.

Hackaday Badge Expansion Header

The center pin RES(ET) goes to the hardware reset pin so that’s useful if we want to connect an external reset switch.

+V and GND is the voltage source and ground. With the pair of AAs present, these pins act as power sources for external components. If the AAs are absent, these pins can accept external power. Do note, though, that there’s no voltage regulation on the badge so +V/GND has to stay within the voltage range tolerated by badge components.

C13 and C14 are set up for serial communication. These are the most widely accessible of the expansion pins, usable from BASIC uin and uout, Z80 emulated CP/M machine via xmdem, and C user programs via rx_read and tx_write at the end of hw.c.

The remaining four pins are explicitly labeled as expansion pins 0 (G2), 1 (G3), 2 (B0), and 3 (B1). Accessible from BASIC with the edr / ein / eout commands and accessible from C user programs with exp_ddr / exp_get / exp_set functions in hw.c.

I see “I2C” written on top of G2 and G3, along with labels of SCL and SDA, but I have yet to find any actual I2C support infrastructure on the badge firmware. Maybe this is coming in later?

Also note that while G2 and G3 have minor protection in the form of a 220 ohm resistor, B0 and B1 are ‘naked’. Those expansion pins are connected directly to the corresponding PIC pins and officially must be free from external components when used for programming purposes. Typically this means they’re unused or disconnected from peripherals during programming, though there are ways to use them and still follow specifications. For example, they can be connected to a normally-open switch. As long as the switch doesn’t close during programming, everything should be fine.

Hackaday Badge Data Storage

The PIC32 chip at the heart of Hackaday Belgrade 2018 badge has a fixed program memory for storing machine code. There’s also a pool of random access memory for program data during execution. But what happens to user data? It wouldn’t belong in fixed code memory, and if it is kept in RAM it would be lost when the battery is removed.

The answer is a small block of nonvolatile memory that the user can read and write but would also maintain their data when the chip is shutdown or reset. It is a little chip with eight legs that sit to the right of the main PIC32 processor who has many more than eight legs.

Hackaday Badge Storage

A comment block in badge_settings.h outlines how this flash memory storage is allocated by the default badge firmware:

/*
* FLASH organization is as follows
* 0x000000-0x003FFF - first slot
* 0x004000-0x007FFF - second slot
* ...etc
* 0x03C000-0x03FFFF - 16-th slot
* 0x040000-0x07FFFF - empty space
* 0x080000-0x0FFFFF - D disk of CP/M machine
*/

The slots refer to BASIC program storage, where users can load from and save to up to sixteen BASIC programs, up to 16 kilobytes each. (BPROG_LEN) These 16 slots * 16 kilobytes takes up the first 256 kilobytes of flash memory. (0x00000-0x3FFFF) The second 256 kilobytes (0x040000-0x07FFFF) are unclaimed and available for custom user programs to use. The 512 kilobytes that follow (0x080000-0xFFFFF) is exposed as drive D: of the Z80 emulator running CP/M.

Custom user programs that wish to access that 256 kilobytes of unclaimed flash memory can access that space by referencing the code used to load and save BASIC programs. Flash memory can be read from, written to, and erased using the fl_* series of functions in hwz.c. See basic_save_program and basic_load_program in badge.c.

If a custom user program needs more than the available 256 kilobytes of flash memory, it’d have to take away from some one else… or does it? There’s one piece of mystery at hand. The memory allocation described above (256 kilobytes for BASIC, 256 kilobytes unclaimed, 512 kilobytes for CP/M drive D) add up to 1 megabyte. Is that all of flash storage?

Yes. No. Maybe.

Hackaday Badge StorageThe schematic and silkscreen on the Belgrade badge both name the flash chip as MX25V1635F. The datasheet for this chip indicates it has 2 megabyte capacity. However, the number actually printed on the chip is AT25DF081A, which is a 1 megabyte chip. The chip identity was confirmed by the badge Bill of Materials on Findchips.

But for the Hackaday Superconference badge, the flash chip is quoted to be a Microchip SST26VF016BT, which is a 2 megabyte chip. Maybe we’ll have a second megabyte of flash to play with at Supercon!

Hackaday Belgrade flash chip

Hackaday Badge Keyboard

The most visible physical feature of the Hackaday Belgrade 2018 badge, taking up most of the space on its circuit board, is an array of tiny little tactile clicky buttons making up a QWERTY keyboard. This is where badge hackers can type in BASIC programs and run them for an easy entry into this badge’s retrocomputing theme.

I’m no electronics expert, but I’ve seen enough circuit boards to recognize the convention for components to be lined up nicely in a grid. The keyboard buttons didn’t follow this pattern and sat at a slight angle. I had thought this was done just for aesthetics, standing apart from convention, but I was wrong. There was a functional goal at work: the slight angle allowed the button’s pins to be staggered and thus packed more closely together. Neat!

Hackaday Badge Keys

Electrically, most of the keys are laid out across a matrix of 10 columns and 5 rows. This allows the PIC32 chip to detect any single press of these 50 buttons using just 15 pins on the chip. The default firmware has a timer that fires regularly for household maintenance, and one of the tasks is to scan these pins for keyboard activity in function keyb_tasks in hw.c. Each timer slice checks one row on the keyboard, so it may take up to five time slices to scan the entire keyboard.

This is simple and efficient, but only works properly when one key at a time is pressed. When more than one key is pressed, the combination is ambiguous. For example, the following key combinations:

Hackaday Badge Keyboard Main

  • E + D
  • E + D + R
  • E + D + S
  • E + R + S
  • E + D + R + S

Would all light up the same four pins: B10, B11, B13, and B14 and there’s no way to tell them apart. This ambiguity will present a challenge for projects that require multiple simultaneous key presses. For example, some games require the user to press up and right simultaneously to command a movement to the upper right. Fortunately, this specific scenario is possible because the arrow keys are all on the same row, so a game that depends on arrow keys has to implement a custom variant of keyb_tasks that scan just pin F4’s row for one or more arrow keys. However, other typical sets of game directional keys (“WASD” and “IJKL”) could not be supported in the same way.

Hackaday Badge Keyboard Other

A few special keys on the keyboard have their own pins and read by other places in the firmware. The power button, break, and each of the two shift buttons have their own pin. The reset button is wired in series with the left shift key, so they both must be pressed to reset the badge. They do not share the D10 pin as the schematic might be interpreted to imply. A press of left shift + reset actually goes to MCLR pin, the PIC32 chip’s hardware reset guaranteeing that reset always works regardless of any potential firmware bugs.


Hackaday Badge Power Source

When I got the Hackaday Belgrade 2018 badge playing music, I noticed the LCD screen brightness would visibly pulse when a note is playing. I thought it might be an intentional visual effect to go with the beat of the music, but I didn’t see any sign of code to do so intentionally. The next most obvious explanation, then, would be a dip in screen supply voltage when the speaker amplifier is drawing power.

Hackaday Badge Power

If this is the case, then the problem should be related to voltage regulation on the badge. Can we improve on this situation? I looked on the schematic for the voltage regulator and… hmm… there doesn’t seem to be one.

It looks like the badge is running directly on the pair of AA batteries. The positive terminal is the voltage supply rail, and the negative terminal is the ground plane. So there isn’t anything working to keep the supply voltage constant when the battery level dips, and users see a change in LCD screen backlight brightness.

The lack of voltage regulation also means the most obvious power upgrade carries some risk. Last year’s Hackaday camera badge saw several upgrades from its pair of AA batteries to a single lithium ion battery cell. We were cautioned against doing it, but some people went ahead anyway and seemed successful.

With the microcontroller knowledge I learned over the past year, I understand the warning: The PIC32 chips at the heart of both badges are 3.3V parts and according to their datasheet, they are only officially rated for operation at up to 3.8V. A lithium ion battery cell’s nominal voltage is 3.7V which would be fine. But (and this is a BIG BUT) a fully charged lithium ion battery cell delivers 4.2V directly. This is well into “At Your Own Risk” territory.

So yeah – last year some people connected a lithium cell and that seemed OK, but it’s going beyond spec. I expect that some people will again perform the same upgrade to their badge this year. Personally? I’m not going to do it.

If I need to power my badge with anything other than AA batteries, I’ll remove the AA pair and power the badge through its expansion header. The +V pin connects directly to the supply rail, and GND connects directly to the ground plane. Putting a 3.0-3.3V regulated voltage on those pins should power the badge nicely.

Note that in this case, when I disconnect the external power supply the AA pair will still need to be reinstalled for a firmware upgrade, as the programmer (PICkit 3 or similar) is not able to supply enough power to run the badge.

Hackaday Badge LCD Screen

The main user interface for the Hackaday Belgrade 2018 badge is the LCD screen up front and center. Looking at the badge’s main menu, we can tell it can display text characters. 40 columns in width, and 20 rows in height according to DISP_BUFFER_WIDE and DISP_BUFFER_HIGH in hw.h. This is just a little under an Apple II’s capabilities, which are 40 columns wide and 24 characters high.

Hackaday Badge Main Menu Straight

Based on badge startup animation and the user program demo art, this screen is not strictly limited to character display. However, at first glance it’s hard to tell if what we saw are creative text art or if we can do general purpose graphics on this screen. Where can we get this information? The datasheet for the screen, of course. Based on the badge schematic, we have a model number to use in a web search.

Hackaday Badge LCD

And it was a very easy search! The display unit is from a company whose product model numbers correspond to the unit’s capabilities. It starts with NHD which is the company name Newhaven Display Inc, followed by a 2.4 indicating screen’s physical size of 2.4″ in diagonal, and 240320 meaning a graphics resolution of 240 by 320 pixels, etc.

One unexpected attribute of this LCD module is that it has an integrated controller chip. The display module datasheet has all the relevant electrical details, but for the specifics of data flow and command set, it asks the user to go look in the datasheet for the Sitronix ST7789V controller.

Newhaven Display’s web site has an “Application Notes” section for their products. Clicking on the link for the 2.4″ display with ST7789 controller points to this fragment of C code, which looks a lot like some of the badge display interface code in disp.c.

Also in disp.c is the text display code and a hard-coded basic font. So all the character display stuff is on the badge for us to hack. This is a very promising start to exploring the graphics capability of the badge. I’ll definitely return to dig deeper.

Hackaday Badge Music

Hackaday Badge AudioAfter looking at the Hackaday Belgrade 2018 badge‘s onboard RGB LED, I moved on to looking over the audio subsystem to see how it accomplished its three-voice audio functionality. My first guess was that music playback was handled by a peripheral of some sort. On the board schematic I saw that the speaker was connected to a chip labelled LM4890 so it seemed like an obvious candidate for audio peripheral. However, after downloading and reading the datasheet for LM4890, I learned the chip only functions as an amplifier to take a low-powered audio waveform (via pins labeled +IN and -IN) as input and push that same waveform out at a speaker-appropriate level of power. So yes, it is a dedicated audio peripheral, but not a tone or music generator.

So where’s the music coming from? I see on the schematic capacitors and resistors but nothing else that would generate sound waves, except maybe what’s connected to the PIC32’s pins D0 through D3. Perhaps the PIC32 has a built-in music peripheral?

Looking in the code, I started tracing from the BASIC side with the tune statement, handled by tune_statement in ubasic.c. It calls sound_play_notes in hw.c. A few more straightforward C call tracing ended at sound_set_generator which flips some hardware control bits and puts the desired frequency in a hardware register. What are the results of these actions?

Searching on the specific keywords in set_sound_generator didn’t get me anywhere immediately. Reading the code more carefully led to a key insight: for sound generator 0, it deals with the number 2. For generator 1, number 3, and for generator 2, number 4. After running around in circles for a bit, I figured out these are PIC32 hardware timer peripherals. These bits control PIC hardware timers 2, 3, and 4 whose actions are handled by Timer2Handler, Timer3Handler, and Timer4Handler in hw.c. Every time the timer interrupt fires, the handler inverts a pin named GEN_0_PIN / GEN_1_PIN / GEN_2_PIN defined to be LATDbits.LATD1 / LATDbits.LATD2 / LATDbits.LATD1 which matches up with the PIC32 pins on the schematic.

So it’s not a music peripheral like I originally guessed. They are three of the PIC32’s generic timer peripherals, each used to toggle a pin on and off at a set frequency. These three timers are responsible for the three voices, whose waveforms are merged and sent into a LM4890 chip (lower center of picture below) to drive the speaker (center of picture).

Hackaday Badge Audio

Hackaday Badge RGB LED

The canonical introductory activity in microcontroller programming is to blink a LED. The Hackaday Belgrade 2018 badge makes this easy because there’s already an LED on board. Actually three LEDs – a red, a green, and a blue inside a single integrated unit.

Badge RGB LED

To make this even easier to access, this LED can be commanded from the onboard BASIC interpreter enhanced with badge-specific command led. It makes the LED blinking activity nearly trivial. This is a great way to get people started in a way that is as non-intimidating as possible

The custom led command in the BASIC interpreter is handled by the function led_statement inside ubasic.c, which calls the function set_led inside hw.c. Custom user programs written in C can call set_led as well, or copy code from set_led to manipulate LED hardware directly. They set the state of several predefined PIC hardware pins. In hw.h, we see the following

#define LED_R LATDbits.LATD6
#define LED_G LATFbits.LATF1
#define LED_B LATDbits.LATD7

Belgrade Badge LEDs

These pins match up with what we see on the schematic, wired to three pins on the controller each in series with a current-limiting resistor and the corresponding LED.

So if someone wants to blink the LED on/off, they are all set. The infrastructure exists to do so from either BASIC or from C.

However, if they want to do something more sophisticated than just on or off – such as dimming, pulsing, or mixing the three LEDs to create custom colors, the existing infrastructure is not enough. In order to create a light intensity level somewhere between full on and full off, additional code will be required. The PIC is perfectly capable of creating this pulse-width modulated (PWM) activity on an output pin, it’d take just a bit of code, and should be one of the easier custom coding project to tackle.

Hackaday Badge User Program Template

As part of the retro computing theme, the Hackaday Badge offers a BASIC interpreter and an emulated Z80 computer running CP/M. However, there’s also provision for people who want to get closer to the hardware. This took the form of a “User Program” option on the main menu, which points to a sample C program for modification and experimentation. This C program has access to all the badge system infrastructure utilized by the aforementioned BASIC interpreter and Z80 emulation.

Since I had the luxury of a badge on hand, the easy thing to do first is to launch the sample program and see what it does. I can see some text printed on screen, and a prompt for a key press. Once I pressed a key (no need to hit ENTER) the program switched over to a graphics drawing demonstration.

Hackaday Badge User Program

The colorful patterns cycled through with a very visible scan rate, taking roughly two seconds to update pixels from the top to bottom of the screen. My first reaction was: “Gosh, I hope 0.5 frames per second is not the fastest it can go.”

Once I saw it in action, it was time to dive into the source code. Here the text I saw was drawn using the same commands to draw the main menu: clear screen, set color, set X/Y position, and output text.

The first bit of novelty was processing the key press. Unlike the menu, the non-blocking keyboard check is interleaved with text drawing commands that could continue executing while waiting for a key press. This will be useful in things like game loops, where we want the action to keep going even if the user hasn’t pressed anything.

After the key press is the drawing demo. It is using a bitwise operator to update screen contents on every pass. And here we have good news: Not only is there an explicit delay in here (there’s a code comment that says “less than 1 ms”) the screen update is also taking place one pixel at a time, the least efficient method possible.

So the graphics demo update rate is definitely NOT the fastest the badge can go. How fast can we push it? That’s something to test in the near future.