Running TurtleBot3 Mapping Demonstration (With a Twist)

We’ve found our way to the source code for the simple turtlebot3_drive node. It’s a simple starting point to explore writing code in ROS that’ll be worth returning to in the future. In the meantime I keep looking at the other fun stuff available in ROS… like making the robot a little bit smarter. Enter the TurtleBot SLAM (simultaneous location and mapping) demonstration outlined in the manual.

Like all of the TurtleBot3 demo code from the e-Manual, we start by launching the Gazebo simulation environment.

roslaunch turtlebot3_gazebo turtlebot3_world.launch

Then we can launch the node to run one of several different algorithms. Each have strengths and weaknesses, this one has the strength of “it’s what’s in the manual” for a starting point.

roslaunch turtlebot3_slam turtlebot3_slam.launch slam_methods:=gmapping

Note: If this node failed to launch with the error ERROR: cannot launch node of type [gmapping/slam_gmapping]: gmapping it means the required module has not been installed. Install (on Ubuntu) with sudo apt install ros-kinetic-slam-gmapping.

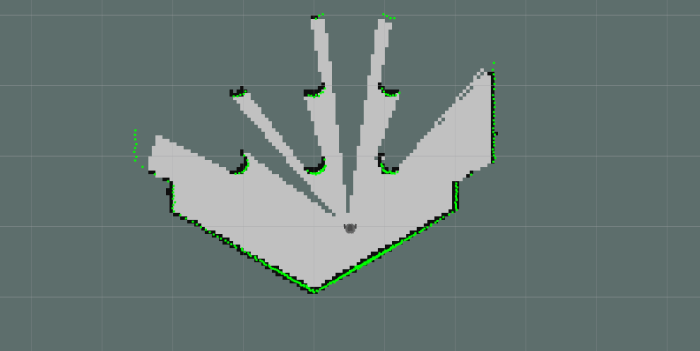
If successful, this will launch RViz and we can see the robot’s map drawn using what it can detect from its initial position.

Initial SLAM map

To fill out the rest of the map, our virtual TurtleBot needs to explore its space. The manual suggests running the ‘turtlebot3_teleop‘ module so we can use our keyboard to drive TurtleBot around turtle world. But I think it’s more fun to watch the robot map its own world, so let’s launch turtlebot3_drive instead.

roslaunch turtlebot3_gazebo turtlebot3_simulation.launch

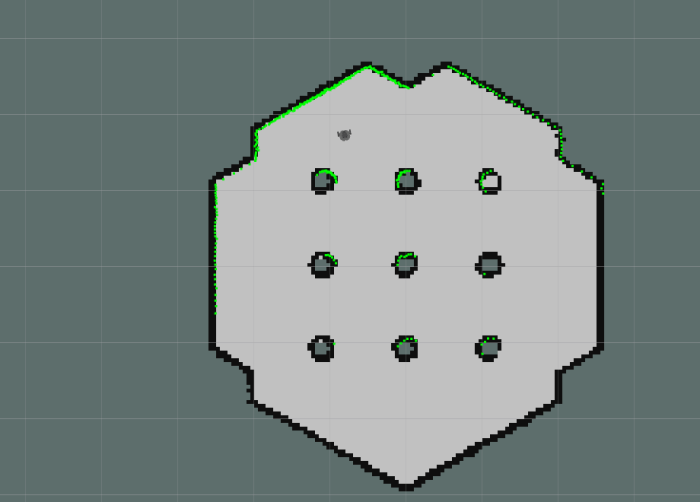
Using this simple self-exploration mode the turtle world will be mapped out eventually. How long this will take depends on luck. One interesting observation is that there’s no explicit randomness in the turtlebot3_drive source code, but because the Gazebo simulation environment inserts randomness in the data to simulate unpredictability of real sensors, turtlebot3_drive ends up being a random walk.

Once our robot has completed mapping its world, we can save it for the navigation demo.

rosrun map_server map_saver -f ~/map

Final SLAM map

More details on how to tune SLAM algorithm parameters are in the SLAM chapter of the manual, which is mainly focused on running the real robot rather than simulation but most of the points still apply.

Pasadena Alpha Muse Block Party

I appreciate being near Pasadena, California. It is a large enough community to have an organization like Innovate Pasadena, focused on spreading the word about some pretty interesting things in the area. A recent announcement on the mailing list was for an event titled Pasadena Alpha Muse Block Party. The title didn’t mean anything to me, and even after reading the Eventbrite page I only have a vague idea what to expect. But it is at a location I haven’t visited, and the event promised local companies, artists, and musicians. That was interesting enough to investigate.

The venue, CTRL Collective, appears to be a co-working facility along similar lines to WeWork or Cross Campus, except it seems to be more focused on creative companies versus technical. I’m sure there are other competitive differences that I failed to pick up, but it is generally along the lines of a facility that hosts multiple small companies who share a common infrastructure. There are offices upstairs, and downstairs is an open area for collaborative work or it can be opened up for events like today.

Pasadena Alpha Muse

Trying to learn about the companies represented by each table was difficult, because the musicians were playing at far too loud of a volume for conversation. Nevertheless, some interesting companies stood out. Top of the list is STEM World Pasadena. Their main focus is after-school STEM education for school age children, but they also advertise a maker space with laser cutter and CNC engraver, which is good motivation for me to go check out their facility.

Happily, there were more than enough interesting artists present, offering different styles for the audience to find something that speaks to them. Sometimes the different styles come from a single artist. Alicia Gorecki had many pieces featuring different topics like architecture, people, and a few others. Each of which had a different style. I loved the series with little just-hatched baby birds in black-and-white line art. I didn’t quite love them enough to buy an original (one of which Alicia is holding up here) but I did buy a greeting card of that series.

Alicia Gorecki

And no, I never did figure out what the event’s title “Alpha Muse” meant.

Understanding a Simple ROS Robot Control Program

In the previous post, a simple “Hello World” Gazebo robot simulation was parsed into its components. I was interested in the node named “turtlebot3_drive” and I’ve figured out how to go from the rqt_graph diagram shown yesterday to its source code.

  1. Decide the node /turtlebot3_drive was interesting.
  2. Look back at the command lines executed and determine it’s most likely launched from roslaunch turtlebot3_gazebo turtlebot3_simulation.launch
  3. Look at the launch file by running rosed turtlebot3_gazebo turtlebot3_simulation.launch
  4. Look through the XML file to find the node launch element <node name="$(arg name)_drive" pkg="turtlebot3_gazebo" type="turtlebot3_drive" required="true" output="screen"/>
  5. Go into the turtlebot3_gazebo package with roscd turtlebot3_gazebo
  6. Look at its makefile CMakeLists.txt
  7. See the executable turtlebot3_drive declared in the line add_executable(turtlebot3_drive src/turtlebot3_drive.cpp)
  8. Look at the source file rosed turtlebot3_gazebo turtlebot3_drive.cpp

Now we can look at the actual nuts and bolts of a simple ROS control program. I had hoped it would be pretty bare-bones and was happy to find that I was correct!

I had feared the laser rangefinder data parsing code would be super complicated, because the laser scanner looks all around the robot. As it turns out, this simple random walk only looks at distance in three directions: straight ahead (zero degrees), 30 degrees one way (30 degrees) and 30 degrees the other (330 degrees) inside the laser scanner data callback Turtlebot3Drive::laserScanMsgCallBack() This particular piece of logic would have worked just as well with three cheap individual distance sensors rather than the sophisticated laser scanner.

The main decision-making is in the GET_TB3_DIRECTION case of the switch statement inside Turtlebot3Drive::controlLoop(). It goes through three cases – if straight ahead is clear, proceed straight ahead. If there’s an obstacle near the right, turn left. And vice versa for right.

GET_TB3_DIRECTION

This is a great simple starting point for experimentation. We could edit this logic, go back to catkin root and run catkin_make, then see the new code in action inside Gazebo. This feels like the kind of thing I would write for competitions like RoboRodentia, where there’s a fixed scripted task for the robot to perform.

I could stay and play with this for a while, but honestly the motivation is not strong. The attraction of learning ROS is to buid on top of the work of others, and to play with recent advances in AI algorithms. Hand-coding robot logic would be an excellent exercise in using ROS framework but the result would not be novel or innovative.

Maybe I’ll have the patience to sit down and do my homework later, but for now, it’s off to chasing shiny objects elsewhere in the ROS ecosystem.

A Beginner’s Look Into The Mind of a Simulated ROS Robot

The previous post outlined a relatively minimal path to getting a virtual robot up and running in the Gazebo simulation environment. The robot is a virtual copy of the physical TurtleBot 3 Burger, and they both run code built on ROS. This setup should be pretty close to a ROS “Hello World” for a beginner like myself to get started poking at and learning what’s going on.

The first thing to do is to run rostopic list. As per tutorial on ROS topics, this is a tool to see all the information topics being published by all components running under a ROS core.

/clicked_point
/clock
/cmd_vel
/gazebo/link_states
/gazebo/model_states
/gazebo/parameter_descriptions
/gazebo/parameter_updates
/gazebo/set_link_state
/gazebo/set_model_state
/gazebo_gui/parameter_descriptions
/gazebo_gui/parameter_updates
/imu
/initialpose
/joint_states
/move_base_simple/goal
/odom
/rosout
/rosout_agg
/scan
/statistics
/tf
/tf_static

That’s a pretty long list of topics, which might seem intimidating at first glance until we realize just because it’s available doesn’t mean it’s being used.

How do we look at what’s actually in use? Again from the ROS topics tutorial, we can use a ROS utility that graphs out all active nodes and the topics they are using to talk to each other. rosrun rqt_graph rqt_graph

random walk rqt_graph.png

Ah, good. Only a few things are active. And this was only when we have everything running as listed at the end of the previous post, which were:

  1. TurtleBot in Gazebo
  2. TurtleBot performing a random walk with collision avoidance
  3. Rviz to plot laser range-finder data.

If we stop Rvis, the /robot_state_publisher node disappears, so that was used exclusively for visualization. The two nodes prefixed with gazebo are pretty obviously interface points to the simulator, leaving /turtlebot3_drive as the node corresponding to the random walk algorithm.

The velocity command topic /cmd_vel looks just like the one in the basic turtlesim used in the ROS tutorial, and I infer it is a standardized way to command robot movement in ROS components. The /scan topic must then be the laser rangefinder data used for collision avoidance.

To find the source code behind item #2, the obvious starting point is the command line used to start it: roslaunch turtlebot3_gazebo turtlebot3_simulation.launch. This tells us the code lives in the turtlebot3_gazebo module and we can look at the launch instructions by giving the same parameters to the ROS edit command. rosed turtlebot3_gazebo turtlebot3_simulation.launch. This brings up a XML file that described components for the random walk. From here I can see the node comes from something called “turtlebot3_drive“.

I found a turtlebot3_drive.cpp in the source code tree by brute force. I’m sure there was a better way to trace it from the .launch file to the .cpp, I just don’t know it yet. Maybe I’ll figure that out later, but for now I have a chunk of ROS C++ that I can tinker with.


ROS Notes: Gazebo Simulation of TurtleBot 3 Burger

TurtleBot 3 is the least expensive standard ROS introductory robot, and its creator Robotis has put online a fairly extensive electronic manual to help owners. The information is organized for its target audience, owners of the physical robot, so someone whose primary interest is simulation will have to dig through the manual to find the relevant bits. Here are the pieces I pulled out of the manual.

Operating System and ROS

Right now the target ROS distribution is Kinetic Kame, the easiest way is to have a computer running Ubuntu 16.04 (‘Xenial’) and follow ROS Kinetic instructions for a full desktop installation.

Additional Packages

After ROS is installed, additional packages are required to run a TurtleBot 3. Some of these, though probably not all, are required to run TB3 in simulation.

sudo apt-get install ros-kinetic-joy ros-kinetic-teleop-twist-joy ros-kinetic-teleop-twist-keyboard ros-kinetic-laser-proc ros-kinetic-rgbd-launch ros-kinetic-depthimage-to-laserscan ros-kinetic-rosserial-arduino ros-kinetic-rosserial-python ros-kinetic-rosserial-server ros-kinetic-rosserial-client ros-kinetic-rosserial-msgs ros-kinetic-amcl ros-kinetic-map-server ros-kinetic-move-base ros-kinetic-urdf ros-kinetic-xacro ros-kinetic-compressed-image-transport ros-kinetic-rqt-image-view ros-kinetic-gmapping ros-kinetic-navigation ros-kinetic-interactive-markers

TurtleBot 3 Code

The Catkin work environment will need to pull down a few Github repositories for code behind TurtleBot 3, plus one repo specific to simulation, then run catkin_make to build those pieces of source code.

$ cd ~/catkin_ws/src/
$ git clone https://github.com/ROBOTIS-GIT/turtlebot3_msgs.git
$ git clone https://github.com/ROBOTIS-GIT/turtlebot3.git
$ git clone https://github.com/ROBOTIS-GIT/turtlebot3_simulations.git
cd ~/catkin_ws && catkin_make

Simple Simulation

There are several simulations available in the manual’s “Simulation” chapter, here is my favorite. First: launch a Gazebo simulation with a TurtleBot 3 Burger inside the turtle-shaped test environment. At a ROS-enabled terminal, run

$ export TURTLEBOT3_MODEL=burger
$ roslaunch turtlebot3_gazebo turtlebot3_world.launch

(Note: If this is the first run of Gazebo, it will take several minutes to start. )

Once started, there will be a little virtual TurtleBot 3 Burger inside a turtle-shaped virtual room, sitting still and not doing anything. Which isn’t terribly interesting! But we can open a new ROS-enabled terminal to launch a very simple control program. This performs a random walk of the robot’s space, using the distance sensor to avoid walls.

$ export TURTLEBOT3_MODEL=burger
$ roslaunch turtlebot3_gazebo turtlebot3_simulation.launch

Turtle Room

Which is great, but I also want to see what the robot sees with its laser distance sensor. This information can be explored using Rvis, the data visualization tool built into ROS. Open up yet another ROS-enabled terminal to launch it.

$ export TURTLEBOT3_MODEL=burger
$ roslaunch turtlebot3_gazebo turtlebot3_gazebo_rviz.launch

This opens up an instance of Rvis, which will plot out the relative location of the robot and where it sees return pulses from its laser distance sensor.

Laser Rangefinder

ROS Notes: TurtleBot 3 Burger

Now that I have a very basic understanding of robotic simulation environment Gazebo, I circled back to ROS tutorial’s Where Next page. They suggested running virtual versions of one of two robots to learn about ROS: either a PR2 or a TurtleBot. I knew the PR2 is an expensive research-oriented robot that costs about as much as a Lamborghini, so whatever I build will be more along the lines of a TurtleBot. Sadly, the official TurtleBot’s idea of “low cost” is only relative to the six-figure PR2: when I last looked at ROS over a year ago, a TurtleBot 2 would still cost several thousand dollars.

Today I’m happy to learn that my information is out of date. When I last looked at ROS a year ago, the third generation of TurtleBot would have just launched and either it wasn’t yet publicly available or I just missed that information. Now there are two siblings in the far more affordable TurtleBot 3 family: the TurtleBot 3 Waffle is a larger robot suitable as platform for more elaborate projects, and the TurtleBot 3 Burger is a smaller robot with less room for expansion. While the Waffle is still over a thousand dollars, hobbyists without a kilobuck toy budget can consider the entry level TurtleBot 3 Burger.

Offered at $550, that price tag is within the ballpark of robot projects like my own Sawppy rover. If we look at the MSRP of its major components (OpenCR board + Raspberry Pi + IMU + laser scanner + 2 Dynamixel XL430 servos + battery) they add up to roughly $550. So it doesn’t feel like a horribly overpriced package.

My primary goal is still to get ROS running on Sawppy. But if I have a TurtleBot 3 Burger to play with established ROS libraries, that might make it easier down the road to adapt Sawppy to run ROS. While I stew over that decision, I can start my Gazebo simulation exploration using the virtual TurtleBot 3 Burger.

turtlebot-3

Notes on Gazebo Simulator Beginner Tutorial

My computer science undergraduate degree program required only a single class from the Chemistry department. It was an introductory course that covers basic chemistry concepts and their applications. Towards the end of the quarter, during a review session held by my Teaching Assistant, there was a mixup between what the TA was saying and lecture material that might be on the final exam. After some astute classmates brought up the difference, the TA was apologetic and his explanation made a strong impression:

Sorry about that. The simplification we use for this intro class isn’t what we actually use in research. Those of you who continue to get a chem degree will learn later how all of this is wrong.

This was a theme that repeated several more times in an undergraduate curriculum across different departments: The introductory course of a subject area uses a lot of simplifications that communicated rough strokes of ideas, but isn’t totally accurate.

I bring up this story because it is again true for Gazebo: a powerful and complex system for robotics simulation research and the beginner’s tutorial covers the basics by using simplifications that aren’t how serious work gets done. It’s not deceptive or misleading – it’s just a way to get oriented in the field.

This mostly manifested in the third part of the beginner’s tutorial. The first two are fairly straightforward: a brief overview page, followed by a page that described general UI concepts in the software. The third page, a quick tour of Gazebo Model Editor, is where beginners actually get some hands-on time using these simplifications.

Following the tutorial, the beginner will build a simplified model of a differential drive robot. A simple cylinder represents each of the two wheels, and a sphere represents the caster. They are connected to the box of a chassis by the barest joint relationship description possible. This model skipped all of the details necessary for building a real robot. And when it comes to simulating real robots, it’s not expected to be built from scratch using Gazebo Model Editor UI. More realistic simulation robots would be written using SDF and there’s an entirely separate category of tutorials for the topic.

But despite all these simplifications not representative of actual use… the model editor tutorial does its job getting a beginner’s feet wet. I know I’ll have to spend a lot more time to learn the depths of Gazebo, but this beginner’s tutorial was enough foundation for me to look at other related topics without getting completely lost.

Gazebo Model Editor Tutorial


ROS Notes: Downgrading from Lunar to Kinetic

kinetic 400After realizing my beginner’s mistake of choosing the wrong ROS distribution to start my self-education, I set out to downgrade my ROS distribution from the newer but less supported “L” (Lunar) release to the previous “K” (Kinetic) release. Given the sheer number of different packages involved in a ROS installation, I had been worried this was going to be a tangled mess chasing down files all over the operating system. Fortunately, this was not the case, though there were a few hiccups that I’ll document today for other fellow beginners in the future.

The first step is to undo the package installation, which can be accomplished by asking the Ubuntu package manager to remove the desktop package I used to install.

sudo apt remove ros-lunar-desktop-full

Once the top-level package was removed, all of its related packages were marked as unnecessary and could be auto-removed.

sudo apt autoremove

At this point ROS Lunar is gone. If a new terminal is opened at this point, there will be an error because the Lunar setup script called by ~/.bashrc is gone.

bash: /opt/ros/lunar/setup.bash: No such file or directory

This is not an immediate problem. We can leave it for now and install Kinetic.

sudo apt install ros-kinetic-desktop-full

After this completes, we can edit ~/.bashrc and change the reference from /opt/ros/lunar/setup.bash to /opt/ros/kinetic/setup.bash. This will address the above “No such file or directory” error when opening up a new terminal.

Then we can fix up the build environment. If we now go into the catkin workspace and run source devel/setup.bash as usual, that command will succeed but trying to run catkin_make will result in an error:

The program 'catkin_make' is currently not installed. You can install it by typing:

sudo apt install catkin

This is a misleading error message because catkin_make was installed as part of ROS Kinetic. However, devel/setup.bash still pointed to ROS Lunar which is now gone and that’s why our system believes catkin_make is not installed.

How to fix this: open a new terminal window but do NOT run source devel/setup.bash. Go into the catkin workspace and run catkin_make there. This will update devel/setup.bash for ROS Kinetic. After this completes, it is safe to run source devel/setup.bash to set up ROS Kinetic. Now catkin_make will execute successfully using ROS Kinetic version of files, and we’re back in business!

ROS Notes: Choosing Which Distribution

ROS-Lunar 400x400ROS gives creative names to each release, but the key part is that the names are in alphabetical order. When I looked into the ROS nodes to help control Dynamixel serial bus servos, I was confused as to their support of ROS distributions.

Both options supported the ‘K’ release (Kinetic Kame.) One of them seemed to have gotten stale, not getting maintenance or newer versions. The other one — officially built by Robotis — supported ‘K’ and ‘M’, skipping over ‘L’. There must be a reason, but why?

When I picked up learning ROS again this time around, I looked at the latest version M (“Melodic”) first. I saw it did not support Ubuntu 16.04. I needed to run Ubuntu 16.04 because of TensorFlow, so I went with the newest version that supported 16.04, which is how I ended up with Lunar Loggerhead. In hindsight, this was not the best choice. It appears every other distribution of ROS has a far shorter support life than its siblings, as seen on the list of ROS distributions. On this list, Kinetic Kame is marked as “(Recommended)” as of today.

It appears that “Kinetic” is the long-term support version, which is tied to Ubuntu’s 16.04 long term support version. “Melodic” is quite new, built on the recently released Ubuntu 18.04 LTS, so it makes sense that stabilization work is still ongoing. At some point in the near future, I’m sure “Melodic” will become the recommended version.

“Lunar” seems to be in an awkward middle spot where it is neither the latest release nor the stable long-term supported release. In fact, even though it is younger than “Kinetic”, the calendar says it will fall out of support sooner.

Even worse than that, its shorter lifespan meant people are less motivated to align their software packages to the release. Hence why packages like Robotis Dynamixel SDK has a Kinetic release and a Melodic release, skipping over Lunar. Looks like users like me should stick with the long-term support releases: not just for support from core ROS team, but also from third-parties like Robotis.

Given that I’m tied to Ubuntu 16.04, I should follow the recommendation and downgrade my installation of ROS to Kinetic Kame.

JPL Open Source Rover is Officially Official

OSR Rocks
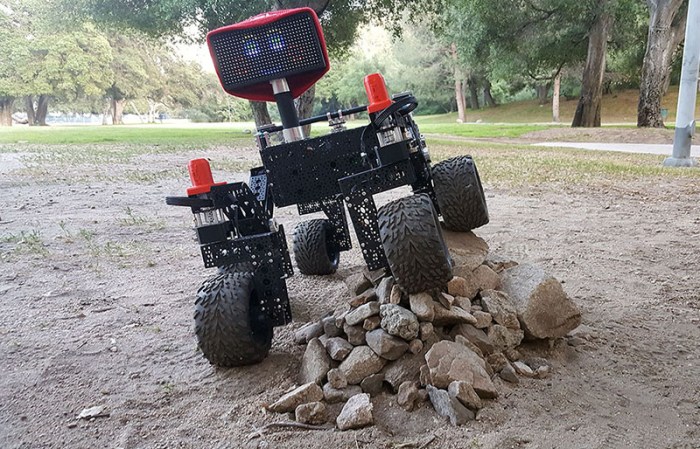
Back in January of this year I joined a team of pre-release beta testers for a project out of nearby Jet Propulsion Laboratory (JPL). While not exactly a state secret, we were asked not to overtly broadcast or advertise the project until after JPL’s own publicity office started doing so. This publicity release happened two days ago so the JPL Open Source Rover is now officially public.

Our team members drew from SGVHAK, so we’ve been calling our rover SGVHAK rover instead of JPL open source rover. Past blog entries talking about SGVHAK’s customization were described as done in contrast to a vague undefined “baseline rover.” I’ve gone back and edited those references (well, at least the ones I could find) to point to JPL’s rover web site. Which had gone live a few weeks ago but that was a “soft opening” until JPL’s publicity office made everything officially public.

After SGVHAK team completed the rover beta build in March, I went off on my own to build Sawppy the Rover as a much more affordable alternative to a rover model. To hit that $500 price point, I had described the changes and trade-offs against SGVHAK rover but it was really against JPL’s open source rover. I’ve fixed up these old blog posts minimally – the references are now correct though some of the sentence structures got a little awkward.

As part of JPL’s open source rover project, they had established a public web forum where people can post information about their builds. To share our story I’ve gone ahead and created a forum thread for SGVHAK rover, and a separate one for Sawppy.

I look forward to seeing what other people will build.

ROS Notes: Dynamixel Servos

serialservo-dynamixel
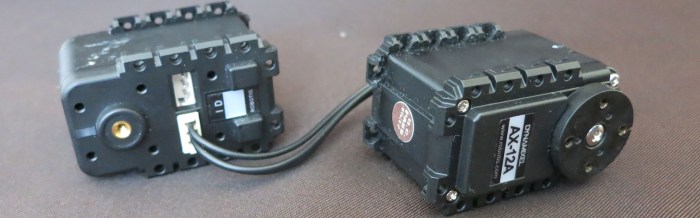
Reading over the list of links on ROS wiki tutorials page, one item caught my attention: a link to Dynamixel Tutorials. The name Dynamixel wouldn’t have meant anything to me when I looked at ROS a year ago, but I recognize it now due to my research for components to build Sawppy the Rover. Robotis Dynamixel is a serial bus servo and as the industry veteran, it has the most software support which I knew included a factory SDK with support for ROS.

As I got into the tutorial, though, a few inconsistencies stood out as odd. Eventually I realized these tutorials were written by someone with no relation to Robotis, talking about a ROS control library with no relation to the Robotis Dynamixel SDK. According to the Github repository for the library, it was last updated eighteen months ago. It aligned with ROS ‘K’ release (Kinetic Kame) and hasn’t been updated for the two following releases ‘L’ (Lunar Loggerhead) or ‘M’ (Melodic Morenia)

This is pretty common in the world of open source… something is interesting so multiple parties each present their solution. The fact “anybody can do it” is both an upside and downside, depending on the situation. I should be more used to it by now but it still catches me off guard. This library also shows another downside: when the author loses interest for whatever reason, the code stops getting maintained.

Here’s its package information:

Package: ros-kinetic-dynamixel-controllers
Version: 0.4.1-0xenial-20180516-150315-0800
Priority: extra
Section: misc
Maintainer: Antons Rebguns <arebgun@gmail.com></arebgun@gmail.com>
Installed-Size: 760 kB
Depends: ros-kinetic-actionlib, ros-kinetic-control-msgs, ros-kinetic-diagnostic-msgs, ros-kinetic-dynamixel-driver, ros-kinetic-dynamixel-msgs, ros-kinetic-rospy, ros-kinetic-std-msgs, ros-kinetic-trajectory-msgs
Homepage: http://ros.org/wiki/dynamixel_controllers
Download-Size: 56.0 kB
APT-Sources: http://packages.ros.org/ros/ubuntu xenial/main amd64 Packages
Description: This package contains a configurable node, services and a spawner script to start, stop and restart one or more controller plugins.
Reusable controller types are defined for common Dynamixel motor joints. Both speed and torque can be set for each joint. This python package can be used by more specific robot controllers and all configurable parameters can be loaded via a yaml file.

In contrast to this “dynamixel-controllers”, we have “dynamixel-sdk” whose maintainer is listed with an @robotis.com e-mail address, so it looks pretty official. According to this post on ROS Answers forum, Robotis intends to continue supporting ROS with their factory SDK.

Package: ros-kinetic-dynamixel-sdk
Version: 3.5.4-0xenial-20180308-062313-0800
Priority: extra
Section: misc
Maintainer: Pyo <pyo@robotis.com>
Installed-Size: 293 kB
Depends: libc6 (>= 2.17), libgcc1 (>= 1:3.0), libstdc++6 (>= 4.1.1), ros-kinetic-roscpp
Homepage: http://wiki.ros.org/dynamixel_sdk
Download-Size: 38.5 kB
APT-Sources: http://packages.ros.org/ros/ubuntu xenial/main amd64 Packages
Description: This package is wrapping version of ROBOTIS Dynamxel SDK for ROS.
The ROBOTIS Dynamixel SDK, or SDK, is a software development library that provides Dynamixel control functions for packet communication. The API is designed for Dynamixel actuators and Dynamixel-based platforms.

Though Sawppy ended up not using Dynamixel servos, my research into the devices gave me enough familiarity with their control protocol that I think the Dynamixel SDK will be a good precedent to follow when I start looking into creating my own ROS controller nodes.

While I’m not ready to embark on that project just yet, I thought it might be good to take a quick look. This attempt failed but the failure became its own ROS learning adventure.

I had installed ROS ‘L’ distribution (Lunar Loggerhead) and the Robotis SDK supported ‘K’ and ‘M’, skipping over ‘L’. Why is that? My effort to understand is the story of the next blog.