Second Caliper Battery Hack Prioritizes Simplicity

One of my early 3D printing projects was motivated by the wasteful battery usage of a cheap Harbor Freight digital caliper. I didn’t want to replace its LR44 battery all the time, and I didn’t want to directly modify the caliper in any way, so I ended with an overly complex tray to hold a AAA battery in place of the default LR44 battery.

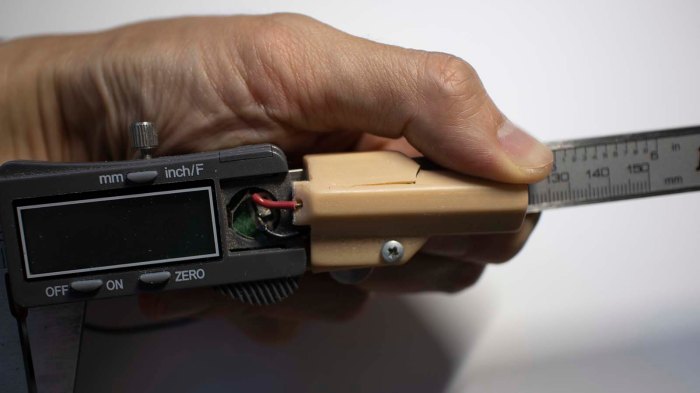
The main goal was to avoid the wastefulness of burning through LR44 batteries, and that goal was a success. I was able to use cheaper AAA batteries and use them for longer. In fact, this caliper was able to run on AAA batteries that were too weak for much else, giving them a very useful secondary life. However, my battery tray suffered poor reliability of electrical contact points. In actual usage it was too easy to move a component just enough to break electrical connection, resetting the caliper and losing whatever measurement I had at the time. After a few frustrating episodes, I broke off the plastic head substituting the LR44 battery and soldered wires directly.

Caliper printed battery tray cracked

After years of use, the battery tray I designed and 3D printed finally cracked. And this time around I decided to go for simplicity instead: a commodity AA battery tray held to the back side of my caliper with double-sided foam tape.

Caliper commodity battery tray back mounted

Wires from this battery tray were soldered directly to the battery tabs inside my caliper for reliable operation. I could no longer lay this caliper down flat on a table, but I don’t think that will be a significant concern. I’ll know for sure after some usage and if it proves to be a problem I will re-evaluate.

In the meantime, I have a replacement battery tray allowing me to run my caliper on weak AA batteries already destined to be thrown away. And since this tray is a mass produced commodity item, using it was cheaper and it was faster to install than my previous solution.

Moral of the story: sometimes 3D printing is not the answer.

Drilling Wheels For JPL Open Source Rover

Jet Propulsion Laboratory’s Open Source Rover uses six wheels adapted from Traxxas remote control trucks. Traxxas suspension has a hex shaped mounting point for these wheels, but the ServoCity motor hubs used by OSR does not fit. To bolt these wheels onto those hubs, rover builders need to drill two holes aligned with two diagonally opposite holes on the ServoCity hub. Precisely locating these holes may prove challenging, and some rover builders have offered their solution to the problem. This post outlines my approach.

The heart of my approach is a 3D printed jig that is clamped in a drill press vise. It is tall enough to accomodate one of these wheels, with a cylindrical tip that locates the center hole for the wheel. There are two holes on either side of this tip, corresponding to the locations where we want to drill. For setup, the vise and jig are positioned such that one of the holes are aligned with the location of our drill bit.

OSR wheel drill jig with wheel 1

Once aligned, a wheel is mounted on the jig and we drill our first hole. Once that is done we turn the wheel 180 degrees. We can visually align the newly drilled hole to the printed hole in the jig, or we can use another drill bit as a locating pin. Drop this drill bit through the just-drilled hole into the 3D printed hole in order to locate the wheel.

OSR wheel drill jig with wheel 2

This setup has room for improvement in terms of precision. The holes aren’t precisely the correct size so the location pin/drill bit has room to move. But it is sufficiently precise for the task at hand so I didn’t put in the time to revise the jig for additional precision.

The 3D printed jig is shared on Thingiverse, and a video demonstration has been posted to YouTube:


A Wobbly First Draft Of Z Axis Gantry

We had a few final bits of goofing off without a Z-axis before starting to build a real one. Two beams available for construction were found to be exactly the same length as the width of our table, so they were natural candidates as the main horizontal gantry structure. Now we could use arbitrary lengths for the vertical support beams bolted to either side, because they could drape past the edge and below the table surface. Not only does it give us complete flexibility on what height to mount our main horizontal beam, we also gain the option to reinforce the beam with brackets bolted to the bottom of the table.

Once the drilling and bolting started, however we found a few unexpected problems.

A small problem was that while our horizontal beam is exactly the width of the table, we also had a black plastic moulding surrounding the edge of the table. Actually dropping the beam below the table surface meant cutting interfering pieces of plastic away. Which we could do, but we don’t need to do so just yet so that’s been deferred.

A more significant problem was that one of the two holes of a bracket overlapped with the existing metal structure of this printer table. If it lined up exactly with the horizontal parts of the metal, we could drill a hole through it just as we did the wooden parts. Unfortunately it partially overlapped with some vertical members of the support structure, which would severely weaken the table if we drilled into it. We chose not to drill, but it also meant there were only two bolts instead of four fastening our gantry to the table.

This meant we ended with a less rigid gantry than we had originally hoped. It is pretty good left-right (parallel to machine X axis) but front-back (machine Y axis) is weak. We’ll have to add more reinforcements before we get serious about cutting material, but in the meantime it is the best Z-axis yet for pen plotting.

So Emily created a program that draws a gift for our enthusiastic supportive online cheerleader. This was the machine’s first run with nontrivial G-code, and its success cleared the way to further refinement of this machine.

Making Our Way To A Z-Axis Gantry

After some debugging and re-awakening, I brought the laptop running UGS back to the workshop and this time it mostly worked. There were still a few unexplained system freeze-ups early in the work session but it was stable afterwards. Was there something weird with Java runtime settling down? I’m not sure, but I’ll have to keep an eye out to see if this recurs upon every system bootup.

Having a computer running UGS proved useful because we now have a 3D visualization of G-code tool path. It allowed us to see where a particular program declared its origin, so we could set work coordinate zero accordingly. It also allowed us to debug a few problems with the G-code we’ve randomly found online. The smiley face, for example, issued a G54 command early in the program but Grbl didn’t like that upon rerun and demanded a G0 before it.

Running G-code programs repeatedly to debug UGS settings meant we had ample opportunity to goof around with more drawings.

While fun, this “let’s act like a crappy Z-axis” game is not the point of the project. We know we need some sort of structure to fasten a Z-axis mechanism to. We hunted around the workshop for items collecting dust and found a set of 40mm x 40mm aluminum extrusion beams along with associated hardware. Formerly some sort of display for trade shows, it has been retired and available for use.

For the first draft we just want something better than holding the pen by hand, so we weren’t picky. Not really understanding what we wanted also meant we were reluctant to cut into these beams destructively until we know better. This meant using the lengths as-is and playing with various arrangements. C-clamps were very useful to temporarily hold pieces in place! Eventually we had enough of a plan and the clamps were replaced with bolts.


Computer Running UGS As CNC Control Console

One thing that didn’t go quite according to plan during our first system test was how we sent our G-code file to the controller. I had planned to dedicate my Dell Inspiron 11 (3180) to the task of CNC control console, but it didn’t turn on at the workshop.

This was a problem, because I had hoped the G-code sender program I had installed on that laptop would help us understand what’s going on as we drive the machine. While CNC G-code is officially standardized, the standards still left a lot to the individual machine makers to define. Grbl (mostly) follows example set by LinuxCNC, so for the most part I can use LinuxCNC reference guide. I doubt I could memorize everything immediately, so a little software help might have been nice.

Grbl ESP32 is capable of operating completely independently using web interface. This is a basic interface which is extremely streamlined and missing some of the luxury features of other control interfaces. Furthermore, there is not enough onboard storage for CNC programs. To address the latter, there’s provision for attaching a SD card for storage via four pins on the ESP32. This is great for building small self-contained (maybe even portable!) machines.

But since our project is not very easily portable, I thought it’d be better to have a more full featured control console for this CNC. Grbl project wiki included a list of popular G-code senders, after reading that list I decided to try UGS and installed it on the little Dell. Since it was written for Grbl, it understands the Grbl-specific subset of G-code and also has a visualization module so we know what to expect when we run a program. All of these would have been useful in an initial system run.

At the workshop I pulled the Dell out of my backpack, pushed the power button, and nothing happened. After a few failed efforts to wake the machine, I resorted to using simple_stream.py from the Grbl site, a flat Python script with absolutely no user friendly features whatsoever.

I brought the little Dell home in order to debug the problem. Once I got home, I determined the machine is running but stuck. I held the power button for longer than 4 seconds, which per ACPI spec will power down the machine regardless of state. I thought I had tried that at the workshop but I guess I didn’t quite hold it long enough? In any case the computer is ready for another attempt.

[Update: UGS didn’t pan out, more details here.]

Freehand + CNC Pen Plotter

While we’ve proven our nascent CNC could home and respond to individual hand-typed G-Code commands, we have yet to run more than a single line at a time. We’ve just bolted it down to a table but before we put too much effort into more hardware, it seemed like a good idea to make sure the software side is capable of a multi-line program.

Emily found a short snippet of G-Code that purports to draw a smiley face with a pen plotter. It is a great introduction to G-Code, showing us a basic way to start and stop the machine. Curiously, there is no Z-axis motion at all. It uses spindle motor commands to communicate “drawing” (M3 = spindle on) and “not drawing” (M5 = spindle off.)

T1 M6
G90 G94
G54 X0 Y0
G00 X0 Y0
G00 X-25 Y20
G91 X-10
G02 X10 Y-10 I10 J0 F200 M3
G02 X-10 Y10 I0 J10;
G90 G00 M5 X0 Y0;
G00 X25 Y20
G91 X-10
G02 X10 Y-10 I10 J0 F200M3
G02 X-10 Y10 I0 J10;
G90 G00 M5 X0 Y0;
G00 X40 Y0
G02 X-40 Y0 I-40 J0 F200 M3
G90 G00 M5 X-55 Y0;
G02 X0 Y-55 I55 J0 F200 M3
G02 X-55 Y0 I0 J55
M30;

Reading through this, I could see the XY coordinates are all around (0,0) so the center of this smiley face should be at the origin. Other than that, I have no idea. And since we haven’t built our Z-axis yet, Emily volunteered to be a human Z-axis. We sent this snippet of G-Code (some hiccups along the way) and our reward at the end of this work session was an artistic collaboration between human and machine.

Some Nuts And Bolts For XY Stage

Once we can successfully perform XY axis homing in Grbl ESP32 and see that it responds to some simple G-Code commands, it was time to get a little more rigorous about our hardware configuration. Up until this point this machine was mere placed on a dusty table, itself a salvaged piece of equipment.

Based on the appearance of a slot in the middle and a metal shelf underneath, it appears to have been designed for old dot matrix (or maybe even daisy-wheel) printers that use continuous fanfold paper fed through that slot. Given that such printers have a carriage that moves left-right (now our X axis) it was unexpectedly wobbly along that axis. Our X-axis movement now sets the table oscillating.

We may need to reinforce that sometime down the line, but the first task is to bolt our XY stage to the table. Since it is quite powerful and heavy, there’s a lot of momentum involved in its motion and we could not depend on friction to hold it in place: it slides around on the surface. Six holes were drilled in the table for 1/4″-20 threaded rods, each held in place by a nylon insert locking nut above and below. Now XY stage will no longer slide around on the table.

The chosen location is aligned with the front edge of the table, slightly right of center, due to the Y-axis lead screw to the left of the table. This placement left equal amount of space to the left and right for us to plan out how we want to build a Z-axis gantry. The first candidate approach is to use some aluminum extrusion beams that are sitting around gathering dust in the shop. But in the spirit of “build a little, test a little” we want to run a short G-Code file for fun.

Drilling Into Half Inch Diameter Tubes

It didn’t take long before my new old drill press was put to work doing something that was difficult without the tool: I needed to drill a total of eight holes through three half inch diameter aluminum tubes, perpendicular to the tube’s axis.

Because the surface is curved at the point where drilling starts, it takes a skilled hand to perform the task via freehand held drill and workpiece. I did not have such skills in my hands. Putting the workpiece in a vise helps, but still difficult for me to keep a hand held drill on center. What I needed was a way to hold both the workpiece and the drill bit in rigid relation to each other, meaning a custom workholding solution bolted to the drill press table.

Printed V vise jaw installed

It was built using a very cheap Harbor Freight vise. Its jaws were removable and I designed and 3D printed replacement jaws with a V profile to better hold a round object. The other benefit of 3D printed plastic jaws compared to metal jaws is the reduced chance of marring workpiece surface.

Printed V vise jaw gripping tube

The next step is to bolt this vise onto the drill press table. I saw mounting slots on both the table and the vise, and their slots were in the same pattern. I naively thought this was a standard form factor and they will easily line up.

When I put my vise on the table, I found that they did not.

Vise and drill press table slots do not align

Fortunately even though they did not actually line up, they left enough room for me to use a smaller bolt to try to make things work. In this case, my stockpile of 1/4″-20 bolts.

Vise and table has room for quarter inch-20

The slots are too wide for the typical 1/4″-20 washers I had on hand for this bolt, but again I could turn to my 3D printer for custom solutions that help me bolt the vise to the drill press at the location I needed.

Drill jig for 0.5 inch tube

It took some adjustment to bolt the vise exactly where it needs to be. (Tip: double check to make sure the drill press table isn’t itself moving!) But once everything was tightened down, the jig made drilling the holes I needed very simple.

Public Onshape CAD file for this project are available here.

Old Drill Press Is New Drill Press

When local fellow maker Emily upgraded to a big floor standing Delta drill press, her old benchtop drill press was up for grabs. “Free if you pick it up” were the terms of the sale, and I was glad I could pick it up before someone else did. Taking part in countless Emily projects in the past, it shall now play a role in my projects in the near future.

Its long history in the hands of many handy creators showed clearly, with many stock parts missing replaced by either scratch fabricated or adapted parts. This is not a problem at all, a drill press is fundamentally a fairly simple machine and none of the modifications changed its ability to do its core job. Besides, with a less-than-new machine, I feel less intimidated about adding my own modifications as necessary.

The first project on the list addressed a known existing mechanical problem: the drive belt occasionally rubs against the chassis when it is installed in the lowest and slowest of four pulley slots. I inherited a workaround from Emily which I was content to leave in place, but then I saw the set screws holding the pulley to the motor shaft.

Drill press motor pulley

I thought it might be worth a shot to try loosening the set screw and move the pulley a little higher. There might be a good reason why the pulley was in its location. I thought it was possible (likely) the motor was not original and had a shorter shaft, or something along those lines. But it was worth investigating.

I put my hex wrench on the set screw and discovered it is loose now. The reason this pulley is too low is because the set screw came loose and it fell down due to gravity. I moved the pulley a little bit higher, tightened the set screw, and we’re back in business without any rubbing between belt and chassis. This was a great start to what I hope will be a long illustrious career for this drill press, enabling my project ideas in the future.

Industrial Glass Marbles

I remember playing with glass marbles as a child’s toy. I also remember mom being not terribly pleased when she would find them in various corners of the house, and definitely unhappy when some were on the floor where an adult might step on one and fall.

I also remember the swirls of color that were added to the glass to make them look prettier, and those are absent from industrial glass marbles. They have a job to do, and they don’t need to look pretty doing it. Not only do they lack the colorful swirl, they don’t even necessarily need to be perfectly spherical or have smooth exterior surfaces. I hadn’t known about these glass marbles with jobs until I learned of an overturned truck accident that was very difficult to clean up because its cargo were a full load of industrial marbles.

Curious, I read up on industrial glass marbles and how they are employed. I was excited when I learned that they are commonly used inside aerosol spray cans to stir its contents. They are what rattles when we shake up a can before spraying. I consumed several spray cans of Plasti-Dip for my RX-BB-8 project and saved the cans planning to cut into them to look at some industrial marbles up close. I finally got around to that particular project.

Clamp to release remaining pressure

Even though they’ve stopped delivering dip, these cans still had some propellent inside delivering pressure. It seemed wise to relieve that pressure before we cut into the can, so I used a clamp to keep the top pressed and waited until the hissing stopped.

Drill into can for industrial glass marble

A hole is then drilled in the can for a starting spot, where pliers can dig in and start tearing up the thin metal shell. It only takes a few rips to open a hole large enough for the marble to see the light of day.

Industrial glass marble extracted

A little cleanup later, I had my first look at a cosmetically imperfect but still fascinating industrial glass marble.

Industrial glass marble x3

I had several other empty spray cans which underwent the same procedure for marble extraction. I was fascinated by the surface texture of the first one I extracted, it gave the glass sphere more character than a perfectly smoothly counterpart. I plan to explore putting them in front of LEDs so their flaws can be part of a distinctive light diffuser.

I do not consider those glass imperfections of industrial glass marbles to be bug — I believe they have potential to be very unique features!