Final(?) Update to rxbb8.com

Moving my RXBB8 project website from AWS to GitHub Pages has another benefit: now it is trivially simple to update. I push a change, and GitHub default Action will handle publishing. Much easier than copying the files over to an AWS S3 Bucket like I had to do earlier. Which means it is a great time to make (what’s very likely) the final update to this project site.

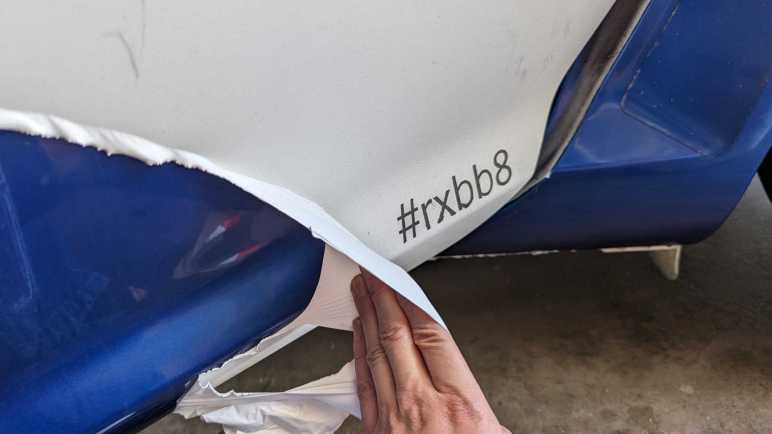
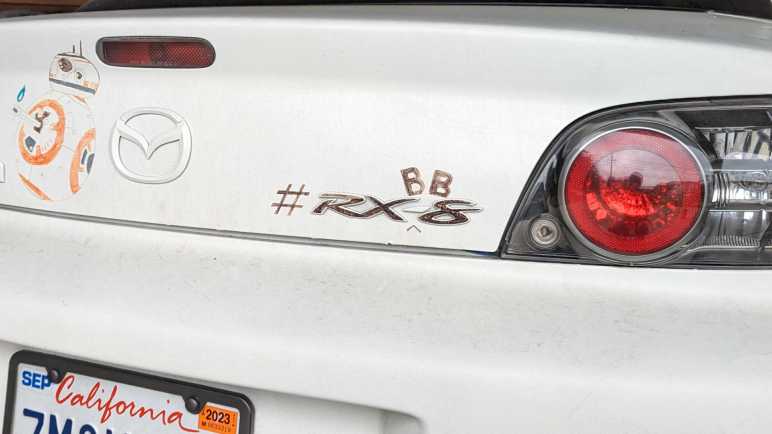
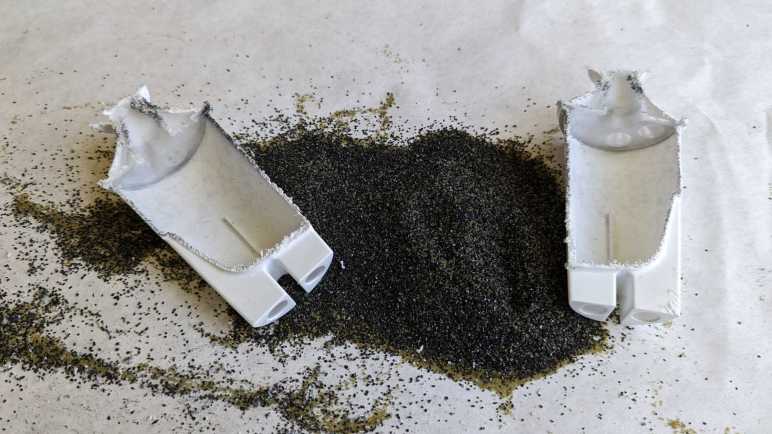
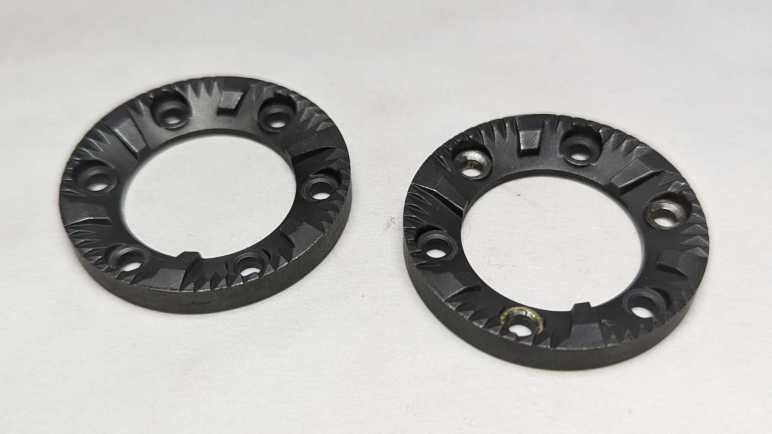
First, I updated the content of the page, adding a shorter version of what I’ve posted earlier: Why I decided to say goodbye to RXBB8, and then the process of actually doing so. Illustrated with the same image files I used here. I decided against following the precedence of providing a “web” (low resolution) and “full” (high resolution) copies of each image. For this final update, I’m providing only the web resolution image. Previous content is largely untouched except for one point: instead of link to “latest activity” on social media Facebook and Instagram, I updated it to be past tense and added Twitter as well.

After the content was updated, I updated the behind-the-scenes infrastructure as well. I had used the Materialize-CSS library for this project, and I thought I would be six years out of date. (Fortunately given it is a static site, the chances of a dangerous security flaw are quite low.) Then I looked at Materialize-CSS library releases and realized I was only about a year out of date. The library reached version 1.0.0 on September 2018 at which point activity stopped. Since it is done I thought I should download the version 1.0.0 CSS and JavaScript files for direct inclusion on my site. There’s no longer any worry of falling out of date, but now there is the worry of the project distribution site disappearing.

Since I only used some superficial capabilities of the library, I did not expect anything to break and visually everything looks fine. I did notice one advancement, though: version 1.0.0 no longer depends on jQuery, so I removed the line loading jQuery from my page.

Is this the end of my interaction with Materialize-CSS? Maybe, maybe not. There’s a potential upside of a library frozen in 2018 at version 1.0.0: It probably still works on Windows Phone browser. I will likely revisit Materialize-CSS if I want to work with Windows Phone browser again. And even if the project site disappears, I have a copy of the library CSS and JavaScript now.

And finally, I added <!DOCTYPE html> to the top of the page. Because I’ve learned that could be important.

Migrate rxbb8.com from AWS to GitHub Pages

After peeling the BB-8 inspired art from my Mazda RX-8, it seems like a good time to do some long-overdue cleanup on the project site as well. Six years ago, I wasn’t sure whether it’s better to build a website for each project or just put everything here on a single personal blog. With experience, I now know my scatterbrained nature is a better fit for the latter. Also, domain registration costs add up quick!

I had created http://rxbb8.com to be a small static web site served via Amazon Web Services, and one of the earlier entries on this blog was an outline of my experience setting it up. What I have forgotten (and did not write down) was why I chose this approach as opposed to using GitHub Pages. I already had a GitHub repository for the markup files, though without the image files. I suspect there was something about GitHub policy six years ago that made it impractical. Was there a file size limit that prevented image files? Another data point was that project predated Microsoft acquiring GitHub which changed a lot of policies. Also, a lot of features were added to GitHub over these years. Is it possible GitHub pages didn’t exist at the time? I no longer remember.

What I do know is that I would like to move it off AWS now. Hosting this site via AWS has been quite affordable. Every month I pay $0.50 USD for the Route 53 name service and a few cents for S3 bandwidth. Historically that has added up to less than half of the domain registration itself, which was $18/yr via DreamHost. However, there’s a hidden risk on that S3 expense: there is no upper bound. If someone decides to write a script to repeatedly download all of my images as quickly as possible, my bill will go up accordingly and I won’t know until I see my bill next month. Sure, it’d cost them bandwidth as well, but most bandwidth are cheaper than S3 rates and that’s assuming they aren’t doing something unethical like consuming some innocent third party’s bandwidth. Six years ago, I dismissed such worry as “Nobody would have a reason to do that.” Now I am older and more cynical. The truth is all it’d take is for one person to decide “because I can” is a good enough reason and cause me grief.

In the time I’ve been learning web development, I’ve come across horror stories of unexpected AWS bills. Always inconvenient, sometimes it leads to people getting fired from their job, and occasionally a startup has to declare bankruptcy and shut down because they can’t pay their AWS bill surprise. Thinking about that possibility has me on edge and I have enough to worry about in my life. I don’t need that stress.

Another reason is to eliminate a recurring stream of nag mail. Setting up a static web site as I have done means setting an Amazon S3 bucket to be globally readable by everyone. This wasn’t a big deal six years ago but there have been multiple cases of people finding confidential data stored in publicly accessible S3 buckets. Because of this, public buckets are now rightly treated as potentially risky. So, Amazon sends periodic email reminding me I have a public bucket and to review that I’m really, really sure I wanted it that way. This is good security practice, but I have enough email spam. I don’t need another stream.

Now that I’ve finally gotten around to moving the site, my steps are:

  1. Upload project image files to existing GitHub repository.
  2. Enable GitHub pages for the repository, which becomes available at https://roger-random.github.io/rxbb8.com/
  3. Log into DreamHost control panel and reset DNS references back to default DreamHost DNS instead of Amazon Route 53 DNS.
  4. Tell DreamHost DNS to forward http://rxbb8.com requests to https://roger-random.github.io/rxbb8.com/

After waiting a day to ensure all DNS changes have propagated, I can deactivate my AWS Route 53 hosted zone and delete my AWS S3 bucket. With the new forwarding action, browser URL bar would visibly change to https://roger-random.github.io/rxbb8.com/ as well. I’m fine with that. If I really wanted to keep the URL bar at http://rxbb8.com, I can read up on how to use a custom domain with GitHub Pages. But right now, my priority is on making what is likely to be the final update to the site.

Removing RXBB8 Plasti-Dip

My RXBB8 project is looking pretty tired after six years, and I’ve decided it’s time to say goodbye and restore my 2004 Mazda RX-8 to its original factory blue. Removing a Plasti-Dip project involved several different distinct steps.

Large Surface Removal

The easiest part is the headline feature of Plasti-Dip: we can peel it off automotive paint. When applied thick enough, large sheets can be peeled off intact. My first full-car Plasti-Dip project only had three coats and it was annoying to remove. RXBB8 had six coats of white plus up to three additional coats for either orange, silver, or black. The hood was easiest to peel on account of its thick layer of Plasti-Dip, followed by the roof and trunk. Those were all horizontal surfaces where I was comfortable applying thick coats. I was afraid of drips on vertical surfaces, so doors and fenders didn’t get as thick of a coat and were correspondingly more difficult to peel off intact.

Ever heard “the first 90% of a project takes 10% of the time”? Removing Plasti-Dip is like that. My car was 90% back to its original blue very quickly, but removing the rest will take a lot more effort.

Edge Cleanup

As large surfaces were removed, they tend to leave fragments of their edges behind. I probably didn’t spray the edges as thickly as the middle, causing them to break apart and be left behind. And since they were already reluctant to leave, taking them off becomes time-consuming. Each of these two fragments took about as much time to cleanup as peeling majority of the bumper.

Overspray Cleanup

Beyond edge pieces lie overspray, super thin bits of Plasti-Dip that is not thick enough to become a peelable layer. Now I need to turn to chemical removal with solvents that can remove Plasti-Dip without damaging the underlying paint. (Or at least, not damage it too much.) I used Xylene, which was the recommended cleanup solvent six years ago, but there might be a better choice now.

In this picture I temporarily removed the rear window so I could reach all of the overspray underneath window edges. Some overspray is accessible without removing any parts, like the doorsill visible through this window.

Detail Cleanup

And finally, I have to pull out the box of Q-Tips so I can remove Plast-Dip that has worked their way into tiny little details. Overspray and detail cleanup is tedious, and I have to take frequent breaks because Xylene fumes are unpleasant even when working in a well-ventilated space.

The problem with detail cleanup is that it feels like a never-ending process. I tackle the most visible things first and when that is done, I take a step back to look for the next most visible area to clean. As I make progress, the “next most visible” area becomes harder and harder to clean. I don’t think I’m going to be able to get absolutely everything, and I have to be resigned to my car having little crooks and crannies of white and orange.

Cleanup in the real world gets messy and possibly never-ending. Fortunately, cleaning up this project in the digital world is a lot more definitive.

RXBB8 Plasti-Dip After Six Years

Around six years ago I decided to use Plasti-Dip to turn my 2004 Mazda RX-8 into a fan tribute to Star Wars BB-8 droid. This project titled RXBB8 was originally intended for a few months, but I loved it enough to keep it on my car for several years. Unfortunately, it has degraded enough I am ready to say goodbye.

No Cracks

Plasti-Dip sprays on as a liquid and dries to a rubbery layer that conforms to the sheetmetal curvature but does not adhere to the paint. That’s the beauty of it: I can peel it off when I’m done. Due to its soft texture, I had expected Plasti-Dip to degrade like all soft texture materials do under relentless Southern California sunshine: turn brittle and crack apart. I was pleasantly surprised to find that it had not done so after six years. It may be a little less stretchy than new, but it was still intact.

Minor Fade

Another failure point I had expected is color fading, another typical reaction for things under sunlight exposure. Plasti-Dip exceeded expectations here as well. I thought the silver parts would hold up but the bright orange to fade. While the color did fade over the years, it did so gradually. More importantly, it faded evenly so I didn’t end up with blotches of different shades of color.

Sharpie Ink Faded

The same could not be said of Sharpie permanent marker ink. For smaller scale details like the emblem and a thumbs-up BB-8 on the trunk, that’s what I used instead of Plasti-Dip. Marker art faded significantly and also faded unevenly so colors were blotchy. This is a lesson learned and I know not to rely on markers for this purpose in the future.

Embedded Dirt

And finally, the biggest reason I’ve decided to peel off RXBB8 is because it has become very difficult to keep clean. Because it is a relatively soft material exposed to road conditions, tiny grains of dirt could embed themselves into Plasti-Dip in a way I couldn’t wash off. Over years this buildup accumulated to the point the car looks dirty even after a good scrub. It is especially noticeable on white! When I had to admit to myself the car looks dirty no matter what I did, it’s time to say goodbye to RXBB8.


Administrative side note: This is the 2000th post of this blog. I learned a lot in my first 1000 posts and adapted my style accordingly. I haven’t changed my format for the next thousand as it’s been working pretty well for me.

Window Shopping Cool Retro Term

I experimented with building a faux VFD effect on modern screens. Just a quick prototype without a lot of polish. Certainly not nearly as much as some other projects out there putting a retro look on modern screens. One of those I’ve been impressed with is cool-retro-term. (Mentioned as almost an aside in this Hackaday article about a mini PDP-11 project.) I installed it on my Ubuntu machine and was very amused to see a window pop up looking like an old school amber CRT computer monitor.

The amber color looks perfect, and the text received a coordinate transform to make the text area look like a curved surface. Not visible in a screenshot are bits of randomness added to the coordinate transform emulating the fact CRT pixels aren’t as precisely located as LCD pixels. There is also a slight visual flicker effect simulating CRT vertical refresh.

The detail I found most impressive is the fact effects aren’t limited to the “glass” area: there is even a slight reflection of text on the “bezel” area!

So how was all this done? Poking around the GitHub repository I think this was written using Qt native UI framework. Qt was something I had ambition to learn, but I’ve put more time into learning web development because of all the free online resources out there. I see a lot of files with the *.qml extension, indicating this is a newer way to create Qt interfaces: QML markup versus API calls from code. Looking around for something that looks like the core of emulating imperfect CRTs, the most promising candidate for a starting point is the file ShaderTerminal.qml. I see mentions of CRT visual attributes like static noise, curvature, flickering, and more.

It should be possible to make an online browser version of this effect. If the vertex shaders in cool-retro-term are too complex for WebGL, it should be possible to port them to WebGPU. Turning that theory into practice would require me to actually get proficient with WebGPU, and learn enough Qt to understand all the nuts and bolts of how cool-retro-term works so I can translate them. Given my to-do list of project ideas, this is unlikely to rise to the top unless some other motivation surfaces.

Faux VFD Experiment on CodePen

Before I can become a hotshot web developer capable of utilizing any library I come across, I need to build up my skills from small projects. One of the ideas that occurred to me recently was motivated by an appreciation for vacuum fluorescent displays (VFD) as used in a Buick Reatta dashboard.

I’ve played with a small VFD salvaged from an old video cassette machine, but that’s nothing like the panorama we see on a Reatta dashboard. It is not something we’re likely to see ever again. The age of VFDs have long since passed and it’s not practical for an average hobbyist to build their own. The circle of people who consider VFD retro cool is probably not big enough to restart VFD manufacturing. That leaves us with building fakes out of technology we have on hand, and I thought I could quickly prototype my idea using web technologies, and here it is:

There are two parts to this faux VFD.

Less obviously visible is the fine hexagonal mesh emulating the control grid I saw when I put my salvaged VFD under a macro lens. I believe it is one of the two electrodes, whether anode or cathode I do not know. But it is a subtle part of a VFD that designers put effort into reducing and masking. Now it is part of the VFD charm and I wanted to replicate it.

Since it is a pattern built out of many small repeating sections, I thought the best way to recreate this mesh is with a bit of JavaScript code drawing to a <canvas>. Otherwise, I would have to create it in markup and that means a lot of duplication in a massive markup file. The innermost section of the loop draws three lines 60 degrees apart, and the loop iterates across the entire display area. Using code to draw vector graphics (versus tiling a bitmap) make this grid dynamically scalable to different resolutions.

Rendered behind the mesh is the “content” of the VFD, which is just a simple circle in this case. Since this is a large feature likely to be subject to direct editing, I decided to do this in SVG markup. My first attempt didn’t look right: modern screens are far too clear and crisp compared to a VFD. Such clarity is useful to render the fine details of my hexagonal control grid, but not for the VFD phosphors. I looked around online and found a SVG blur filter which was a lot closer to how a VFD would look.

I know the result isn’t perfect and I don’t know if I would end up applying this experiment to a future project, but I really liked the fact I could whip up a quick prototype in less than an hour. And furthermore, be able to share the prototype online via infrastructure like CodePen. Even if I don’t end up using it myself, putting it online makes it available for someone else to take this idea further.

Window Shopping Arwes Framework

The reason I want to be able to read JavaScript code written by others, no matter what oddball syntax they want to use, is because I want to be able to leverage the huge selection of web development libraries available freely on the internet. I started learning software development in a very commercialized world where everything costs money. Frameworks, components, technical support, sometimes even documentation costs money. But in today’s open-source world, the biggest cost is the time spent getting up to speed. I want to have the skill to get up to speed quickly, but I’m definitely not there yet.

The latest motivation is a nifty looking web app framework under development called Arwes. (Heard through Hackaday.) Arwes aims to make it easy to build computer interfaces that resemble fictional interfaces we see in science-fiction movies. This is, of course, much easier said than done. What shows up onscreen in a movie typically only needed to serve the purpose of a single scene. Which means a single interaction path, with a single set of data, towards a single goal. It could easily be a PowerPoint slide deck (and sometimes that’s exactly what they are on set.)

Real user interfaces have to handle a wide range of interactions, with a wide range of data, and serving multiple possible tasks. Not to mention having to worry about things never seen onscreen like internationalization and accessibility. Trying to make Sci-Fi onscreen interfaces work in a real world capacity usually ends up as a painful exercise. I’ve seen many efforts to create UI resembling Star Trek: The Next Generation‘s LCARS interface and it always ends up as something that delivers a poor user experience and inefficient use of screen real estate. And there’s the fact copyright around LCARS prevents a free open-source web framework.

I’m confident Arwes will evolve to tackle these and other similar issues. Reading the current state of documentation, I see there exists a set of “Vanilla” controls for use in any web framework of choice, and a sample implementation of such integration with React.js framework. At the moment I don’t know enough to leverage the Vanilla controls directly, and I have yet to learn React. I have more learning ahead of me before I could look at a framework like Arwes and say: “Oh yeah, I know how to use that.” That is still my goal and I’ll get there one small step at a time.

JavaScript Spread Syntax and Other Un-Google-Able Shorthand

I’ve had the opportunity to look at a lot of sample JavaScript code snippets as part of learning web development. For the most part I could follow along, even if I lacked the skill to create something new on my own. Due to its rather haphazard evolution, though, JavaScript does have an annoying habit of having many different ways to do the same thing. Part of this is past-looking historical: as browsers tried to merge different implementations into one globally compatible whole, everyone’s slightly different approaches had to remain valid for backwards compatibility. Part of this is future-looking cultural: well-meaning people try solving old problems by inventing something new intended to do everything the old stuff does “but better”. When combined with the need for backwards compatibility, such efforts meant we end up with the legendary XKCD “Standards”.

Particularly annoying to me are JavaScript syntax additions that are just about impossible to put through a search engine. They’re usually scattered around but I found a Medium post JavaScript’s Shorthand Syntax That Every Developer Should Know that was a pretty good roundup of every single one that had annoyed me. The author pitches these shorthand as enabling “futuristic, minimal, highly-readable, and clean source code!” And as a beginner, I disagree. They are opaque and unreadable to those that didn’t already know them and, due to their nature, it is very hard for newbies to figure out what they mean.

Take the first example: the spread syntax. When I first came across it, what I saw in the source code were three periods. That is not self-explanatory as to its function. This Medium post had a comparison example and touted spread syntax as much cleaner than Array.from(arguments) but I could search for “Array.from()” and “arguments” to learn what that does. Trying to search for “…” was a fruitless exercise in frustration that ended in tears because search engines just ignore “…” as their input. I did not know what the spread syntax was (or even that’s what it was called) thus I was up a creek without a paddle.

The rest of this Medium post covered:

  • Inline short-circuits and nullish coalescing. This uses “||” but any search hits would be buried under information about logical OR operation.
  • Exponential operator and assignment. This is “**” and “**=” which usually gets treated as accidental duplicate characters leading to information about “*” and “*=“.
  • Optional chaining via “?.” a series of punctuation marks who also get ignored by search engines just like “...“.
  • Non-decimal number representation is the least bad of this bunch, at least beginners have something to search with like “What does 0x10 mean in JavaScript”.
  • De-structuring and multiple assignment are the worst. There is literally nothing to put into a search engine. Not even an “...” or “?.” (which gets ignored anyway.) There’s no way for a beginner to tell the syntax would extract selected member values from a JavaScript object.

I can see the value of these JavaScript shorthand for creating terse code, but terse code is not the same as readable code. Even though I’m aware of these concepts now, every time I come across such shorthand I have to stop and think before I could understand the code. It becomes a big speed bump in my thought process, and I don’t like it. I certainly don’t feel it is more readable. However, I have to grudgingly agree the author’s title is true, just not in the way they meant it. They are JavaScript’s Shorthand Syntax That Every Developer Should Know because such code already exists, and every JavaScript developer need to know them well enough to understand code they come across.

Lowering IKEA Chair for Driving Games

I thought there was a good chance my cheap driving wheel setup would sit unused, given my history of buying such peripherals, but I’ve spent several hours in Forza Horizon 5 with my economy-class setup. Not yet enough to justify upgrading to more expensive hardware, but enough to start thinking about low-budget improvements. I’ve been using the wheel and pedal with my living room couch. The seat cushion is approximately the right height, but the seat back is too far back.

There are vendors out there selling racing simulation seats resembling those in real cars. Some people would actually skip the fakery and go to an auto salvage yard to get a seat from a real car. But I’m too cheap for even that approach, for my first draft I want to spend $0 and use what I already have.

I have an old IKEA chair that has been mostly gathering dust. The seat cushion height is too tall for the steering wheel. While the seat back distance is far better than the couch, it is a relatively upright seating position which is unlike what is found in sporting cars.

Since I had my hand saw (and sawdust cleanup tools) already out for messy teardown projects, I decided to cut down this chair’s legs. For the first draft I’ve taken 10cm off the front legs and, to lean back the seating angle, I took 12cm off the back.

It’s still a little higher than my couch cushion and still a pretty upright seating angle, but I want to try a small step before going further. It’s a lot easier to cut the legs shorter than it’d be to cut them longer.

If the changes are too subtle, here are the two pictures side by side.

The first trial run was promising. It is obviously not a real racing seat, and it is not comfortable enough for long endurance sessions. But that shouldn’t be a problem as I haven’t spent too much time in Forza Horizon‘s Mexico yet. So just like before: this cheapo setup will serve until I actually spend enough time to justify spending more money. Besides, it can be argued that if I’ve been sitting in this seat long enough to become uncomfortable, I should probably get up and do something else.


UPDATE: After a few hours of testing this setup, I’ve cut an additional 2cm off the front legs and 4cm off the back. (For a total of 12cm from front and 16cm off back.) This felt even better but puts me at the limit of seat angle: my center of gravity is now far enough back it’s too easy to tilt backwards. If I make another change, it’ll be smaller and reduce seat angle. Maybe a single centimeter off the front and nothing off back.

Brita Water Filter Cartridge Internals

My last teardown got really messy, but that was because I didn’t figure out how to do it right (nondestructively) until the day afterwards. Since I have all of my mess cleanup tools already set up, I decided to tackle projects I had been postponing because I knew they would be messy.

A Brita water filter cartridge is a consumable item to be replaced at regular intervals. From the Wikipedia page for Brita I learned the cartridge contents mostly consisted of “activated carbon” and “ion-exchange resin”.

Some years back, Brita evolved their cartridges to have this inverted-cone shape at the top. This serves as a convenient handle for handling the filter during replacement, but I also understood it had the purpose of diverting the force of water. This filter needs time to do its job, and it is counterproductive to have a stream of tap water force their way directly into the filter. This diverter sends that force sideways.

Given this externally visible mechanism, I started wondering about whether there were any internal mechanisms out of sight. Is this filter just a simple container or are there clever internal baffles to optimize filtering capability? I was also curious if I could see any visible signs of a used filter. I live in an area with hard water where everything that touches water inevitably builds up hard scales. Would I see similar buildup inside a used filter?

When this filter was replaced, I set it aside to dry. I hope it would make things easier to handle and drying would increase the odds of seeing any hard water buildup that might be visible. Once dried, I took a saw and cut it in half. I got the big mess I expected.

This is a closeup of the fine mesh keeping the filter particles out of my drinking water. This is the top mesh, molded from a slightly different textured plastic. There’s also a counterpart bottom mesh. Other than these meshes, there are no internal structures of note inside the filter.

Matching Wikipedia description, I see two different types of material within. I would guess the angular black pieces are activated carbon, and the round translucent yellow-green balls are the ion-exchange resin. And unfortunately, because the action of sawing the cartridge in half created a lot of sawdust from the enclosure’s white plastic, it was not possible to distinguish anything that might be hard water deposit on the filter material.

Burr Type Coffee Grinder Teardown Postscript

I took apart a retired burr-type coffee grinder and had a hard time because I couldn’t figure out how to take it apart nondestructively. After everything was taken apart, I still was puzzled. While I thought over that problem, I took a closer look at the grinding burrs salvaged from the machine.

I had expected the static burr to be different from the rotating burr, but they appear to be identical parts. Once cleaned up, the only difference was damage visible on the rotating burr. It had been held by rivets that I drilled out and the drill bit scraped off some material. I suppose any optimization for better static vs. rotor performance wouldn’t have been worth the cost of having a different part to manufacturer.

They show minor wear after a few years of use, not nearly as much as I had expected. This material is quite tough standing up to the abuse of grinding coffee beans, far beyond what I can reasonably expect to 3D print. However, I am confident I could design and 3D print some other mechanism to reuse these grinding wheels. I’ll put them in the bin of interesting salvaged parts.

Back to the mystery of the grinder motor: while putting the motor away with other salvaged motors, I noticed strong similarity between the burr grinder motor (right) and the Bodnum chopper grinder motor (left). Their bodies have slightly different diameters and lengths, but show very similar construction techniques. The output shaft and mounting also look very similar.

Once I removed the mounting hardware, the two motors output ends are nearly identical. The only difference I can see is the Bodum motor (left) has a slightly longer threaded length.

With that interesting comparison, I turned both motors around. The motor shaft on the left had a slot so I can use a flat-blade screwdriver to keep the shaft from turning while I unscrew the chopping blade. There was no such visible slot on the right side motor, and that contributed to how my teardown became destructive. For the left side motor, I kept the two screws that mounted the motor to the base. The right side motor had two similar looking screws in identical positions. When I was going around removing every fastener I can find, I somehow overlooked this pair.

Removing all the tail end hardware showed an equally close resemblance between the two motors. While there is no flat slot for a screwdriver, the exposed shaft does have slightly flattened sides so I could grab them with an adjustable wrench. This would have allowed me to keep the motor shaft from rotating as I unscrewed the grinding burr and, from there, take the burr grinder apart nondestructively. This would have been good to find out earlier, now it is too late for the dismembered grinder. I’ll try to keep this lesson in mind for future teardowns.