Damaged HP Windows Mixed Reality Headset Tether

In the middle of 2018, I bought a HP Windows Mixed Reality headset (VR1000-100) and it’s been a lot of fun. It lived up to the promise I saw in 2014 from an Oculus DK2 (Development Kit 2) headset, which set a bar never met by a long series of lackluster phone-based VR systems. Which got a little of play then set aside and never used again. I was far more entertained by the HP WMR headset and its 6DOF tracking for superior immersion. I’ve been using it on-and-off over the past several years to the point I needed to replace worn out soft foam parts. But that was small potatoes compared to what happened a few weeks ago: plugging a disconnected tether cable back into the headset, something went wrong and damaged the connector. I went to my workbench for a closer look under better lighting.

I see damage in the outermost metal shield, with a corner of the metal bent pack. I see damage in the black plastic with pieces at the bottom of the well, instead of the sides where they belong. And the worst part: 6-8 thin copper pins bent out of place.

Based on damage, I have a guess on the sequence of events: In the middle of a game, I stepped on the tether and this connector popped free to relieve the sudden strain and keep it from doing damage elsewhere. Falling away from the headset, this connector struck something that bent an exposed corner of the metal shield. Not realizing this damage and eager to get back to my game, I plugged the connector back in. The damaged metal shield made contact and started bending outward. As it bent it also acted as a lever pushing the black plastic and copper connectors inward. They made contact with the other end of this connector but in the wrong shape, resulting in shattered plastic and bent pins.

As this device is long out of support from HP, I headed to eBay to see what I could find. I found a few pairs of controllers, some complete sets purported to be in working condition, and many headsets with some variation of “Not working, for parts only: broken cable.” I guess this is a common failure for these headsets! I had hoped to find an aftermarket replacement cable, but no luck. And I’m not going to spend hundreds of dollars for a secondhand set, I’d rather put that money towards a newer VR headset.

Back to the workbench, I thought I had nothing to lose by trying to repair the connector. I pulled out a set of fine-tipped tweezers. They were designed for SMD work but they were also able to reach inside this connector to pull out pieces of shattered plastic and bend pins back into an approximation of their intended positions. The 7-8 bent pins no longer had plastic backing to apply pressure for optimal electrical conductivity, but they were close to their intended locations and maybe it’s good enough.

Using needle-nosed pliers, I tried to bend the outer metal shield back, but I could not return it to its original shape. Eventually metal fatigue was victorious with the tab breaking off entirely. I accepted my defeat and switched tactics: I filed down remaining jagged edge after adding some tape to protect conductors from metal shavings.

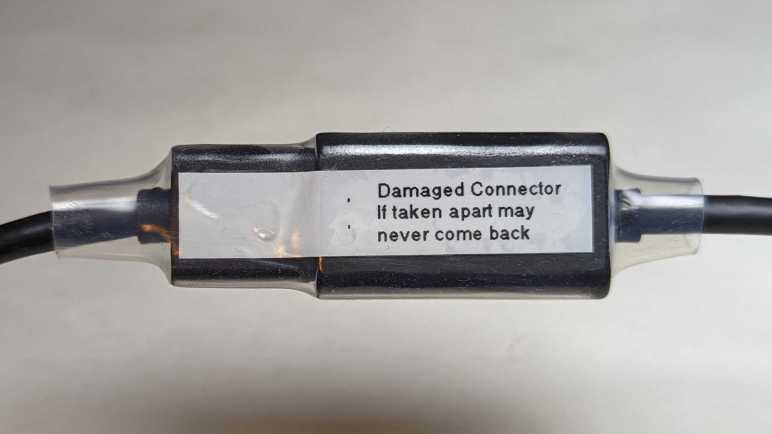
I carefully plugged this connector back in and there were no untoward crunching sensation or sound. I’m pretty sure this connector should never be separated again. I added a label to remind me and then securing the connector with a length of clear heat shrink tube.

I started this experiment thinking I had nothing to lose but, when I had the HDMI plug in my hand reaching to plug it into the computer, I realized I did have something to lose: the computer. What if one or more of these pins were out of place? What if some metal file shavings got into the works despite my taped protection? If I’ve accidentally shorted power to ground, that would do bad things.

Looking in my pile of PC hardware, I reassembled the guts of my decommissioned Luggable PC Mark II. This time I used a proper PC case and so I could plug Radeon R9 380 video card directly into mini-ITX motherboard without the problematic PCI-Express extension cable. This old Radeon R9 380 does not meet minimum system requirements for VR, but it is still a modestly capable GPU and I wouldn’t cry (too much) if it dies.

Plugging the headset into the R9 380, the good news is that an image came up and everything seems to work. The bad news is that I now have this doubt in my mind about the quality of my repair. Yes, it seems to work now, but is it solid or is it marginal? What if one of those loosely-flapping pins start moving around as I am wearing the headset moving around in virtual reality? I am still at risk for electrical faults that can kill an expensive video card. I don’t like it, and I’m going to use it as my excuse to upgrade.

HP Windows Mixed Reality Headset (VR1000-100)

Disappointed by phone-based virtual reality systems, hampered by their limited 3DOF tracking, I committed to spending the money for a PC-based 6DOF system. I didn’t quite go all-in, though, because it was quite possible this headset would also end up just gathering dust. So instead of buying leading-edge hardware, I bought one of the first wave of Windows Mixed Reality headsets after they were discounted to compete with more advanced headsets that launched later. In my case this meant the HP Windows Mixed Reality headset model VR1000-100 and, thankfully, it did not end up just gathering dust. This 6DOF headset was far more enjoyable than lackluster 3DOF setups from Google Cardboard & friends.

This was around mid-2018, a few years after my first experience with a 6DOF PC setup that enchanted me. I eagerly anticipated seeing what a few years of hardware evolution had brought. The first and most immediately noticeable advancement is in display resolution. This headset specification lists 1440×1440 per eye, which multiplies out to double the number of pixels of an Oculus DK2. As expected, I saw the virtual world in much sharper detail. The “screen door effect” of black lines are present if I look for them, but not so thick as to be distracting and I could ignore them.

On the opposite end, the most immediately noticeable problem is frequent loss of tracking of handheld controllers. This headset has just two cameras for tracking, and it’s pretty easy for my controller to move out of view of these two cameras. Newer headsets have four cameras to increase coverage volume. This older headset also lacked built-in audio speakers designed to maximize positional audio effects. It has a standard headphone jack and I plugged in some cheap earbuds, but they don’t work as well as purpose-built speakers.

One downside of a PC-based system is the fact there is a long tether to the computer somewhere nearby, restricting range of motion. I was able to extend the reach with a pair of ten-feet (~3 meter) cables: an HDMI extension cable (*) and a USB3 extension cable. (*) I never noticed any problems that I attributed to these cables, and they let me move around more freely. But they are still cables in the real world, subject to tripping hazard and cord damage. (This would bite me later.)

Every Windows Mixed Reality headset seems to use a common reference design for their handheld controllers. I have been mostly happy with these, especially the wrist straps that saved the controllers from flying across the room on several occasions. They have proven to be very durable. Especially the illuminated LED halo for position tracking. Every once in a while, excited in my virtual world, I would enthusiastically wave and accidentally whack them against each other. In rare occasions, this would cause the controller to reset leading to a few seconds of “Oh no, did I break it?” panic.

One downside of these controllers is their power consumption. The power tray is shaped for standard AA batteries and rechargeable batteries are highly recommended. I tried a pair of non-rechargeable Alkaline AA batteries for curiosity’s sake, and they died within twenty minutes of use. Due to their power consumption I have to recharge my NiMH AAs after every VR sesson, no matter if I use nice Eneloop batteries or cheap AmazonBasics batteries.(*)

I used this headset enough to start wearing out the soft touch portions. After several years of on-and-off usage, the foam surround soaked up enough sweat to smell bad and fall apart. Since HP had discontinued support for this old headset, I had to buy an aftermarket replacement from VR-Cover.

Back to the topic of the cable tether: one engineering design decision that had worried me was the cable connector near my temple. If the cable should tangle up on something, it disconnects. I agree a disconnection is preferable to either yanking the headset off my head, or the laptop off my desk, or ripping the cable out of the HDMI port. But the connector is a nonstandard unidirectional type that is very finicky to plug back in and had very fine-pitched connectors. (I estimate 0.5mm pitch, on par with HDMI or DisplayPort connector but definitely not either of those types.) Such a dense connector with small contact points seems like a bad type to handle violent events like accidental cord jerks.

Eventually it happened: separating in response to an accidental yank, the connector suffered some kind of damage. I didn’t look at it too carefully before plugging it back in. When I did, I felt and heard a crunch. “Oh, no. That can’t be good.” That ended the evening’s VR session and the headset moved over to my electronics workbench for a closer look.


(*) Disclosure: As an Amazon Associate I earn from qualifying purchases.

Ditching Phone-Based Virtual Reality for PC

I was fascinated by virtual reality and my frugality was tempted by Google Cardboard’s promise of phone-based virtual reality on the cheap. But eventually I had to face the reality I wasted a lot of money on disappointing hardware. They were limited to tracking rotation in x, y, and z axes. (3DOF = three degrees of freedom.) I wanted the magic I first experienced with an Oculus Rift DK2 so in 2018 I committed to spend money necessary to move beyond phone-based systems (*) for a PC-based system that tracks both rotation and translation in x, y, and z. (6DOF)

For many years the market consisted of a duopoly between Oculus Rift and HTC Vive. Then Microsoft convinced multiple PC hardware manufacturers to sell 6DOF VR headsets conforming to Microsoft’s Windows Mixed Reality (WMR) specification. While still expensive pieces of hardware, they were slightly more affordable than earlier offers. Competition is good!

No matter which way I went, though, I still needed to upgrade my desktop PC video card and that had been the bigger barrier. The cryptocurrency craze made a new GPU financially unfeasible for many years. Around the middle of 2018 I found a workaround to crypto frenzy: a laptop computer with a VR-capable GPU. Laptops are not cost-effective for cryptocurrency mining, nor could their cooling systems sustain performance for cryptocurrency math around the clock. I wanted a laptop anyway and the cost premium of stepping up to a VR-capable unit was a relative bargain compared to desktop video cards being gobbled up. Around the time I got that laptop, the initial launch wave of WMR headsets like the HP Windows Mixed Reality headset model VR1000-100 could be found at a discount. As newer headsets had released, and first-gen needed discounts to be competitive.

I snapped up that bargain and as soon as I started moving around in my new HP headset, I knew the extra money was worthwhile. 6DOF tracking gave me a sense of immersion that 3DOF tracking could not match. I was glad to be back in the kind of world promised by that Oculus DK2 years ago, and I enjoyed my visits to PC-based virtual worlds far more than I ever enjoyed phone-based virtual experiences.


(*) The Oculus Quest, which launched in 2019 (about a year after this) is a 6DOF VR system that operated standalone without requiring a supporting PC. It had a lot of commonalities with high-end phones like a Qualcomm Snapdragon processor and the Android operating system. It is, however, definitely not a phone.

Google Cardboard and Friends

Almost ten years ago, an Oculus Rift DK2 (Development Kit 2) gave me an exciting peek into consumer-grade virtual reality. I was enthusiastic, but the leading edge of VR technology was still very raw and also very expensive. Trying to make this novel technology more accessible, Google Cardboard was a way to turn Android phones into VR headsets. A simple box so cheap, they can be given away as promotions. I have a BB-8 themed viewer that promoted Star Wars: The Force Awakens.

The downside of using a phone is that we only have an accelerometer to sense device orientation. There’s nothing to sense device position. This meant visuals can rotate in response to a head tilt in roll/pitch/yaw directions (three degrees of freedom or 3DOF) but doesn’t change if we take a step left/right, or a step front/back, or sit/stand/kneel. (Which constitute an additional three degrees of freedom for a total of six or 6DOF.)

I eventually decided trading off three degrees of freedom for low cost was false economy. My virtual reality “Ah-ha” moment of leaning in close to a panel was impossible to do in a 3DOF system like Google Cardboard. It’s not just a matter of missing features: I quickly get motion sickness in 3DOF VR. No matter how I tried to keep my body still, there are small movements in the remaining three degrees of freedom and after a few minutes my body started protesting the lack of visual feedback for that motion.

Still, the price was low, which translated to high distribution volume. People tried to iterate on the idea to grow the market, and I kept hoping I could find something I like. Spending money that I should have saved towards a real 6DOF VR system.

The most entertaining take was a VR revival of the View-Master brand. I had an old-school View-Master with a few picture discs, and that nostalgia motivated me to buy one of these new viewers. Technologically speaking it was merely Google Cardboard in View-Master’s signature red plastic, including the orange “lever”. As it was merely a styling and software effort, the business case failed: VR content cost a lot more to produce than those old View-Master picture discs! The best thing I can say is the fact View-Master experiences were only good for short durations, avoiding my motion sickness issue.

With big brands like Mattel and Google onboard, a lot of other brands jumped into the market looking for a successful niche. This was a “Utopia 360” viewer that added two axes of adjustments to improve visual comfort: (1) focal distance between our eyes and the phone, and (2) IPD adjustment. (Interpupillary Distance, or the distance between eyeballs.) Instead of standard tap-on-screen interface, this viewer bundled a small Bluetooth controller. Unfortunately, these features needed software-side support to be useful, and approximately nobody bothered to do so. (This particular unit had a troublesome spring-loaded generic phone holder, so I decided to make a custom holder as one of my first 3D printing projects.)

Samsung is never shy about throwing money at experimental niches. They took a stab with the Gear VR. Going beyond standard Google Cardboard, Samsung added a directional keypad to the side as well as higher quality accelerometer for faster and more accurate 3DOF feedback. I didn’t have a Samsung phone but had a friend who had a Galaxy S7. I thought he shared my enthusiasm of VR, but I later learned he was just being polite while I spewed my enthusiasm. How did I learn this? I bought this Gear VR for him to use with his phone. Years later, he retired that S7 and donated it to my pile of retired Android phones I keep for random projects. Along with the phone he also returned the Gear VR, still unopened in its packaging. By then Samsung has moved on to other things and shut down their Gear VR software support ecosystem so now I can’t do anything with it either.

My final 3DOF VR experiment was this first-generation Google Daydream viewer. It was a small additional expenditure as I already had a Google Pixel phone to go with it. Daydream was Google’s own evolution of the Cardboard concept, with at least two advancements: there were two capacitive touch nubs on the headset to help the phone align its onscreen image. A handheld remote was included, much like the Utopia 360. Google used their muscle to get more software support for Daydream controllers than Utopia 360 ever got for theirs, but there was no way to overcome the fundamental limitations of 3DOF VR.

This string of experiments firmed up my position on virtual reality: 6DOF or GTFO. By the time Oculus released their Go headset, I dismissed it as just another 3DOF system with no meaningful advantages over my Google Daydream. I decided against buying a Go, saving up money towards a 6DOF system of my own.

My Virtual Reality “A-Ha” Moment

Nearly ten years ago, I got my first taste of consumer-grade virtual reality hardware when I had the opportunity to put an Oculus Rift DK2 (Development Kit 2) on my head. Up until that point, I had only science fiction stories like Star Trek‘s Holodeck and reading about professional/industrial installations that were priced well beyond my reach. I knew Oculus launched their hardware development as a Kickstarter campaign, but I was too skeptical to put in my own money. I was still very interested in the technology, though, so it would come up in conversation with other tech-oriented friends. I learned one of my friends did pitch in the Kickstarter campaign and was slated to receive a DK2. Unfortunately, my friend’s computer did not meet DK2 GPU hardware requirements and in the absence of data they were reluctant to throw more money at it. I saw an opportunity: my gaming PC had a Radeon HD 7950 GPU which met DK2 minimums. (The minimums would be raised for release, excluding my HD 7950, but that came later.) We decided to meet up and plug their DK2 into my PC so we can both see firsthand what it’s all about.

I have vague memories of software installation struggles mostly with batch files and only a few graphical installer applications. I had to give administrator privileges to many unknown binaries and that made me squirm, and there were error messages to address. All of these unpolished edges were normal and expected of a development kit.

I don’t remember any hardware connectivity issues: I think everything plugged in together just fine. When the picture actually came up, the first impression was rather underwhelming. DK2 display panel resolution was relatively low, resulting in a blurry picture as if my eyeglass prescriptions are out of date. Plus, there was a distracting “screen door effect” caused by visible black lines between pixels. But of course, if we just wanted a static viewpoint, we could have just stared at a computer monitor. Things got more interesting once we started moving our heads to look around, leveraging key elements of virtual reality technology.

The demo applications (all under development) were mixed. It was definitely early days for the technology, with lots of people trying ideas to see what works. There were many standalone test apps and a few VR modes grafted onto existing titles. My friend and I quickly reached agreement we didn’t care for the titles that simulated motion independent of our seating position. The worst of those were roller-coaster simulations, one of them caused my friend to loudly proclaim “NOPE!” and yanked the headset off their head. We both got motion-sick from such experiments and had to take a break.

We were starting to think the whole thing might be a waste of time and money when we fired up Elite: Dangerous and its then-experimental VR mode. After our experience with VR roller-coaster and the like, we were not optimistic about flying around in a spaceship. But hey, we’ve come this far, might as well take a look. I remember it took some effort to get the game to switch from computer monitor over to the DK2 headset. My friend fiddling at the keyboard and the DK2 on my head. “Do you see the cockpit yet?” “Nope” “How about now?” “Still nope” Then it came up. “Hey I see something!”

The ship was still unpowered, so the only movement were of my own head. Even then I could look around at the controls and it felt like I was at the controls of a spaceship. A virtual representation of a reality that’s out of my reach: I could go on real rollercoasters; I couldn’t fly real spaceships. This was all very promising, but there was a problem. Elite Dangerous ship cockpits were designed to be shown on high resolution monitors. Sitting in the middle of the cockpit wearing the low resolution DK2 headset, all control labels were blurry and illegible. I suppose if I were already familiar with the game I could go from memory, but I was not familiar with it and didn’t know how to start up my ship.

My friend and I put our brains together, drawing from our collective computer gaming experiences. Maybe pressing “Z” will zoom in? How about the mouse scroll wheel? PgUp/PgDn? Arrow keys? The answer was none of those, because this was something new. I forgot which of us had the insight to lean closer to the panel, but I leaned closer to the labels and found I could read them. Such a simple thing we would do in the real world without thinking, but somehow it took several minutes for us to think of doing it in the VR world.

That was my VR “A-ha” moment. I no longer remember anything from that day after that moment. Did we manage to get our ship into space? Did we get motion sickness from flying around? It didn’t matter. The mundane act of leaning closer to read labels was the moment it clicked in my mind, and I was hooked on the concept of virtual reality. Sadly, I was too cheap to commit to good VR with 6DOF tracking and wasted a lot of money on cheaper 3DOF headsets like Google Cardboard and friends.

Extracted Magnets from Wired Earbuds

Headphone jacks are disappearing from recent phones, which is a shame. Thanks to global volume, wired earbuds have become simple and effective accessories for audio on-the-go. So inexpensive as to be practically disposable, the price fits with the fact they have a finite and short lifespan. As the wires flex and bend, they eventually break and cause intermittent connections audible as cracks and pops. Which was why this particular set (Monoprice #18591) was retired.

Compact and lightweight, there’s hardly any material here at all to reclaim or recycle. But there’s a small rare earth magnet inside each earbud, and I want to extract them before the remaining carcass heads to the landfill. Similar to what I did to a retired iPad cover case.

These earbuds had been waiting processing for a while, hence the dust.

The soft rubber layer pops off easily. As I recall this was a user-replaceable item. The earbuds came with three sizes. The midsize one is installed by default, with smaller and larger sizes in the package the user can switch to best match the size of their ear canal.

There were no further user-serviceable parts. Everything else is molded or glued together so I had to break things apart with a pair of pliers.

Inside the black plastic enclosure is a shiny metal case for the tiny soundmaker.

Prying off the front metal plate exposes the thin membrane that vibrates with a small copper coil. Inside the center of that copper coil is the magnet I seek.

The magnet is glued to the enclosure, but thankfully the glue here wasn’t very strong. Bending the sheet metal to get more clearance, I was able to reach in with a thin metal tool and pop out the magnet.

Attached to the magnet is a thin metal circle of the same diameter. I think it serves as a spacer, held on by the same not-very-strong glue so I could separate it from the magnet.

Here’s the entire stack disassembled. Circled in red square is the magnet I will keep. Remainder will head to landfill.

Compass Project Updated with Angular Signals

I’ve been digging through the sample for Getting Started with Angular Signals code lab and learned a lot beyond its primary aim of teaching me Angular Signals. But a beginner could only absorb so much. After learning a whole bunch of things including drag-and-drop with the Angular CDK, my brain is full. I need to get back to hands-on practice to apply (some of) what I’ve learned and cement the lessons. Which means it’s time for my Angular practice app Compass (recently upgraded to Angular 16) to use Angular Signals!

In my practice app, I created a service to disseminate magnetometer sensor information. It subscribed to the relevant W3C sensor API and publishes data via RxJS BehaviorSubject. I didn’t know it at a time, but I had effectively recreated a Signal using much more powerful (and heavyweight) RxJS mechanisms. One by one I converted to broadcast data via signals: magnetometer x/y/z data, magnetometer service status (user-readable text string), and finally service state (an enumeration). I also removed the workaround of making an explicit call to Angular change detection. I never did understand why I needed it under Mozilla Firefox and Microsoft Edge but not under Google Chrome. But after switching to Angular signals, I had different change detection problems to investigate.

The switchover greatly simplified my application code, making it much more straightforward to read and understand. Running in a browser on my development desktop computer, I didn’t have real magnetometer data but my placeholder data stream (sending data to the same signals) worked well. Making me optimistic as I deployed, and then surprised when I failed to see magnetometer data updates on an Android phone.

Since the failure was specific to the device, it was time for me to set up Chrome remote debugging for my phone. My development desktop has Android Studio installed, so all of the device drivers for hardware debugging were in place. Following instructions on the Chrome documentation page DevTools/Remote Debugging, I established a connection between Chrome DevTools on my desktop and Chrome on my phone. Forwarding port 4200 for my Angular development server, I could load up a development mode version of my app for easier debugging. Another advantage was that it’d show up as http://localhost:4200. The magnetometer sensor API is restricted to web code served via https:// but there’s an exemption for http://localhost for debugging as I’m doing.

I was happy to find the Chrome DevTools advertised at Google I/O worked very well in practice: there is a source map allowing me to navigate execution in terms of my Angular TypeScript source code (versus the transpiled JavaScript) and I could use logpoints to see execution progress without having to add console.log() to my app. Thanks to those lovely tools I was able to quickly determine that magnetometer reading event handler was getting called as expected. That callback function called signal set() with new data, but those signals’ dependencies were never called. I had two in Compass: numerical text in HTML template to display raw coordinates onscreen, and code to update position of compass needle drawn via three.js.

Just like earlier, I had a problem with Angular Signals code not getting called and breakpoints can’t help debug why calls aren’t happening. I reviewed the same documentation again but gained no insights this time. (I have the proper injection context, so what now?) Experimenting with various hypothesis, I found one hit: there’s something special about the calling context of a sensor reading event handler incompatible with Angular signals. If I add a timed polling loop calling the exact same code (but outside the context of a sensor callback) then my magnetometer updates occur as expected.

This gives me a workaround, but right now I don’t know if this problem is an actual bug with Angular Signals or if it is merely hacking over a mistake I’ve made elsewhere. I need more Angular practice to gain experience to determine which is which.


Source code for this project is publicly available on GitHub.

Angular Signals Code Lab Drag & Drop Letters

After looking over some purely decorative CSS in the Angular Signals code lab sample application, I dug around elsewhere in the source code for interesting things to learn. The next item that caught my attention was the “keyboard” where we drag-and-dropped letters to create our decoder. How was this done?

Inside the HTML template code, I found an attribute cdkDropListGroup on the keyboard container. A web search pointed me to the Angular CDK (Control Development Kit.) Angular CDK is a library that packages many common web app behaviors we can use in our own custom controls, one of them being drag-and-drop as used in the Angular Signals sample app. The CDK is apparently under the umbrella of Angular Material, which has a set of fully implemented app controls implemented to the Material Design specification. Many of them use the CDK for their own implementation.

Drag-and-drop behavior in Angular CDK is very flexible and has many options for configuring behavior. Such flexibility and options unfortunately also meant it’s easy for a beginner to get lost. I’m thankful I have the Angular Signals code lab cipher app. It lets me look over a very specific simple use of CDK drag-and-drop.

Here’s an excerpt of the HTML template for the cipher keyboard in file cipher.ts, stripped of everything unrelated to drag-and-drop.

<div class="cipher-wrapper" cdkDropListGroup>
    <div class="key-container">
      <letter-key
        *ngFor="let l of this.cipher.alphabet"
        cdkDropList
        cdkDropListSortingDisabled
        [cdkDropListData]="l"/>
    </div>
    <div class="guess-container"
      cdkDropList
      cdkDropListSortingDisabled>
      <letter-guess
        *ngFor="let l of this.cipher.unsolvedAlphabet()"
        cdkDrag
        [cdkDragData]="l"
        (cdkDragDropped)="drop($event)">
        <div class="placeholder" *cdkDragPlaceholder></div>
      </letter-guess>
    </div>
  </div>

It has two containers, one for a list of custom control letter-key and and another for a list of letter-guess. Drag-and-drop is all encapsulated here in cipher.ts, there’s nothing in either of those two controls concerning drag-and-drop.

Uniting these two containers is a div with cdkDropListGroup which associates all child cdkDropList elements together. This allows us to drag individual letter-guess (tagged with cdkDrag) from one cdkDropList onto the sibling cdkDropList of letter-key. These properties are enough to let Angular CDK know how to respond to pointer input events to manipulate these elements. All the app has to do is register a cdkDragDropped listener for when a cdkDrag element is dropped into a cdkDropList.

I poked around the code looking for how a letter-guess sits in the key-container after it has been dropped into the right location. The answer is: it doesn’t, that’s just an illusion. When a letter is dropped into the correct location, it is removed from the list returned by this.cipher.unsolvedalphabet(). Meaning that particular letter-guess I had been dragging disappears. The letter-key I had dragged it onto, however, will pick up a new CSS class and change its appearance to look as if the letter-guess stayed in that location.

I had to spend some time flipping between looking at source code and looking at CDK drag-and-drop API documentation. But once I made that time investment, I could understand how this app utilized the library. Once understood, I’m impressed at how little work is required in an Angular app to pick up very complex behavior from Angular CDK.

I look forward to leveraging this capability in my own projects in the future. Before that, though, I can try using Angular signals in my Compass practice app.

Angular Signals Code Lab Decorative CSS

I want to understand the Angular Signals code lab project beyond what was set up for signals practice. While learning why layout for <body> looks funny, I stumbled across CSS quirks mode which I hadn’t known before. And since I’m already in a CSS mindset, I stayed on topic to understand a few places where the sample app used CSS to create aesthetic visuals.

The first item I wanted to understand was a large list of <div> in index.html, taking up more than half of the lines in the file. I originally thought it had something to do with the alphabet cipher keyboard, but it was actually implementation of the fake speaker grill. CSS class .sound-grid is a grid of 8 columns filled with a <div> styled to be a small circle. There were 48 of them to create 6 rows in those 8 columns. Some of these circles are dark representing holes, some light representing… something else, and four corner circles were transparent to de-emphasize the rectangular nature of a grid.

That was kind of neat. And the next item I wanted to understand was the green screen display resembling a monochrome LED like an old Game Boy. I was curious how the graph paper grid was implemented, and the answer is a CSS linear gradient (class .message::before) given parameters to be very not smooth in the gradient transition in order to create a grid. I was mildly confused looking at the gradient and text styles, as they are all working in grayscale. The answer is another piece of CSS (.message::after) that gave a green tint over the entire screen area plus a bit of blur for good effect.

While these are nifty creations, I am curious why CSS was used here. Both the fake speaker and screen grid feel like vector graphic tasks, which I had thought was the domain of either SVG (if via markup) or canvas (if via code). What’s the advantage of using CSS instead? Sure, it worked in this case, but it feels like using the wrong tool for the job. I hope to eventually learn reasons beyond “because we can”. For now, I turn my attention to other functional bits of this sample application.

Angular Signals Code Lab CSS Requires “No-Quirks” Mode

The sample application for “Getting Started with Angular Signals” is designed to run on the StackBlitz cloud-based development environment. Getting it up and running properly on my local machine (after solving installation and compilation errors) took more effort than I had expected. I wouldn’t call the experience enjoyable, but it was certainly an educational trip through all the infrastructure underlying an Angular app. Now I have all the functional components up and running, I turn my attention to the visual appearance of the app. The layout only seems to work for certain window sizes and not others. I saw a chance for me to practice my CSS layout debugging skills, but what it also taught me was “HTML quirks mode”.

The sample app was styled to resemble a small hand-held device in the vein of the original Nintendo Game Boy: a monochrome screen up top and a keyboard on the bottom. (On second thought, maybe it’s supposed to be a Blackberry.) This app didn’t have audio effects, but there’s a little fake speaker grill in the lower right for a visual finish. The green “enclosure” of this handheld device is the <body> tag of the page, styled with border-radius for its rounded corners and box-shadow to hint at 3D shape.

When things go wrong, the screen and keyboard spills over the right edge of the body. Each of which had CSS specifying a height of 47% and an almost-square aspect-ratio of 10/9. The width, then, would be a function of those two values. The fact that they become too wide and spill over the right edge means they have “too much” height for the specified aspect ratio.

Working my way up the component tree, I found the source of “too much” height was the body tag, which has CSS specifying a width (clamped within a range) and an aspect-ratio of 10/17. The height, then, should be a function of those two values. When things go wrong, the width seems to be clamped to maximum of specified range as expected, but the body is too tall. Something has taken precedence over aspect-ratio:10/17 but that’s where I got stuck: I couldn’t figure out what the CSS layout system had decided was more important than maintaining aspect ratio.

After failing to find an explanation on my own, I turned to the StackBlitz example which worked correctly. Since I’ve learned the online StackBlitz example isn’t exactly the same as the GitHub repository, the first thing I did is to compare CSS. They seemed to match minus the syntax errors I had to fix locally, so that’s not it. I had a hypothesis that StackBlitz has something in their IDE page hierarchy and that’s why it worked in the preview pane. But clicking “Open in new tab” to run the app independent of the rest of StackBlitz IDE HTML still looks fine. Inspecting the object tree and associated stylesheets side-by-side, I saw that my local copy seems to have duplicated styles. But since that just meant one copy completely overrides the other identical copy, it wouldn’t be the explanation.

The next difference I noticed between StackBlitz and local copy is the HTML document type declaration at the top of index.html.

<!DOCTYPE html>

This is absent from project source code, but StackBlitz added it to the root when it opened the app in a new tab. I doubted it had anything to do with my problem because it isn’t a CSS declaration. But in the interest of eliminating differences between them, I added <!DOCTYPE html> to the top of my index.html.

I was amazed to find that was the key. CSS layout now respects aspect-ratio and constrains height of the body, which kept screen and keyboard from spilling over. But… why does the HTML document type declaration affect CSS behavior? A web search eventually led me to the answer: backwards compatibility or “Quirks Mode”. By default, browsers emulate behavior of older browsers. What are those non-standards-compliant behaviors? That is a deep dark rabbit hole I intend to avoid as much as I can. But it’s clear one or more quirks affected aspect-ratio used in this sample app. Having the HTML document type declaration at the top of my HTML activates the “no-quirks” mode that intends to strictly adhere to modern HTML and CSS standards, and now layout works as intended.

The moral of today’s story: Remember to put <!DOCTYPE html> at the top of my index.html for every web app project. If things go wrong, at least the mistake is likely my own fault. Without the tag, there are intentional weirdness because some old browser got things wrong years ago and I don’t want that to mess me up. (Again.)

Right now, I have a hard enough time getting CSS to do my bidding for normal things. Long term, I want to become familiar enough with CSS to make it do not just functional but also fun decorative things.


My code changes are made in my fork of the code lab repository in branch signals-get-started.

Running “Getting Started with Angular Signals” Code Lab Locally

After fixing local Angular build errors for the Getting Started with Angular Signals code lab sample application, I saw it was up and running but not running correctly. Given the fact I had to fix installation errors for this sample before fixing the build errors, seeing runtime errors were not a surprise.

Of course, some of the missing functionality is intentional, because this is a hands-on code lab where we fill in a few intentional gaps to see Angular signals in action. I’ve done the exercise once before on StackBlitz so I knew what to expect. The signal() and computed() exercises went smoothly, but the effect() had no effect. Every time solvedMessage signal changed, our effect() was supposed to compare it against superSecretMessage. And if they matched, launch a little confetti effect. I saw the completion confetti on StackBlitz, and nothing on my local version. Time to start debugging.

There were no error messages, so I started by adding a few console.log() to see what is and isn’t happening. It led me to the conclusion that the code inside my effect() call was not getting executed. This is a bit of a pickle. Standard debugging procedure is to attach a breakpoint to an interesting piece of code and see what happens when it is called. But in this case, my problem is that the code was not getting called. D’oh! A breakpoint on code inside effect() would be useless because it is never hit. In these situations, the next thing to try is setting a breakpoint somewhere upstream. Ideally in the bit of logic that decided whether to call my code or not. Unfortunately, here it means setting a breakpoint somewhere inside Angular’s implementation of effect() and I don’t know where that is or where to even start looking. I barely understand code in an Angular application, digging into Angular framework internals is beyond my current skill level.

At a loss on how to find my answer in code, I decided to revisit the documentation. Specifically, re-reading Angular Signals developer guide. Since it’s a new feature in developer preview, it’s still relatively sparse document and not something overwhelmingly long. I hoped to find an answer here and the most promising information is about Injection context. It explained effect() requires something called an injection context and gave a few examples of how to make sure an effect() has what it needs. The document didn’t say what happens if an effect() did not have an injection context so I have no idea if my problem match the expected symptoms. Still, it was worth a shot.

For the code lab, we were instructed to put our effect() inside the ngOnInit() function. I don’t know if ngOnInit() has an injection context, but it isn’t in any of the examples listed in documentation. I followed the first example of putting my effect() in the constructor. Once that code was moved, my console.log() messages inside started sending data to the developer console and, when I solved the cipher, I see a pop of confetti. Success!

I’m glad that worked, because it was a stab in the dark and I’m not sure what I would try next if it had not worked. So how did the StackBlitz example’s effect() throw up confetti upon completion if ngOnInit() had no injection context? Comparing code I see a difference: in the StackBlitz project, the prompt “// TODO(3): Add your first effect()” was in the constructor and not ngOnInit() as per both the GitHub repository and code lab instruction text. I had wrongly thought StackBlitz cloned from the same GitHub repository. And now that I know the code is different, it helps explain “How the heck did this even work on StackBlitz” mystery.

I’m glad I got the code lab application up and running correctly locally on my own computer, but there’s something weird with its CSS layout I need to investigate.


My code changes are made in my fork of the code lab repository in branch signals-get-started.

Compiling “Getting Started with Angular Signals” Code Lab Locally

It was easy to follow “Getting Started with Angular Signals” tasks with the online StackBlitz development environment, but as a practice exercise I wanted to get it up and running on my own computer. This turned out to be more challenging than expected, with several problems I had to fix before I could install dependencies on my computer with “npm install“.

Successful installation of project dependencies moved me to the next part of the challenge: Angular project issues. Running “ng serve” resulted in the following error:

Error: Schema validation failed with the following errors:
  Data path "" must have required property 'tsConfig'.

Unfortunately, there was no filename associated with this error message, so it took a lot of wrong turns before I found the answer. I compared files between my Compass project and this demo project and eventually figured out this was referring to the "build"/"options" section in angular.json. In my Compass project, I had a “tsConfig” entry pointing to a file tsconfig.app.json. This code lab exercise project’s angular.json is missing that entry and missing the file tsconfig.app.json. I copied both from my Compass project to reach the next set of errors:

Error: src/cipher/cipher.ts:1:21 - error TS2305: Module '"@angular/core"' has no exported member 'effect'.

1 import { Component, effect, OnInit } from '@angular/core';

This is just the first of several errors, all complaining that the newfangled Angular signal mechanisms signal, computed, and effect were missing from @angular/core. Well, of course they wouldn’t be. The packages.json file specified Angular 15, and signals were one of the new touted features of Angular 16. Running “ng update” I was informed of the following:

Using package manager: npm
Collecting installed dependencies...
Found 25 dependencies.
    We analyzed your package.json, there are some packages to update:
    
      Name                               Version                  Command to update
     --------------------------------------------------------------------------------
      @angular/cdk                       15.2.9 -> 16.0.1         ng update @angular/cdk
      @angular/cli                       15.2.8 -> 16.0.2         ng update @angular/cli
      @angular/core                      15.2.9 -> 16.0.3         ng update @angular/core
      @angular/material                  15.2.9 -> 16.0.1         ng update @angular/material

So I ran “ng update @angular/cdk @angular/cli @angular/core @angular/material“. It was mostly successful but there was one error:

Migration failed: Tsconfig cannot not be read: /src/tsconfig.spec.json
  See "/tmp/ng-QdC8Cc/angular-errors.log" for further details.

Judging by the “spec.json” suffix this has something to do with Angular testing and I will choose to ignore that error. Now when I run “ng serve” I no longer get complaints about missing Angular signal mechanisms. I get syntax errors instead:

./src/cipher/guess/letter-guess.ts-2.css?ngResource!=!./node_modules/@ngtools/webpack/src/loaders/inline-resource.js!./src/cipher/guess/letter-guess.ts - Error: Module build failed (from ./node_modules/postcss-loader/dist/cjs.js):
SyntaxError

(17:5) /workspaces/codelabs/src/cipher/guess/letter-guess.ts Unclosed block

  15 |     }
  16 | 
> 17 |     p {
     |     ^
  18 |       font-size: clamp(16px, 3vw, 20px);
  19 |       margin: 0;


./src/secret-message/secret-message.ts-5.css?ngResource!=!./node_modules/@ngtools/webpack/src/loaders/inline-resource.js!./src/secret-message/secret-message.ts - Error: Module build failed (from ./node_modules/postcss-loader/dist/cjs.js):
SyntaxError

(87:10) /workspaces/codelabs/src/secret-message/secret-message.ts Unknown word

  85 |       font-size: clamp(10px, 3vw, 20px);
  86 | 
> 87 |       // color: #c0e0c7;
     |          ^
  88 |       text-shadow: -1px -1px 1.2px rgb(255 255 255 / 50%), 1px 1px 1px rgb(1 1 1 / 7%);
  89 |       background: transparent;

This sample project has component CSS as string literals inside the TypeScript source code files. This is a valid approach, but these bits of CSS were broken. For the first one, the paragraph style didn’t have a closing brace, exactly as the error message complained. Adding a closing brace resolved that error. The second stylesheet error used double-slash comment style which isn’t how CSS comments work. Changing that over to /* comment */ style resolved that error. After all of those changes, the little cipher app is up and running onscreen with some visual errors relative to what I saw for the same project StackBlitz.

How did StackBlitz run despite these problems? I’m going to guess that it has its own default tsconfig and did not require one to be specified. In the repository package.json I see that @angular/core was specified as “next“. Apparently StackBlitz interpreted that to be something new that included signals, whereas my local machine decided “next” is the same “15.2.9” as everything else which did not. As for the CSS syntax errors… I have no guesses and that remains a mystery to me.

But at least now I have something running locally, and I got a useful exercise understanding and fixing Angular build errors. Now onward to fixing runtime errors.


My code changes are made in my fork of the code lab repository in branch signals-get-started.

Installing “Getting Started with Angular Signals” Code Lab Locally

I revisited Compass, my Angular practice project, in light of what I’ve recently learned about Angular standalone components & other things. And now I’ll rewind back to Getting Started with Angular Signals code lab. I’ve gone through the primary exercise of Angular signals, but the app has many more lessons to teach me. The first one is: how do I fix a broken Angular build? Because while the code lab works fine on the recommended StackBlitz online environment, it failed to install locally on my development machine when I ran “npm install

npm ERR! code ERESOLVE
npm ERR! ERESOLVE unable to resolve dependency tree
npm ERR! 
npm ERR! While resolving: qgnioqqrg.github@0.0.0
npm ERR! Found: @angular/compiler@15.2.9
npm ERR! node_modules/@angular/compiler
npm ERR!   @angular/compiler@"^15.2.2" from the root project
npm ERR! 
npm ERR! Could not resolve dependency:
npm ERR! peer @angular/compiler@"15.1.0-next.2" from @angular/compiler-cli@15.1.0-next.2
npm ERR! node_modules/@angular/compiler-cli
npm ERR!   dev @angular/compiler-cli@"15.1.0-next.2" from the root project

Earlier, for the sake of doing the Angular signals code lab, I resorted to using error-free StackBlitz. Now I want to get it working locally. Checking the versions published to NPM for @angular/compiler package, I see 15.1.0-next.2 listed. @angular/compiler-cli also showed a 15.1.0-next.2 as a valid version. Their presence eliminated the “listing nonexisting version” as a candidate problem.

What’s next? I thought it might be how @angular/compiler has several different versions listed. Not just 15.1.0-next.2 that I checked, but also 15.2.9 and 15.2.2. Why don’t they match? Looking for the source of these version numbers, I looked through the repository and found they were listed in package.json file. I see 15.1.0-next.2 was explicitly named for the three @angular/[...] components under devDependencies, while “^15.2.2” is specified for all the @angular/[...] components under dependencies. That “^” prefix is apparently a “caret range” specifier, and 15.2.9 is the latest version that satisfies the caret range.

In order to make all @angular/[...] component versions consistent, I replaced all three instances of “15.1.0-next.2” with “^15.2.2“. That got me to the next error.

npm ERR! code ERESOLVE
npm ERR! ERESOLVE unable to resolve dependency tree
npm ERR! 
npm ERR! While resolving: qgnioqqrg.github@0.0.0
npm ERR! Found: typescript@4.7.4
npm ERR! node_modules/typescript
npm ERR!   dev typescript@"~4.7.2" from the root project
npm ERR! 
npm ERR! Could not resolve dependency:
npm ERR! peer typescript@">=4.8.2 <5.0" from @angular/compiler-cli@15.2.9
npm ERR! node_modules/@angular/compiler-cli
npm ERR!   dev @angular/compiler-cli@"^15.2.2" from the root project
npm ERR!   peer @angular/compiler-cli@"^15.0.0" from @angular-devkit/build-angular@15.2.8
npm ERR!   node_modules/@angular-devkit/build-angular
npm ERR!     dev @angular-devkit/build-angular@"^15.2.2" from the root project

Updating to 15.2.9 meant TypeScript “~4.7.2” is too old. Not fully understand what changed between those versions, I tried the lowest version listed as acceptable: 4.8.2. These version number changes were required to make them consistent with each other, and that is enough to bring me to the next error:

npm ERR! code ERESOLVE
npm ERR! ERESOLVE could not resolve
npm ERR! 
npm ERR! While resolving: qgnioqqrg.github@0.0.0
npm ERR! Found: @angular/animations@16.0.3
npm ERR! node_modules/@angular/animations
npm ERR!   peer @angular/animations@"^16.0.0 || ^17.0.0" from @angular/material@16.0.1
npm ERR!   node_modules/@angular/material
npm ERR!     @angular/material@"^15.2.2" from the root project
npm ERR!   peerOptional @angular/animations@"16.0.3" from @angular/platform-browser@16.0.3
npm ERR!   node_modules/@angular/platform-browser
npm ERR!     peer @angular/platform-browser@"16.0.3" from @angular/forms@16.0.3
npm ERR!     node_modules/@angular/forms
npm ERR!       peer @angular/forms@"^16.0.0 || ^17.0.0" from @angular/material@16.0.1
npm ERR!       node_modules/@angular/material
npm ERR!         @angular/material@"^15.2.2" from the root project
npm ERR!       1 more (the root project)
npm ERR!     peer @angular/platform-browser@"^16.0.0 || ^17.0.0" from @angular/material@16.0.1
npm ERR!     node_modules/@angular/material
npm ERR!       @angular/material@"^15.2.2" from the root project
npm ERR!     3 more (@angular/platform-browser-dynamic, @angular/router, the root project)
npm ERR!   1 more (the root project)
npm ERR! 
npm ERR! Could not resolve dependency:
npm ERR! @angular/animations@"^15.2.2" from the root project
npm ERR! 
npm ERR! Conflicting peer dependency: @angular/core@15.2.9
npm ERR! node_modules/@angular/core
npm ERR!   peer @angular/core@"15.2.9" from @angular/animations@15.2.9
npm ERR!   node_modules/@angular/animations
npm ERR!     @angular/animations@"^15.2.2" from the root project

Since I had upgraded my Angular tools to v16 for Compass, I now have a problem with this project which specified an older version. Now I have to downgrade with the following steps:

  1. Uninstalling Angular v16 via “npm uninstall -g @angular/cli
  2. Flush v16 binaries from my project tree with “rm -rf node_modules
  3. Installing 15.2.2 with “npm install -g @angular/cli@15.2.2“.

With these version numbers updated, I was able to run “npm install” successfully to install remaining dependencies.

How did this work on StackBlitz when I had problems on my local machine? I hypothesize that StackBlitz handles their installation procedure differently than a local “npm install“. If they ignore the “devDependencies” section, there wouldn’t have been a conflict with “15.1.0-next.2” modules. And if they ignored the caret range and used “15.2.2” exactly instead moving up to 15.2.9, there wouldn’t have been a TypeScript conflict either.

For now, I have solved my Node.js package management headaches and onwards to Angular headaches.


My code changes are made in my fork of the code lab repository in branch signals-get-started.

Compass Project Updated to Angular 16, Standalone Components

After reading up on Angular Forms (both template-driven and reactive) I was ready to switch gears for some hands-on practice of what I’ve recently learned. My only Angular practice project so far is my Compass app. I couldn’t think of a reasonable way to practice Angular reactive forms with it, but I could practice a few other new learnings.

Angular 16 Upgrade

Every major Angular version upgrade is accompanied by a lot of information. Starting with the broadest strokes on the Angular Blog “Angular v16 is here!“, then more details in Angular documentation under “Updates and releases” as “Update Angular to v16” which points to an Angular Update Guide app that will list all the nuts and bolts details we should watch out for.

My compass app is very simple, so I get to practice Angular version upgrade on easy mode. Before I ran the update script, though, I thought I’d take a snapshot of my app size to see how it is impacted by upgrade.

Initial Chunk Files           | Names         |  Raw Size | Estimated Transfer Size
main.0432b89ce9f334d0.js      | main          | 642.10 kB |               145.70 kB
polyfills.342580026a9ebec0.js | polyfills     |  33.08 kB |                10.65 kB
runtime.7c1518bc3d8e48a2.js   | runtime       | 892 bytes |               513 bytes
styles.e5365f8304590c7a.css   | styles        |  51 bytes |                45 bytes

                              | Initial Total | 676.11 kB |               156.89 kB

Build at: 2023-05-23T23:37:24.621Z - Hash: a00cb4a3df82243e - Time: 22092ms

After running “ng update @angular/cli @angular/core“, Compass was up to Angular 16.

Initial Chunk Files           | Names         |  Raw Size | Estimated Transfer Size
main.6fd12210225d0aec.js      | main          | 645.17 kB |               146.60 kB
polyfills.f00f35de5fea72bd.js | polyfills     |  32.98 kB |                10.62 kB
runtime.7c1518bc3d8e48a2.js   | runtime       | 892 bytes |               513 bytes
styles.e5365f8304590c7a.css   | styles        |  51 bytes |                45 bytes

                              | Initial Total | 679.08 kB |               157.76 kB

Build at: 2023-05-23T23:50:05.468Z - Hash: f595c7c43b5422f4 - Time: 29271ms

Looks like it grew by 3 kilobytes, which is hard to complain about when it is 0.5% of app size.

Standalone Components

I then converted Compass components to become standalone components. Following the “Migrate an existing Angular project to standalone” guide, most of the straightforward conversion can be accomplished by running “ng generate @angular/core:standalone” three times. Each pass converts a different aspect of the project (convert components to standalone, remove vestigial NgModule, application bootstrap for standalone API) and we have an opportunity to verify our app still works.

Initial Chunk Files           | Names         |  Raw Size | Estimated Transfer Size
main.39226bf17498cc2d.js      | main          | 643.58 kB |               146.35 kB
polyfills.f00f35de5fea72bd.js | polyfills     |  32.98 kB |                10.62 kB
runtime.7c1518bc3d8e48a2.js   | runtime       | 892 bytes |               513 bytes
styles.e5365f8304590c7a.css   | styles        |  51 bytes |                45 bytes

                              | Initial Total | 677.48 kB |               157.52 kB

Since Compass is a pretty simple app, eliminating NgModule didn’t change very much. All the same things (declare dependencies, etc.) still had to be done, they just live in different places. From a code size perspective, eliminating NgModule shrunk app size down by about 1.5 kilobytes, reclaiming about half of the minimal growth from converting to v16.

Remove Router

Compass is a very simple app that really didn’t use the Angular router for any of its advanced capabilities. Heck, with a single URL it didn’t even use any Angular router capability. But as a beginner, copying and pasting code from tutorials without fully understanding everything, I didn’t know that at the time. Now I know enough to recognize the router portions of the app (thanks to standalone components code lab) I could go in and remove router from Compass.

Initial Chunk Files           | Names         |  Raw Size | Estimated Transfer Size
main.4a58a43e0cb90db0.js      | main          | 565.24 kB |               128.77 kB
polyfills.f00f35de5fea72bd.js | polyfills     |  32.98 kB |                10.62 kB
runtime.7c1518bc3d8e48a2.js   | runtime       | 892 bytes |               513 bytes
styles.e5365f8304590c7a.css   | styles        |  51 bytes |                45 bytes

                              | Initial Total | 599.14 kB |               139.94 kB

Build at: 2023-05-24T00:30:36.609Z - Hash: 155b70d2931a3e06 - Time: 18666ms

Ah, now we’re talking. App size shrunk by about 77 kilobytes, quite significant relative to other changes.

Fix PWA Service Worker

And finally, I realized my mistake when playing with turning Compass into a PWA (Progressive Web App): I never told it anything about the deployment server. By default, a PWA assumes the Angular app lives at the root of the URL. My Compass web app is hosted via GitHub Pages at https://roger-random.github.io/compass, which is not the root of the URL. (That would be https://roger-random.github.io) In order for path resolution to work correctly, I had to pass in the path information via --base-href parameter for ng build and ng deploy. Once I started doing that (I updated my npm scripts to make it easier) I no longer see HTTP 404 errors in PWA service worker status page.

I’m happy with these improvements. I expect my Compass web app project will continue to improve alongside my understanding of Angular. The next step in that journey is to dive back into the Angular Signals code lab.


Source code for this project is publicly available on GitHub.

Notes on Angular “Forms” Guide

A quick survey of Google App Engine and other options for hosting Node.js web applications found a few free resources if I should start venturing into web projects that require running server-side code. That survey was motivated by the Getting Started with Angular Standalone Components code lab which included instructions to host our Angular app on Google App Engine. That example application also made use of form input, an Angular topic that I knew I needed to study if I were to build useful Angular apps.

As it’s such a big part of web development, Angular’s developer guide naturally included a section on forms. The first time I read the forms overview, I got as far as learning there were two paths to building forms on Angular: “Reactive Forms” and “Template-Driven Forms”. At the time, I didn’t know enough Angular to understand how they differ, so I put the topic aside for later. I almost managed to forget about it, because the Angular “Tour of Heroes” tutorial (which I took twice) didn’t use any forms at all! The standalone components code lab reminded me it’s something I needed to get back into.

This time around, I understood their difference: Reactive forms are almost entirely specified in TypeScript code, whereas template-driven forms are mostly specified via directives in HTML markup template. Template-driven forms resemble what I saw in Vue.js with v-model directives, allowing simple forms to be built with very little work. As scenarios get more complex, though, template-driven forms become limiting, and some features (like dynamic forms and strictly typed forms) are only available in reactive forms.

Both approaches use the FormControl class for underlying code functionality. Each instance corresponds to a single input field in the HTML form. As forms usually have more than one input field, they are collected in a FormControlGroup. A FormControlGroup can nest inside another as desired to represent a logical structure in the form. FormControlArray is an alternative way to group several FormControl together, focused on dynamic organization at runtime.

To validate data user has entered into the form, Angular has a Validators library that covers common data validation activities. Where equivalent HTML validation functionality exist, the Angular Validators code replaces them by default. Custom data validation logic would naturally have to be written in code, but they can be attached either programmatically in a reactive form or via directives in template-driven forms.

Common control status like valid, invalid, etc. can be accessed programmatically as boolean properties on AbstractControl (common base class for FormControl, FormControlGroup, etc.) They are also automatically reflected on the CSS classes of associated HTML input control with .ng-valid, .ng-invalid, etc. Handy for styling.

After reading through this developer guide, I’ve decided to focus on reactive forms for my projects in the near future based on the following reasons:

  • The sample applications I’ve already looked at for reference use reactive forms. This includes the recently-completed standalone components code lab and the starter e-commerce project.
  • My brain usually has an easier time reasoning about code than markup, and reactive forms are more code-centric or the two.
  • Data updates in reactive forms are synchronous, versus asynchronous updates in template-driven forms. If given the choice, synchronous code is usually easier for me to debug.
  • I like data type enforcement of TypeScript, and strictly-typed forms are exclusive to reactive forms. I like the ability to explicitly list expected data types (plus a null for when form is reset) via <type|null> and declare fields expected to be optional with the “?” suffix.

While I understood this developer guide a lot better than the first time I tried reading it, there are still a lot of information I don’t understand yet. Features like asynchronous validators are topics I’ll postpone until the time when I need to learn them. I’ve already got too much theoretical Angular stuff in my head and I need to get some hands-on practice before I forget them all.

Window Shopping Google App Engine (And Some Competitors)

I think I have a working understanding of Angular Standalone components and plan to use them for my future Angular projects. But the sample application in “Getting Started with Angular Standalone Components” code lab had other details worth looking into. Two Google cloud services were included in the exercise: Diagflow Messenger and App Engine. I assume their inclusion were a bit of Google product cross-promotion, as neither were strictly required to build Angular applications using standalone components.

Diagflow Messenger makes it easy to incorporate a chatbot onto your page. I personally always ignore chatbots as much as I can, so I’m not likely to incorporate one to my own project. On the other hand, Google App Engine looks interesting.

The standalone component code lab project only used App Engine to host static files via express.static. In that respect, it could have just as easily been hosted via GitHub Pages, which is what I’ve been using because my projects so far have been strictly static affairs. But I have ambition for more dynamic projects in the future and for those ideas I’ll need a server. When I took the Ruby on Rails Tutorial (twice) aspiring web developers could host their projects on Heroku’s free tier. Unfortunately, Heroku has since eliminated their free tier. Web development learners like me will have to look elsewhere for a free option.

Heroku implemented their service on top of Amazon Web Services. Looking around AWS documentation, I didn’t find an equivalent service making it trivial to deploy backend projects like Ruby on Rails or Node.js. We could certainly roll our own on top AWS EC2 instances and there’s a tutorial to do so but it’s not free. While there’s an EC2 introductory offer for 750 free hours in the first 12 months, after that there’s nothing in Amazon’s always-free tier for this kind of usage.

Google App Engine is similar to Heroku in offering developer-friendly way to deploy backend projects, in this case Node.js. And even better, basic level services are free if I stay within relevant quotas. According to documentation, this service is built on containers rather than EC2 virtual machines like Heroku. I don’t know if there’s enough of a difference in developer experience for me to worry about. One footnote I noticed was the list of system packages available to my projects. I saw a few names that might be useful like FFmpeg, ImageMagick, and SQLite. (Aside: The documentation page also claims Chrome headless, but I don’t actually see it on the list.)

To round out the big three, I poked around Microsoft’s Azure documentation. I found Azure App Service and instructions for deploying a Node.js web app. Azure also offers a free tier and it sounds like the free tier is also subject to quotas. Unlike Google App Engine, everything on Azure comes to a halt if I hit free tier quotas. For experiments, I prefer Azure’s approach of halting. Exceeding free tier limits on Google App Engine starts charging money rather than taking my app offline. If I build something I want to actually use, I might prefer Google’s method. Sure, I might have to pay a few bucks, but at least I can still access my app.

These two free plans should be good enough for me to learn and evolve my skills, assuming they don’t disapper as Heroku free tier did. If I get far enough in my web application development adventures to be willing to pay for server capacity, I’m will also look into an independent offering like DreamHost’s DreamCompute or one of DigitalOcean’s products for Node.js hosting.

But that’s for later. Right now, I have more I could learn from Angular standalone components code lab sample application.

Angular Standalone Components for Future Projects

Reading through Angular developer guide for standalone components filled in many of the gaps left after going through the “Getting Started with Angular Standalone Components” code lab. The two are complementary: the developer guide gave us reasons why standalone components exist, and the code lab gave us a taste of how to put them to use. Between framework infrastructure and library support, it becomes practical to make Angular components stand independently from Angular modules.

Which is great, but one important detail is missing from the documentation I’ve read. If it’s such a great idea to have components independent from NgModule, why did components need NgModule to begin with? I assume sometime in the history of Angular, having components live in NgModule was a better idea than having components stand alone. Not knowing those reasons is a blank spot in my Angular understanding.

I had expected to come across some information on when to use standalone components and when to package components in NgModule. Almost every software development design decision is a tradeoff between competing requirements, and I had expected to learn when using a NgModule is a better tradeoff than not having them. But I haven’t seen anything to that effect. It’s possible past reasons for NgModule has gradually atrophied as Angular evolved with the rest of the web, leaving a husk that we can leave behind and there’s no reason to go back. I would still appreciate seeing words to that effect from the Angular team, though.

One purported benefit was to ease the Angular learning curve, making it so we only have to declare dependencies in the component we’re working on instead of having to do it both in the component and in its associated NgModule. As a beginner that reason sounds good to me, so I guess should write future Angular projects with standalone components until I have a reason not to. It’s a fine plan but I worry I might run into situations when using NgModule would be a better choice and I wouldn’t recognize “a reason not to” when it is staring me in the face.

On the topic of future projects, at some point I expect I’ll grow beyond serving static content via GitHub Pages. Fortunately, I think I have a few free/trial options to explore before committing money.

Notes on Angular “Standalone Components” Guide

I went through the code lab Getting Started with Angular Standalone Components to see standalone components in action. The exercise provided a quick overview and a useful background to keep me focused while reading through corresponding documentation on the topic: Angular’s developer guide for standalone components. The opening paragraph advertised reducing the need for NgModule. Existing Angular applications can convert to using standalone components in a piecemeal fashion: it’s not an all-or-nothing choice.

Current standard Angular code structure packages one or more related components in a NgModule, which defines their shared configuration such as dependency injection. This made sense for solving problems like reducing duplication across similar components. Unfortunately, it would also bring its own set of problems which standalone components are intended to solve. Here is my current beginner’s understanding of these problems. (Likely with some mistake in the details):

The first and most relevant problem for Angular beginners like me is that every change to component dependency requires editing files in two locations. Beginners have to remember to jump back and forth: it’s not enough to add a new dependency in the component we are working on, we also have to remember to add new import references to the associated NgModule. (Which, for small beginner projects, is a single global NgModule.) This got to be pretty annoying when I was playing with adding Angular Material to Tour of Heroes tutorial.

Eventually an Angular developer would want to graduate beyond a single NgModule, at which point they’re faced with the challenge of code refactoring. Which dependencies were brought in for which components needed to be sorted out to see which imports can be omitted from a NgModule and which ones needs to be duplicated.

One motivation for splitting an Angular application into multiple NgModule is to speed up application load time. Load just what we need to run, when we need to run them. This is especially important on startup, put something up on screen as fast as possible for the user to know the application hasn’t frozen. Changing around which components are loaded, and when, is a lot easier when they are standalone and Angular introduced new lazy-loading mechanisms to take advantage.

There are other advantages to standalone components, but those three are enough for me to get an idea of the general direction. Enough motivation to learn all the new mechanisms introduced to replace what used to be done with NgModule. Starting with the root component, which every application has. If we want to make that standalone, we need to use bootstrapApplication() to define application-level configuration. Some framework level providers have added a standalone-friendly counterpart. A standalone component can use provideRouter() instead of importProvidersFrom(RouterModule.forRoot). The challenge is to find them in the documentation when we need them! I’m sure this will be a recurring issue as I intend to adopt standalone components for my future Angular projects.

Notes on “Getting Started with Standalone Components” Code Lab

I enjoyed the code lab exercise of Getting Started with Angular Signals, and I think I can learn even more from the exercise application source code. First up is learning “Angular Standalone”. I’ve seen mentions of this feature before, but I misunderstood it to be an advanced feature I should postpone until later. It wasn’t until an Angular presentation at Google I/O 2023 that I learned standalone components were intended to make Angular easier for beginners. My mistake! I noticed the Cipher sample project for Angular Signals were itself built with standalone components. Conveniently, the final page of that code lab pointed to another one: Getting Started with Standalone Components. So, I clicked that link to get my first look.

This code lab is a little bit older, about a year old judging from the fact it was written for Angular 14. But it wasn’t too far out of date because I was able to follow along on Angular 16 with only minor differences. That said, some Angular knowledge was required to make those necessary on-the-fly changes and I wouldn’t have known enough to do that earlier. Despite its bare-bones nature, template HTML in this code lab application used semantic HTML tags like <article> and <section>. I was happy to see that.

I learned a few things in addition to the main topic. As part of converting the boilerplate Angular application to use standalone components, I finally learned to recognized how Angular router is included in an app. Angular router is very powerful, core of component navigation and associated features like lazy-loading components. But it is big! For the sake of exercise, I took my newfound knowledge and built an empty Angular app without router. That came out to ~160kb from ng build. Adding the router back in and running ng build again got ~220kB of code. This means adding router ballooned size by over 37%. (220/160=1.375) Wow. At least now I think I know how to strip the router out of simple Angular applications that don’t need it.

This sample app also gave me another example of HTML forms in Angular. I’m still not very confident in building my own Angular app to take form input, but I think I understand enough to recognize this application is using the “reactive form” option in Angular. Not the “template-driven form” option which uses the NgModel directive that (at least to my limited knowledge) resembles Vue.js v-model.

And finally, this code lab sample application plugged Google Cloud services that have nothing to do with Angular standalone. “How to embed a chat dialogue in a standalone component using Dialogflow Messenger” and “How to deploy an Angular application to Google Cloud App Engine using Google Cloud CLI (gcloud)“. I’m probably never going to look at Diagflow Messenger again, but Google’s App Engine is interesting enough for a look later. Right now I want to follow this code lab with a dive into Angular developer guide for standalone components.

Notes on “Getting Started with Angular Signals” Code Lab

As part of Google’s I/O 2023 developer conference, they released several code labs that went with some of the talks. We can get a quick taste of new technology with these low-overhead exercises. I went through the WebGPU code lab out of curiosity to learn basics of modern GPU hardware programming. In contrast, I went into Getting Started with Angular Signals with more than just curiosity. I had full expectation I’ll learn stuff I can use in future Angular projects.

Project source code is set up for us to run in the browser (on StackBlitz infrastructure) with no need for local machine installation. Since I expect to use Angular Signals in future projects, I thought I’d clone the repo into my typical Angular environment: a Visual Studio dev container running locally. However, I ran into an error while running “npm install“:

While resolving: qgnioqqrg.github@0.0.0
Found: @angular/compiler@15.2.9
node_modules/@angular/compiler
  @angular/compiler@"^15.2.2" from the root project

Could not resolve dependency:
peer @angular/compiler@"15.1.0-next.2" from @angular/compiler-cli@15.1.0-next.2
node_modules/@angular/compiler-cli
  dev @angular/compiler-cli@"15.1.0-next.2" from the root project

This might have been easy to resolve with a little time, but StackBlitz was ready to go with no time. I decided to postpone debugging this situation until later and went through this code lab exercise on StackBlitz. It was fine, pretty much exactly what I saw in the video presentation associated with this code lab. We get to use signal() (the reactive piece of data), computed() (which reacts to other signal(s) and deliver its own reactive result) and effect() (which also reacts to other signal but does not deliver its own reactive result.) After going through Vue.js documentation recently, I recognize these as closely analogous to Vue’s data, computed, and watch.

If that’s all I got out of the code lab project, I would be disappointed because I hadn’t learn anything in addition to what was covered in the video presentation. But unlike the video presentation, I have the rest of the project in hand for me to sink my teeth into. The first thing I wanted to investigate was the “Angular Standalone” concept, which I had thought was an advanced technique. But one of the Angular seesions at Google I/O told me I was wrong: It was something intended to make Angular easier for beginners and small-scale projects. I should look into that! This Angular Signals code lab project makes use of standalone:true and I wanted to learn more. Fortunately for me, this code lab linked to an earlier code lab Getting Started with Standalone Components.