Death Clock User Input Integration

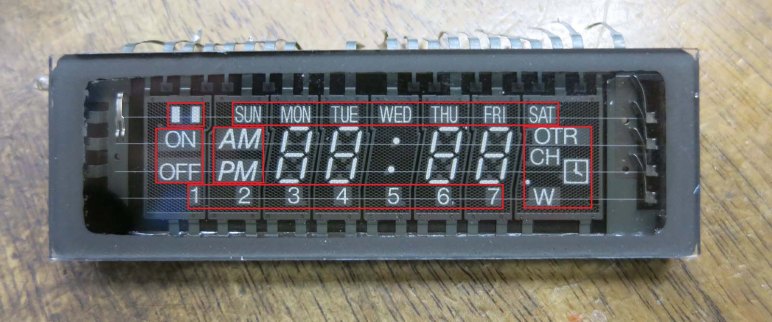
After our brief orientation on a capacitive touch input sensor, Emily and I started looking into how we would integrate it into our Death Clock project. During the course of this research we also learned that according to Microchip our PIC microcontroller is supposedly capable of touch input as well, without needing a separate sensor peripheral. We’re going to file that information away for another day since already got this touch board in hand and we’ve learned enough to try using it.

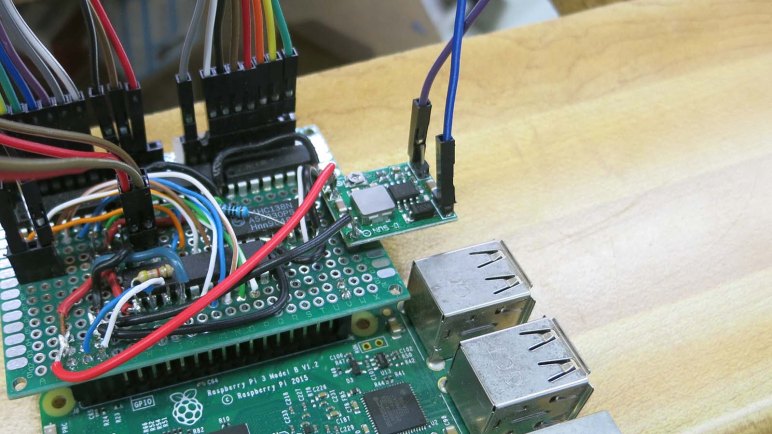
Since our Death Clock state machine will be running on our Raspberry Pi, it made the most sense to interface this touch board to our Pi via one of its available GPIO pins. I had previously soldered an extra pair of pins and at the time it was merely for the purpose of mechanical support. Looking on a Raspberry Pi GPIO reference chart, though, we see these two pins (#39 and 40 on the pinout chart) are GPIO21 and GND and coincidentally perfect for our use. Our touch sensor board signals detection by pulling its output signal line to ground, so once we’ve configured GPIO21 for digital input with internal pull-up, we can easily test (without sensor board) by grounding GPIO21 to its adjacent GND pin with a piece of conductive metal like a paperclip or a coin.

Raspberry Pi GPIO pins can tolerate a maximum of 3.3 volts, so for the actual sensor board we’ll have to tap power from 3.3V pin on Pi header instead of the 5V we’re using for our PIC. Ground and GPIO21 already have headers, and those three points are all we need to wire up our touch sensor to our Pi. After that the sensor board requires just one more wire – the touch sense input wire – but that will lead elsewhere in the Death Clock enclosure and not to the Raspberry Pi.

Examining Adafruit AT42QT1070 Capacitive Touch Sensor Breakout

The Death Clock logic is built around user action to trigger its little show for amusement. While we could easily incorporate a micro switch or some such simple mechanical input, Emily felt it would make more sense to have a capacitive touch sensor. This fits into the theme of the clock, sensing and reading a person’s body instead of merely detecting a mechanical movement. So we’ll need something to perform this touch sensing and she procured an Adafruit #1362, AT42QT1070 5-Pad Capacitive Touch Sensor Breakout Board for use. Inside the package was a set of leads for breadboard experimentation, so we soldered them on, put the works on a breadboard, and started playing with it.

Initially the board worked mostly as advertised on Adafruit product page, but it is a lot more finicky than we had anticipated. We encountered frequent false positives (signaled touch when we haven’t touched the contact) and false negatives (did not signal touch when we have touched the contact.) Generally the unpredictability got worse as we used larger pieces of conductive material. Either in the form of longer wires, or in the form of large metal blocks we could touch.

Digging into the datasheet linked from Adafruit’s site, we learned that the sensor runs through a self calibration routine upon powerup, and about a “guard” that can be connected to something not intended as touch contact in order to form a reference for intended touch contacts. The calibration routine explains why we got wild readings as we experimented with different touch pads – we should have power cycled the chip with each new arrangement to let it recalibrate.

After we started power-cycling the chip, we got slightly better results, but we still needed to keep conductive material to a minimum for reliable operation. We played with the guard key and failed to discern noticeable improvement in touch sense reliability, perhaps we’re not using it right?

For Death Clock implementation we will try to keep the sensor board as close to the touch point as we can, and minimize wire length and electrical connections. Hopefully that’ll give us enough reliability.

Death Clock Code Organization

When we established our set of display states for the Death Clock project, we knew there would need to be a state machine somewhere in its logic to manage those display states. And when we designated different zones that can be composited together for a single frame in our display animation, we knew there would need to be some kind of animation engine in charge of corresponding work. These requirements formed our starting point for designing and organizing code for Death Clock.

The state machine was implemented as an infinite loop running an if/elif/else loop checking for our state value. Each clause corresponds to a display state and has (1) calls to code handling that display and (2) conditions to transition to another state. The state machine resides in a single class deathclock which also owns the reference to Pi GPIO library for display. It may make sense to split the I2C communication to another class but there’s no need to do so just yet.

Different display states require different operations to assemble their animation frame. An attempt to create a master animation engine capable of all operations became unnecessarily complex and was eventually abandoned. Instead, we’ll have multiple classes (nyancat, thinkingface, and deathtime) each of which will stay focused on the type of operations required for a single display state. This keeps the simple animations simple, and allows us to experiment with more complex animations without fear of damaging unrelated display states. This will result in some code duplication that we can come back to refactor later, but keeping each display state animation code separate lets us iterate ideas faster.

Code discussed in this blog post is available on Github.

Raspberry Pi GPIO Library Gracefully Degrades When Not On Pi

Our custom drive board for our vacuum fluorescent display (VFD) is built around a PIC which accepts commands via I2C. We tested this setup using a Raspberry Pi and we plan to continue doing so in the Death Clock project. An easy way to perform I2C communication on Raspberry Pi is the pigpio library which was what our test programs have used so far.

While Emily continues working on hardware work items, I wanted to get started on Death Clock software. But it does mean I’d have to work on software in absence of the actual hardware. This isn’t a big problem, because the pigpio library degrades gracefully when not running on a Pi. So it’ll be easy for my program to switch between two modes: one when running on the Pi with the driver board, and one without.

The key is the pigpio library’s feature to remotely communicate with a Pi. The module that actually interfaces with Pi hardware is called the pigpio daemon, and it can be configured to accept commands from the local network, which may or may not be generated by another Pi. Which is why the pigpio library could be installed and imported on a non-Pi like my desktop.

pigpiod fallback

For development purposes, then, I could act as if my desktop wants to communicate with a pigpio daemon over the network and, when it fails to connect, fall back to the mode without a Pi. In practice this means trying to open a Pi’s GPIO pins by calling pigpio.pi() and then checking its connected property. If true, we are running on a Pi. And if not, we go with the fallback path.

This is a very straightforward and graceful fallback to make it simple for me to develop Death Clock code on my desktop machine without our actual VFD hardware. I can get the basic logic up and running, though I won’t know how it will actually look. I might be able to rig up something to visualize my results, but basic logic comes first.

Code discussed in this blog post are visible on Github.

Display Zones of Vacuum Fluorescent Display

Now that we have a set of states for what to display on our vacuum fluorescent display (VFD) we’ll need to start dividing up the zones we’ll composite together to create the display at any given point in time.

The easiest part are digits at the center: core functionality is to display a time of day on four digits and the colon at their center. We might do something non-digital with them in other animated states, but we know we’ll show numbers appropriate for a time of day at some point.

To the left of those digits are the AM/PM elements, which will be part of time display. And as long as we’re display a time of day, we know only one of those two will be illuminated. They will never be both illuminated, nor both dark.

Above them are the days of week, and we know we’ll illuminate one and only one when showing our death prediction. Not more than one, and not zero.

Beyond these known zones, things get a little fuzzier. The ON/OFF elements are tentatively marked into their own zone, and the two rectangles above them in their own zone. The numbers 1 through 7 at the bottom will probably be their own zone, and finally off to the far right we have the “miscellaneous” section with OTR, CH, W, a clock face, and a dot. We have no plans to use any of them at the moment, but that could change.

Bit Operations For Death Clock Display

The way we’ve wired up our VFD (vacuum fluorescent display) control board, each segment on a VFD is a bit we can manipulate from the driver program. It can be anything that communicates via I2C and right now that is a Python script running on a Raspberry Pi. VFD pattern data in Python will be represented in the form of byte literals as outlined in PEP #3112. This is something we’ve already started using in existing Python test scripts. The ‘b‘ in front is how we designate this string as a byte literal. Each byte within is described with a leading backslash ‘\‘ and two hexadecimal digits. Each digit represents half (4 bits) of a byte.

Our VFD hardware board is wired so setting a bit high will ground the corresponding element, turning it dark. Setting a bit low will allow pull-up resistors to raise voltage of the element, illuminating it. This particular VFD unit has 8 pins for grids and 11 pins for elements. However, not all combinations are valid for illuminating a specific segment. There’s room blocked out for bits in our control pattern corresponding to these combinations, but they will have no effect on VFD output. For more details, see the VFD pattern spreadsheet where bits without a corresponding physical segment had their checkboxes deleted.

So far so good, and for Death Clock we will take the next step beyond showing a fixed set of static patterns. We’ll have to start changing bits around during runtime to do things like displaying the day of week and time of day. Manipulating our VFD pattern byte literals with Python bitwise operators allow us to take multiple bit patterns, each representing one subset of what we want to show, and combine them together into the pattern we send to the PIC for display. This is conceptually similar to compositing in video production, but at a much simpler scale.

Death Clock Display States

At this point we have decided on what the Death Clock project will do, established priorities of how we’ll go about it, and the hardware we’ll use for our first iteration. Now it is time to sit down and get into the details of what code we’ll write. This will be more sophisticated than just looping a single list of animation frames. Here are the candidate states in the sequence they are likely to run:

  • Initial power-on: As soon as the Python script starts running, we want to send a VFD pattern to establish the Pi is communicating with the PIC. This pattern doesn’t have to be fancy, its main purpose is to visually show our Python code has at least started running. So all it really needs to be is to be different from the PIC’s power-on default pattern.
  • Waiting to start: We might want a pattern to be displayed after the Python script has started running, but before we can act like a Death Clock. At the moment we don’t know of anything that require such a delay, so we’ll skip over this one for now.
  • Attraction loop: An animation sequence inviting people to touch the capacitive sensor button. Any text will have to be shown as a scrolling marquee of text using the four 7-segment digit displays. Might want to superimpose animations using remaining segments. This can start simple and get fancier as we go.
  • Thinking and processing loop: Once touched, we might want to do a little show for the sake of presentation. There’s no practical reason to need this as a Pi can generate a random time effectively instantaneously. But where’s the suspense in that? We don’t have to do this in the first test run, this can be added later.
  • Oracle speaks: Present the randomly chosen day of week and time of day. May or may not do anything with the remaining segments. This is the core functionality so we’ll need to look at this one first.
  • Thank you come again: Animation sequence transitioning from “Oracle speaks” display to “attraction loop”. This is again for presentation and can be skipped for the first test run and added later.

Raspberry Pi Drives Death Clock

Since this was the first time Emily and I built something to light up a VFD (vacuum fluorescent display) we expected things to go wrong. Given this expectation, I wanted to be able to easily and rapidly iterate through different VFD patterns to pin down problems. I didn’t want to reflash the PIC every time I wanted to change a pattern, so the PIC driver code was written to accept new patterns over I2C. Almost anything can send the byte sequences necessary — Arduino, ESP32, Pi, etc — but what was handy that day was a Raspberry Pi 3 previously configured as backup Sawppy brain.

The ability to write short Python scripts to send different bit patterns turned out to be very helpful when tracking down an errant pin shorted to ground. It was much faster to edit a Python file over SSH and rerun it than it was to reflash the PIC every time. And since we’ve got it working this far, we’ll continue with this system for the following reasons:

  • The established project priority is to stay with what we’ve already got working, not get sidetracked by potential improvements.
  • Emily already had a Raspberry Pi Zero that could be deployed for the task. Underpowered for many tasks, a Pi Zero would have no problem with something this simple.
  • A Raspberry Pi Zero is a very limited platform and a bit of a pain to develop on, but fortunately the common architecture across all Raspberry Pi implies we can do all our work on a Raspberry Pi 3 like we’ve been doing. Once done, we can transfer the microSD into a Raspberry Pi Zero and everything will work. Does that theory translate to practice? We’ll find out!
  • We’ve all read of Raspberry Pi corrupting their microSD storage in fixed installations like this, where it’s impossible to guarantee the Pi will be gracefully shut down before power is disconnected. But how bad is this problem, really? At Maker Faire we talked to a few people who claimed the risk is overblown. What better way to find out than to test it ourselves?

On paper it seems like a Death Clock could be completely implemented in a PIC. But that requires extensive modification of our PIC code for doubious gain. Yeah, a Raspberry Pi is overkill, but it’s what we already have working, and there are some interesting things to learn by doing so. Stay the course and full steam ahead!

Death Clock Project Priorities

A project that started with exploration of VFD (vacuum fluorescent display) has evolved into a fun little project the Death Clock. Emily has an aesthetic in mind for its external enclosure and I’m fully on board with it. What’s inside the box will be dictated by the priorities we’ve agreed on. The overriding theme is focus: we’ve spent a lot of time and effort getting this far, let’s focus on putting it in use and not get distracted.

For the power system, we will use parts from the original device as we’ve done in our experiments so far. This means the original transformer, rectifier module, and several capacitors. There was the temptation to turn this into a battery-powered contraption for better portability and easier show-and-telling, but that’s a distraction today. We can tackle battery power for a future VFD project.

For the control system, we will use the exploratory control board we’ve rigged up. It is a simple circuit with an 8-bit PIC driving three ULN2003A Darlington arrays. Plus a 3-to-8 bit decoder to help with grid control. We started looking at the Microchip HV5812, a control chip designed specifically for driving VFDs, but that’s a distraction today. We can consider that chip for a future VFD project.

And finally, staying with the theme meant the simple software running on the PIC will remain as-is. I had considered adding the capability to control brightness of individual segments: fade effects are rarely seen in old VFD screens and I thought it would be a fun differentiator between old and new. But again that would be a distraction now and I can pursue it later. Potentially in conjunction with Microchip HV5812 above.

Keeping it simple and avoid feature creep. That’s the key to finishing projects instead of letting them drag on forever.

VFD Project: The Death Clock

Emily and I have been working with a VFD (vacuum fluorescent display) salvaged from a piece of old electronics. The primary objective was to demystify this now-obsolete class of technology, and with the screen lighting up to our commands, that part has been a success. But we’re not content to just leave it be… we want to do something with it. Hence the secondary objective: using this old and left-for-dead piece of technology in a “Death Clock”

What is a “Death “Clock” in this context? It’s a clock, but not a timepiece. If someone wanted a VFD clock which tells the time of day, go to a thrift store and rummage around. We didn’t go through all this work just to duplicate that! No, what we’re going to do is a quirky fun electronics project off the beaten path.

The core functionality is fairly basic, we will put a random value on this display’s time-of-day and day-of-week capability. It will do so when commanded by a touch sensor. The gag is that the clock has touched your body and sensed the time and day you will die. Completely unscientific, it’s just a fun gag. And since it’s random: if you don’t like the answer, just touch it again for another prediction on your death.

If anyone is still unsure why Emily has named her YouTube channel “Emily’s Electric Oddities“, this project should serve as prime example. Emily has done most of the electrical work and has started building prototype enclosures. My responsibility will be producing code to run this display.

Here’s Emily describing the project during episode 5 of Hackaweek Coast2Coast. (This URL should already be cued to the correct time, but if YouTube is uncooperative, skip ahead to 54:10.)