Switching to ESP32 For Next Exercise

After deciding to move data processing off of the microcontroller, it would make sense to repeat my exercise with an even cheaper microcontroller. But there aren’t a lot of WiFi-capable microcontrollers cheaper than an ESP8266. So I looked at the associated decision to communicate via MQTT instead, because removing requirement for an InfluxDB client library meant opening up potential for other development platforms.

I thought it’d be interesting to step up to ESP8266’s big brother, the ESP32. I could still develop with the Arduino platform with an ESP32 but for the sake of practice I’m switching to Espressif’s ESP-IDF platform. There isn’t an InfluxDB client library for ESP-IDF, but it does have a MQTT library.

ESP32 has more than one ADC channel, and they are more flexible than the single channel on board the ESP8266. However, that is not a motivate at the moment as I don’t have an immediate use for that advantage. I thought it might be interesting to measure current as well as voltage. Unfortunately given how noisy my amateur circuits have proven to be, I doubt I could build a circuit that can pick up the tiny voltage drop across a shunt resistor. Best to delegate that to a dedicated module designed by people who know what they are doing.

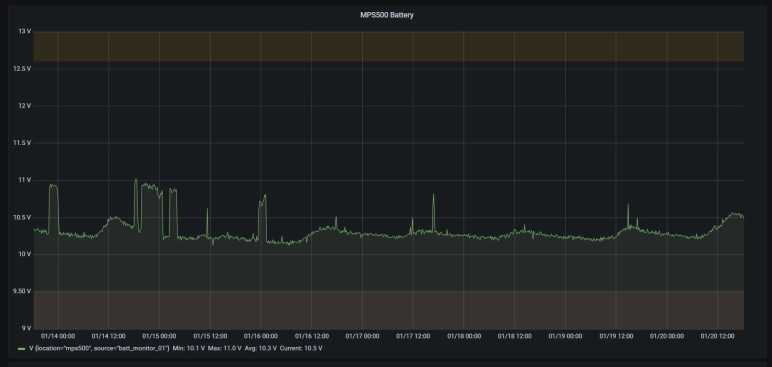
One reason I wanted to use an ESP32 is actually the development board. My Wemos D1 Mini clone board used a voltage regulator I could not identify, so I powered it with a separate MP1584EN buck converter module. In contrast, the ESP32 board I have on hand has a regulator clearly marked as an AMS1117. The datasheet for AMS1117 indicated a maximum input voltage of 15V. Since I’m powering my voltage monitor with a lead-acid battery array that has a maximum voltage of 14.4V, in theory I could connect it directly to the voltage input pin on this module.

In practice, connecting ~13V to this dev board gave me an audible pop, a visible spark, and a little cloud of smoke. Uh-oh. I disconnected power and took a closer look. The regulator now has a small crack in its case, surrounded by shiny plastic that had briefly turned liquid and re-solidified. I guess this particular regulator is not genuine AMS1117. It probably works fine converting 5V to 3.3V, but it definitely did not handle a maximum of 15V like real AMS1117 chips are expected to do.

Fortunately, ESP32 development boards are cheap, counterfeit regulators and all. So I chalked this up to lesson learned and pulled another board out of my stockpile. This time voltage regulation is handled by an external MP1584EN buck converter. I still want to play with an ESP32 for its digital output pins.

Move Calculation Off Microcontroller to Node-RED

After I added MQTT for distributing data, I wanted to change how calculations were done. Using a microcontroller to read a voltage requires doing math somewhere along the line. The ADC (analog-to-digital) peripheral on a microcontroller will return an integer value suitable for hardware registers, and we have to convert that to a floating-point voltage value that makes sense to me. In my first draft ESP8266 voltage measurement node, getting this conversion right was an iterative process:

  • Take an ADC reading and convert to voltage using a conversion multiplier.
  • Comparing against voltage reading from my multimeter.
  • Calculate a better conversion factor.
  • Reflash ESP8266 with Arduino sketch that includes the new conversion factor.
  • Repeat.

The ESP8266 ADC is pretty noisy, with probable contributions from other things like temperature variations. So there was no single right conversion factor value, it varies through time. The best I can hope for is a pretty-close average tradeoff. While looking for that value, the loop of recalculating and uploading got to be pretty repetitious. I want to move that conversion work off of the Arduino so it can be more easily refined and updated.

One option is to move that work to the data consumption side. This means logging raw ADC values into InfluxDB and whoever queries that data is responsible for conversion. This preserves original unmodified measurement data allowing the consumers to be smart about dealing with jitter and such. I like that idea but not ready to dive into that sort of data analysis just yet.

To address both of these points, I pulled Node-RED into the mix. I’ve played with this flow computing tool earlier and I think my current project aligns well with the strengths of Node-RED. The voltage conversion process, specifically, is a type of data transformation people do so often in Node-RED that there is a standard node Range for this purpose. Performing voltage conversion in a Range node means I could fine-tune the conversion and update by clicking “Deploy” which is much less cumbersome than recompiling and uploading an Arduino sketch.

Node-RED also allows me to carry both the original and converted data through the flow. I use a Change node to save original ADC value to another property before using Range to convert ADC value to voltage. Now I have a Node-RED message with both original and converted data. Now I need to put that into the database, and I searched the public Node-RED library for “InfluxDB” and I decided to try node-red-contrib-stackhero-influxdb-v2 first since it explicitly supported version 2 of InfluxDB. I’m storing the raw ADC values now even though I’m not doing anything with it yet. The idea is to keep track so in the future I can explore voltage conversion on the data consumption side.

To test this new infrastructure design using MQTT and Node-RED, I’ll pull an ESP32 development board out of my pile of parts.


Here is my Node-RED function to package data in the format expected by node-red-contrib-stackhero-influxdb-v2 InfluxDB write node. Input data: msg.raw_ADC is the original ADC value, and msg.payload the voltage value converted by Range node:

var fields = {V: msg.payload, ADC: msg.raw_ADC};
var tags = {source: 'batt_monitor_02',location: 'lead_acid'};
var point = {measurement: 'voltage',
      tags: tags,
      fields: fields};
var root = {data: [point]};
msg.payload = root;
return msg;

My simple docker-compose.yml for running Node-RED:

version: "3.8"

services:
  nodered:
    image: nodered/node-red:latest
    restart: unless-stopped
    ports:
      - 1880:1880
    volumes:
      - ./data:/data

Routing Data Reports Through MQTT

Once a read-only Grafana dashboard was up and running, I had end-to-end data flow from voltage measurement to a graph of those measurements over time. This was a good first draft, from here I can pick and choose where to start refining the system. First thought: it was cool that an ESP8266 Arduino could log data straight to an InfluxDB2 server, but I don’t think that is the best way to go.

InfluxDB is a great database to track historical data, but sometimes I want just the most recent measurement. I don’t want to have to spin up a full InfluxDB client library and perform a query just to retrieve a single data point. That would be a ton of unnecessary overhead! Even worse, due to the overhead, not everything has an InfluxDB client library and I don’t want to be limited to the subset that does. And finally, tracking historical data is only one aspect of the system, at some point I want to take action based on data and measurements. InfluxDB doesn’t help at all for that.

To improve these fronts, I’m going to add a MQTT broker to my home network in the form of a docker container running Eclipse Mosquitto. MQTT is a simple publish/scribe system. The voltage measuring node I’ve built out of an ESP8266 is a publisher, and InfluxDB is a subscriber for that data. If I want the most recent measurement, I can subscribe to the same data source and see it at the same time InfluxDB does.

I’ve read the Hackaday MQTT primer, and I understand it is a popular tool for these types of projects. It’s been on my to-do list ever since and this is the test project for playing with it. Putting MQTT into this system lets me start small with a single publisher and a single subscriber. If I expand on this system, it is easy to add more to my home MQTT network.

As a popular and lightweight protocol, MQTT enjoys a large support ecosystem. While not everything has an InfluxDB client library, almost everything has a MQTT client library. Including ESP8266 Arduino, and InfluxDB in the form of a Telegraf plugin. But after looking over that page, I understand it is designed for direct consumption and has little (no?) options for data transformation. This is where Node-RED enters the discussion.


My simple docker-compose.yml for running Mosquitto:

version: "3.8"

services:
  mqtt-broker:
    image: eclipse-mosquitto:latest
    restart: unless-stopped
    ports:
      - 1883:1883
      - 9001:9001
    volumes:
      - ./config:/mosquitto/config
      - ./data:/mosquitto/data
      - ./log:/mosquitto/log

Using Grafana Despite Chronograf Integration

I’ve learned some valuable lessons making an ESP8266 Arduino log data into InfluxDB, giving me ideas on things to try for future iterations. But for the moment I’m getting data and I want to start playing with it. This means diving into Chronograf, the visualization charting component of InfluxDB.

In order to get data around the clock, I’ve changed my plans for monitoring solar panel voltage and connected the datalogging ESP8266 to the lead-acid battery array instead. This allows me to continue refining and experimenting with data at night when the solar panel generates no power. It also means the unnecessarily high power consumption also means the battery is being unnecessarily drained, but an ESP8266 on full power is still consuming only a small percentage of what my lead-acid battery array can deliver so I’m postponing that problem.

Chronograf was pretty easy to get up and running. Querying on the tags of my voltage measurement/table, plotting logged voltage values over time. This is without getting distracted by all the nifty toys Chronograf has to offer. Getting a basic graph allows me to explore how to present this data in some sort of dashboard, and here I ran into a problem. There doesn’t seem to be a way within Influx to present a Chronograf chart in a read-only manner. I found no access control on the data visualization dashboard, nor could I find access restriction options at an Influx users level. Not that I could create new users from the UI

Additional users cannot be created in the InfluxDB UI.

A search for more information online directed me to the Chronograf GitHub repository, where there is a reference to a Chronograf “Viewer” role. Unfortunately, that issue is several years old, and I think this feature got renamed sometime in the past few years. Today a search for “viewer role” on InfluxDB Chronograf documentation comes up empty.

The only access control I’ve found in InfluxDB is via API tokens, and I don’t know how that helps me when logged in to use Chronograf. The only way I know to utilize API tokens is from outside the system, which means firing up a separate Docker container running another visualization charting software package: Grafana. Then I could add InfluxDB as a data source with a read-only API token so a Grafana dashboard has no way to modify InfluxDB data. This feels very clumsy and I’m probably making a beginner’s mistake somewhere, but it gives me peace of mind to leave Grafana displaying on a screen without worry about my InfluxDB data integrity. This lets me see the data so I know the system is working end-to-end as I go back and rework how data is communicated.

For reference here is my very simple docker-compose.yml for my Grafana instance.

version: "3.8"

services:
  server:
    image: grafana/grafana:latest
    restart: unless-stopped
    ports:
      - 3000:3000
    volumes:
      - ./data:/var/lib/grafana

Initial Lessons on ESP8266 Arduino Sketch for InfluxDB

Dipping my toes in building a data monitoring system, I have an ESP8266 Arduino sketch that reads its analog input pin, converts it to original input voltage, and log that information to InfluxDB. Despite the simplicity of the sketch, I’ve already learned some very valuable lessons.

The Good

The Arduino libraries do a very good job of recovering from problems on their own, taking care of it so my Arduino sketch does not. The ESP8266 Arduino WiFi library can reconnect lost WiFi as long as I call WiFiMulti.run() periodically. And the InfluxDB library doesn’t need me to do anything special at all. I call InfluxDbClient.writePoint() whenever I want to write data. If the connection was lost since initial connection, it will be re-established and the data point written with no extra work on my part. I’ve had this sketch up and running as I’ve taken the InfluxDB docker container offline to upgrade to newer versions, or performed firmware updates WiFI access point which takes wireless offline for a few minutes. This sketch recovered and resume logging data, no sweat.

The Bad

ESP8266 ADC (analog-to-digital converter) is pretty darned noisy when asked to measure within a narrow range of its full range of voltages as I am. The full range is 0-22V, and I’m typically only within a narrow band between 12-14V. I tried taking multiple measurements and averaging them, but that didn’t seem to help very much.

This noisiness also made it hard to calibrate readings against voltage values as measured by my multi-meter. It’s not difficult to take a meter reading and calculation a conversion factor for an ADC reading taken at the same time. But if the ADC value can drift even as the actual voltage is held steady, the conversion factor is unreliable. Even worse, since the conversion is done in my Arduino sketch, every time I want to refine this value, I had to hook up a computer and re-upload my Arduino sketch.

Since I expect to add more data sources to this system, I also expected to query by source to see data returned by each. For this first iteration, I tagged points with the MAC address of my ESP8266. This is a pretty good guarantee of uniqueness, but it is not very human-friendly. Or at least not to me, as I’m not in the habit of memorizing MAC addresses of my devices.

The Ugly

As typical of Arduino sketches, this sketch is running loop() as fast as it could. Functionally speaking, this is fine. But it means the ESP8266 is always in a state of high power draw, with the WiFi stack always active and the CPU running as fast as it could. When the objective is merely to record measurements every minute or so, I could be far more energy efficient here.

Addressing these issues (and much more I’m sure) will be topic of future iterations. In the meantime, I have some data points and I want to graph them.


[Source code for this project is publicly accessible on GitHub]

Setting Up ESP8266 Arduino Sketch for InfluxDB

I think I’ve got the hardware side sorted out for building an ESP8266 that monitors voltage output of a solar panel, so it’s time to dive into the software side. I want to log this data into InfluxDB as a learning exercise, and the list of client libraries included a pointer to a GitHub repository for an InfluxDB client library for ESP8266 and ESP32 running on their Arduino core.

Arduino is not exactly the most fully featured development environment, so I’ve been doing my Arduino development using PlatformIO plugin of Visual Studio Code. However, this is the first time I’ve had to manually add a third-party library and it’s not the same as Arduino’s Library Manager so I had to go online for a little help like this forum thread. I learned I should go to https://registry.platformio.org/ and search for the desired library. Searching on “InfluxDB” resulted in several results, one of which is the same client library I found earlier but now with instructions on how to install into PlatformIO.

After compiling a simple test sketch, my serial output monitor returned gibberish. The key here is that baud rate must match between my platformio.ini configuration file:

monitor_speed = 115200

And my serial output initialization code in setup() function of my sketch:

  Serial.begin(115200);

Another configuration issue concern information necessary to connect to my home WiFi and my InfluxDB server. This little sketch needs that information to run, but I don’t want to include them in my source code since I intended to upload this to GitHub in a publicly accessible repository. I found a solution on StackOverflow: put my secret information in a separate secrets.h file. After I committed a basic version without any actual information, use the command git update-index --skip-worktree secrets.h to remove it from further Git activity. After that point, I could edit secrets.h and Git would not care to upload that information leaving my local secrets local, which is what I want.

Once all of these setup details were taken care of, I could dive into code and learn some valuable lessons out of the experience.


[Source code for this project is publicly accessible on GitHub]

Hello Wemos D1 Mini Clone

We can run the Arduino framework on an Espressif ESP8266 chip, but that was not its original purpose. It was originally designed as a WiFi bridge for small devices, handling wireless networking duties on behalf of another microcontroller. But as it turned out, the chip was more than capable to drive the whole show by itself for certain scenarios. Versions 1 and 2 of Pixelblaze, for example, ran on an ESP8266 even though my experience has been with the ESP32-based version 3. I haven’t had a project of my own where the ESP8266 made sense until the current InfluxDB logging project. It is time.

My electronics skill isn’t up to the level of directly using a bare ESP8266 chip. Using a module integrating ESP8266 chip with support circuitry (including a circuit board antenna) is close, but just beyond my comfort level. I went online looking for development boards for such modules and it appears many of them are clones of something called “Wemos D1 Mini“. A brief look at related web pages seem to indicate this rose to prominence alongside a development platform called NodeMCU. I don’t know which came first, the NodeMCU platform or the Wemos D1 Mini module, but they seem to be mentioned side by side in a majority of my search hits. Since I came into this project looking to use the Arduino core on an ESP8266 board, I’ll set aside the NodeMCU angle for now. I clicked “Buy” on a batch of Wemos D1 Mini clones from the lowest bidder of the day. (*)

When they arrived, I was pleasantly surprised to find that I had multiple options on connectors. The package came with three sets: I could have pins appropriate for a breadboard, or sockets appropriate for jumper wires, or passthrough connectors with both pins and sockets. And since none of them were pre-soldered on the board, I actually have a fourth option to “dead-bug” wire a circuit directly without any of those connectors. I think this will prove very useful to fit projects in tight spaces. Some people may gripe about having to heat up a soldering iron before this board is usable, and to them I shall point to this fishing line trick.

For my first ESP8266 project, I’ll stick with traditional pins, followed by mounting it in a perforated prototype board.


(*) Disclosure: As an Amazon Associate I earn from qualifying purchases.

Managed InfluxDB Arduino Client Access

While learning how to setup and run InfluxDB 2 in a docker container, I learned some administrative tasks require dropping to the command line. I had to do this by launching bash in a running instance via docker exec -it influxdb /bin/bash. I looked this up because creating less-privileged user accounts for non-administrative access had to be done in the command line, but it turns out InfluxDB manages access levels using authorization tokens and not user accounts. Creating a key with restricted permissions can be done within the UI and does not need the command line.

I wanted restricted access permissions for two main scenarios. The first ability is to add data to a specific table (sorry… um… measurement in InfluxDB terms) but unable to do other things like delete data. This is for my data sources, as I don’t want bugs in my data sources to corrupt or delete the database. The second ability is read-only access for analysis and displaying results. Again, I didn’t want a bug in a data dashboard to damage data.

Once I learned how to create these authorization keys scoped correctly to the minimum access necessary to fulfill a role, the next step is to use them. Looking over InfluxDB’s list of client libraries, I was fascinated to see Arduino listed among the expected list of programming languages. How does an ATMega328 talk to an InfluxDB instance? This got me really curious and clicked that link to a GitHub repository.

On the README.md I got my answer: this library is not for all Arduino boards, just the ESP8266 and ESP32 WiFi-enabled microcontrollers running their respective Arduino cores. Other Arduino platforms like Teensy or the original ATMega328 are excluded. I’ve played with the ESP32 for a bit and never had a real reason to look into its ESP8266 predecessor. This project will be the motivation to play with an ESP8266.

InfluxDB Investigation Skipping 1.x, Going Straight To 2.x

After I read enough to gain some working knowledge of how to use InfluxDB, it was time to get hands-on. And the first decision to make is: what version? The InfluxDB project made a major version breaking change not that long ago. And older projects like the Raspberry Pi Power Monitor project is still tied to the 1.x lineage of InfluxDB. Since this is an experiment, I would keep the footprint light by running InfluxDB in a Docker container. So when I looked on InfluxDB’s official Docker repository I was puzzled to see it had only 1.x releases. [Update: 2.x images are now available, more details below.] Looking around for an explanation, I saw the reason was because they did not yet have (1) feature parity and (2) a smooth automatic migration from 1.x to 2.x. This could mean bad things happening to people who periodically pull influxdb:latest from Docker Hub. While this problem was being worked on, InfluxDB 2 Docker images are hosted on quay.io/influxdb/influxdb instead of Docker hub.

I found it curious Docker didn’t have a standard mechanism to hold back people who are not ready to take the plunge for a major semantic version change, but I’m not diving into that rabbit hole right now. I have no dependency on legacy 1.x features, or a legacy 1.x database to migrate, or code using the old SQL-style query language. Therefore I decided to dive in to InfluxDB 2 with the knowledge I would also have to learn its new Flux query language that looks nothing like SQL.

Referencing the document Running InfluxDB 2.0 and Telegraf Using Docker, I quickly got a bare-bones instance of InfluxDB 2 up and running. I didn’t even bother trying to persist data on the first run: it was just to verify that the binaries would execute, and that the network ports were set up correctly so I could get into the administration UI to poke around. On the second run I mapped a volume to /root/.influxdbv2 so my data would live on after the container itself is stopped. Now all I need to do is to get some data to store!

[Update: After InfluxDB Docker Hub was updated to release version 2 binaries, the mapped volume path changed from /root/.influxdbv2 to /var/lib/influxdb2. See the InfluxDB Docker Hub repository for details under the section titled: Upgrading from quay.io-hosted InfluxDB 2.x image. In my case it wasn’t quite as straightforward. The migration was introduced in InfluxDB 2.0.4, but I got all the way up to 2.1.1 from quay.io before I performed this migration. A direct switch to 2.1.1 did not work: it acted as if I had a new InfluxDB instance and didn’t have any of my existing data. Trying to run 2.0.4 would fail with a “migration specification not found” error due to a database schema change introduced in 2.1.0. Fortunately, running 2.1.0 docker image appeared to do the trick, loading up all the existing data. After that, I could run 2.1.1 and still keep all my data.]

Docker compose file I used to run 2.1.1 image hosted on quay.io, data stored in the subdirectory “mapped” which is in the same directory as the docker-compose.yml file:

version: "3.8"

services:
  server:
    image: quay.io/influxdb/influxdb:2.1.1
    restart: unless-stopped
    ports:
      - 8086:8086
    volumes:
      - ./mapped/:/root/.influxdbv2/

Update: here’s the version to use latest Docker hub image instead:

version: "3.8"

services:
  server:
    image: influxdb:latest
    restart: unless-stopped
    ports:
      - 8086:8086
    volumes:
      - ./mapped/:/var/lib/influxdb2/

Learning InfluxDB Basics

I’ve decided to learn InfluxDB in a project using it to track some statistics about my little toy solar array. And despite looking at some super-overkill high end solutions, I have to admit that even InfluxDB is more high-end than I would strictly need for a little toy project. It will probably be fine with MySQL, but the learning is the point and the InfluxDB key concepts document was what I needed to start.

It was harder than I had expected to get to that “key concept” document. When someone visits the InfluxDB web site, the big “Get InfluxDB” button highlighted on the home page sends me to their “InfluxDB Cloud” service. Clicking “Developers” and the section titled “InfluxDB fundamentals” is a quick-start guide to… InfluxDB Cloud. They really want me to use their cloud service! I don’t particularly object to a business trying to make money, but their eagerness has overshadowed an actual basic getting started guide. Putting me on their cloud service doesn’t do me any good if I don’t know the basics of InfluxDB!

I know some relational database basics, but because of its time-series focus, InfluxDB has slightly different concepts described using slightly different terminology. Here are the key points, paraphrased from the “key concepts” document, that I used to make the mental transition.

  • Bucket: An InfluxDB instance can host multiple buckets, each of which are independent of the others. I think of these as multiple databases hosted on the same database server.
  • Measurement: This is the one that confused me the most. When I see “measurement” I think of a single quantified piece of data, but in InfluxDB parlance that is called a “Point”. In InfluxDB a “measurement” is a collection of related data. “A measurement acts as a container for tags, fields, and timestamps.” In my mind an InfluxDB “Measurement” is roughly analogous to a table in SQL.
  • Timestamp: Time is obviously very important in a time-series database, and every “Point” has a timestamp. All query operations will typically be time-related in some way, or else why are we bothering with a time-series database? I don’t think timestamps are required to be unique, but since they form the foundation for all queries, they have become de-facto primary keys.
  • Tags: This is where we start venturing further away from SQL. InfluxDB tags are part of a Point and this information is indexed. When we query for data within a time range, we specify the subset of data we want using tags. But even though tags are used in queries for identification, tags are not required to be unique. In fact, there shouldn’t be too many different unique tag values, because that degrades InfluxDB performance. This is a problem called “high series cardinality” and it gets a lot of talk whenever InfluxDB performance is a topic. As I understand it, it is a sign the database layout design was not aligned with strengths of InfluxDB.
  • Fields: Unlike Tags, Fields are not indexed. I think of these as the actual “data” in a Point. This is the data we want to retrieve when we make an InfluxDB query.

Given the above understanding, I’m aiming in the direction of:

  • One bucket for a single measurement.
  • One measurement for all my points.
  • “At 10AM today, solar panel output was 21.4 Watts” is a single point. It has a timestamp of 10AM, it is tagged with “panel output” and a field of “21.4 Watts”

With that goal in mind, I’m ready to fire up my own instance of InfluxDB. But first I have to decide which version to run.

Investigating Time Series Data

I’ve had a little solar power system running for a while, based on an inexpensive Harbor Freight photovoltaic array. It’s nowhere near big enough to run a house, but I can do smaller things like charge my cell phone on solar power. It’s for novelty more than anything else. Now I turn my attention to the array again, because I want to start playing with time series data and this little solar array is a good test subject.

The motivation came from reading about a home energy monitoring project on Hackaday. I don’t intend to deploy that specific project, though. The first reason is that particular project isn’t a perfect fit for my little toy solar array, but the real reason is that I wanted to learn the underlying technologies hands-on. Specifically, InfluxDB for storing time-series data and Grafana to graph said data for visualization.

Before I go down the same path, I thought I would do a little reading. Here’s an informative StackExchange thread on storing large time series data. InfluxDB was one of the suggestions and I’m sure the right database for the project would depend on specific requirements. Other tools in the path would affect throughput as well. I expect to use Node-RED for some intermediary processing, and that would introduce bottlenecks of its own. I don’t expect to be anywhere near hundreds of sampling points per second, though, so I should be fine to start.

The original poster of that thread ended up going with HDF5. This is something developed & supported by people who work with supercomputer applications, and again had very different performance requirements than what I need right now. HDF5 came up in a discussion on a revamped ROS logging format (rosbag) and it linked to some people unhappy with HDF5. So there are definitely upsides and downsides to that format. Speaking of ROS2… I don’t know where they eventually landed on the rosbag format. Here is an old design spec absent from the latest main branch, but I don’t know what eventually happened to that information.

While I’m on the subject, out of curiosity I went to look up what CERN scientists use for their data. This led me to something called ROOT, a system with its own file format. Astronomers are another group of scientists who need to track a lot of data, and ASDF exists to serve their needs.

It was fun to poke around at these high-end worlds, but it would be sheer overkill to use tools that support petabytes of data with high detail and precision. I’m pretty sure InfluxDB will be fine for my project, so I will get up to speed on it.