Xbox 360 Kinect Needs A Substitute Rover

It was pretty cool to see RTAB-Map build a 3D map of its environment using data generated by my hands waving a Xbox 360 Kinect around. However, that isn’t very representative of rover operation. When I wave it around manually, motions are mostly pan and tilt but not much translation. The optical flow of video feed from a rover traveling along the ground would be mostly dominated by forward travel, occasional panning as the vehicle turns, and limited tilt. So the next experiment is to put the Kinect on a rover to see how it acts.

This is analogous to what we did at SGVTech when I first brought in the LIDAR from a Neato vacuum: we placed on top of SGVHAK Rover and drove it around the shop to see what it sees. Unfortunately, the SGVHAK Rover is currently in the middle of an upgrade and disassembled on a workbench. We’ll need something else to stand in for a rover chassis. Behold, the substitute rover:

kinect with office chair simulating rover

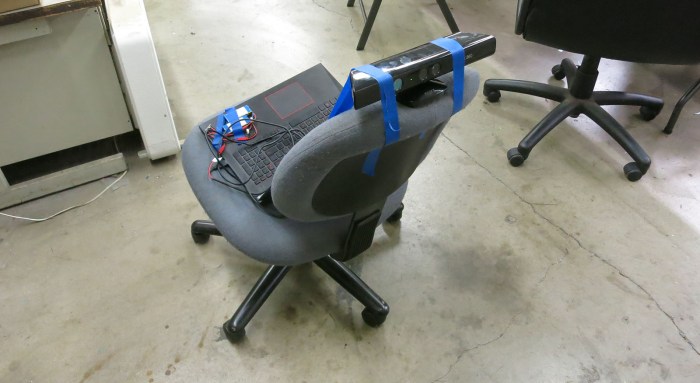
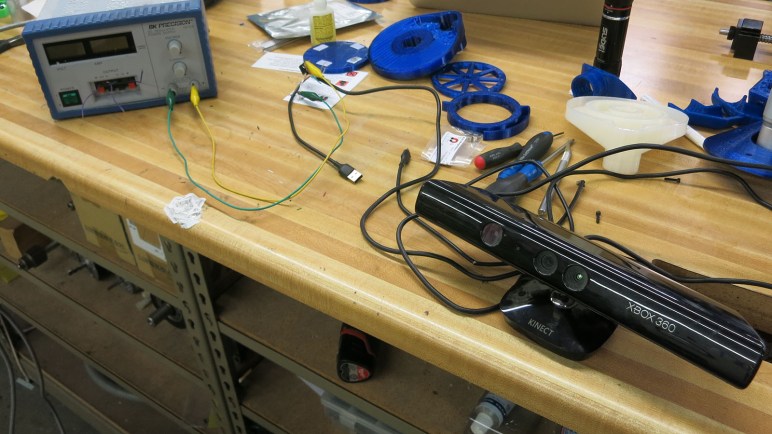
Yes, that is a Xbox 360 Kinect sensor bar taped on top of an office chair. The laptop talking to the Kinect can sit on the chair easily enough, but the separate 12V power supply took a bit more work. I had two identical two-cell lithium battery packs. Wiring those two ~7.4V volt packs in series gave me ~14.8 volts, which fed into a voltage regulator bringing it down to 12V for the Kinect. The whole battery power contraption is visible in this picture taped to the laptop’s wrist rest next to the trackpad.

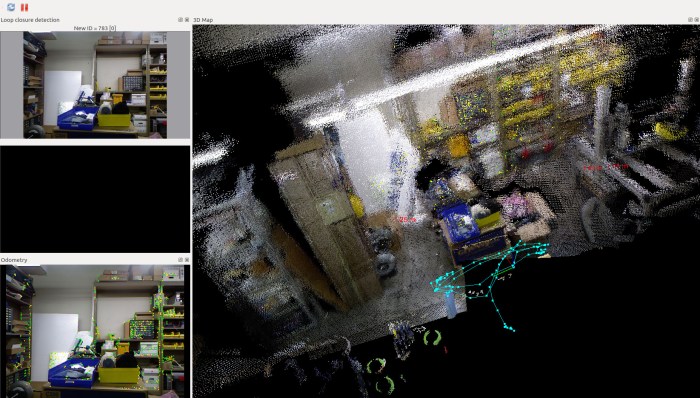
This gave us a wheeled platform for linear and rotational motion along the ground while keeping the Kinect at a constant height. This is more representative of the type of motion it will see mounted on a rover. Wheeling the chair around the shop, we would see the visual odometer performance is impressive, traveling in a line for about three meters resulted in only a few centimeters of error between its internal representation and reality.

We found this by turning the chair around to let the Kinect see where it came from and compare the newly plotted dots against those it plotted three meters ago. But this raised a new question: was it reasonable to expect that RTAB-Map algorithm match the new dots against the old? Using distance data to correct for odometer drift was one thing Phoebe could do in GMapping. I had hoped RTAB-Map would use new observations to correct for its own visual odometry drift. But instead, it started plotting features a few centimeters off from their original position, creating a “ghost” in point cloud data. Maybe I’m using RTAB-Map wrong somewhere… this is worrisome behavior that needs to be understood.

Xbox 360 Kinect and RTAB-Map: Handheld 3D Environment Scanning

I brought my modified Xbox 360 Kinect and my laptop to this week’s SGVTech meetup. My goal for the evening was to show everyone what can be done with an old game console accessory and publicly available open source code. And the best place to start showcasing RTAB-Map is to go through the very first tutorial: Handheld Mapping with RGB-D sensor.

When I installed OpenKinect on my Ubuntu laptop, I was pleasantly surprised that it was offered as part of Ubuntu software repository making installation trivial. I had half expected that I would have to download the source code and struggle to compile without errors.

Getting handheld RGB-D mapping up and running under ROS using RTAB-Map turned out to be almost as easy. They’re all available on ROS software repositories, again sparing me the headache of understanding and fixing compiler errors. That is, as long as a computer already has ROS Kinetic installed, which is admittedly a bit of work.

But if someone is starting with a working installation of ROS Kinetic on Ubuntu, they only need to install three packages via sudo apt install:

Once they are installed, follow instructions on RTAB-Map handheld RGB-D mapping tutorial to execute two ROS launch files. First one launches the ROS node to match the sensor device (in my case the Xbox 360 Kinect), second one launch RTAB-Map itself along with a visualization GUI.

I had fun scanning the shop environment where we hold our meetups. I moved the sensor around, both panning left-right and up-down, to get data from one side of the room. RTAB-Map created a pretty decent 3D representation of the shop. Here’s a camera view of one experiment. The Kinect is sitting on the workbench behind the laptop screen. The visualization GUI has the raw video image (upper left), an image with dots highlighting the features RTAB-Map is tracking (lower left), and a big window with 3D point cloud compilation of Kinect data.

workshop shelves 3d reconstruction - camera

Here’s the screenshot. It is even more impressive in person because we could interact with the point cloud window, rotate and zoom in 3D space to see the area from angles that the Kinect was never at. Speaking of which, look at the light teal line drawn in the lower right: this represents what RTAB-Map reconstructed as the path (in three dimensional space) I waved the Kinect through.

Workshop Shelves 3D reconstruction - screencap.jpg

RTAB-Map is a lot of fun to play with, and shows huge potential for robot project applications.

Trying RTAB-Map To Process Xbox 360 Kinect Data

xbox 360 kinect with modified plugs 12v usbDepth sensor data from a Xbox 360 Kinect might be imperfect, but it is good enough to proceed with learning about how a machine can make sense of its environment using such data. This is an area of active research with lots of options on how I can sample the current state of the art. What looks the most interesting to me right now is RTAB-Map, from Mathieu Labbé of IntRoLab at Université de Sherbrooke (Quebec, Canada.)

rtab-mapRTAB stands for Real-Time Appearance-Based, which neatly captures the constraint (fast enough to be real-time) and technique (extract interesting attributes from appearance) of how the algorithm approaches mapping an environment. I learned of this algorithm by reading the research paper behind a Hackaday post of mine. The robot featured in that article used RTAB-Map to generate its internal representation of its world.

The more I read about RTAB-Map, the more I liked what I found. Its home page lists events dating back to 2014, and the Github code repository show updates as recently as two days ago. It is encouraging to see continued work on this project, instead of something that was abandoned years ago when its author graduated. (Unfortunately quite common in the ROS ecosystem.)

Speaking of ROS, RTAB-Map itself is not tied to ROS, but the lab provides a rtab-ros module to interface with ROS. Its Github code repository has also seen recent updates, though it looks like a version for ROS Melodic has yet to be generated. This might be a problem later… but right now I’m still exploring ROS using Kinetic so I’m OK in the short term.

As for sensor support, RTAB-Map supports everything I know about, and many more that I don’t. I was not surprised to find support for OpenNI and OpenKinect (freenect). But I was quite pleased to see that it also supports the second generation Xbox One Kinect via freenect2. This covers all the sensors I care about in the foreseeable future.

The only downside is that RTAB-Map requires significantly more computing resources than what I’ve been playing with to date. This was fully expected and not a criticism of RTAB-Map. I knew 3D data would far more complex to process, but I didn’t know how much more. RTAB-Map will be my first solid data point. Right now my rover Sawppy is running on a Raspberry Pi 3. According to RTAB-Map author, a RPi 3 could only perform updates four to five times a second. Earlier I had outlined the range of computing power I might summon for a rover brain upgrade. If I want to run RTAB-Map at a decent rate, it looks like I have to go past Chromebook level of hardware to Intel NUC level of power. Thankfully I don’t have to go to the expensive realm of NVIDIA hardware (either a Jetson board or a GPU) just yet.

Xbox 360 Kinect Depth Sensor Data via OpenKinect (freenect)

I want to try using my Xbox 360 Kinect as a robot sensor. After I’ve made the necessary electrical modifications, I decided to try to talk to my sensor bar via OpenKinect (a.k.a. freenect a.k.a. libfreenect) driver software. Getting it up and running on my Ubuntu 16.04 installation was surprisingly easy: someone has put in the work to make it a part of standard Ubuntu software repository. Whoever it was, thank you!

Once installed, though, I wasn’t sure what to do next. I found documentation telling me to launch a test/demonstration viewer application called glview. That turned out to be old information, the test app is actually called freenect-glview. Also, it is no longer added to the default user search path. I have to launch it with the full path /usr/bin/freenect-glview.

Once I got past that minor hurdle, I have on my screen a window that showed two video feeds from my Kinect sensor: on the left, depth information represented by colors. And on the right, normal human vision color video. Here’s my Kinect pointed at its intended home: on board my rover Sawppy.

freenect-glview with sawppy

This gave me a good close look at Kinect depth data. What’s visible and represented by color is pretty good, but the black areas worry me. They represent places where the Kinect was not able to extract depth information. I didn’t expect it to be able to pick out fine surface details of Sawppy components, but I did expect it to see the whole chassis in some form. This was not the case, with areas of black all over Sawppy’s chassis.

Some observations of what a Xbox 360 Kinect could not see:

  • The top of Sawppy’s camera mast. Neither the webcam nor the 3D-printed mount for that camera. This part is the most concerning one because I have no hypothesis why.
  • The bottom of Sawppy’s payload bay. This is unfortunate but understandable: it is a piece of laser cut acrylic which would reflect Kinect’s projected pattern away from the receiving IR camera.
  • The battery pack in rear has a smooth clear plastic package and would also not reflect much back to the camera.
  • Wiring bundles are enclosed in a braided sleeve. It would scatter the majority of IR pattern and those that make it to the receiving camera would probably be jumbled.

None of these are deal-breakers on their own, they’re part of the challenges of building a robot that functions outside of a controlled environment. In addition to those, I’m also concerned about the frame-to-frame inconsistency of depth data. Problematic areas are sometimes visible for a frame and disappear in the next. The noisiness of this information might confuse a robot trying to make sense of its environment with this data. It’s not visible in the screenshot above, but here’s an animated GIF showing a short snippet for illustration:

kinect-looking-at-sawppy-inconsistencies

Xbox 360 Kinect Driver: OpenNI or OpenKinect (freenect)?

The Kinect sensor bar from my Xbox 360 has long been retired from gaming duty. For its second career as robot sensor, I have cut off its proprietary plug and rewired it for computer use. Once I’ve verified the sensor bar is electrically compatible with a computer running Ubuntu, the first order of business was to turn fragile test connections into properly soldered wires protected by heat shrink tube. Here’s my sensor bar with its new standard USB 2.0 connector and a JST-RCY connector for 12 volt power.

xbox 360 kinect with modified plugs 12v usb

With the electrical side settled, attention turns to software. The sensor bar can tell the computer it is a USB device, but we’ll need additional driver software to access all the data it can provide. I chose to start with the Xbox 360 Kinect because of its wider software support, which means I have multiple choices on which software stack to work with.

OpenNI is one option. This open source SDK is still around thanks to Occipital, one of the companies that partnered with PrimeSense. PrimeSense was the company that originally developed the technology behind Xbox 360 Kinect sensor, but they have since been acquired by Apple and their technology incorporated into the iPhone X. Occipital itself is still in the depth sensor business with their Structure sensor bar. Available standalone or incorporated into products like Misty.

OpenKinect is another option. It doesn’t have a clear corporate sponsor like OpenNI, and seems to have its roots in the winner of the Adafruit contest to create an open source Kinect driver. Confusingly, it is also sometimes called freenect or variants thereof. (Its software library is libfreenect, etc.)

Both of these appear to still be receiving maintenance updates, and both have been used a lot of cool Kinect projects outside of Xbox 360 games. Ensuring there will be a body of source code available as reference for using either. Neither are focused on ROS, but people have written ROS drivers for both OpenNI and OpenKinect (freenect). (And even an effort to rationalize across both.)

One advantage of OpenNI is that it provides an abstraction layer for many different depth cameras built on PrimeSense technology, making code more portable across different hardware. This does not, however, include the second generation Xbox One Kinect, as that was built with a different (not PrimeSense) technology.

In contrast, OpenKinect is specific to the Xbox 360 Kinect sensor bar. It provides access to parts beyond the PrimeSense sensor: microphone array, tilt motor, and accelerometer.  While this means it doesn’t support the second generation Xbox One Kinect either, there’s a standalone sibling project libfreenect2 for meeting that need.

I don’t foresee using any other PrimeSense-based sensors, so OpenNI’s abstraction doesn’t draw me. The access to other hardware offered by OpenKinect does. Plus I do hope to upgrade to a Xbox One Kinect in the future, so I decided to start my Xbox 360 Kinect experimentation using OpenKinect.

Modify Xbox 360 Kinect for PC Use

I want to get some first hand experience working with depth cameras in a robotics context, and a little research implied the Xbox 360 Kinect sensor bar is the cheapest hardware that also has decent open source software support. So it’s time to dust off the Kinect sensor bar from my Halo 4 Edition Xbox 360.

I was a huge Halo fan and I purchased this Halo 4 console bundle as an upgrade from my first generation Xbox 360. My Halo enthusiasm has since faded and so has the Xbox 360. After I upgraded to Xbox One, I lent out this console (plus all accessories and games) to a friend with young children. Eventually the children lost interest in an antiquated console that didn’t play any of the cool new games and it resumed gathering dust. When I asked if I could reclaim my Kinect sensor bar, I was told to reclaim the whole works. The first accessory to undergo disassembly at SGVTech was the Xbox 360 Racing Steering Wheel. Now it is time for the second accessory: my Kinect sensor bar.

The sensor bar connected to my console via a proprietary connector. Most Xbox 360 accessories are wireless battery-powered devices, but the Kinect sends far more data than normal wireless controllers and requires much more power than rechargeable AA batteries can handle. Thus the proprietary connector is a combination of a 12 volt power supply alongside standard USB 2.0 data at 5 volts. To convert this sensor bar for computer use instead of a Xbox 360, the proprietary connector needs to be replaced by two separate connectors: A standard USB 2.0 plug plus a 12V power supply plug.

Having a functioning Xbox 360 made the task easier. First, by going into the Kinect diagnostics menu, I could verify the Kinect is in working condition before I start cutting things up. Second, after I severed the proprietary plug and splayed out wires in the cable, a multimeter was able to easily determine the wires for 12 volt (tan), 5 volt (red), and ground (black) by detecting the voltages placed on those wires by a running Xbox 360.

That left only the two USB data wires, colored green and white. Thankfully, this appears to be fairly standardized across USB cables. When I cut apart a USB 2.0 cable to use as my new plug, I found the same red, black, green, and white colors on wires. To test the easy thing first, I matched wire colors, kept them from shorting each other with small pieces of tape, and put 12V power on the tan wire using a bench power supply.

Since I was not confident on this wiring, I used my cheap laptop to test my suspect USB wiring instead of using my good laptop. Fortunately, the color matching appeared to work and the sensor bar enumerated properly. Ubuntu’s dmesg utility lists a Kinect sensor bar as a USB hub with three attached devices:

  1. Xbox NUI Motor: a small motor that can tilt the sensor bar up or down.
  2. Xbox Kinect Audio: on board microphone array.
  3. Xbox NUI Camera: this is our depth-sensing star!

xbox nui camera detected

[ 84.825198] usb 2-3.3: new high-speed USB device number 10 using xhci_hcd
[ 84.931728] usb 2-3.3: New USB device found, idVendor=045e, idProduct=02ae
[ 84.931733] usb 2-3.3: New USB device strings: Mfr=2, Product=1, SerialNumber=3
[ 84.931735] usb 2-3.3: Product: Xbox NUI Camera
[ 84.931737] usb 2-3.3: Manufacturer: Microsoft

xbox 360 kinect with modified plugs 12v usb

ROS In Three Dimensions: Starting With Xbox 360 Kinect

The long-term goal driving my robotics investigations is to build something that has an awareness of its environment, and intelligently plan actions within it. (This is a goal shared by many other members of RSSC as well.) Building Phoebe gave me an introduction to ROS running in two dimensions, and now I have ambition to graduate to three. A robot working in three dimensions need a sensor that works in three dimensions, so where I’m going to start.

Phoebe started with a 2D laser scanner purchased off eBay that I learned to get up and running in ROS. Similarly, the cheapest 3D sensor that can be put on a ROS robot are repurposed Kinect sensor bars from Xbox game consoles. Even better, since I’ve been a Xbox gamer (more specifically a Halo and Forza gamer) I don’t need to visit eBay. I have my own Kinect to draft into this project. In fact, I have more than one: I have both the first generation Kinect sensor accessory for Xbox 360, and the second generation that was released alongside Xbox One.

xbox 360 kinect and xbox one kinect

The newer Xbox One Kinect is a superior sensor with a wider field of view, higher resolution, and better precision. But that doesn’t necessarily make it the best choice to start off with, because hardware capability is only part of the story.

When the Xbox 360 Kinect was launched, it was a completely novel new device offering depth sensing at a fraction of the price of existing depth sensors. There was a lot of enthusiasm both in the context of video gaming and hacking them to be used outside of Xbox 360 games. Unfortunately, the breathless hype wrote checks that the reality of a low-cost depth camera couldn’t quite cash. By the time Xbox One launched with an updated Kinect, interest had waned and far fewer open source projects aimed to work with a second generation Kinect.

The superior capabilities of the second generation sensor bar also brought downsides: it required more data bandwidth and hence a move to USB 3.0. At the time, USB 3.0 ecosystem was still maturing and new Kinect had problems working with certain USB 3.0 implementations. Even if the data could get into a computer, the sheer amount of it placed more demands on processing code. When coupled with reduced public interest, it meant software support for the second generation Kinect is less robust. A web search found a lot of people who encountered problems trying to get their second generation bar to work.

In the interest of learning the ropes and getting an introduction to the world of 3D sensing, I decided a larger and more stable software base is more interesting than raw hardware capabilities. I’ll use the first generation Xbox 360 Kinect sensor bar to climb the learning curve of building a three-dimensional solution in ROS. Once that is up and running, I can try to tame the more finicky second generation Kinect.