Several years ago I bought a box of eight solar lawn lights and installed them in my backyard. At the same time (or soon afterwards) I bought a second box of identical units and stored it away for replacement. I guess I expected their lifetime under the southern California sun to be short, and that I expected difficulty in finding exact replacements later. It turns out I was right on both counts and I’m happy my past self left me a box of replacements. My back yard has been dark for a while, but now I can try to bring these lights back online.
The functional evaluation steps were:
Fully charge a NiMH AAA battery cell for testing.
Remove a lawn light’s solar+LED module with a 1/4 turn counter-clockwise. The module may break apart if plastic has turned brittle.
Open battery compartment door. The latch may break if plastic has turned brittle.
Remove old tired NiMH AAA battery cell for proper recycling.
Inspect battery compartment and clean any corrosion built up on terminals.
Insert charged NiMH AAA battery cell.
Cover solar cell, the LED should turn on and illuminate.
If the LED does not illuminate, the circuit board is dead and the entire unit must be replaced. If the battery compartment door is in good shape, keep the door for use with another unit.
Expose solar cell to sunlight, the LED should turn off.
If LED does not turn off after 5-10 seconds of direct sunlight exposure, the solar cell is dead and the entire unit must be replaced. Again the battery compartment door, if in good shape, can be used in another unit.
If all tests pass up until this point, install one of the salvaged NiMH battery cells and reassemble so the battery can charge via solar power.
Using these steps I determined out of the eight original units, half of their solar cells had failed. A fifth unit had a functioning solar cell, but its structure was brittle and broke apart when I removed it from the light. That leaves three of the original units still functioning well enough to get replacement NiMH batteries, one of them also getting a replacement battery compartment door from one of the dead units. New units replaced the failed lights. Now I have back yard night illumination again, and I still have a few new-in-box replacement units ready to go in the years ahead. I’ll reevaluate my lawn light situation once they run out.
I have solar lawn lights in my back yard that has failed after sitting in the harsh outdoor environment for several years. Their weakest point appear to be their NiMH batteries which I’m willing to replace. But some of them also have failed solar cells or crumbling internal structure, and replacing a battery won’t bring those back. I’ll have to buy new replacements. I went online shopping for solar lawn lights and failed to find an exact match. I expected this but it was worth a few minutes to look. If I wanted to maintain a consistent appearance, I should have bought a second box at the time and stash it away.
As soon as I had that thought, an echo of memory came up in the back of my head. I went looking in the cabinet where I might keep such things and… yes! I had that same thought earlier, bought a second box, and forgot about it until now.
Putting an old sun-beaten unit next to a fresh one out of the box provided quite the contrast. Both in their painted metal surfaces and in the condition of their solar cells.
Here’s a close-up view of a fresh solar cell. I now know the clear top section is not glass, but I don’t know much else beyond that. Someone more knowledgeable about solar cell construction can probably look at this and foresee all the ways it will break down with age and exposure.
What I have now reflects real world long duration outdoor exposure. The clear top layer has yellowed and developed a rough surface texture. And I can’t tell if the outer edges have eroded or if the clear layer material has shrunk. I don’t know if the white visible patches are in the clear top material or in the solar cell underneath. I do know this solar cell stopped producing power some time back and will have to be replaced by a new one.
I have eight solar lawn lights in my yard, and sitting under the sun for several years has taken its toll. Even though they’re basically disposable, I thought I would play with them before throwing any away. I tried to retrofit one with a super capacitor and the attempt taught me several problems not the least of which is that those supercapacitors I bought were too big fit inside. I had better results from my first experiment swapping out a NiMH battery. For the foreseeable future, I think that’s the way to go.
Since my capacitor test light turned out to have a dead solar cell, I used my bench power supply set to 2V as the power source. I charged it up during the day, then disconnected power at sunset to see how long it ran. It shut off a little over six hours later which is roughly the runtime I want out of these lights. It’s also on par with what I get out of running these lights on salvaged NiMH batteries past their prime.
I had contemplated trying my supercapacitor test again with smaller capacitors that would easily fit inside, but physically smaller capacitors would have less energy storage capacity as well. Which means they can’t run as long, and my light would go out sooner. I could compensate for this by wiring several smaller units in parallel, distributed around the light’s interior instead of one big cylinder, but then cost would go up.
The capacitors I bought were advertised as 500F. Given the realities of no-name Amazon vendors I doubt that number is accurate, but it is a starting point for comparison. There are smaller capacitors available roughly the size of my salvaged NiMH cells, which I know would fit with minimal trouble. Maybe even a pair of them. The highest-capacity units I found at that size (*) were advertised as 100F and cost more than my “500F” units. If it runs the lights for 1/5 as long, the lights would only illuminate for a little over an hour before going out. Even a pair working in parallel would go dark in less than two hours, and that’s too short.
I would expect supercapacitors to withstand daily charge/discharge for many years with minimal degradation. But as things stand I would have to pay a price premium and give up significant runtime and even then the solar cell may die first. I don’t think that tradeoff makes sense so I’ve decided to stay with NiMH batteries for now and possibly reevaluate supercapacitor price/performance again in a few years. Especially since I discovered past me had stashed a batch of lights I can use today.
(*) Disclosure: As an Amazon Associate I earn from qualifying purchases.
I’m playing around with some old tired solar lawn lights I have in my back yard. I discovered their energy storage was in the form of AAA NiMH batteries, and as an experiment I was able to resurrect one lawn light with a salvaged NiMH battery cell. I expect it to die again soon, though, because this is a very stressful application. First, a solar ornament sitting under the summer sun gets really hot, near the top end of NiMH operating temperature range, if not beyond. And second, I discovered these lights use 2V solar panels and would pass that all the way to battery terminals for charging. This also exceeds the recommended NiMH voltage range. Excess power would be dissipated as heat, which aggravates the temperature issue.
Given the limited expected lifespan of NiMH battery in this application, I thought it was a good opportunity to play with a supercapacitor. A relatively new branch of the capacitor family tree, they offer several orders of magnitude more energy storage capacity than other capacitor types though still less than commodity batteries. The types I can realistically purchase and play with can comfortably operate at summer heat temperatures, and their maximum voltage of 2.7V has a comfortable margin over solar cell output. Another key capacitor advantage over batteries are their tolerance for high charge and discharge rates, but that’s not important here. Most importantly, prices have dropped enough for me to pick up a batch to play with. I went on Amazon and bought the highest Farad-per-dollar listing I found that day. (*) Once it arrived, I selected another lawn light for this capacitor experiment.
Electrical Failure: Solar Cell
Having established that the YX805 chip at the heart of these lights won’t do anything when the battery is below 0.9V, I used my bench power supply to charge my capacitor up to a NiMH-emulating 1.25V.
I un-soldered the battery compartment wires and soldered them to the YX805 circuit board. The LED illuminated. This is good! Since my solar panel was facing downwards, this is appropriate behavior for a dark environment with energy in the battery.
I then moved the assembly to a bright sunlit spot, and the LED continued shining. This is bad! It was supposed to go into battery-charging mode. Probing with my volt meter, I established the solar cell is not delivering any power so the YX805 chip thinks it’s always dark.
Mechanical Failure: Brittle Plastic
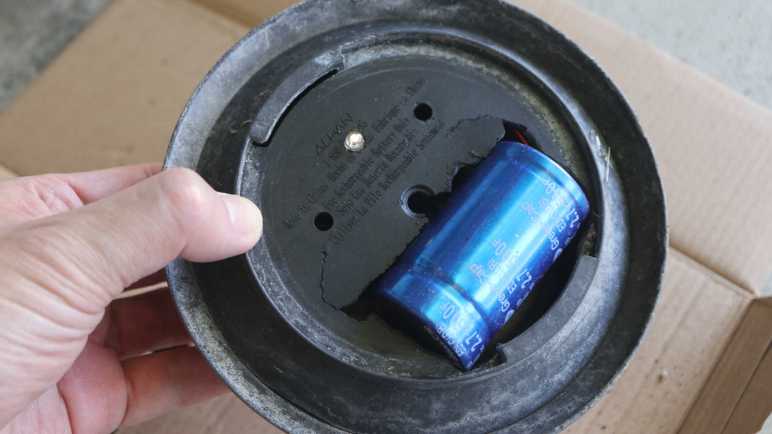
Even if the solar cell was still functioning, I would not have been able to put this light back together. The plastic bracket directly underneath the solar cell had degraded under heat.
There were four screws fastening the bottom and top covers together. When I started turning those screws, three of these corner posts crumbled apart. That left only one superficially intact, but the threads crumbled during removal so that final fourth post is just as useless as the rest. I can’t install a replacement solar cell, as the dead cell and mounting posts were held with this glob of gray epoxy. Which, inconvenient for me, is still holding strong. If the solar cell was still good and I wanted to repair this mounting mechanism, I would have to design, 3D print, and epoxy something that sits apart from this crumbled assembly.
Mechanical Failure: Not Enough Room
The good news: a dead solar cell and broken mount meant I was free to experiment with fitting a capacitor inside. This capacitor is slightly larger than a D-size battery cell, and I’m trying to fit it in a device designed for AAA-sized cells.
I took a chisel and cut out the battery tray, which also took out two of the four mounting screw holes, but they had nothing to fasten to anyway. This tray is made of plastic and almost as brittle as the top bracket. Pieces of plastic crumbled under the chisel as I went.
I quickly made a hole big enough for the capacitor to fit, but not enough for the two halves to close together. I started an iterative process of “make hole bigger” and “test fit” then repeat. I made the hole larger and larger until it started encroaching upon the LED hole in the center. To make room, I turned the LED circuit board 180 degrees and drilled a small hole for LED to shine from an off-center position.
By the time I can close the two halves together, the capacitor was about half-exposed to the outside. Moving it further center would make the problem worse, because the solar panel bracket assembly would force the capacitor further away so more than half of it would be exposed out the bottom. And as it happens, I would need to move further center: I had put the capacitor too close to the outer edge, cutting into volume required for the glass component beneath. Fail! Fails all around, ah well. But it was fun to try. Now I know enough to decide I should stick with NiMH batteries.
(*) Disclosure: As an Amazon Associate I earn from qualifying purchases.
Years ago I bought an 8-pack of solar lawn lights. They were fun for lighting up the back yard for a few hours after sunset, and I was curious how long they’d last. The answer was about five years, plus or minus a few years, depending on your standards because they gradually fade out. Both in terms of shorter duration after sunset, and in terms of dimmer illumination.
Now only one of the original eight offer any visible illumination, for less than half an hour after sunset. This behavior implies whatever internal energy storage device has degraded over years, and I wanted to take a look to see if I can confirm my hypothesis.
Solar lawn lights are very inexpensive now, and it’s much easier to just buy a new set. The reason I wanted to try reviving these lights is because their center clear section is glass, not clear plastic as many current products use.
Glass won’t yellow and fail after years of southern California sunshine, which is not something I can say for whatever non-glass material was used for the solar cell’s top layer. The paint is also very visibly damaged by sunlight. I can repaint if I want to, but condition of that solar cell looks bad.
Flipping the lid over, I was surprised to see a battery compartment door. I had expected a “no user serviceable parts inside” arrangement. I opened the door and the molded plastic latch broke, brittle from years of baking under the sun.
Inside the door is a AAA NiMH battery cell, literally roasted by the sun while it lived inside a black enclosed compartment. After removing the battery, I took a multimeter and measured the open-circuit battery compartment terminals under sunlight. My meter read 2.095 volts. Yikes! That’s a lot higher than the 1.25V nominal level for a NiMH battery cell. Are NiMH batteries expected to take this kind of abuse? I know NiMH batteries can handle over-voltage better than lithium chemistry batteries, but I didn’t know to what degree. While excess energy can be dissipated as heat, it’s hard to shed energy as heat when it is already very hot from sun. Between the high voltage and high temperature, these cells lived a harsh life.
Looking in my pile of NiMH batteries, I found two AAA-sized units and installed one of them. The LED lit up when I covered the solar panel to simulate night, so I decided the old battery must be completely dead. To my surprise, it wasn’t! When I connected it to my “Joule Thief“, the LED lit up and stayed illuminated for days. The battery isn’t completely dead, but not well enough to run this solar lawn light. Connecting it to my bench power supply, I find the LED turns off when battery voltage drops below about 0.9V. In comparison, my Joule Thief will run all the way down to about 0.4V, which is much more demanding on the battery and a bad idea for longevity.
I don’t have many NiMH AAA batteries on hand. I could buy some more, but I don’t particularly relish the thought of buying new batteries just to sentence them to a quick and hot death. I decided to open up the light to see inside. There wasn’t much: the solar panel is well-sealed by a blob of dark gray epoxy, and there’s only a tiny circuit board inside.
The back of the circuit board shows all the signs of something left out in the elements.
As does the front, which showed a YX805 chip in charge of the operation. An online search found a Simplified Chinese datasheet which explained it was specifically designed to run solar lawn lights. Machine translation claimed battery over-discharge protection as a feature, explaining the deactivation at 0.9V. There’s also mention of adjustable battery charge rate, but nothing about over-voltage protection. Either the machine translation missed it, or the designers decided it was OK for a 1.25V nominal voltage NiMH battery cell to face 2.095V charging input. Or perhaps the 2.095V I measured was just an artifact of an open circuit that fails to trigger the battery charge rate limiter?
Given its corroded condition implying it may fail elsewhere in short order, I’m not eager to spend money on new batteries. I have plenty of NiMH cells on hand, though, just not in AAA size. The biggest of which are from Neato battery packs. They’re too old and tired to run a robot vacuum, but perhaps they can run a solar lawn light. I cut the spot-welded tabs in half and soldered to the half-tabs, sparing battery cells from heat of my soldering iron.
Sadly many of those old cells were too weak to get up over that 0.9V minimum bar, but a few of them were good enough to run a solar lawn light (though dimly) for a bit after sunset. Perhaps my solar lawn lights will be my way of giving some old NiMH battery cells yet another life, even if a hot and short one. Or I can use it as motivation to explore another technology: supercapacitors.