Window Shopping: FabGL

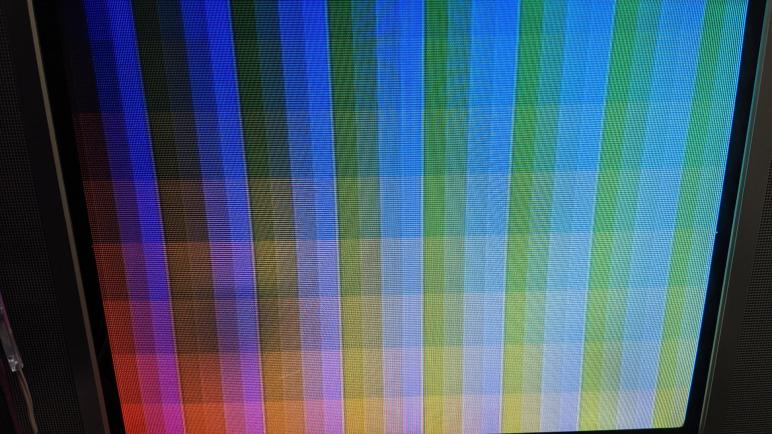
I have a minimally functional ESP32 Arduino display library that lets sketches use the color composite video signal generator of ESP_8_BIT to send their own graphics to an old-school tube TV. However, all I have as an interface is a pointer into the frame buffer. This is fine when we just need a frame buffer to hand to something like a video game console emulator, but that’s a bit too raw to use directly.

I need to put a more developer-friendly graphics library on top of this frame buffer, and I have a few precedents in mind. It needs to be at least as functional as the existing TVout Arduino library, which only handles monochrome but does offer a minimally functional graphics API. My prime candidate for my purpose is the Adafruit GFX Library. That is the target which contenders must exceed.

I’m willing to have an open mind about this, so I decided to start with the most basic query of “ESP32 graphics library” which pointed me to FabGL. That homepage loaded up with a list of auto-playing videos that blasted a cacophony of overlapping sound as they all started playing simultaneously. This made a terrible first impression for no technical fault of the API itself.

After I muted the tab and started reading, I saw the feature set wasn’t bad. Built specifically for the ESP32, FabGL offers some basic user interface controls, a set of drawing primitives, even a side menu of audio and input device support. On the display side (the reason I’m here) it supports multiple common display driver ICs that usually come attached to a small LCD or OLED screen. In the analog world (also the reason I’m here) it supports color VGA output though not at super high color depths.

But when I started looking for ways to adapt it to some other display mechanism, like mine, I came up empty handed. If there is provision to expose FabGL functionality on a novel new display like ESP_8_BIT color composite video generator, I couldn’t find it in the documentation. So I’ll cross FabGL off my list for that reason (not just because of those auto-playing videos) and look at something else that has well-documented ways to work on an external frame buffer.

Packaging ESP_8_BIT Video Code Into Arduino Library

I learned a lot about programming an ESP32 by poking around the ESP_8_BIT project. Some lessons were learned by hands-on doing, others by researching into documentation afterwards. And now I want to make something useful out of my time spent, cleaning up my experiments and making it easy for others to reuse. My original intent is to make it into a file people can drop into the \lib subdirectory of an PlatformIO ESP-IDF project, but I decided it could have far wider reach if I can turn it into an Arduino library.

Since users far outnumber those building Arduino libraries, majority of my web searches pointed to documentation on how to consume an Arduino library. I wanted the other end and it took a bit of digging to find documentation on how to produce an Arduino library, starting with this Morse Code example. This gave me a starting point on the proper directory structure, and what a wrapper class would look like.

I left behind a few ESP_8_BIT features during the translation to an Arduino library. The performance metric code was fairly specific to how ESP_8_BIT worked. I could bring it over wholesale but it wouldn’t be very applicable. The answer was to generalize it, but I couldn’t think of a good way to do that so I’ll leave perf metrics as a future to-do item. The other feature I left behind was the structure to run video generation on one core and the emulator on the other core. I consider ESP32 multicore programming on Arduino IDE to be an advanced topic and not my primary target audience. If someone wants to fiddle with running on another core, they’re going to need to learn about vTaskCreatePinnedToCore(). And if they’ve learned that, they know enough to launch my library wrapper class on the core of their choosing. I don’t need to do anything in my library to explicit to support it.

By working in the Arduino environment, I thought I lost access to ESP-IDF tools I grew fond of while working on Sawppy ESP32 brain. I learned I was wrong when I put in some ESP_LOGI() statements out of habit and noticed no compiler errors resulted. Cool! Looks like esp_log.h was already on the include list. That’s the good news, the bad news was that I didn’t get that log output in Arduino Serial Monitor, either. Fortunately this was easily fixed by changing an option Espressif added to the Arduino IDE “Tools” menu called “Core Debug Level“. This defaults to “None” but I can select the log level of my choosing, all the way up to maximum verbosity. If I wanted to see ESP_LOGI(), I could select level of “Info” or higher.

With this work, I built a wrapper class around the video code I extracted from ESP_8_BIT. Enough to let me manipulate the frame buffer from an Arduino sketch to put stuff on screen. But if I want to make this friendly to all Arduino developers regardless of skill level, frame buffer isn’t going to cut it. I’ll need to have a real graphics API on top of my frame buffer. And thankfully I don’t need to create one of my own from scratch, I just need to choose from the multitudes of graphics libraries already available.

ESP32 Lessons From ESP_8_BIT: CPU and Memory Allocation

I learn best when I have a working example I can poke and prod and tinker to see how it works. With Adafruit’s Uncanny Eye sort of running on my ESP32 running ESP_8_BIT code, I have a long list of things I could learn using this example as test case.

ESP32 CPU Core Allocation

Peter Barrett / rossumur of ESP_8_BIT said one of the things that made ESP_8_BIT run well were the two high performance cores available on an ESP32. Even the single-core variant only hiccups when accessing flash storage. When running on the more popular dual-core chips, core 0 handles running the emulator and core 1 handles the composite video signal generation. In esp_8_bit.ino we see the xTaskCreatePinnedToCore() call tying emulator to core 0, but I didn’t see why the Arduino default loop() was necessarily on core 1. It’s certainly an assertion backed by claims elsewhere online, but I wanted to get to the source.

Digging through Espressif’s Arduino Core for ESP32 repository, I found the key is configuration parameter ARDUINO_RUNNING_CORE. This is used to launch the task running Arduino loop() in main.cpp. It is core 1 by default, but that’s not necessarily the case. The fact it is a project configuration parameter means it could be changed, but it’s not clear when we might want to do so.

Why is core 1 the preferred core for running our code? Again the convention wisdom here says this is because the WiFi stack on an ESP32 runs on core 0. But again, this is not necessarily the case. It is in fact possible to configure the WiFi task with a different core affinity than the default, but again it’s not clear when we might want to do so. But at least now I know where to look to see if someone has switched it up, in case that becomes an important data point for debugging or just understanding a piece of code.

ESP32 Memory Allocation

I knew a Harvard architecture microcontroller like the ESP32 doesn’t have the freedom of a large pool of universally applicable memory I can allocate at will. I remember I lost ability to run ESP_8_BIT in Atari mode due to a memory allocation issue, so I went back and re-read the documentation on ESP32 memory allocation. There is a lot of information in that section, and this wasn’t the first time I read it. Every time I do, I understand a little more.

My Atari emulator failure was its inability to get a large contiguous block of memory. For the best chances of getting this memory, the MALLOC() allocator specified 32-bit accessible memory. This would open up areas that would otherwise be unavailable. But even with this mechanism, the Atari allocation failed. There are tools available to diagnose heap memory allocation problems and while it might be instructive to understand exactly why Atari emulator failed, I decided that’s not my top priority right now because I’m not using the Atari path.

I thought it was more important to better understand the video generation code, which I am using. I noticed methods in the video generation code were marked with IRAM_ATTR and thought it was important to learn what that meant. I learned IRAM_ATTR marked these as pieces of code that needs to stay in instruction RAM and not optimized out to flash memory. This is necessary for interrupt service routines registered with ESP_INTR_FLAG_IRAM.

But those are just the instructions, how about the data those pieces of code need? That’s the corresponding DRAM_ATTR and I believe I need to add them to the palette tables. They are part of video generation, and they are constant unchanging values that the compiler/linker might be tempted to toss out to flash. But they must no be moved out because the video generation routine (including ISRs) need to access them, and if they are not immediately available in memory everything comes crashing down.

With these new nuggets of information now in my brain, I think I should try to turn this particular ESP32 adventure into something that would be useful to others.

Putting Adafruit Uncanny Eyes on a Tube TV

I have extracted the NTSC color composite video generation code from rossumur’s ESP_8_BIT project, and tested it by showing a static image. The obvious next step is to put something on screen that moves, and my test case is Adafruit’s Uncanny Eyes sketch. This is a nifty little display I encountered on Adafruit’s Hallowing and used in a few projects since. But even though I’ve taken a peek at the code, I’ve yet to try running that code on a different piece of hardware as I’m doing now.

Originally written for a Teensy 3 and a particular display, Uncanny Eyes has grown to support more microcontrollers and display modules including those on the Hallowing. It is now quite a complicated beast, littered with #ifdef sections blocking out code to support one component or another. It shows all the evidence of a project that has grown too unwieldy to easily evolve, which is probably why Adafruit has split into separate repositories for more advanced versions. There’s one for Cortex-M4, another one for Raspberry Pi, and possibly others I haven’t seen. In classic and admirable Adafruit fashion, all of these have corresponding detailed guides. Here’s the page for the Cortex-M4 eyes, here’s the page for Pi Eyes, in addition to the Teensy/Hallowing M0 eyes that got me started on this path.

If my intent was to put together the best version I can on a TV, I would study all three variants. Read Adafruit documentation and review the code. But my intent is a quick proof of concept, so I pulled down the M0 version I was already familiar with from earlier study and started merrily hacking away. My objective was putting a moving eye on screen, and the key drawEye() method was easily adapted to write directly to my _lines frame buffer. This allowed me to cut out all code talking to a screen over SPI and such. This code had provisions for external interactivity such a joystick for controlling gaze direction, a button for blink, and a light sensor to adjust iris. I wanted a standalone demo and didn’t care about that, and thankfully the code had provisions for a standalone demo. All I had to do was make sure a few things were #define (or not #define)-ed. That left a few places that were inconvenient to configure purely from #define, so I deleted them entirely for the purpose of the demo. They’ll have to be fixed before interactivity can be restored in this code.

The code changes I had to make to enable this proof of concept is visible in this GitHub commit. It successfully put a moving eye on my tube TV on my ESP32 using a composite video cable, running the color NTSC composite video generation code I pulled out of rossumur’s ESP_8_BIT project. With the concept proven, I don’t intend to polish or refine it. This was just a crude test run to see if these two pieces would work together. I set this project aside and moved on to other lessons I wanted to learn.

[Code for this project is publicly available on GitHub]

Extracting ESP_8_BIT Sega Color Video

ESP_8_BIT implemented a system that could run one of three classic video game console emulators on an ESP32, but my interest is not in those games. My objective is to extract its capability to generate and output a NTSC composite video signal, and significantly, doing it in color without hardware modification. I chose the Sega emulator video generation code path for my project, since it had better color than the Nintendo emulator code path. The Atari emulator code path was not a candidate as it had stopped working on my ESP32 for memory allocation failures, caused by factors I don’t understand and might investigate later.

The objective of today’s project will mean deleting the majority of ESP_8_BIT. Most of the bulk were cut away quickly when I removed all three emulation engines along with their game ROMs. All three emulation engines had an adapter class that derived from a base emulator (Emu) class, and they were removed without issue thanks to the clean architecture separation. All lower level code interact with the emulators via the base class. With so many references to the base class sprinkled throughout the code, it took more finesse to find and cleanly remove them all.

Beyond the color video generation code that is my objective, there were various other system level services that I wanted to strip off to get to a minimum functional baseline. My first few projects will go without any of the following functionality: Bluetooth controller interface, infrared (IR) remote interface, and loading ROMs from on-board SPIFFS storage of ESP32. These are all fairly independent subsystems. Once I have built confidence in the base video code, and if I should need any of the other system services, I can add them back in one at a time.

That leaves a few items intertwined with video output routines. The easiest to remove were the portions specific to Atari and Nintendo emulators, clearly marked off with #ifdef statements. ESP_8_BIT creator rossumur explained that the color signal hack had an unfortunate side effect of interfering with standard ESP32 audio output peripherals, so as an alternate mechanism audio had to be generated via ESP32’s LEDC peripheral originally designed for controlling LED illumination. Since audio didn’t seem to work on my setup anyway, I removed that mechanism as well. The final bit of functionality I didn’t need was PAL support since I didn’t have a PAL TV. I started removing that code but changed my mind. The work to keep PAL looks to be fairly manageable, and it’s definitely a part of video signal generation. Plus, I want this project to be accessible to people with PAL screens. However, I have to remember to document the fact that I don’t have a PAL TV to test against, so if I inadvertently break PAL support with this work I wouldn’t know unless someone else tells me.

Another reason for choosing the Sega emulator code path is that its color palette is a mapping I know as RGB332. It is a way to encode color in eight bits: three bits for red, three for green, and two for blue. This mapping is more common than hardware-specific palettes of either Atari or Nintendo paths. I anticipate using RGB332 will make future projects much easier to manage.

As a practice run of the code that’s left after my surgery, I wrote a test to load a color image. The was a picture Emily took of her cat, cropped to 4:3 aspect ratio of old school tube TVs and then scaled to the 256×240 resolution of the target frame buffer. This results in a PNG file that looks vertically stretched due to the non-square pixels. Then I had to convert the image to RGB332 color. Since this is just a practice run, I wrote a quick script to extract the most significant bits in each color channel. This is an extremely crude way to downconvert image color lacking nice features like dithering. But image quality is not a high concern here, I just wanted to see a recognizable cat on screen. And I did! This successful static image test leads to the next test: put something on screen that moves.

[Result of this extraction project is publicly available on GitHub]

Observations on ESP_8_BIT Nintendo and Sega Colors

I have only scratched the surface of rossumur’s ESP_8_BIT project, but I got far enough for a quick test. I rendered the color palette available while in Nintendo emulation mode, and found that it roughly tracks with the palette shown on its corresponding Wikipedia page.

I say “roughly” because the colors seem a lot less vibrant than I would have expected from a video game. These colors are more pastel, or maybe like a watercolor painting. For whatever reason the color saturation wasn’t as high as I had expected. But judging color is a tricky thing, our vision system is not a precision instrument. What I needed was a reference point, and I found one with the OSD (on-screen display) for this TV’s menu system.

This menu is fairly primitive, using basic colors at full saturation. I can see the brilliant red I expected for Mario, alongside the brilliant green I expected for Luigi. These colors are more vibrant than what I got out of the Nintendo emulator palette. What causes this? I have no idea. NTSC colorburst math is voodoo magic to me, and rossumur’s description of how ESP_8_BIT performs it went high over my head. For the moment I choose to not worry about the saturation. I am thankful that I have colors at all as it is a far superior situation than earlier grayscale options.

At this point I felt confident enough to look at the Sega emulator code path, and was encouraged to see the table returned by its ntsc_palette() method had 256 entries instead of the 64 in the Nintendo path. Switching ESP_8_BIT into Sega mode, I can see a wider range of colors.

Not only are there four times the number of colors available, some of the saturation looks pretty good, too.

The red (partially truncated by overscan in the lower left) is much closer to the red seen on OSD, the yellow and blue looks pretty good, too. The green is still a bit weak, but I like what I see here. With its wider range of colors in its palette, I decided to focus on ESP_8_BIT Sega emulator code path from this point onwards.

Studying NES Section of ESP_8_BIT

I’m not sure why ESP_8_BIT Atari mode stopped working on my ESP32, but I wasn’t too bothered by it. My objective is to understand the NTSC color composite video signal generation code, which I assumed was shared by all three emulators of ESP_8_BIT so one should work as well as another. I switched the compile-time flag to Nintendo mode, saw that it started display on screen, and resumed my study.

The emu_loop() function indicated _lines was the frame buffer data passed from one of three emulators to the underlying video code. This was defined in video_out.h as uint8_t** and as its name implied, it is an array representing lines on screen. Each element of this array is a pointer to another array, storing uint8_t represent pixels on screen. This is a very flexible design that allowed variation in vertical and horizontal pixels, just by changing the size of one array or another. It also accommodates any extra data necessary for a line on screen, for example if there are padding requirements for byte alignment, without code changes. That said, ESP_8_BIT appears to use a fixed resolution of 256 pixels wide by 240 lines high: In video_out.h, video_init() always sets _active_lines to 240, and the for() loop inside blit() is hard-coded to 256.

Inside blit() I learned one of my assumptions was wrong. I thought video_out.h was common across all three emulators, but there were slight variations marked out by #ifdef sections. I confess I didn’t understand what exactly these different chunks of code did, but I could make two observations: (1) if I wanted to use this code in my own projects I only need one of the code paths, and (2) they have something to do with the color palette for each emulator.

With that lead, I started looking at the color palette. Each emulator has its own color palette, when running in NTSC mode (my target) it is returned by the aptly named ntsc_palette() function. This appears to be a fixed array which was interesting. 8-bit color was very limiting and one of the popular ways to get around this limitation was to use an optimized adaptive palette to give an impression of more colors than were actually available. Another reason I had expected to find variable palette was the technique of palette animation (a.k.a. color cycling) common in the 8-bit era. Neither technique would be possible with a fixed palette. On the upside, it simplifies my code comprehension task today so I can’t complain too much.

With some basic deductions in hand on how this code works, I wanted to do a quick exercise to test accuracy of my knowledge. I wrote a quick routine to fill the frame buffer with the entire range of 256 values, isolated into little blocks. This should give me a view of the range of colors available in the palette.

    for(int y = 0; y < 240; y++)
    {
      yMask = (((y>>4)<<4)&0xF0);
      for(int x = 0; x < 256; x++)
      {
        _lines[y][x] = ((x>>4)&0x0F) | yMask;
      }
    }

When I ran this in the Nintendo emulator mode, I got what appeared to be four repeats of the same set of color. Referencing back to Nintendo code path in video_out.h I can see it meshes. Color value was bitwise-AND with 0x3F meaning only the lower six bits of the color value are used. Cycling through 256 meant 64 colors repeated 4 times.

        case EMU_NES:
            mask = 0x3F;

I didn’t need four repeats of the same 64 colors, so I edited my test program a bit to leave just a single bar on screen. Now I can take a closer look at these colors generated by ESP_8_BIT.

ESP_8_BIT Atari Mode Mysteriously Stopped Working

I was interested in getting my hands on some code that could generate color NTSC composite video without esoteric hardware hacking, and rossumur’s ESP_8_BIT promised to do that. As soon as I had it loaded on my own ESP32 and turned on my old tube TV with composite input, I could see it delivered on that promise. Everything else in this project would just be icing on the cake.

Sadly I had a lot of trouble getting the rest of ESP_8_BIT to work for me, so there were precious little icing for me. The first problem I encountered was that I didn’t have audio. This was expected for the Atari logo screen, but I checked the ESP_8_BIT YouTube video and saw there was supposed to be sound when the robot came on screen. Mine stayed silent, darn.

The next step was to get an input device working. ESP_8_BIT included a Bluetooth HID stack to interface with Bluetooth peripherals. One of the options is a Bluetooth Classic (not BLE) keyboard, and I had a Microsoft Wedge Mobile Keyboard on hand for this test. This is a keyboard I knew worked for my Bluetooth-enabled computers as well as an Apple iPad, so I did not expect problems. Unfortunately after going through the ESP_8_BIT pairing procedure, my ESP32 went into an endless reboot loop. As an alternate to Bluetooth, ESP_8_BIT also supported some infrared controllers, but I didn’t have any compatible device on hand. So unless I’m willing to buy an IR controller or buy another Bluetooth keyboard, it appears that there will be no ESP_8_BIT gaming for me.

There was one other mystery. This initial test pass was made several weeks ago. Afterwards, I set down ESP_8_BIT to be explored later. I worked on a few other projects (including Micro Sawppy rover) in the meantime. When I returned to ESP_8_BIT, I could no longer run the Atari emulator. It now enters a failure reboot loop with an error of insufficient memory. Not by a lot, either: the largest available segment of memory was only a few hundred bytes short of what’s requested.

esp_8_bit

mounting spiffs (will take ~15 seconds if formatting for the first time)....
... mounted in 99 ms
frame_time:0 drawn:1 displayed:0 blit_ticks:0->0, isr time:0.00%
emu_task atari800 running on core 0 at 240000000mhz
MALLOC32 235820 free, 113792 biggest, allocating Screen_atari:92160
MALLOC32 allocation of Screen_atari:92160 3FFE4374
MALLOC32 143644 free, 64864 biggest, allocating MEMORY_mem:65540
MALLOC32 FAILED allocation of MEMORY_mem:65540!!!!####################
ets Jun  8 2016 00:22:57

rst:0xc (SW_CPU_RESET),boot:0x13 (SPI_FAST_FLASH_BOOT)
configsip: 0, SPIWP:0xee
clk_drv:0x00,q_drv:0x00,d_drv:0x00,cs0_drv:0x00,hd_drv:0x00,wp_drv:0x00
mode:DIO, clock div:1
load:0x3fff0018,len:4
load:0x3fff001c,len:1216
ho 0 tail 12 room 4
load:0x40078000,len:10944
load:0x40080400,len:6388
entry 0x400806b4

I hadn’t touched the code, and the hardware was only changed in that I actually have it on a circuit board this time. So I’m at a loss what might have caused this difference. One hypothesis is that an underlying Arduino library had been updated and took a little more memory than it used to, leaving not quite enough for the Atari emulator. Another hypothesis is that my Micro Sawppy code left something behind on this ESP32, impacting behavior of ESP_8_BIT.

Without more data or knowledge I couldn’t track down the source of this problem. So with the Atari emulator out of commission, my study course moved on to the Nintendo emulator for me to gain that knowledge.

NTSC Color Composite Video From ESP_8_BIT by rossumur

I’ve buried my head in remote-control vehicles for a while now, most recently writing code for my own Sawppy rover and looking over code written by others. Rover fatigue is setting in, so I’m going to look at a different topic as a change of pace.

About a year and a half ago Emily and I had a study session examining composite video signals. Using an oscilloscope to compare and contrast between different signal sources. Our reference was a commercial video camera, and we compared them against outputs generated by various microcontroller libraries. Two that run on ATmega328 Arduino, and one running on ESP32.

One thing they all had in common was that they were all in grayscale. The extra signal required for color NTSC composite video were beyond the reach of stock hardware. People have done some very creative things with hacking on oscillators to change operating frequencies, but even with such hacking the capability was quite limited. We thought color would be out of reach except by using chips with dedicated hardware such as the Parallax Propeller chip.

I was so happy to learn we were wrong! GitHub user rossumur found a way to generate color NTSC composite video signal from an ESP32 on stock unmodified hardware. The clever video hack was done using, of all things, an audio peripheral called the Phase Locked Loop. This color video capability formed the basis of an 8-bit video game console project called ESP_8_BIT, and I had to take a closer look.

For most projects I find online, I spend time researching the code before I bother investing equipment. But this project had such minimal hardware requirements that I decided to build a test unit first. I didn’t even need a circuit board: the video pin can be wired straight through and the audio pin only required a resistor and a capacitor. A few wires on a 0.1″ pitch connector and composite video jacks salvaged from an old TV were all I needed to install those parts on an ESP32 dev board.

Compared to the effort of wiring things up to my ESP32 dev board, getting my composite video screen actually took more effort. I had an old tube TV gathering dust sitting under a lot of other stuff, and it took more time to dig it up than to perform my ESP32 wiring. But once everything is plugged in and turned on, I could see the Atari logo on screen. And most importantly: it was in color! I’m going to follow this rainbow to the pot of ESP32 coding gold at the end, even if this adventure had an inauspicious start.