RX-8 Backup Camera Bracket

I’ve decided to retrofit a backup camera to my 2004 Mazda RX-8. After running the camera wire from the dashboard receiver into the trunk, I had to install the camera somewhere and plug into that wire. I decided to put the camera near my rear license plate, which meant I had to remove many old brittle plastic fasteners before I could remove my rear bumper cover. I was happy to find I didn’t need to drill any holes in either the body or the bumper cover. There’s a slot already in the bumper cover to accommodate a license plate light, and it’s much wider than it had to be. The metal body had several existing holes I could repurpose for my project. I removed an existing plastic-and-rubber plug to run my camera wire, followed by a dab of hot glue to plug it up so rain water does not enter.

That leaves the problem of exactly where to mount the camera. The bundle came with a license plate bracket that would mount it centered above the license plate, but that would block my license plate light and I doubt law enforcement would be happy about that. It also came with a small bracket and double-sided foam tape but I didn’t trust tape under SoCal summer sun. I had a metal frame around my license plate purely for aesthetics, so I drilled and tapped two M3 holes in the frame corner for the small bracket.

I was so focused on the camera that I didn’t notice what I had done until I took a step back and looked at the situation: the camera now obscures my license plate registration sticker, and that’s going to make local law enforcement even grumpier than if I had blocked the light.

I have a stack of small thin aluminum sheets waiting for a project, and I decided to fashion a mounting bracket from one of them. I don’t have real sheet metal cutters (it’s on my tool shopping list) but this aluminum is barely thicker than kitchen foil and easily cut with diagonal cutters.

A test fit looks good, tucking the camera into the existing slot adjacent to the license plate light so I don’t block the light.

Now the camera draws less attention and it doesn’t block my registration sticker either. Looks great, I’ll keep an eye to see how well it holds up long term. Onward to the next project.

RX-8 Navigation Upgrade Project Phase Two: Backup Camera

My 2004 Mazda RX-8 has a cracked radiator. While I wait for a replacement radiator to be shipped to me, I’ve applied some J-B Weld as a short term workaround. And since I already have tools scattered about my garage, I thought I would work on a few more RX-8 project to-do items. First on the list is I will resume my navigation screen upgrade project. I had removed the stock GPS navigation system LCD screen and replaced it with a standalone receiver for wireless Android Auto/CarPlay. My receiver came bundled with a backup camera, but I decided against tearing up too much of the car before I decided if I even like the receiver. So I paused after receiver installation to evaluate.

It’s been a few months and the inexpensive receiver has not been perfect. I have to manually adjust screen brightness between daylight and night time driving, but that’s only 3 taps and a mild annoyance I can live with. I’ve had the occasional audio stutter and data dropout, reminding me why wired connections are always more reliable than wireless. Sadly wired Android Auto/CarPlay have fallen out of favor with standalone receivers like these. I’ve also seen the thing crash and reboot itself, but not often enough for me to recognize any pattern to what might have trigger it.

Despite its imperfections, I have grown fond of having my phone automatically connect to my car every time I start it up. It’s nice to always have Google Maps on screen and access to my entire audio entertainment library stored on my phone. Given its low price ($60 as of this writing *) I can forgive a few hiccups here and there. It’s a keeper! I will now proceed to install that backup camera which had merely been gathering dust the past few months.

Accessing the stock factory navigation display hood is a lot easier the second time around. I now know enough to avoid completely disassembling the center console like I did the first time. For example, now that I know I only need to access two fasteners behind the factory audio head unit’s face plate, I only need to slide it out a few centimeters leaving all wire bundles connected. Much easier this way!

After plugging the camera cable into the receiver, I ran its wire down the left side of the center console. Under the ashtray and along the center of the car underneath all cupholders. I mostly followed the existing navigation computer wiring harness. Speaking of which, I took this opportunity to unplug all connectors from that outdated computer so it doesn’t consume power uselessly. I thought about removing it entirely but I didn’t want to leave a hole in the console between rear seats. The backup camera cable proceeded under the now-unplugged computer, behind the right rear passenger seat back, and into the trunk where it can meet up with the camera module. That takes care of the electrical wiring, now I need a camera mounting bracket.


(*) Disclosure: As an Amazon Associate I earn from qualifying purchases.

RX-8 Navigation Upgrade Project Phase One Complete

I had a minor setback in my project to upgrade my 2004 Mazda RX-8’s in-car navigation capability from the now-ancient factory integrated system. But despite the setback, I have a usable system. Enough to declare this as successful completion of project phase one. By removing the navigation map display unit, and installing a standalone wireless CarPlay/Android Auto receiver in its place, I now experience the following advantages:

  • Connects to my Pixel 7 phone via wireless Android Auto, so now my in-car navigation screen has access to up-to-date maps and traffic information.
  • Audio entertainment including music or podcasts can stream from my phone.
  • User interaction such as setting a destination for navigation can be done via my phone’s highly responsive touchscreen. It’s superior to the sluggish receiver touchscreen and far superior to the factory system of painstakingly typing an address via joystick-controlled on-screen keyboard.

These items were left unchanged, and they were important project criteria:

  • Factory appearance with no visible alteration to interior trim. When the car is turned off, the only visible difference is the new receiver has a glossy screen whereas the factory LCD had a matte surface.
  • All in-car controls were maintained, including volume control both via center console and steering wheel buttons.

Unfortunately, there were several functional regressions:

  • Due to electrical interference, I had to disconnect the factory motor retract mechanism. I’m optimistic I can regain this functionality as a future phase of the project.
  • When the factory system loses GPS signal, it can estimate position based on vehicle speed and direction. The new receiver is GPS-only and helpless when signal is lost. I don’t see any way to restore this functionality, but it’s not a high priority to do so.
  • The factory system automatically dims the display when headlights are on, and when the light sensor detects low ambient light. The new receiver’s brightness must be manually adjusted. I don’t see any way to restore the headlight response functionality with this receiver. However, buying a different Android Auto receiver with a built-in light sensor may restore auto-dimming capability.

Potential future phases for this project:

  • Restore the factory motor retract mechanism. Fortunately, Mazda engineers designed the geartrain to be back drivable. Or in plainer language, I could still adjust the angle manually without damaging either the motor or its gears. This will be important if a headlight or sunlight is inconveniently angled to reflect off that glossy screen into my eyes: I can still reach out to change that angle.
  • Install the backup camera that came bundled with the receiver. [UPDATE: completed as phase 2.]
  • Install a power switch for times when I don’t want that screen.
  • Remove/repurpose other components of the factory navigation system. Including the control panel just behind the shifter, and the map data DVD drive + navigation computer between the rear seats.

For now, I will use the system as-is without the motor retract mechanism. See what other problems crop up during use so I could solve them before going further.

Integrated Test Failed Due to Interference

After devising ways to hold everything together, I performed a quick test and things seemed OK. Then I buttoned everything up, reassembled the navigation hood panel, and installed it on the dashboard. Before I reinstall everything else (center ventilation grille on down) I turned on the car to verify everything still worked.

It did not.

Upon power-up, the navigation hood actuator opened to unveil the screen, which was good. Then I saw the boot-up sequence, which was also good. But a few seconds later, things started going wrong. The screen started blinking on and off every few seconds, and the system acted as if I’m touching the screen even though I have not. (Phantom touches.) When I did try to use the touchscreen, it would react properly only about half of the time. This is not a usable system.

Since the beginning of this project, my top worry has been potential interference from the LCD control board. Even though I’m no longer using the original LCD, I had to keep the control board installed to maintain original actuator functionality. To see if the board was indeed causing problems, I disconnected the ribbon cable from the rear module. Doing so disabled hood actuator functionality. On the upside, the random screen blinks are gone, and the capacitive touchscreen functions correctly again.

My earlier quick test placed those components adjacent to each other, but there’s something special about actually tightening up and reassembling interior trim that triggered this system freakout. Unfortunate. Looking on the bright side, if my quick test worked it meant I’m not terribly far from a functional arrangement. If I can devise a way to shield the LCD board from the receiver, I may yet be able to reuse the original LCD control board for its motor control capability. I will note that as a future to-do item, because I wanted to keep what I have as “Minimum Viable Product” for this project. Use it as-is for a while to see if I find any other problems.

Receiver Mechanical Installation in Navigation Hood

I have electric power supply and other connections figured out for putting a wireless CarPlay/Android Auto receiver in place of the factory navigation system display in my 2004 Mazda RX-8. Now I need to figure out how to keep everything physically in place. Normally I would turn to 3D printing to solve such problems, but this will be on top of a black car dashboard. I know for sure 3D printed PLA plastic parts soften and deform under summer sun, and that wasn’t even inside a car. I think PETG could withstand such temperatures, but I’m not sure.

Uncertain of plastic durability, I turned to metal. This was the folded sheet metal tray from a Seagate external backup drive. I cut out the four tabs that formerly held screws securing the 3.5″ HDD in place.

These tabs were then used to hold the receiver in place, using original support posts and their screws. This is not a very precise mechanism. Because the tabs would shift slightly as I tightened the screws, it was hard to keep the receiver in exactly the right place to ensure the screen image is perfectly centered. After several attempts ended with a slightly off-center alignment, I decided “meh, close enough” and moved on.

The slight misalignment made me glad I decided against drilling a hole for the integrated microphone. I haven’t used voice assistant features and I don’t intend to start. And since I didn’t drill a microphone hole, I don’t have to worry about precisely aligning it, either.

Now I need to put the original display circuit board back in, without the display. The only reason it is still here is because it also handles retraction motor control and I wanted to preserve that capability. I first tried to fit the circuit board while it was still installed on its metal backing plate. I liked the extra structural rigidity, and I hoped the metal plate would act as shielding protecting the receiver from interference.

Unfortunately, there’s not enough room. Top edge of the circuit board sticks out beyond where the lid would go. For everything to fit, I will have to go without that metal plate.

The receiver’s own plastic enclosure should act as electrical insulation on the bottom. On top, I cut down a depleted Costco shop card to act as shield and insulation against the retraction servo assembly.

A quick in-car test looks good enough to proceed: the retraction motor worked as long as I ensured it stayed in operating range, and the receiver boots up as expected.

With that success, I buttoned everything down. The original LCD circuit board, now just a retraction motor control board, is then secured via zip-ties. Then everything was put back in the car for a full-up functional test.

Tapping Power from RX-8 Navigation Hood

Once I figured out the navigation hood actuator position needs to stay within an expected range, I got things back up and running enough to perform a reset and erase all of my personal information from the ancient factory navigation computer of my 2004 Mazda RX-8. Now I can focus on the wireless CarPlay/Android Auto receiver I intend to install in its place, and the first order of business is finding a power source.

The receiver came with a cigarette lighter power adapter, it even has a right-angle USB type C connector. But the connector is too large to fit through the hood hinge. Besides, running the power wire all the way from the nearest cigarette lighter socket feels inelegant. The existing navigation hood mechanism has access to power, I should tap into that instead!

Probing the LCD assembly connectors, I first found all the ground/shield wires. Using that as a reference, I could measure the rest of the wires.

I confirmed the two expected power supply pins: 1Q has power as long as the battery has power, and 1O is only powered on when the key is in the ACC or ON positions. I don’t know of any reason why the receiver needs power when the car is shut off, so I’ll tap into 1O for accessory power.

On the receiver side, I cut off the USB-A end of my just-purchased right-angle USB-C extension cable (*). This cut-off end could be easily routed through the hole in the middle of the hinge. A quick test showed this receiver is happy with +5V on the red wire and ground on the black wire, no voltage dividing resistors necessary to negotiate power delivery.

Sitting between those two ends is a LM2596 buck converter module (*) to convert ACC power (~11V-14.4V) down to 5V. It is protected by a short length of clear heat-shrink tubing (*) and mounted to the side of the housing with double-sided tape. The wires are kept in place with some adhesive-mounted zip ties (*) hopefully reducing metal fatigue from a car’s normal high-vibration environment.

I stuck it to the side because I knew there was enough room there under the dash, but I forgot to account for installation opening which is narrow and would block a straightforward install. But, if I carefully tilt the assembly off to one side, I can make just enough room to slide the buck converter past this ledge. This was good enough for the first pass. If it doesn’t work out, I will have to reposition the buck converter and reroute the wires.


(*) Disclosure: As an Amazon Associate I earn from qualifying purchases.

Navigation Hood Actuator Electrical Test

I reconnected all the electrical cables I took apart on my 2004 Mazda RX-8, intending to clear all personal data from the original navigation system before I replace it with a wireless CarPlay/Android Auto receiver. But when I turned the car back on, everything stayed dark. I found and fixed a problem with the audio control panel, caused when I used too much force upon removal. Now the audio panel works, but the navigation screen still stayed dark.

Everything electrical seemed to check out, I got as far as confirming that there’s power going into the LCD control board, but nothing is moving. Normally when I power up the system, the motor whirs to unveil the screen and the screen turns on to show the navigation system boot sequence. Now I have no motor whir and the screen stayed dark. Since I’m doing just an electrical test, the motor is connected but merely sitting off to the side.

Thinking maybe I’ve missed a subtle detail somewhere, I kept my eyes open as I mechanically reassembled the navigation hood as well. Retrying the experiment, I was excited to see the motorized hood moving into place and the screen came on as expected. Interesting! I pressed the open/close button to verify the closing sequence, then I pressed it again to open it up. The second time, nothing moved and the screen stayed dark. What’s going on?

Eventually I figured out the motor sequence will not execute if the actuator is out of its expected range of motion. This seems reasonable enough in hindsight. Such was the case when the motor was just sitting off to the side and was the case again when the partially reassembled hood closed. (When fully reassembled, the surround panel will keep it from moving that far.) The inertia from closing pushed it a little too far and out of the expected range, so it refused to run the second time. But if I push it a little bit, back within its normal range of motion, it will run.

That was good to know, and now I have the old navigation screen up, I could perform the reset sequence as per RX-8 owner forum thread:

  • Go to System menu.
  • Select Version Information.
  • Move the navigation control joystick: up, up, up, down, down, down, up, up. This should bring up a diagnostics menu.
  • Select “CD Check”
  • Select “Cold Start”

The system will reboot and, when it comes up, the “Select Destination” menu will show up with “Marked Point” and “History” grayed out: they have been erased. This was what I wanted, and I can proceed with my screen replacement project.

Audio Head Unit Was Damaged During Removal

After cutting some plastic away, I was able to fit a wireless CarPlay/Android Auto receiver in the space originally occupied by the factory navigation LCD in my 2004 Mazda RX-8. It’s a tight fit, so several right-angle extension cables are on order. While I waited for them to arrive, I thought I would hook up all of the original components. There were two reasons for this. First, because this replacement would make the original system inaccessible (can’t interact without a screen) I wanted to wipe all personal data. Information like travel history, bookmarks, and so forth. Second, in case the new system doesn’t start up as expected, I wanted to know I didn’t break anything getting to this point. That turned out to be a very good call.

After I put everything back together, I turned the key to “ACC” (accessory) and while the dashboard lit up as expected, the center console did not. Usually, the LED status bar above the radio would display “mazda RX-8” in the center between the clock and thermometer, but that entire status bar stayed dark. NO text, no clock, no thermometer. Furthermore, the navigation hood is supposed to flip open to expose the display, where I can watch the old navigation system boot up. The hood did not flip up, and the screen stayed dark.

After taking a deep breath, I started on a list of diagnostic steps:

  • Unplugged and reseated all connections didn’t help.
  • Checked the fuse box, the ACC fuse looked fine and has electrical continuity.
  • Turn everything off and back on: disconnected the battery, waited half an hour, plug it back in. Didn’t help.

I removed the audio head unit for closer inspection on the workbench. While looking around for obvious signs of damage, I found the culprit:

This is one of four fastener positions holding the glossy black plastic audio control panel to the metal equipment cage behind it. For this fastener, I can see the serrated edge of a heat-set insert. I’m not supposed to see that! Apparently, when I removed this module, I pulled too hard trying to free it from plastic clips and ripped this fastener out.

Just inside the ripped-out insert was a connector like the ones I saw in the Toyota and Honda units I’ve explored. This is probably a standardized durable part that works very well for this application, but they definitely won’t work when the two parts were held a centimeter apart by a stripped-out heat-set insert.

Now that I see the problem, it was easy enough to fix with my soldering iron.

And ta-da! It’s back in. Reinstalling the control panel, I can see the connectors are now actually connecting. This time when I turned the key, I saw the LED status bar light up alongside working audio and HVAC controls. However, the navigation hood motor didn’t move, and the LCD stayed dark. One problem down, but I still have more debugging to do.

Trimming Both Receiver and Bezel to Fit

I want to install a cheap wireless CarPlay/Android Auto receiver into my 2004 Mazda RX-8 factory navigation display enclosure, but it was just a little bit too wide. I rather not cut the enclosure so I took a look inside the receiver to see if I can get things to fit by just cutting the cheap Amazon purchase. While there weren’t any electronics on the edges where I wanted to cut, the front face is made of glass instead of clear plastic, and I don’t have a good way to cut that. I resigned to the fact I have to cut into the interior trim piece after all.

My tool of choice is the Cutra WonderCutter S, which had no problem cutting ABS plastic.

While setting up to start cutting, I took a closer look the soft rubber bumpers that exist to cushion the face as it closed. I thought they were pretty permanent but they were actually really easy to remove after a light tug to stretch and make it thinner.

I couldn’t cut the glass face of the receiver. I could probably cut the sheet of plastic bonded to that glass, but it’d be a lot of work for minimal gain. Everything behind them, though, were thinner and easier to cut free.

To fit those trimmed-down sides, I cut slots into the bottom of existing molded support posts. This way I preserve the ability to remount original equipment if I wanted, and also leaves open the option to use those supports to mount the new receiver. With these slots, and with the soft rubber bumpers removed, the receiver can slide into place. (In the orientation of this picture, the receiver slides in from right to left.)

Once the receiver was in place, I had final confirmation there’s very little remaining space for my connectors. I ordered right-angle adapters for all connections:

I needed to wait a few days for them to arrive but that’s OK, as it turned out I had some problems to diagnose before I could reset my old navigation system.


(*) Disclosure: As an Amazon Associate I earn from qualifying purchases.

Peeking Inside a Wireless CarPlay Android Auto Receiver

Once I disassembled the navigation hood of my 2004 Mazda RX-8, I discovered the wireless CarPlay/Android Auto receiver I wanted to install would not fit. It’s a few millimeters wider than the existing navigation screen and the bezel had no room to spare. I would have to cut something to make everything fit. Between the cheap device I could easily replace with another Amazon order versus Mazda interior trim piece, I prefer to cut the cheap device. I will take the receiver apart to look inside. Since I’m just scouting for trimming potential, this is not a full teardown.

Its enclosure was held with just clips, no fasteners. It was a matter of jamming enough opening picks into the gap to release a row of clips on one edge. Once that’s accomplished, remaining clips released easily.

It’s pretty minimalist inside, as fitting for a low cost device. Just a single main circuit board, the screen, and a few supporting components.

I had half expected a PCB antenna, but happy to see a short little thing glued to the case and attached to the circuit board with a removable connector. This potentially give me more options. Either in relocating this antenna elsewhere or replacing it with a different antenna in the hopes of improving reception. I will use this one as-is until I have a reason to tinker.

Looking at this antenna, I felt something was wrong and it took a few seconds of thought to realize what: when I look at similar antenna during computer teardowns, they’re always carefully placed outside of metal RF shielding. This device appears to have no metal shielding at all. In fact, now that I am looking for them, I noticed there were no label for make and model number and, most important for this discussion, no FCC ID listed. Is this thing even legal?

On the upside, the lack of metal shielding meant it’ll be easier to cut this enclosure backside to any shape I need to mount it in my navigation hood. And the lack of components meant I won’t damage anything on the way.

I saw quite a few unused provisions on this circuit board. The terminals labeled “-” and “+” are apparently provisions for a battery. I’ll be running this on car power so I don’t care. More interesting to me are two surface mount buttons that are not accessible when this unit is closed up. What are they for?

Down in one corner I see the embedded microphone and, a few centimeters away, a cable leading to the screen. I thought this might be backlight power, but terminals labeled with I2C style “SCL” and “SDA” tells me this is more than just supplying light. This is probably the capacitive touch controller.

Flipping the screen open, I could confirm it is indeed the touch controller. The good news is that capacitive touch digitizer is roughly the same size as the LCD, so they’re safely out of the way from trimming operations. The bad news is the front of this unit is a single sheet of glass bonded to the front of this enclosure. Given the price point I had expected a sheet of clear plastic, but it’s glass.

The only method I have of cutting glass is the “scratch a line and bend” method. I don’t have a handy diamond to scratch glass, though maybe one of my carbide tipped cutting tools can do it. More problematic is the bonded piece of plastic which makes the “and bend” part very difficult to do neatly. I’d likely shatter something else in the process.

Looking at this situation, I decided I couldn’t avoid cutting into Mazda interior trim piece. But I’ll try to minimize the damage. On the device side, I’ll cut away as much of the plastic as I could. Whatever is left (the glass and its plastic backing) will need only a narrow slot to slide in sideways.

Disassembling Navigation Hood from 2004 Mazda RX-8

A car’s interior is a pretty awkward place to work. As soon as I freed the navigation LCD assembly from my 2004 Mazda RX-8 dashboard, I moved my project to a flat work area. It was lined with a clean soft white towel to reduce chances of something getting scratched up.

I immediately unclipped the center speaker mesh, because that looks extremely fragile. I set it aside in a safe out of the way location. In hindsight, I didn’t need to bother. This large panel can be freed easily enough.

There are two buttons on this assembly, one on either side of the retracting hood and each secured with a screw. The retracting hood itself is an assembly I can unscrew as well.

The electromechanical assembly can then be separated from the large cosmetic panel.

I was encouraged by what I saw on the side. I can see the retraction gear mechanism and two details that would help me reassemble this later. First, the motor has a D-shaped shaft (round with a flat section) so the gear can be removed and reinstalled in the exact same place. Second, there is a small white mark on the gear for alignment with a similarly marked tooth on the track.

I also saw the retraction hinge is hollow, with a beefy ground wire through the hole on this side. This will help me route wires for my project. But all I see here is a solid grounding wire. Where is the wiring for everything else?

I found my answer after undoing the four screws (two on each side) holding the hinge in place, freeing the hood itself. Now I can clearly see a wide flat FPC (flexible printed circuit) handling the majority of electrical connections between the base and the hood. I can also access the two screws holding the hood lid.

Once hood lid was removed, I have a clear view of the retraction mechanism sitting behind the LCD screen. I would have expected the retraction mechanism to live in the base and not in the hood, but here it is taking up valuable volume inside. I also didn’t expect it to be controlled by the LCD circuit board, but I learned this was the case from RX-8 owner forum of others who have done this before. I had originally thought I could just remove everything inside the hood but, if I want to maintain the hood retraction capability, I’d have to keep the LCD circuit board for its little side function.

Removing the motor assembly allowed me to open up the stout metal shield protecting the factory navigation LCD screen. This shield is the destination for that beefy ground wire I saw routed through the hinge. Using my multimeter, I found three of the FPC ribbon cable connections had continuity to the beefy ground wire, but they were apparently not enough. It sure looked like Mazda engineers were forced to install additional grounding during vehicle development. I wonder what the problem was.

Speaking of problems, this section of the LCD circuit board has me extremely worried. Based on CAUTION! HIGH VOLTAGE! warning printed on the circuit board, big beefy components nearby, and thick wires leading to the display, I deduced this is for a CFL (compact fluorescent) backlight. My car was apparently too old for a LED backlight.

A high voltage transformer like this assembly will throw off a lot of noisy electromagnetic signals, the kind that would mess up a capacitive touchscreen. The factory screen is not a touchscreen so it has no worries on that front, and the stout metal shielding would have mitigated interference with other components. But I’m going to swap out the screen and keep this circuit board to manage the retraction motor, and this circuit might be trouble.

And that’s not my only trouble. After removing the factory LCD assembly, I measured its width at 177mm including the sheet metal cage. My wireless CarPlay/Android Auto receiver is wider at 190mm and would not fit in between mounting posts molded into the retracting hood.

In order for this to fit, I will have to cut something. RX-8 owners who posted their tablet installation procedures on the RX-8 forums usually cut these mounting posts. I hesitate to make destructive modifications to my car. I would much rather cut into the inexpensive receiver, because it would be much easier and cheaper to buy a replacement off Amazon if I make a mistake. But before I start cutting, I should look inside to see if there’s anything critical along its edges.

Removing Navigation LCD Assembly from 2004 Mazda RX-8

After reviewing RX-8 owner forums, I feel I have a good idea how to tackle my project: swap out my 2004 Mazda RX-8’s factory navigation system LCD screen for a modern wireless CarPlay/Android Auto receiver. The first order of business is to extract that existing factory navigation LCD assembly, which required taking apart many pieces of interior trim. Such extensive disassembly was needed because Mazda designed the center console as a series of overlapping pieces. Each one had to be removed to uncover fasteners for the next one.

The first step was easy: unscrew my manual transmission shift knob. (I have no idea what this looks like for RX-8 with automatic transmission.)

Upper console panel surrounding the shifter is held only by clips, so it can be loosened by careful prying. No screwdriver necessary. Once loosened, I unplugged three electrical connectors: the navigation control panel, and seat warmer switches for driver’s side and passenger side seats.

A salute to the Mazda engineers who put in extra effort to make it extremely difficult to mix up the driver-side and passenger-side seat warmer controls. Not only are they differentiated by color (black for driver’s side and white for passenger side) they are also physically keyed differently. The driver’s side had two shallow channels, the passenger side had one deep channel and one blocked channel.

Now we can access the two screws holding the ashtray panel in place.

There are three electrical connections to the ashtray panel. One for the cigarette lighter socket, one to illuminate that socket, and one to illuminate the tray. I could not extract the tray illumination assembly, but I eventually figured out it was much easier to remove the bulb.

With the ashtray panel out of the way, we can access two screws holding the center panel (with audio and HVAC controls) in place.

Before we can slide the audio head unit + HVAC controls module out, we have to take a side detour to the driver’s side footwell. Just under the steering column is a plastic panel held by clips, and behind it a metal bracket held by these four screws.

Then we can stick our head down there. Looking towards the center console, we can see a single 10mm bolt in the side of the audio head unit that must be removed. Don’t get distracted by the two nuts. Theyare much more easily accessible but will not help with this task.

Once that bolt is removed, I pulled on the panel to release four clips at these marked locations. Because this panel is glossy black, I was wary about using prying tools and didn’t use them. This was a mistake: in order to loosen the top two clips, I pulled too hard on the glossy panel and damaged it. (Though I wouldn’t realize it until later.)

Once loosened, I reached my hand behind this panel to unplug all the electrical connectors. From top to bottom:

  • Connector to the LED status screen.
  • Small round AM/FM antenna connector.
  • Large rectangular connector for power, speakers, etc.
  • Beefy connector directly behind the fan speed knob, presumably for fan motor.
  • Smaller connector, presumably for remainder of HVAC controls.

After extracting the audio/HVAC panel, I could access two screws holding the center ventilator grille.

Once that’s removed, I could finally access the two screws holding the navigation LCD unit panel.

Beyond those two screws, the panel is held by copious clips all around. Loosening them allowed access to unplug three electrical connectors from the navigation LCD unit:

  • Beefy grounding cable
  • Power and communication with the navigation computer between the rear seats.
  • Center console control panel that sat just behind the shifter.

The navigation LCD assembly is now freed.

A view of the cavity formerly hosting said assembly. This view also shows location for all the clips.

Someone more familiar with this system might be able to remove the navigation LCD panel without fully disassembling everything as I did. For example, in hindsight the shifter surround panel could probably move enough to allow access to ashtray panel screws without disconnecting seat warmer and navigation control panel connectors. But I didn’t know that at the time, and I was curious to see what’s behind these panels.

Next, the newly freed navigation LCD assembly is moved to a more comfortable work area for further disassembly.

Online Resources for RX-8 Navigation Project

I bought a cheap wireless CarPlay/Android Auto receiver and preliminary tests show it should work well if I can install it in place of the factory navigation screen in my 2004 Mazda RX-8. This is not the type of procedure covered by Mazda’s official workshop manual. I would need to check the RX-8 owner’s forum at https://rx8club.com to see what others have done before me. One advantage of a twenty-year old car is twenty years of other people sharing their stories of tinkering with theirs.

Surprisingly, I didn’t find anybody doing the exact same thing. Perhaps standalone wireless receivers are too new for this DIY crowd? There were plenty of threads about CarPlay/Android Auto audio head units with the Metra kit, like this relatively recent example, but I’ve already decided I’m not going that route.

The closest matches were from people who installed a 7″ tablet in their factory navigation hood, as my new wireless receiver is basically a 7″ tablet. I found several threads and many of them referenced one of these two pioneers: one project installing a Samsung Galaxy Tab 2, and another project installing a Huawei MediaPad. Both of these were long threads with reference pictures and many good questions followed by valuable answers.

For connecting tablet audio to the car, later RX-8 came with an auxiliary audio input jack. Early RX-8 did not but this is a well-solved problem. People reverse engineered the audio head end circuit so we can get an auxiliary audio port that the car believes to be the optional cassette tape deck or minidisc player modules. Implementations range from an Arduino-based DIY solution to commercial products for sale. I bought and installed a Sylfex AuxMod Basic years ago, a product that has now been discontinued. Current-day alternatives include the GTA adapter kit.

My wireless CarPlay/Android Auto receiver came bundled with a backup camera. I’m going to postpone that project until a future phase but, when I get around to it, there are forum threads I can reference as well like this one.

Armed with knowledge, I opened up my toolbox and started dismantling my center console.

First Impressions of CarPlay and Android Auto Receiver (TTXSCAM T86)

After I quickly reviewed everything that came in the box of this TTXSCAM T86 CarPlay/Android Auto receiver I bought via Amazon (*) it was time to power it up to see it in action. There were two test configurations. The first was powered by a solar charged battery and desktop speakers, the second round were powered by my car’s battery and output to my car’s speakers via an aftermarket audio input port. (Sylfex AuxMod Basic, now discontinued.) My observations are as follows:

The first thing I measured was the visible display area, and it was good news: it almost matched the size of stock navigation screen bezel. 4mm narrower in width and 3mm shorter in height, this is as close of a match as I could hope for. Mounting this inside the existing navigation hood would leave only a negligible black border.

When booting up, the screen displays this image which I think depicts a McLaren 720S. I want to change this image to maybe the Mazda logo or a picture of my own car, but I couldn’t figure out how. The device also emits a little musical chime on startup on both its internal speaker and the audio line-out port. I didn’t find a way to change or silence that, either. Neither of these boot-up behavior is a deal breaker but customization would be nice.

The device home screen has a few functions, the only one I cared about was “Android Auto”. Pairing it with my phone as a Bluetooth peripheral enabled Android Auto. Scrolling around Google Maps on this device, I found the system responsiveness to be merely acceptable. There’s a noticeable delay between input and response, and scrolling animations are chunky. It feels roughly on par with <$100 USD Android phones commonly sold with prepaid cellular services. I am optimistic the device’s sluggish response won’t matter, because if I want to do something like putting in a new address for navigation, I can use my (much more responsive) phone’s screen.

Once connected to my phone, this receiver will try to reconnect to my phone every time it powers up. I counted ~30 seconds between turning on power and projecting information from my phone. It’d be nice if this was faster, but ~30s should be fast enough for everything to be up and running by the time I’ve backed out of the driveway.

Speaking of which, I also did a quick test of the bundled backup camera. I just connected the wires, no mechanical mounting. The camera is just sitting on the floor looking at my feet. With the camera connected and the signal wire tied to input voltage (emulating the power line of an illuminated reverse gear light bulb) it only takes ~10 seconds between screen power-on and showing backup camera view. This is roughly on par with the amount of time I allow the engine to settle down to idle before shifting into reverse, so I’m also filing it under “would be nice to be faster, but probably fast enough” as well.

When using audio line out, to my car’s audio input port, I could control sound volume with the existing sound volume control knob or steering wheel controls. This worked as expected with no surprises.

Screen brightness is another story. The factory navigation system automatically adjusts screen brightness based on an ambient light sensor and a signal wire indicating if headlights are on. I can’t tell if there’s a brightness sensor built into this device, but it definitely doesn’t have the headlight state. I have to manually adjust brightness to fit ambient light. I neglected to look for this aspect when listing my shopping criteria, oops. I’ll have to see if this bothers me enough to make me pay for an upgrade.

I’m encouraged by the almost-perfect screen size fit, fast-enough startup time, and integration into existing volume control. I can probably learn to ignore the startup image and chime. I’m not so sure about screen brightness behavior, but that’s not an immediate deal breaker. This cheap thing is not excellent, but it seems good enough to meet my needs. Before I take my car interior apart, though, I should do my homework and study information available online.


(*) Disclosure: As an Amazon Associate I earn from qualifying purchases.

Unboxing Wireless CarPlay and Android Auto Receiver (TTXSCAM T86)

I wanted to add CarPlay/Android Auto capability to my 2004 Mazda RX-8 by replacing the screen of the ancient Mazda factory navigation system. I picked out a standalone wireless receiver with features I liked and a physical size that I hoped would fit. When my TTXSCAM T86 (*) showed up, there was a satisfying quantity of stuff in the box.

I immediately went to the manual (which called the device a T86MP5) and found it to be nearly useless. A thin booklet of 22 meager pages that didn’t cover basic information like installation or anything about the backup camera. I think I’m on my own to figure out most of this device.

It came with two sets of mounting hardware. One for the top of the dashboard, either by the included double-sided adhesive or four fastener holes. And the other is a suction cup mount either to the windshield or to the included a smooth plastic disc, also with double-sided adhesive. I will mount this device inside a piece of existing interior trim, so I won’t be using either of these mounting arms.

It also came with a 3.5mm stereo audio cable, and a power cable that plugs into the de facto in-car power source form factor that traces its origin to a cigarette lighter. The device end of this power adapter is a USB type C plug, but this adapter is not a full USB PD (Power Delivery) source. It only claims to deliver 5 Volts at up to 3 Amps.

Majority of the parts count are associated with the backup camera. Electrically, there’s a wiring harness long enough to run the length of the car, various zip ties and other cable management tools, even a roll of electrical tape. I didn’t recognize the red plastic pieces and had to search online to learn they are T-tap connectors. Further reading taught me I am supposed to use them to tap into the reverse light power wire, so the system knows to turn on the backup camera.

Mechanically, this package included a license plate bracket and associated hardware to mount the camera top and center above the license plate. I can’t use this directly as-is because the RX-8 has its license plate illumination light centered above the plate, and this mount would block that light with the camera. I will have to modify the bracket, or existing light, or get creative with something else.

I was charmed by the inclusion of a few tools. A tiny screwdriver to work with the small camera-mounting screws, and a large piece of orange pry bar for removing interior trim. Something I’ll be doing a lot to run the camera wiring harness through the car. Looks like a proper backup camera installation will be a lot of work. Fortunately, I can put that off until later. The next order of business is to explore how this receiver works with a benchtop test.


(*) Disclosure: As an Amazon Associate I earn from qualifying purchases.

CarPlay and Android Auto Receiver for 2004 Mazda RX-8

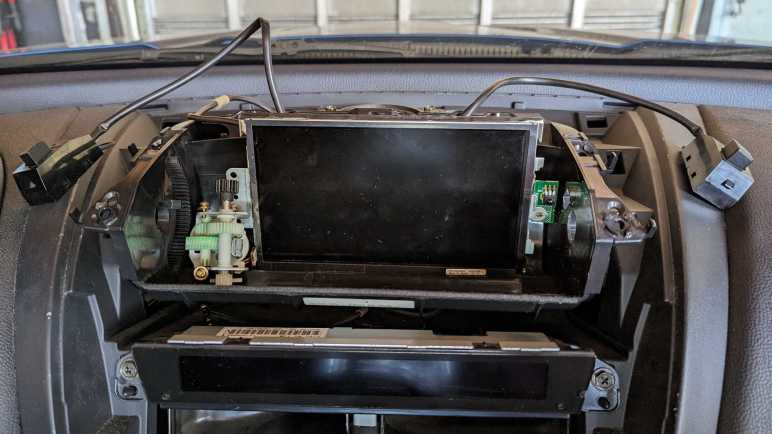
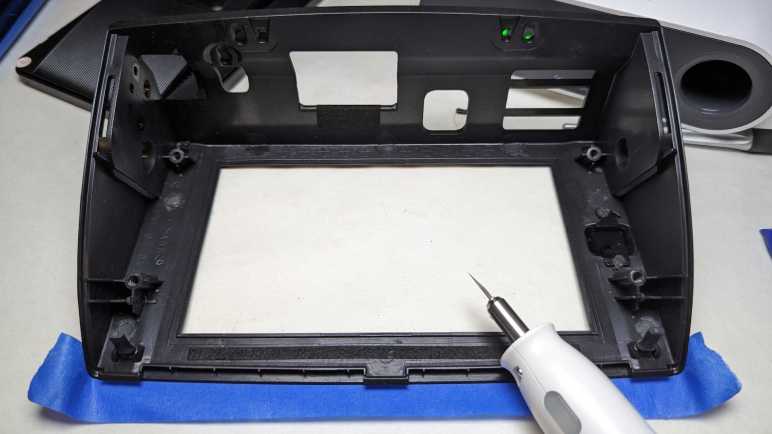
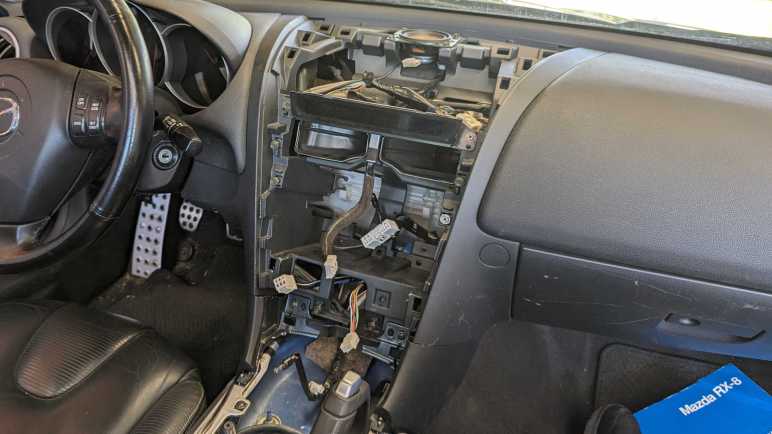
I wanted to add CarPlay/Android Auto capability to my nearly twenty-year old car and as soon as I learned standalone receivers existed, I knew that was the direction I wanted to go. I started looking for a good candidate for installation inside existing navigation hood. It’s a little motorized retractable pod where Mazda housed the screen for the factory navigation system, and fitting into that pod will be the primary physical constraint. In addition to physical size, there are several other evaluation criteria:

Screen

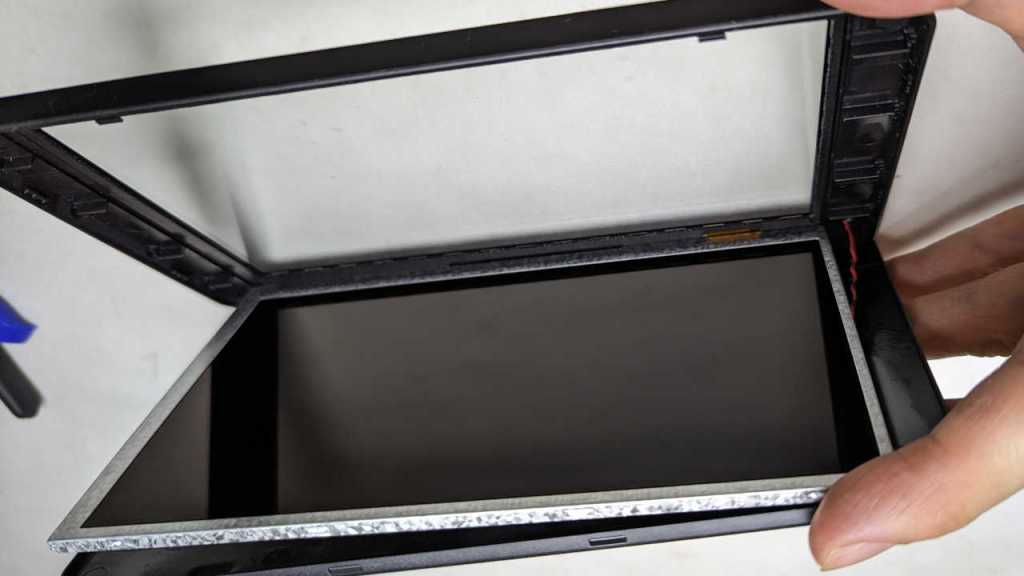
Annoyingly, screen size is the next most important constraint, yet it isn’t something I can confidently determine. I want to buy a unit with visible screen area matching the factory navigation screen, so it fits perfectly in the original bezel, but the exact height and width are never specified. The best I can do is look for a “7-inch class” diagonal screen, excluding significantly larger and smaller screen sizes. I also excluded wide aspect ratio screens like this example. (*) A wide screen is a great idea for sitting on top of the dashboard, the intended use these standalone receivers. Showing more data without being too tall and blocking the driver’s view. But I want to fit into an existing 16×9 aspect ratio bezel, so those novel designs are out.

For the display panel, I personally prefer IPS panels for their color and viewing angles. Some units use a TN panel which will probably suffice. (The original navigation screen was likely a TN panel.) I don’t think they make VA panels at these small sizes, but they would also suffice. And finally, I’m not willing to pay the premium for an OLED panel here. Their stunning contrast ratio would be lost in the interior of a car, and there’ll be a lot of infrequently changing pixels risking OLED burn-in. Making OLED a poor choice for this application.

Most of these 7-in screens list their resolution as 1024×600. This is pretty low by modern screen standards, but it’s going to be mounted in a car further away than my usual computer and phone screen distance, so it might be fine. I’m confident it’ll be an upgrade from the factory navigation screen resolution! If resolution proves to be a limitation, I’ll come back and pay extra for a unit with a 1920×1080 screen.

[UPDATE: It would be nice if the device automatically dimmed the screen when dark. I forgot to look for that in my first device, it’ll be added to the criteria list if I shop for another.]

Touch Input

Capacitive touch technology has taken over everything, I didn’t see any of these receivers listed with a resistive touchscreen. My concern with capacitive touch is their sensitivity to environmental interference. A resistive touchscreen will only react to physical forces. A capacitive touchscreen might be affected by the plastic bezel, mounting hardware, or other electronics in close proximity. But given the lack of non-capacitive options I just have to give it a try.

Camera

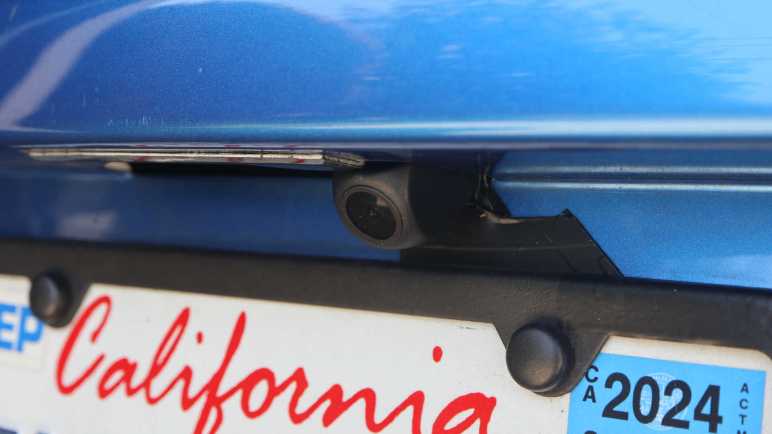
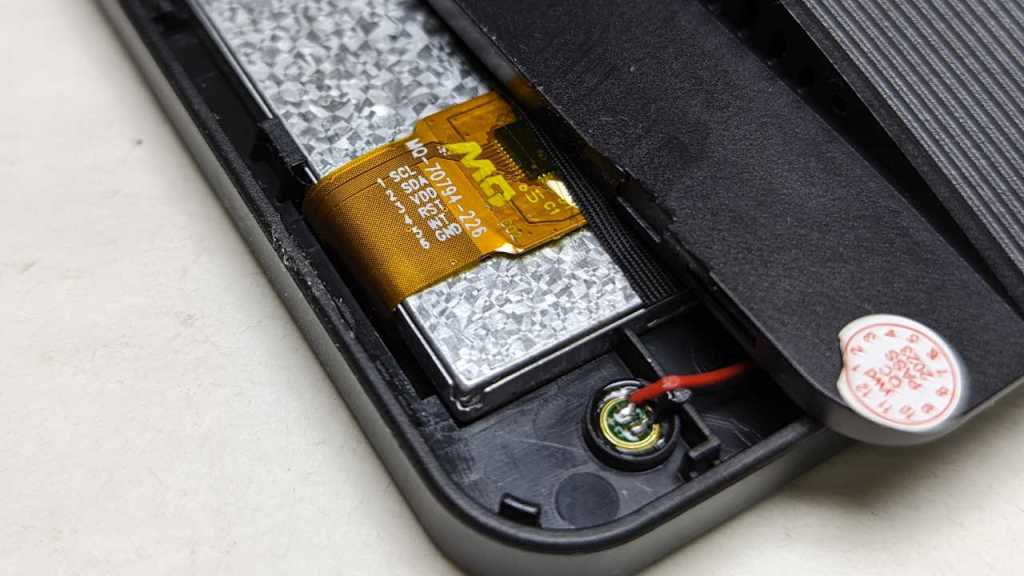
Since these things are designed to sit on top of our dashboard, some (like the wide aspect ratio item linked above) integrated a front-facing dashboard camera. Since I want to bury mine inside the factory navigation hood, that feature would be useless for me. On a related note, several included either provision for a backup camera or comes packaged with one. This caught my interest. RX-8 rearward visibility is not great, and I’ve occasionally wished for a backup camera.

Audio

For audio output, these devices all have a little built-in speaker for when they’re sitting on the dash. Since I want to integrate it into my car, I want units with a line-level audio output jack. Some of these units can also act as a FM transmitter so we can tune in with the radio, which might sound better than the tiny built-in speaker but not as good as line-level audio signal.

They all have a built-in microphone for audio input, for use with Apple’s Siri or Google’s Assistant. Some of them have an audio input jack for an external microphone, and some have provision for an external button to activate voice commands. I never use voice input, so this was irrelevant to me.

Wired or Wireless?

I’m torn on whether to go for wired CarPlay/Android Auto or wireless. A wired interface will be immune to RF interference and will charge up my phone while in use. Wireless will be more convenient, and one less cable I have to route under trim panels in the car. I can go either way and if it proves to be a problem, I could buy a unit with the other connection method.

Winner

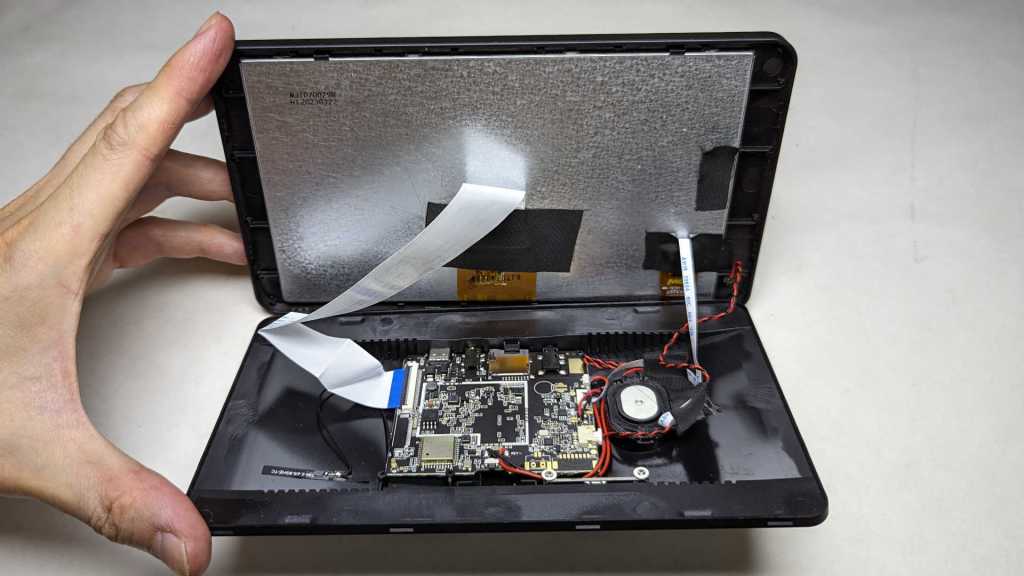
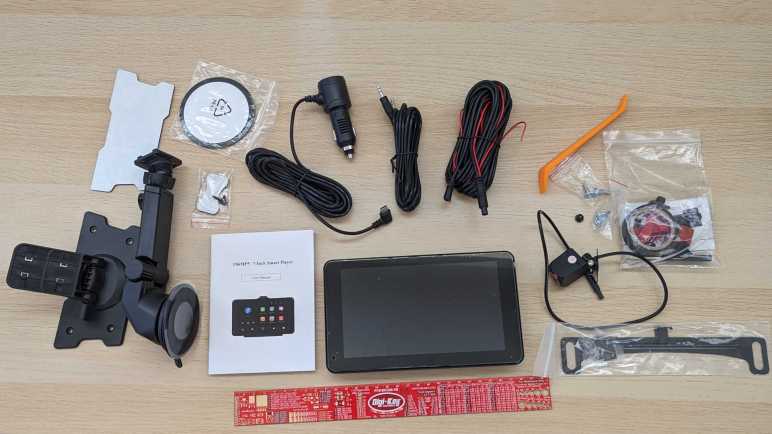
Criteria above culled Amazon listings down to about two dozen very similar products from brands I’ve never heard of. Not knowing how to evaluate differences, I do what most Amazon shoppers do: sort by price. I then clicked “Add to Cart” for a TTXSCAM T86 (*) which had the following features:

  • 7″ IPS capacitive touchscreen with 1024×600 resolution.
  • Bundled backup camera, no front facing dashcam.
  • Audio-out jack in addition to built-in speaker and FM transmitter.
  • Built-in microphone only. No audio-in jack or voice activation button.
  • Wireless CarPlay and Android Auto

This is a very affordable unit. I thought I would start here and, if I find anything annoying, that would teach me reasons to justify going upscale. Keeping things cheap also means it’ll be less intimidating to modify as needed to fit my car. Once it arrived, I looked over everything that came in the box.


(*) Disclosure: As an Amazon Associate I earn from qualifying purchases.

Standalone CarPlay/Android Auto Receivers Exist

I wanted to put CarPlay/Android Auto capability in my car, which is approaching twenty years old. The known solution displaces factory audio with a double-DIN bay for an aftermarket head unit. I decided against that path, because I wanted to keep the factory audio head unit (and all its electronic and stylistic integrations) intact. Instead, I want to put that capability where the factory navigation system screen sat.

Mazda’s factory navigation screen sits in a little motorized hood that retracts when not in use and keeps a screen close to a driver’s field of view while in use. I liked that position and thought perhaps I could fit an aftermarket unit within that volume. It has enough width and height to match a double-DIN bay, but only a fraction of the depth. This is not a problem because we’re not dealing with CDs or cassette tape mechanisms so modern head units can be very shallow. For example, this unit (*) claims to be a mere 1.77 inches (probably designed for 40mm) deep. Possibly small enough to fit in the stock navigation hood. Another potential candidate is to buy a unit like this one (*) that fits in a single-DIN bay and connects to an external screen. I could mount that screen in place of factory navigation screen and find some space nearby to mount the main body.

I knew these solutions are overkill, because they are full audio head units. Meaning they have their own speaker amplifiers, AM/FM tuners, and many other components that I don’t really need because I’m keeping Mazda’s stock audio head unit. I had searched for head units because I didn’t know any better, but Amazon search algorithm helped me out: it started suggesting sale listings for standalone CarPlay/Android Auto receivers. I didn’t know these things existed! But as soon as I understood they were available, I ignored the full audio head units. Standalone receivers are even shallower and, I hoped, more amenable to creative mounting schemes. Which of many offerings listed on Amazon would be a good replacement for a 2008 Mazda RX-8 navigation screen?


(*) Disclosure: As an Amazon Associate I earn from qualifying purchases.

Going Off the Beaten Metra Path

My 2004 Mazda RX-8 was factory equipped with an optional in-car navigation system, but the map data and the electronics behind it are now twenty years out of date. Potential upgrade ideas evolved over my two decades of ownership, but I never got around to any of them. Now I’ve decided to give my car a modern (for now) capability: connect to a phone via Apple CarPlay or Google’s Android Auto.

A typical upgrade solution is to replace the factory stock audio head unit with an aftermarket unit. There’s a large selection of CarPlay/Android Auto capable products, like this randomly chosen example Pioneer DMH-W2700NEX. (*) Such replacement is relatively easy for dashboards that conform to the dual-DIN standard for audio head units. Unfortunately, interior design has been moving away from that standardized format, a trend that included my car. Stylistically integrating audio with the rest of interior now hinders my attempted upgrade.

Fortunately, the aftermarket has an answer for that as well, in the form of Metra 95-7510HG. (*) This kit replaces the entire center console panel with a new facade that accommodates a dual-DIN head end. The “HG” suffix has a glossy finish that matches the stock panel, the version without “HG” prefix may blend in better with the rest of the interior which did not have a glossy finish. There’s also a single-DIN variation with a little storage cubby, but that would be too small to accommodate a CarPlay/Android Auto touchscreen. In all cases, we lose the circle themed Mazda styling on the original panel.

The price tag on these kits is far more expensive than a plastic panel and a few brackets, because there’s a fair bit of electronics that have to be installed as well. Remember that interior integration trend? This panel, formerly hosting the audio controls, also hosts the HVAC controls. Plus, sitting above this panel is a single glowing red screen displaying both HVAC and audio status. The Metra kit includes electronics to interface with the HVAC and status display. It also interfaces with the steering wheel audio controls. And finally, a critical safety item: the emergency flasher button is also part of this assembly.

Searching on the RX-8 owner forum, I found many reports that the Metra kit is not a seamless experience. There are complaints about mechanical fit, cosmetic finish, and electrical gremlins in the electronic interface translators. They’re all solvable problems except for the last one: I don’t usually look down that far when driving. My car already has a screen up high in my normal field of view. I want to use that location. Based on the above criteria, I decided against the Metra kit and will try a different route.


(*) Disclosure: As an Amazon Associate I earn from qualifying purchases.

Replacing Factory Navigation for 2004 Mazda RX-8

I am slowly grinding away at learning FreeCAD, hoping to get good enough so I can use it for future projects. There’s not much to write about learning the ropes, so I’ll write about a different project currently underway in parallel. I had recently concluded a cosmetic art car project, removing Plast-Dip I applied to make it resemble Star Wars’ BB-8. Now my car is back to its factory blue color, and I want to tackle an item that’s been on my to-do list for a long time: upgrade the in-car navigation system.

Mazda offered the 2004 RX-8 with an optional in-car navigation system. It was an expensive add-on, but I was young and flush with a tech salary, so I got mine so equipped. This luxury far predated the age of everyone having maps on their cell phones. (Reminder: the first iPhone launched in 2007.) Add-on units from Garmin and TomTom existed at the time, but the factory options were superior for several reasons:

  1. Spoken directions are piped through the audio system instead of a tiny speaker on the dash.
  2. A dedicated GPS antenna with a better view of the sky than a box in the cabin.
  3. It has access to vehicle speed and direction to estimate position if GPS signal is lost.
  4. Does not occupy a power socket and does not require a tangle of wires.
  5. Screen is elegantly integrated with the interior, not a suction cup on top.

I knew map obsolescence will become a problem at some point, but I wasn’t too worried. At the time I had expected to trade the car in for another one in a few years, I didn’t expect to love the car enough to still have it today. A 2004 model year car that I bought in 2003 means the map data was probably compiled in 2002 if not earlier. This is now quite old, and I don’t recall ever hearing anything from Mazda about map updates, for free or for fee.

One advantage of having the optional factory navigation system is that, if I wanted to tackle an upgrade project, a lot of wiring is already in place as well as the factory interior trim pieces to accommodate a navigation screen. But what would this upgrade project entail? The project ideas evolved as the years went on. Early in my car ownership, I contemplated converting the in-car navigation system to an in-car Windows PC running Microsoft Streets & Trips and patched to the in-car GPS antenna. That would have been a hugely complex project, so I never got started. For a simpler alternative, I considered shucking a Garmin free of its factory enclosure and integrate it into the car, but that never happened either. Then online maps like Google Maps got good enough I thought about replacing the factory navigation screen with an Android tablet with Google Maps running offline maps downloaded at home via WiFi. While I procrastinated, data plans got cheap enough for our phones to use live data online. So, I thought about putting a phone mount inside the factory navigation hood.

None of those happened, but I’m finally tackling the project now. The current state of the art for in-car integration takes the form of Apple CarPlay and Android Auto. That’ll be my target but I’m taking an unconventional route.