Watching Operation Of Electron Microscope Live Was Surprisingly Interesting

It’s always amazing to see what people bring to the Hackaday Superconference. I think the audience would appreciate my project Sawppy, but I didn’t bring my rover to Supercon for two reasons. First, Sawppy is somewhat unwieldy and bulky and second, I expect to be pretty busy as part of event staff helping out on badge logistics.

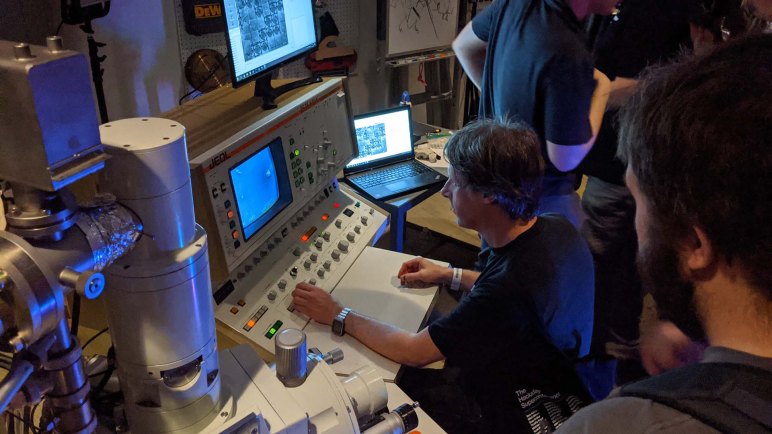
The second reason held true throughout the weekend, but I was put to shame on the first front because Adam McCombs (Twitter @nanographs) brought a scanning electron microscope. I never thought they were very portable and I was right, but that didn’t stop Adam! It occupied what little open space there was in the DesignLab shop area. I’ve seen SEM imagery and thought it might be fun to take a closer look, but what I didn’t realize was how cool it was to watch one in operation.

I never got time at the operator console, but I watched others turn knobs at their disposal. I had not known how many different parameters were adjustable to highlight different features on the sample. When we see a published picture generated from a SEM, an operator has already adjusted these knobs to the appropriate settings. Seeing less-than practiced operators adjust them live and experiment to see what works was mesmerizing.

I was also surprised at how feedback is visible immediately. It was explained to me the whole machine is a very analog process. The path from the electron beams striking the sample to picture on operator console CRT has no digital frame buffers or processing inserting delay. Every once in a while an image is recorded to the adjacent laptop, and that process consumes several seconds, but the knob-twiddling is effectively instantaneous on CRT as are interactions with the sample. I saw some small specs of dust dance around and initially thought it was due to air movement, but then I learned the sample is held in a vacuum. What is moving the dust? The electron beam!

My mind evaluates this technology from the perspective of an optical camera, and from that perspective the available range of magnification is astounding. Traversing several orders of magnitude of magnification with a single twist of a knob. I saw no indication that a SEM has any equivalent of focus or depth of field limitations: everything in the image is always razor sharp. I was not surprised to see panning across the sample, but I was surprised to see tilt was an option as well to see some items from different perspectives.

Watching a SEM in operation was not something I knew I needed to see until I saw it. The pictures afterwards are a great reminder, but no match for the live experience. The opportunity doesn’t come often, but if one is available I highly recommend it.


Freebie Supercon SAO from Zio.cc

Digging through some old piles, found this advertisement freebie given out at Supercon 2018. (This was handed out by one of the attendees and not part of the conference goody bag.) The board already has all the surface mount pieces, I just need to solder the two through-hole components: the LED and the SAO header. It should be a short soldering project, might as well give it a shot.


With writing on both sides, I realized it wasn’t obvious which side each component should be soldered to. Well, I wasn’t going to use it as a badge SAO anyway, so it didn’t really matter. I chose arbitrary directions.

zio.cc Supercon 2018 SAO 40 connector

I’m not familiar with this “Qwiic” connector. It looks like something these guys are trying to promote as an interconnect for an ecosystem of components. I guess they saw Seeed Studio’s Grove Connectors and decided they had a better idea? This little giveaway didn’t exactly entice me to dive in to their system, but it did let me know it existed and to look it over. I guess mission accomplished for this little freebie giveaway.


I used my bench power supply to deliver 3.3 volts to the input pins. The LED lit up and that’s when I learned it was a fast color-changing LED. The lens is frosted instead of clear like the ones I’ve been using for fun, but the same basic idea.

It lights, it’s fine.

Eyes At Supercon: Adafruit HalloWing

Another key attraction in the Supercon swag bag was a HalloWing from Adafruit. Not just the module, a complete package: in order to make sure Supercon attendees can immediately start playing with it, a battery is included. Plus a lanyard to make sure we can wear it for others to see and start conversations about this Adafruit product. It’s exactly the kind of thing we’d expect as a sponsorship item in the swag bag. Adafruit has produced a lot of products that appeal to this exact audience, along with a ton of tutorials and useful reference information that have helped me in my own explorations.

The Supercon edition of HalloWing came with a custom firmware running through a simple slide show. It cycles through a few bitmap images of event sponsor logos: Adafruit logo, Hackaday logo, Digi-Key, etc. But that barely scratches the capability of this module.

Reading Adafruit’s product information page, it looks like one signature attraction of the HalloWing is that it’s one of the boards with support for CircuitPython. A recent addition to Adafruit’s grand plan to make electronics more approachable to more people, it is hoped that Python would be even easier for beginners to pick up than Arduino.

As my first experiment, I tried to modify the slide show. I translated each animation frame of Nyan Cat into 128×128 bitmap files and loaded them onto my HalloWing. By editing slide show parameters like removing transition effects and shortening time between slides, I had hoped that I can turn the slide show into a crude animation of Nyan Cat in action. Sadly I took a wrong turn somewhere, and my HalloWing no longer boots up. I suspect I skipped a critical step for updating slide show program’s CircuitPython source code and managed to corrupt storage.

Fortunately it was easy to reset the HalloWing with a fresh copy of its firmware. Standard (non-Supercon) HalloWing purchased from Adafruit comes with “spooky eyes” firmware that displays an eyeball that randomly looks around. I followed instructions and my HalloWing is back up and running with an eyeball. Side bonus, it looked cooler than a slide show.

This is just a start. I look forward to digging more into this board’s possibilities in the near future. CircuitPython, Arduino, and at the center of it all? A SAM D21 chip, part of the line I just learned about at Supercon.

I foresee a lot of fun with this new toy.

[UPDATE: I started simple with a cardboard companion minion.]

Mystery At Supercon: Supplyframe Cube

What’s big, orange, and a mystery? The Supplyframe cube given to Supercon attendees. It is a pretty neat physical manifestation of the Supplyframe logo. It is made of injection-molded plastic that’s been given some sort of surface finish treatment. The result is a vaguely satin feel more upscale than commodity plastic. It also comes in a nice cardboard box whose description of its contents were not sufficiently technical for the hardware hackers looking it over. Likely intentionally to give it an air of mystery.

Supplyframe Cube with Box

We see a micro USB port on the side, and a clear plastic rectangle mounted on the bottom. Also visible on the bottom are four screws, and removing them to see the insides revealed an expected circuit board behind the micro USB port. What was less expected was the wire soldered to the board, and a sheet of copper foil at the other end of the wire. What is this thing?

Supplyframe Cube interior

This being Supercon, people quickly figured out there’s a FTDI USB to serial chip behind the port, so computers see the cube as a serial port. When plugged in, the plastic rectangle at the bottom reveals its function to diffuse light from the twelve LEDs shining downwards. It’s all very pretty, but what does it do?

People were making headway figuring it out, and they got to check their answers during Voja’s scheduled talk about the 2018 Hackaday Supercon badge. Voja did say a few words about the badge, but he was clearly more interested in talking about the cube which he also designed. He switched gears to the cube around the 6:40 mark of the recorded talk.

The default firmware implements a random number generator that could store up to 2 megabytes of random bytes. The copper foil works as one half of a capacitor for transmitting data between two cubes sitting next to each other, so one cube can get an identical copy of the random bytes in another cube. Once copied, each cube could be used as one-time ciphers to encrypt up to two megabytes of data that only a person with the other cube can decrypt.

But of course, that’s just the default firmware. Voja went over what’s on the board and what else it can do. The LEDs are random (except when they all light up to signal a cube is waiting for transmit or receive) and there’s currently an accelerometer sitting unused. After the conference Voja created a Hackaday.io project for the cube and now we wait to see if people do fun things with it.

Gifts At Supercon: Sponsorship Swag Bag

When I checked in to Supercon Saturday morning, I was given the items given to every Supercon attendee. A T-shirt, of course. A magazine (pamphlet? flyer?) titled Supplyframe RealTalk Electronics. A small water bottle, and a reusable tote bag filled with stuff.

Supercon2018 Goodie Bag

In the background of this picture is the tote bag. All the stickers in the bag were laid out to the lower left: two Tindie stickers and many more Hackaday stickers of all types. On the top is a Hackaday postcard. All fun stuff, but what excites Supercon attendees are the electronics.

The orange item in the upper left is the enigmatic Supplyframe cube. A 3D realization of their company logo, it has electronics inside for a purpose mysterious to Supercon attendees (at least at first.)

Next to the cube, sitting on top of its antistatic bag and nearly invisible due to its size, is a Tomu. A complete ARM powered computer on a circuit board the size of a USB plug, it is remarkable here because it was still in development at last year’s Supercon. At the time its creator had solved most hardware issues and was recruiting people to help write the supporting software. I heard the recruiting pitch but sadly my programming skills were not aligned with the project’s needs. It’s great to see that others have pitched in and made Tomu a reality.

Next to Tomu is a LED circuit board in the shape of Hackaday’s Jolly Wrencher logo alongside a Tindie LED badge of similar function. Many attendees soldered these up through the weekend for a little bright wear.

Below the Tindie badge is a Sparkfun Roshamglo board. I read the product description saying it was an electronic way to play rock-paper-scissors over infrared signals, but I knew that couldn’t be the whole story because there’s obviously a USB connector at the end and you don’t need that for a silly little game. And further reading confirmed the rock-paper-scissors was only the default firmware – users can use the Arduino IDE to program the onboard ATTiny84 chip to do something else. This might be a fun exploration.

And last but not least, in the lower right peering back at the camera is an Adafruit Hallowing. It is shown assembled here because I couldn’t wait to take a picture before putting it together. More on this nifty little board shortly.

Shine At Supercon: Pixelblaze Cube

When I was working on my time-lapse camera badge hack for last year’s 2017 Superconference badge, I had the luck to meet Ben a.k.a Electromage, creator of Pixelblaze. He was sitting across the table from me and had to stare at the backside of my Luggable PC Mark II for most of the weekend. Our paths crossed again earlier in 2018 at the Bay Area Maker Faire, where I was working for Tindie‘s booth and he stopped by to drop off a sample Pixelblaze unit as he sells on Tindie. After my booth shift was over, I stopped by his booth set up to promote Pixelblaze and was impressed by what I saw.

I don’t recall anything demonstrating Pixelblaze at Supercon 2017, but Ben brought a nice attention-pulling demo for Supercon 2018: a sound-reactive LED cube controlled by Pixelblaze with optional sensor expansion board. It was sitting in front of him on the badge hacking bench as he worked most of the weekend on that ESP32 mesh network. Here’s a view of the cube looking down the length of the bench at all the other badge hackers.

Pixelblaze Cube

The cube’s five visible sides each had an 8×8 = 64 LED array, and they react to changes in sound volume. The microphone is part of the sensor expansion board and is paired with its own processor to dynamically adjust to local ambient noise level to pick out sharp changes. All that audio processing was required, Ben explained, because electronic microphones don’t react to sound the same way human hearing does. His algorithms make the sensor board act similarly to how a human being perceive sound. All this is necessary so a Pixelblaze program reacting to sound would “look right” to a human observer.

After seeing Pixelblaze in action at Bay Area Maker Faire, I added “play with Pixelblaze” to my electronic to-do list. Seeing this sound-reactive demo cube in action at Supercon 2018 promoted it higher on my list. And now, thanks to an unexpected series of events and Ben’s generosity, I now have one on hand I could play with.

My first challenge: I don’t have an individually-addressable LED strip/array to use with this Pixelblaze. Reading Pixelblaze documentation I learn the APA-102 series of LED modules are the best match for Pixelblaze capabilities, so I’ve ordered a meter long strip to start. I’m looking forward to seeing what I can do with it.

Miss At Supercon: ESP32 Mesh Network Demo

In the pre-Superconference badge hacking call to action, wireless badge communication was raised as a specific challenge laid out for attendees to tackle. One particularly ambitious effort was to build a mesh network for wireless communication using ESP32 modules mounted to the badge expansion header. The ESP32 mounting system is straightforward, it was the software that would prove to be tricky.

At the end of the weekend, Morgan and Ben got the network up and running with just over an hour to spare. They started recruiting people to join their IRC-style chat network for the final demo, and I signed up. In the test session I was able to see messages sent over the network, and send a few myself. But when it came time for the actual demo on stage, my badge was unable to connect! Fortunately they had enough other participants so my participation was not critical, but I was sad to have missed out. After the presentation (and winning a prize) the team told everyone on the network we could keep the ESP32 as a token of thanks.

After the conference I examined my ESP32 mount and found a few cracked solder joints. It looks like I had accidentally smashed my ESP32 module sometime between the test session and the presentation. Looking on the Hackaday.io project page, I found the simple schematic and tested connections using my multimeter. Several connections were indeed severed between the badge header and the mounting circuit board. I tried the easy thing first by reheating all the solder to see if they could bridge the gaps. This helped, but two lines remain faulty and were patched with wires.

After this patch, I tested with [mle_makes] ESP32-equipped badge and we could not communicate, indicating further problems with my ESP32. The next step is to desolder it from the board to see if I could use the ESP32 as a standalone module. Once the module was removed from the carrier board, I saw a problem: three of the pads had separated from the module, one of them being the EN(able) pin critical to a healthy ESP32. The other two damaged pads (IO34 and IO35) I hope I could live without.

Is this the end of the road for my gifted ESP32? I thought it was, but [mle_makes] disagrees. The next experiment is to try soldering to the trace leading to EN pad, or the via further inboard. This will be a significant challenge – that via is smaller than the tip of my soldering iron! 

Heard At Supercon: SAM D MCU from Atmel (Now Microchip)

One of the best parts of attending Hackaday Supercon is the opportunity to chat with other like-minded people and see what they find interesting. Because odds are good that I’ll find it interesting, too. A prime example this year was hearing about the SAM D series of microcontrollers developed by Atmel. It is now branded a Microchip product due to acquisition.

Since I was spending most of my time in the badge hacking area, “talking shop” usually meant talking about microcontrollers in one context or another. The heart of the Hackaday Superconference 2018 badge is a PIC32 processor, which doesn’t seem to be particularly well-regarded among the people I talked to. I personally pledge no particular allegiance to one chip over another – my philosophy is that they’re all tools with their own advantages and disadvantages. But that’s not the same opinion held by everyone, and it’s interesting to hear other opinions.

The PIC32 is a completely different architecture from the 8-bit PICs I’ve played with earlier.. PIC32 aim for a higher tier of products with higher functionality but also higher price. I had been aware of Atmel’s AVR line of chips, though I have yet to play with them firsthand. As head-to-head competitor with Microchip PIC for many years, they too have a low-end 8-bit offering and a high-end AVR32 line. I was also aware that ARM-based chips like those used in the Raspberry Pi and my cell phone occupies an even higher tier, though they could reach as low as PIC32/AVR32 tier.

I was wrong: They can actually be downsized even further than that! I did not know ARM can be so flexible until conversations at Supercon. Chips with a Cortex-M0 core can be price and feature competitive with 8-bit PICs and AVRs. One such example being the SAM D series of controllers. The lowest end SAM D10 is available from Digi-Key for roughly a dollar each. They’re not available in a breadboard-friendly DIP form factor for experimentation, but that can be mitigated by relatively inexpensive development breakout boards like the SAM D10 Xplained pictured below.

And the best part of learning this as part of a friendly Supercon crowd: When I honestly said I didn’t know about the SAM D series, I didn’t get an elitist “Oh you don’t know? You are so out of touch” response, I got an excited welcoming “Oh you don’t know? Well now you have something new and fun to explore!” This attitude makes a huge difference in community building.

ATSAMD10-XMINI
SAM D10 Xplained Mini evaluation board, available from Digi-Key


Hackaday Badge Nyan Cat Wrap Up

With just two minor bugs in Nyan Cat both centered around power management, I’m content to leave them for later (if ever.) And it’s not like I have any way to patch all the badges out there… we don’t exactly have a badge counterpart to Windows Update. I’m going to finish documenting this project and move on to the next.

The first item is to create a page on Hackaday.io about this project. I’ve had several projects where I documented in parallel on Hackaday.io and here, but Nyan Cat was a rush job and I couldn’t spare the time. That project page will focus on the Nyan Cat specifically, so for example it won’t have the blog entries about exploring hardware features of the Belgrade badge.

Nyan Cat on .io

The second item is to dip my toes in YouTube video content creation. I’m setting low expectations on my first effort. A short script was written beforehand but I still stumble over a few words and the delivery is a bit wooden. The camera is fixed and looking straight down at the badge. The biggest problem turned out to be lighting, I have not yet figured out the camera settings required to have it do a faithful translation of colors on screen. (I had the exact same problem a year ago.)

It’s not great, but the best way to get better is to learn by doing!

Hackaday Badge Nyan Cat Bugs

I had a great time at 2018 Hackaday Superconference and I think Nyan Cat was a success as part of the conference badge. I’m happy with it, even though I found two minor problems with my Nyan Cat app during the weekend.

The first problem was that it does not tell the badge it is running, which is required to prevent automatic power-down. The auto-sleep feature was added after my code was merged into master, shortly before the badges started getting flashed en masse. I knew this power saving feature was going in but I was busy with badge production. So I didn’t have the chance to add code to keep the badge from going to sleep while Nyan Cat is running. My life was filled with rows and rows of badges.

Acrylic back installation

What this means is that Nyan Cat couldn’t just keep running on a badge forever. The badge will go to sleep and need to be awakened for animation to resume.

Somewhat related to the above, there’s a problem with timer synchronization upon wake. It appears that when the badge is asleep, the main timer still advances at some rate. I believe this is a side effect of loop_badge() in badge.c. Called by timer #5 every 15 milliseconds to check the status of the power button. During this check, the main system timer (running on timer #1) clicks upwards even though the rest of the badge is asleep.

What this means is that, if the badge is running Nyan Cat when it goes into low power mode, the timer will advance even though the animation & music does not. As a result, when the badge wakes up, the loops in charge of animation and timing will frantically try to catch up. It only takes a second or two to get back in sync, but in that brief moment we get a comically distorted kitty running and singing at warp speed.

This second problem can be reproduced by:

  1. Launch Nyan Cat with ‘nya’ to see and hear dancing singing pop tart cat.
  2. Push the power button to put the badge in low power mode.
  3. Wait about 30 seconds.
  4. Push the button again to wake up the badge.
  5. See and hear cat in hyperdrive for a few seconds before slowing down to normal speed.

I might go back and fix these bugs in the future, but they’re not horrendous embarrassments (and Nyan Cat in hyperdrive is pretty hilarious) so I’m content to leave them as-is for now.

(Cross-posted to Hackaday.io)

Hackaday Badge Nyan Cat At Supercon

NyanCat Badge 1024w

In my pull request for Nyan Cat to go in the Hackaday Superconference 2018 badge, I included a way to launch it by typing ‘nya’ at the main menu. It existed mainly because I felt silly to create a pull request for a feature that was impossible to launch. This was originally intended to be a placeholder and be replaced by something else, but due to time crunch that “something else” never happened. So the final badge firmware flashed to every unit distributed to Supercon attendees had Nyan Cat launched via ‘nya’. It’s not the original intention, but also not the end of the world.

What this meant was that Nyan Cat badge app is now also an unplanned social experiment. By default only people who comb through badge firmware source code will find it. I didn’t think that would be enough, so on Friday I walked around telling people about it while the animation was playing on the badge around my neck. I think I told roughly one dozen people (some of them in groups) by the time Friday evening’s official kickoff party was done. Saturday morning at the official opening ceremony, I saw a person I didn’t recognize with Nyan Cat running on their badge. At that point I felt the knowledge seeding stage was complete, and it was time to let the word-of-mouth propagation take over.

One thing I thought was interesting: I had programmed a mute button to the app so it’s possible to play the animation without the music. Every time I told someone about Nyan Cat, I also mentioned ‘0’ would mute and ‘9’ would resume playback. However, as the weekend went on, I realized not everyone who knew about ‘nya’ knew about the mute button! It’s possible these people found out about ‘nya’ by reading the badge main menu source code (which launched the app) but not the app’s own source code (where the mute code lives.) It was also possible it got lost in the word-of-mouth propagation.

I knew there was a risk that people (including myself) would be annoyed at the music by the end of the weekend. But the sheer number of people packed in a small venue created a noisy enough environment that the music is actually a little difficult to hear over ambient noise. I didn’t encounter any complaints about it being a nuisance. Whew!


(Cross-posted to Hackaday.io)

I Should Have Bought a Real Wire Stripping Tool a Long Time Ago

A lot of the talks at Hackaday Superconference 2017 were inspiring, informative, entertaining, or a combination of the above. But one of them is the first to have a significant impact on my hands-on projects and that honor goes to the Wiring Bootcamp talk by Bradley Gawthrop.

Your first reaction is probably the same as mine: “wiring? really?” Yes, really. At first glance a boring subject, Bradley turned it into an engaging presentation. One portion of the talk preached the wonders of having an actual wire-stripping tool. After the talk I felt motivated enough to try the Knipex tool he recommended. (*)

After using it in a few projects, I found myself really enjoying the luxury of stripping wire insulation with a single motion. This purchase has thus been categorized under “Where have you been all my life?


Knipex Jaw.jpg

Key to the magic is the relationship between the handle, the front jaw (black plastic) and the cutting blade (shiny metal.) When the handle is first pulled, the motion goes towards closing this assembly. When jaw closes on the wire insulation, the blade closes a little bit further to cut into the insulation. Beyond this point, motion on the handle is translated into horizontal movement so the blade pulls the insulation away from the conductor.

There’s no obvious way to adjust the distance between the jaw and the blade. It is either fixed or inferred from some spring tension. This works fairly well, the only problem surfaces when cutting wires with very thin insulation. In these cases the blade bites too deeply and nicks the conductor.

But that is a minor nitpick. I certainly nick conductors at a far higher rate when using my previous wire strippers. Which have been assigned the job of collecting dust while waiting as backup in case the Knipex breaks.

Retiree

I got myself a real wire stripping tool and loved it. You should do it, too.

Here’s the wiring talk posted on the Hackaday YouTube channel:


(*) Disclosure: As an Amazon Associate I earn from qualifying purchases.

Hologram Working to Make Cellular Data Easy

One of the sponsors at Hackaday Superconference 2017 is Hologram.io. In the attendee bag I saw a sticker with their name and logo. It was just one of many names and logo stickers in the bag so it didn’t make much of an impression beyond “I saw it”. The name “Hologram” made me think they were some sort of video or image related system, possibly VR. But when I dug deeper I found a SIM card with the company name and logo on it.

Hologram SIM

Well, now, this is different. Since video and VR are very data-intensive services, I doubt my initial guess was right. So they have something to do with the cellular network, but I had a badge to hack and thought I’d get more information later.

As it turned out, I didn’t have to go looking for more information, they came to me. Specifically two people wearing T-shirts with the Hologram logo were walking through the badge hacking area and wanted to know more about my Luggable PC. I paused my project to answer their questions and generally chat to see what people are interested in. (A big part of the fun of hanging around supercon.) I asked about their company and got the quick sales pitch: they make it easy to use cellular data.

Their SIM is just the starting point. It allows access to cellular data worldwide without having to worry about dealing with cellular carriers. Hologram takes care of that. To help curious experimenters get started, their entry-level “Developer” plan is free for the first megabyte of data in the month. Additional data would be $0.60/mb which is not the cheapest rate, but if only a few megabytes a month are needed, it should still end up cheaper than the monthly fee charged by every other carrier.

That sounds great, but they go further: Hologram Nova is a USB device that acts as a cellular data modem and can be plugged into a Raspberry Pi, or a Beaglebone, basically any computer running Linux to give it cellular data connectivity.

What if a Linux computer is overkill for the task at hand? What about projects that could be handled by something simpler like an Arduino? They’ve got that covered, too. Their Hologram Dash is a board with self-contained cellular hardware and a CPU that can be programmed with the Arduino IDE. No computer necessary.

Now I’m impressed. I’ve had project ideas that would send data over the cellular network, but they were sitting in the low-priority stack because I didn’t feel motivated enough to deal with all the overhead of using cellular data. Now I know I could pay Hologram to deal with the ugly parts and focus on my idea.

I hadn’t heard of the name before Supercon, and now I’m contemplating projects that would use their service. Their sponsorship outreach effort is a success here.

TI eZ430-Chronos and ISM Bands for RF Projects

An event like Hackaday Superconference 2017 is supported by many sponsors that want to reach that audience. An important part of the outreach is the bag of goodies handed out to conference attendees. One item was from Texas Instruments, offering a discount for the “eZ430-Chronos wireless development tool in a watch” which caught my interest.

Recent news in smart watches are dominated by Apple and Google. Very powerful but at a price point I find unacceptable. So while I’m intrigued by the idea of a wrist computer that I could write code for, I’m waiting for the market to mature and the price to drop.

ez430-chronos
Photo by Texas Instruments

It never occurred to me that there might be smart watch platforms that offer less power and capability, at a much lower price. If I had gone looking, maybe I would have found the TI Chronos watch earlier. A web search indicated it is about 7 years old so hardly cutting edge, but it is a wristwatch I could program, for around the same money as a non-programmable Casio watch from Target. The development kit also includes two USB devices: one is a programmer to deploy code to the watch, and the other lets software running on a PC to communicate with software on the watch via RF.

Following the instruction to search for “Chronos” on the store site, I got two results: eZ430-Chronos-868 and eZ430-Chronos-915. What distinguishes the -868 from the -915? I went looking for data sheets and other documentation to help me choose between them. But they all assumed the reader already knew which they’d want! It turns out this is an instance of a complete beginner tripped up by basic knowledge in the field. These numbers indicate the RF frequency the device operates on: 868 MHz vs. 915MHz.

These are frequencies of the ISM (Industrial, Scientific, Medical) radio bands, open frequency range that people can use with minimal regulatory requirements. People who have worked with ISM RF would have recognized 868 MHz as the ISM band common in Europe and 915 MHz for North America.

Well, we’re all beginners at some point. At least now I know.

Texas Instruments has a whole set of products for people who want to build RF solutions in the ISM radio band under the SimpliciTI brand. I like the fact that these hardware components are available, but I’m less thrilled with the fact the software development is based on tools by IAR Systems. I’m barely a beginner on Microchip’s MPLAB X, I really don’t want to learn another development stack right now.

I already have a set of things I want to gain proficiency on and have to choose where to spend my time. So as interesting as the TI smart watch development platform is, I’m going to have to set it aside as a distraction.

Sorry, TI!

Supercon 2017 Fun: Other People’s Projects

The Hackaday Superconference 2017 was full of people who have a long list of project ideas. And it is also a venue where it’s easy to chat people up and ask about their projects.

Here are some highlights from people I had a chance to talk to:


Yesterday’s post mentioned Ariane Nazemi’s Compaq Portable, the original luggable PC. While he is very obviously skilled at keeping old PC running, he also does some pretty cool modern stuff. The talk was about mechanical keyboards and his Dark Matter keyboard in particular.

img_6113
Photo from Atom Computer web site’s Project Dark Matter page.

I was quite encouraged to learn that making my own custom mechanical keyboards wouldn’t be as crazy as I thought they might be. I’m rather particular about the feel of my keyboards, and the encroachment of cheap membrane keyboards meant I had to pay more and more for the mechanical keyboards with the feel I like. I’m now well into the gamer keyboards of the ~$100 range. Which, according to Ari, is to the point where I might as well start building my own. I’ll give it serious consideration.


I had the chance to chat with Sarah Petkus after her talk about her robotics projects, looking at robots from a refreshingly different perspective than most robot tinkerers I’ve met. Her projects are “personally expressive”, more works of art than functional tool. But they’re not just static sculptures! The projects are still real machines built from the same mechanical principles I’m familiar with, but they were born out of very different motivation.

I have not considered robots from her world view, and it was mind-opening to try to see and think about robots in a different way.

And it was a pleasure to meet Noodle in person.

dodlt9du8aaw85x
Photo by Twitter @cameronjblocker

Sarah said Noodle doesn’t walk very well just yet, and there are a lot of challenges to solve on the way to get there. I have ambition to know about control systems for leg-walking robots, but I’m not there now. Perhaps, if I ever get there, I can help her teach Noodle to walk. (Or better yet, help Noodle learn to walk.)


I was impressed by the Tomu project: an ARM microprocessor that fits mostly in a USB port and costs roughly $10. It is in the very early stage of development and like almost all open source projects, could use the help of more people. The creator was at Supercon to spread the word. As an incentive to join in the effort, people who do something useful and submit a pull request on Github will receive a unit. I’ll look into this in more detail later.


The creator of OpenMV was walking around and showing off units and giving demos. This project is at a much more advanced stage than Tomu was. It’s a product versus a project getting off the ground. As a result the demo is less a recruitment for the effort and more of a sales pitch. Still, it looks pretty cool and I’m definitely interested in machine vision. Once I learn enough about vision to understand what OpenMV can and can’t do for me, I’ll evaluate if I’m interested in buying.

Supercon 2017 Fun: The Original Luggable PC

I named my Luggable PC project after the original IBM PC clone by Compaq. The Compaq Portable was the computer that started the PC clone market that is still going strong today. It picked up the nickname “luggable PC’ because it was roughly the size and weight of a sewing machine. I’ve seen pictures in books and on web sites, and occasionally I see a unit on display in a museum somewhere. I never expected to see and touch a running unit.

So I was pleasantly surprised (and amazed!) to see one at Hackaday Superconference 2017. It was brought in by Ariane Nazemi, who gave a talk about mechanical keyboards and brought the Compaq as one of his visual aids showing old-school mechanical keyboards. Chatting with Ari I learned one of his hobbies is to restore old computers to running condition. So the original luggable was not just a demonstration piece, it was an actual functional computer.

One of the optional equipment available for the Compaq Portable was a Computer Graphics Adapter. The CGA resolution of 320×200 is has long since been surpassed by modern equipment. But it isn’t very far off from the conference badge camera’s resolution of 128 x 128. And that’s probably why Ari worked to incorporate the Compaq into his badge project. I didn’t want to bother him while he’s focused on getting it to work, but I did ask to take a picture of my Luggable PC sitting next to the original while he worked.

LuggableOldAndNew

I had looked forward to his project presentation at the end of the conference, but I missed it because I had to take care of some administrative tasks. Alas.

It was great to have these two sit side-by-side and see over thirty years of progress in PC hardware evolution.

(Cross-posted to Hackaday.io)

Supercon 2017 Fun: Big Screen + Little Screen

I brought my Luggable PC Mark II (Rev B) to the Hackaday Superconference 2017. Its primary purpose was to be my development workstation as I dug into the source code for camera badge hacking. Its secondary purpose was to serve as conversation ice-breaker since the Supercon crowd includes the kind of people who would appreciate it. It accomplished its mission on both fronts!

One fun experience that came out of the weekend was sitting down in the badge hacking area next to the person behind the PaperBack project. He thought it was hilarious that I had the biggest screen on the table and his was the smallest. One discussion led to another and we decided it would be fun to have my computer simultaneously drive its big 24″ screen and his 6″ PaperBack screen.

We had to borrow a DVI to VGA connection from another helpful person in the badge hacking area, and there were some further fiddling with wiring connectors and display settings. (Including several reboots between Ubuntu and Windows since they each provide different ways to customize display parameters.) But eventually we got my Luggable PC to talk to his PaperBack as an external display.

PaperBack closeup

I put our respective Hackaday.io project pages on each of the displays. His PaperBack showing his project page, and my Luggable PC screen showing its own project page.

PaperBack and LugPCmkII

This was a completely random project done mostly just to see if it could be done. Exactly the kind of curious exploratory spirit that was pervasive throughout the conference.

(Cross-posted to Hackaday.io)

Supercon 2017 Badge Film “In the Back Alley”

My Superconference 2017 camera badge project concludes with the 1-minute short “In the Back Alley of Spercon.” I entered it into the short film festival and was ecstatic to have been selected as the winning film!

I recorded a bunch of footage during the day on Saturday, but once the sun went down the camera could no longer record usable footage. So I switched efforts to putting together a presentation of what I’ve recorded. Since the camera badge has no audio capabilities – no microphone nor speaker – it was going to be a silent film by necessity. I followed precedence for silent films, using the text capabilities of the camera badge app framework to put up static text which give context to the moving pictures.

I started with the ambition of writing a short film editing app on the phone, and quickly decided that would take more time than I had. I switched to hard-coding the sequence of text and videos into a single app that I could run on the camera badge. You can still see my original intent in the filename “avitrim.”

Once running, I had something I could show to other people. Friendly curious people had asked about my project in progress Friday and Saturday, and now I could press “Go” to show them the results. Unfortunately that wouldn’t work for the film festival, where they intend to put it up on the big screen. I talked to Hackaday Mike and he suggested I record the badge app in action and put it up on YouTube.

I tried a few different cameras and they all exhibited problems trying to record the footage playing on the OLED screen. Blooming, flickering, and loss of color saturation to various degrees that I struggle to correct with camera settings. The least-bad version came from my cell phone’s camera so that’s the one I uploaded to YouTube.

Playing the YouTube clip on my TV indicated the video was good enough, but the audio was not. I held my breath during the recording so people wouldn’t have to hear my breathing, but the microphone picked up other background sounds. To cover up this annoyance, I went to the YouTube royalty-free music library and picked out a music clip that’s roughly a minute long. It’s not exactly my favorite song but it’s far better than random background noises.

(The project described in this post is documented on Hackaday.io and the source code is publicly available on Github.)

Supercon 2017 Badge – Now Recording Time Lapse Video

I arrived at the Supercon badge hacking area Saturday morning and immediately got to work. I picked up where I left off – looking for the place in the code where I can change the frame playback rate to be higher than the 1fps capture rate. Once done, a test run confirmed that the automatic power-off will shut down the camera during a time-lapse so I added a line to reset the powerdowntimer counter during a time-lapse capture.

According to the plan, I should now take what I’ve learned and write a dedicated time-lapse capture app. But as I’m successfully recording time-lapse footage, the motivation to do has dropped drastically. I’d rather walk around and try to record fun footage around the conference. So with that, I’ve abandoned the previously planned “phase 2” and “phase 3”. I’m now more interested in utilizing my time-lapse video capability instead of continuing to invest time refining it. Time is an extremely limited resource on this weekend project!

The badge is not taking full advantage of the sensor, so the lack of resolution and crispness is not a surprise. But since we’re getting so little out of the sensor, we can use all the help we can get. This is why I was both excited and felt sheepish when I realized that I had been filming for half the day with the protective plastic still covering the lens. Removing it didn’t make as much of a difference as I had hoped but hey, every bit counts.

Increase Resolution

Once the sun went down, I stopped shooting footage. There is not enough low-light capability to obtain useful video. Returning to the computer, I started brainstorming the best way to present what I’ve captured. I started trying to write a rudimentary video editor (just to trim frames before and after the parts I wanted to keep) but I had no luck navigating the AVI data structure.

With the ever-ticking clock, I changed tactic: instead of an editor, I’m going to write an app that is hard-coded to play specific video files in order, and a few blocks of text in between. Just like silent films of old. I’m confident this less-ambitious application could be finished by Sunday afternoon.

(The software project discussed in this post is publicly available on Github.)

Supercon 2017 Badge – Software Orientation

With the focus on getting the panning base up and running before Supercon weekend, I haven’t spent as much time as I had wanted on software side. The camera badge source code was released a few weeks ago and were constantly getting updated as the weekend got closer. (Differences between the prototype and production boards, plus other fixes.) I had wanted to keep up to date with the software but my project investigation and the pan base took up all the time I had to spend on this project.

As soon as I had two bases up and running, I went to the early check-in and badge hacking session Friday afternoon. It started at noon and I thought showing up at 3pm would still allow some time to work. I did get some time to work, but I also found that plenty of people arrived before I did and there were no table space remaining.

IMG_5340

Oh well. At least I have the badge in hand now. The first thing I did was to perform a quick test. The camera badge came with a video record option, which I intend to dissect for my time-lapse video app. But until then, I could do a real-time video captured while panning on my base to show the basic concept works.

Another bonus of getting the badge in hand is that I was immediately more productive learning the code. The source code was informative, the documentation online was helpful, but my brain needed the anchor of actually seeing the code running. It’s was a great help to play with a menu with my hands, then go back to read the code drawing that menu. The code made a lot more sense after seeing it in action.

I dove into the basic app support framework, and after I understood the basic structure, switched to analyzing the camera app. By the end of the evening I understood enough to know how to modify the camera app to restrict the video recording frame rate to one frame per second. This artificially limited rate much more closely resembles what I would want to do in my time lapse app.

Unfortunately the playback frame rate is “accurate” in the sense it tries to play one frame per second. I have more learning ahead of me before I start writing my own time-lapse app. As a short term workaround, just to see things work with what I have, I copied the file to my computer and used ffmpeg to convert the frame rate of my end-of-evening milestone video.

(The project discussed in this blog post is publicly available on Github)