High Power 600W Power Supply (HP1-J600GD-F12S)

Along with the “keyboard is broken” laptop, I was also asked to look into a mid-tower PC that would no longer turn on. I grabbed a power supply I had on hand and plugged it into the motherboard, which happily powered up. Diagnosis: dead power supply. I bought a new power supply for the PC to bring it back to life, now it’s time to take apart the dead power supply to see if I can find anything interesting. Could it be as easy as a popped circuit breaker or a blown fuse?

According to the label, the manufacturer has the impossibly unsearchable name of “High Power”. Fortunately, the model number HP1-J600GD-F12S is specific enough to find a product page on the manufacturer’s site. The exact model string also returned a hit for a power supply under Newegg’s house brand Rosewill, implying the same device was sold under Newegg’s own name. Amusingly, Newegg’s Rosewill product listing included pictures with “High Power” embossed on the side.

If there is a user-replaceable fuse or a user-accessible circuit breaker, they should be adjacent to the power socket and switch. I saw nothing promising at the expected location or anywhere else along the exterior.

Which meant it was time to void the warranty.

Exterior enclosure consisted of two pieces of sheet metal each bent into a U shape and held together with four fasteners. Once pried apart, I had to cut a few more zip-ties holding the cooling fan power wire in place before I could unplug it to get a clear view at the interior. Everything looks clean. In fact, it looked too clean — either this computer hadn’t been used very much before it blew, or it lived in a location with good air filtration to remove dust.

Still on the hunt for a circuit breaker or a fuse, I found the standard boilerplate fuse replacement warning. Usually, this kind of language would be printed immediately adjacent to a user-serviceable fuse. But getting here required breaking the warranty seal and none of the adjacent components looked like a fuse to me.

Disassembly continued until I could see the circuit traces at the bottom of the board. Getting here required some destructive cutting of wires, so there’s no bringing this thing back online. Perhaps someone with better skills could get here nondestructively but I lacked the skill or the motivation to figure things out nicely. I saw no obviously damaged components or traces on this side, either. But more importantly, now I could see that 120V AC line voltage input wire is connected to a single wire. That must lead to the fuse.

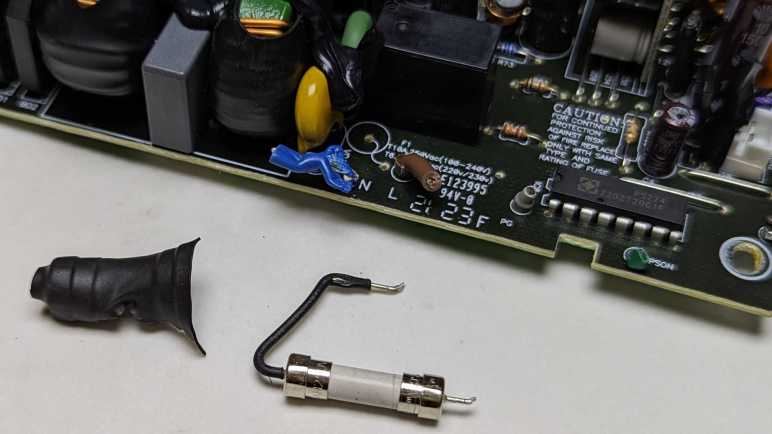
Turning the board back over, I see the line voltage input wire (brown) connected to a black wire that led to a cylinder covered in heat-shrink tubing and held in place by black epoxy. The shape of that cylinder is consistent with a fuse. The heat-shrink and epoxy meant this is really not intended to be easily replaced.

Once unsoldered, I could see the electronic schematic symbol for fuse printed on the circuit board. The “F” in its designation “F1” is consistent with “Fuse”, as do the amperage/voltage ratings listed below. This fuse is a few centimeters away from the caution message I noticed earlier, which was farther away than I had expected. My multi-meter showed no continuity across this device, so indeed the fuse has blown. I cut off the heat-shrink hoping to see a burnt filament inside a glass tube, but this fuse didn’t use a glass tube.

I started this teardown wondering if it was “as easy as a popped circuit breaker or a blown fuse”. While it was indeed a blown fuse, a nondestructive replacement would not have been easy. I don’t know why the fuse on this device was designed to be so difficult to access and replace, but I appreciate it is far better to blow a fuse than for a failing power supply to start a fire.

Zalman 120mm Case Fan, Clear with Blue LED (ZA1225CSL)

After years of faithful service, this particular cooling fan has worn down to a point where it would vibrate noisily, its associated friction dragging down fan blade speed. Time for me to retire it but not before subjecting it to a teardown.

Sticker on the back says it is a Zalman model ZA1225CSL.

This particular fan was cast in clear plastic and has embedded blue LEDs for visual novelty.

Four LEDs are angled such that they turn fan blades into LED light pipes creating an illuminated arc while the fan spun.

A glued-on clear cover hides the LED within. Getting good leverage on this cover is tough with the fan blades in place, so I’ll work on removing the fan first.

A razor blade made quick work of the rear sticker.

Under the sticker, we can see fan motor shaft held in place by a small white plastic ring.

Remove the ring (not terribly visible against a white background, I admit) and the fan hub slides free. Despite the racket it has been making, I see no obvious signs of wear on either this fan hub shaft or the hub bearing. I guess a tiny amount of wear was enough for the system to start wobbling.

It was easy to break those LED covers free once fan blades were no longer in the way.

The blue LEDs appear to be standard 3mm diameter units, powered by wires that were glued into channels molded into fan hub support beams. Pulling them free destroyed the clear insulation on those wires. Given how affordable LEDs are now, there’s not much point trying to salvage these LEDs beyond trying to see if I could. I had a 75% success rate: one LED out of four was torn off its wires, oops.

I removed the fan hub, and it appears this chip is in charge of the operation. Marked FTC S276.2QD, a web search found this to be the FS276 two-phase DC motor control chip by FTC. The website indicates Feeling Technology Corp is a Taiwan-based semiconductor company. The chip’s datasheet shows an integrated hall effect sensor, which explains why it is positioned to pick up magnetic field of the fan rotor. It has four pins: power on one end, ground on the other, and sinks for two motor phases.

The single-sided circuit board marked ZB111228 implemented the FS276 datasheet circuit with a few additions. Around the perimeter, we have pads for the four blue LEDs, each connected to power and ground through a current-limiting resistor marked with 681. I believe this means 68 * 101 = 680 ohms. We also have a transistor, connected to one of the two motor phases, to communicate tachometer signal.

I will likely find a use for the three-conductor wire with PC cooling fan connector on one end. I might stick the blue LEDs on a future project just for laughs. The motor control circuit board will go to electronic recycle. All the clear plastic will go to landfill.

Google Pixel 7 Camera Off-Axis Blur in Closeups

Thanks to Black Friday sales, I have upgraded my phone to a Google Pixel 7. My primary motivation was its camera, because most of the photographs posted to this blog were taken with my cell phone (Pixel 5a) camera. Even though I have a good Canon camera, I’ve rarely pulled it out because the cell phone photos have been good enough for use here. By upgrading to the Pixel 7, I hope to narrow the gap between the phone camera and a real Canon. So far it has been a great advancement on many fronts. There are other phone camera review sites out there for all the details, but I wanted to point out one trait worse than my Pixel 5a. It is specific to the kind of photos I take for this blog and not usually covered by photography reviews: with close-up shots, the image quality quickly degrades as we move off-axis.

I took this picture of an Adafruit Circuit Playground Express with the Pixel 7 roughly fifteen centimeters (~6 inches) away. This was about as close as the Pixel 7 camera was willing to focus.

The detail captured in the center of the image is amazing!

But as we get to the edges, clarity drops off a cliff. My Pixel 5a camera’s quality also dropped off as we moved off-axis, but not this quickly and not this badly.

For comparison, I took another picture with the same parameters. But this time, that GND pad is the center of the image.

Everything is sharp and crisp. We can even see the circuit board texture inside the metal plated hole.

Here are the two examples side by side. I hypothesize this behavior is a consequence of design tradeoffs for a camera lens small enough to fit within a cell phone. This particular usage scenario is not common, so I’m not surprised if it was de-emphasized in favor of other camera improvements. For my purposes I would love to have a macro lens on my phone, but I know I’m in the minority so I’m not holding my breath for that to happen.

In the meantime, I could mitigate this effect by taking the picture from further away. This keeps more of the subject in a narrow angle from the main axis, reducing the off-axis blur. I would sacrifice some detail, but I still expect the quality to be good enough for this blog. And if I need to capture close-up detail, I will have to keep this off-axis blur in mind when I compose the photo. I would love a sharp close-up photo from frame to frame, but I think I can work with this. And everything else about this Pixel 7 camera is better than the Pixel 5a camera, so it’s all good!

Micro-Mark 2″ Self-Centering Machinist’s Vise

For my workholding needs, I have been using the most affordable vise from Harbor Freight: Item #30999 4-inch Drill Press Vise. It was a huge improvement over holding things by hand, but it wasn’t great, and I’m ready for an upgrade. Now I have Micro-Mark’s Item #87469 2″ Self Centering Machinist’s Vise with Swivel Base and first impressions are promising.

The Harbor Freight vise was sufficient for most tasks. The most important feature were removable jaws: I designed and 3D printed many custom jaws to hold pieces of various projects. Once I’ve clamped something down, it stays put, fulfilling the point of a vise. My problem was that the sliding jaw had quite a bit of play along its motion. This caused two problems. First: the tiny amount of play in its motion means it can be difficult to clamp something exactly where I want it. As I tighten the vise and take up slack in its play, those jaws might shift a tiny bit which also shift position of my workpiece. Second: this vise expects all forces to be downward, which is reasonable for a drill press vise. But sometimes my drill bit would pull on the work piece as it drilled, and that would lift the workpiece and sliding jaw upwards a tiny bit as well. Most of the time this isn’t a problem, but every once in a while, that upwards lift ruins things.

When it comes to tools, precision costs money. The Harbor Freight vise was very cheap so its flaws were reasonable. To gain better precision I would have to move into the realm of vises designed for metal machining work. (And spend more money.) A 6″ vise is the standard baseline machining vise but that is overkill for my needs. (Example: Kurt DX6) I didn’t see anything promising on the Harbor Freight catalog, so I looked into the Micro-Mark catalog for accessories alongside their small metalworking mills. I started by looking at their Item # 82577 Quick-Lock Milling Vise, but that vise didn’t appear to have removable jaws. Then I looked at Item #21134 Toolmaker’s Vise which had removable jaws, but the geometry of the design gave me concern. All the machinist vises I’ve looked at had their leadscrew below the working area, so that a portion of clamping force is also directed downwards to resist upward pulls. I’m not certain #21134 does that. The only vise that seems to meet all of my requirements is Item #87469 2″ Self Centering Machinist’s Vise with Swivel Base. I didn’t particularly care about the self-centering aspect, but everything else looked promising.

A few days later it arrived in a well-padded box. The vise itself was coated in oil, sealed inside a plastic bag to avoid oil leaking into the shipping materials. I can confirm smooth confidence-inspiring movement in the jaws, which are removable as required. Even though both jaws move instead of just one moving, they still had far less free play combined than the singular jaw of the Harbor Freight vise. The resistance to upward lifting forces is still a question mark until I really put it to use, but I’m satisfied with everything else.

The only criticism is the handle, which extends below the level of the base. When I bolt this vise to a surface, I might not be able to crank it all the way around unless I make sure it dangles over an edge. Otherwise I would have to remove the handle and reinstall it at a different angle for every turn, which could get annoying. I’m not sure how serious of a problem this will be in practice, time will tell.

Windows PC Keyboard Beeps Instead of Types? Turn Off “Filter Keys”

A common side effect of technical aptitude is the inevitable request “Can you help me with my computer?” Whether this side effect is an upside or downside depends on the people involved. Recently I was asked to help resurrect a computer that had been shelved due to “the keyboard stopped working.”

Before I received the hardware, I was told the computer was an Asus T300L allowing me to do a bit of research beforehand. This is a Windows 8 era touchscreen tablet/laptop convertible along the lines of a Microsoft Surface Pro or the HP Split X2. This added a twist: the T300L keyboard base not only worked while docked, but it could also continue working as a wireless keyboard + touchpad when separated from the screen. This could add a few hardware-related variables for me to investigate.

When I was finally presented with the machine, I watched the owner type their Windows login password using the keyboard. “Wait, I thought you said the keyboard didn’t work?” “Oh, it works fine for the password. It stops working after I log in.”

Ah, the hazard of imprecision of the English language. When I was first told “keyboard doesn’t work” my mind went to loose electrical connections. And when I learned of the wireless keyboard + touchpad base, I added the possibility of wireless settings (device pairing, etc.) I had a hardware-oriented checklist ready and now I can throw it all away. If the keyboard worked for typing in Windows password, the problem is not hardware.

Once the Windows 8 desktop was presented, I could see what “keyboard stopped working” meant: every keypress resulted in an audible beep but no character typed on screen. A web search with these symptoms found this Microsoft forum thread titled “Keyboard Beeps and won’t type” with the (apparently common) answer to check Windows’ Ease of Access center. I made my way to that menu (as the touchscreen worked fine) and found that Filter Keys were turned on.

Filter Keys is a feature that helps users living with motor control challenges that result in shaky hands. This could result in pressing a key multiple times when they only meant to press a key once or jostling adjacent keys during that keypress. Filter Keys slow the computer’s keyboard response, so they only register long and deliberate presses as a single action. Rapid tap and release of a key — which is what usually happens in mainstream typing action — are ignored and only a beep is played. Which is great, if the user knew how to use Filter Keys and intentionally turned it on.

In this case, nobody knows how this feature got turned on for this computer, but apparently it was not intentional. They didn’t recognize the symptoms of Filter Keys being active. Lacking that knowledge, they could only communicate their observation as “the keyboard stopped working.” I guess that description isn’t completely wrong, even if it led me down the wrong path in my initial research. Ah well. Once Filter Keys were turned off, everything is fine again.

Mystery Slot in Xbox Series X Packaging

In the video game console market, I am definitely on Team Green of the pie chart going all the way back to the original Xbox. Right now, the Xbox hardware product line is split into two: the expensive Series X with maximum power and the Series S which made design tradeoffs for affordability. Supplies of both were hampered by global electronics supply chain disruption at launch. I wanted a Series X but I didn’t want it badly enough to pay a scalper premium. The Series S got sorted out and has been widely available for several months, and I was happy to find that the supply of Series X is just starting to catch up to demand. During this year’s Black Friday sales season when everyone was out looking for discounts, I was just happy to find Series X available at all for list price. (There were discounts on Series S, but I was not interested.)

When I flipped opened the box, I was happy to see that Microsoft put some design effort into its packaging. The unboxing experience isn’t up to the premium bar set by Apple & others but a far step above the “sufficient and practical” packaging of past Xbox consoles. The console itself is front and center, wrapped like a gift under a “Power Your Dreams” banner. A cardboard box behind the console held a power cable, a 4K120FPS capable HDMI cable, and a single Xbox controller complete with a pair of AA batteries.

Underneath the console, between two blocks of packaging foam, is a piece of cardboard. This turned out to be a “Getting Started” card for those too impatient to read a manual.

The bottom of that card has a fold, and a rounded slot was cut out of it. Why is it shaped like that?

Making this fold and cutting out that slot consumed manufacturing time and money. This was definitely an intentional design choice, but I can’t tell what its purpose could be. The information printed on the card is specific to Series X, so the cutout wouldn’t have been used elsewhere and just went unused here. I thought maybe it was supposed to help hold it somewhere in the box so we could see it when we flipped it open, but this card was just lying in the bottom of my box. The “Power Your Dreams” banner is front and center, so that’s not the location for this card and (2) I don’t see anything for that slot to fit onto elsewhere.

The rest of the package is too well thought-out for this slot cutout to have been an accident, yet it went unused. I can smell a story here, and I am fascinated, but I have to accept that I will never know the answer.

Notes on Codecademy “Learn Bash Scripting”

After a frustrating time with Codecademy’s “Learn Sass” practice projects, I poked around the course catalog for something quick and easy to go through. I saw the “Learn Bash Scripting” course which had just a one-hour estimate for time commitment. Less than an hour later, I can say it met expectations: it was quick and easy covering a few basic things, leaving plenty more for me to learn on my own if I wanted to.

Technically speaking I’ve already been making shell scripts to automate a few repetitive tasks, but they have all just been lists of commands I would have typed at the command line. Maybe an echo or two to emit text, but no more. If I had needed to automate something that required decision-making logic, I used to go to something like Python. Which works but rather heavyweight if all I wanted was, say, a single if statement in reaction to a single user input. I could have done that with a shell script.

And after taking this course, I know how. One of the first things we saw was if/then/else/fi. There is a limited set of logical operators available, along with warnings that spaces are consequential. (One extra space or one missing space become syntax errors.) Getting user input from a read is straightforward, though parsing the resulting string and error-handling weren’t covered. We also got to see loop commands for, until, and while. What we did not cover in this course were how to define functions to be called elsewhere in the script in order to reduce repetition. That was the only thing I wished the course covered. If I wanted to do anything more sophisticated that the above, I would likely go to Python as I used to do.

The practice project associated with this course was touted as a “build script” but it’s not a makefile, just a series of copy commands interspersed with a bit of logic. I was a little annoyed it assumed we knew command line tools not covered in class, like head and read, but I’ve learned about them now and I could add them to my command-line toolbox.

Problems with Codecademy “Learn Sass” Projects

I revisited Codecademy’s “Learn Sass” class for a quick review and also to check out new material added since my first run. I’m also a Codecademy Pro subscriber this time, which opened up the practice project assignments. The lessons went fine, but the projects did not. The learning environment was supposed to automatically compile SCSS to CSS every time I hit “Run”. But it was quickly obvious that changes I made to SCSS file were not being reflected in the corresponding CSS file nor visible in HTML. Is it another back-end failure like what foiled my Codecademy MongoDB course? Some debugging later, I figured out the problem: if I make a mistake in the SCSS file and create invalid Sass syntax, the background compiler runs and fails. This is a part of learning and is OK. What is NOT OK is the fact it silently fails without showing me an error message. This infuriating behavior is not the first time Codecademy did this to me. Fortunately, this time project material is easy enough for me to port elsewhere.

The quickest and easiest (if not the most efficient) way to do this was to fire up Visual Studio Code and tell it to build me a dev container. I could replicate most of this functionality on my own, launching a Node.js Docker container instance and mapping a volume to my GitHub repository working directory. But by using a published configuration file for Node.js JavaScript projects, I was up and running in a half dozen mouse clicks and much quicker than doing it on my own. After the container was up and running, I followed Sass installation directions to run npm install -g sass. Now I could run sass compiler myself and get error messages to help me fix my mistakes.

Even with that, though, I’m not out of the woods. This course is several years old and shows signs of lacking maintenance. One project stumbled into deprecated behavior that generated compile-time warnings.

Deprecation Warning: Using / for division outside of calc() is deprecated and will be removed in Dart Sass 2.0.0.

Recommendation: math.div($tons-produced, 3) or calc($tons-produced / 3)

More info and automated migrator: https://sass-lang.com/d/slash-div

   ╷
54 │     height: #{$tons-produced/3}px;
   │               ^^^^^^^^^^^^^^^^
   ╵
    main.scss 54:15  root stylesheet

Fortunately fixing this one is fairly easy, following the recommendation to wrap the calculation inside a call to calc(). But then it gets worse: we get a non-obvious error.

Error: Undefined operation "null % 3".
   ╷
56 │     @if($i % 3 == 0){
   │         ^^^^^^
   ╵
  main.scss 56:9  root stylesheet

I understand the intent of the project, but I don’t know why this code isn’t working. Even after I copied directly from the answer key to verify I’m not just making a silly typo somewhere. $i was defined in the @each loop and we could use at the top level of the loop successfully. But this line is in an inner scope and using $i is an error here. My hypothesis is that I stumbled into a Sass breaking change regarding variable scopes.

Even if I ignore these technical errors, I’m not terribly fond of these projects. This particular error was from a project using CSS to build bar charts. Would anyone actually do this? It feels like a pointless demo showing something could be done but not something actually useful. Due to this and the fact we are looking at old material, I didn’t get as much out of these projects as I had hoped. I shrug and move on.

Notes on Codecademy “Learn Sass”

Reviewing what’s new (and relevant to me) with Angular over the past two years, I saw improved support for Sass listed. As soon as I saw that, I realized I should review Sass before diving into Angular again. Codecademy has a “Learn Sass” course and based on my notes here I’ve taken it once years ago. My Codecademy progress tracker page showed the course as “Completed” as well. But when I clicked “Start”, my progress bar dropped to 41% complete. This is because the course had a few updates in the “Sustainable SCSS” section. There’s also the fact that my previous run was without a Codecademy Pro subscription, so I didn’t have access to the projects section of the course.

Reviewing the Lessons turned out to be quite useful, as I had forgotten some of Sass and other pieces took on a different meaning in light of other recent classes I’ve taken. Notable Sass features include:

  • Nesting: the course started with nesting clauses, which is still my favorite part of Sass and probably still the biggest value added. Keeping related CSS rules together in a parent/child hierarchy helps understand organization in a style sheet, we no longer have to memorize which rules we’ve seen elsewhere.
  • Variables: The Sass variables mechanism isn’t exactly the same as CSS variables a.k.a. custom properties, but they solve many of the same problems. Historically, Sass variables existed before CSS variables support were widespread among browsers.
  • Functions: Sass functions also start with a fixed set just like CSS functions. (We can’t declare our own functions.) But Sass goes further by giving us features like loops and if/else which I haven’t seen from CSS functions.
  • Mixin: The final major Sass feature I liked. A @mixin is a CSS macro that we can then use elsewhere in the style sheet via @include. As demonstrated in the course, this is great for packing all different vendor prefixes into a single line.

The course covered other topics, but they didn’t stand out as much to me. Maybe I’ll value them after tackling more projects. I’m curious if the best practices recommended in “Sustainable SCSS” would be very practical elsewhere, especially something like Angular which imposes its own project file structure.

So the lessons review were fine, and now with a Pro subscription I wanted to give the projects a shot. I ran into problems immediately: my changes in .scss file did not reflect on .css, nor are changes visible in rendered HTML. What’s going on? Time for some debugging.

A Quick Look at Angular 15

In the interest of improving the odds that I’ll actually learn something I can put to use, I’ve devised a plan for how I intend to learn and apply Angular application framework. My skills have evolved since the last time I ran through Angular tutorial, and it’s no surprise that Angular has evolved itself. Web technologies move fast! My previous effort worked with Angular 11, and as of about two weeks ago, we’re now up to Angular 15. I looked through the changes to see how much I understood and how much would actually affect the kind of projects I intend to build. It appears that I picked a good time to review Angular — v15 looks to be quite a consequential step forward.

From the “Angular v15 is now available” (2022/11/16) page:

  • Standalone components: I got excited about this item because I didn’t understand Angular terminology. I thought “standalone” meant I could use Angular components piecemeal independent of the Angular framework, I was wrong. Reading more, I’ve learned some people felt Angular components are too dependent on a specific Angular mechanism “NgModule”. Architecturally that meant a NgModule was the smallest unit of reusability, and not Component as intended. This “standalone” feature makes it easier for an Angular Component to run without NgModule.
  • NgOptimizedImage: Sounds like the Angular framework can now handle resizing image files. So large screen desktops don’t get blurry images and small mobile devices don’t waste bandwidth downloading high resolution images.
  • Stack traces are more helpful: Sounds promising. Getting an informative stack trace has always been a problem with debugging asynchronous code.
  • MDC-based components: Angular Material was why I started looking at Angular framework to begin with! At the time it was an Angular-focused set of web controls that are implemented differently from those intended for non-Angular web sites. (The non-Google affiliated Materialize-CSS project was something I’ve tried along similar veins.) Now it seems like the two worlds are converging, nice.

From the “Angular v14 is now available” (2022/6/2) page:

  • Strictly typed forms: Reading the description, it’s the kind of thing that surprised in the “Wait, you meant it wasn’t like that already?” category. Angular uses TypeScript and leverages its compile time type checking to catch bugs. Given this fact I was surprised that forms (a major way to interact with user data) aren’t strictly typed. Perhaps there’s subtlety here I don’t understand but better type checking is almost always a good thing.

From the “Angular v13 is now available” (2021/11/3) page:

  • End of IE11 support: This only impacts me because I have a bunch of old Windows Phones that I had intended to reuse in other projects via its integrated web browser, which is a mobile build of Internet Explorer. Angular 11 didn’t officially support IE but it was possible to build for IE with a few project settings. The results… mostly worked. As of Angular v13 that is no longer an option. If I still want to put those old Windows Phones to work via web apps, I’d have to do it with older versions of Angular or without Angular at all.

From the “Angular v12 is now available” (2021/5/12) page:

  • Sass: I had forgotten about Sass until I read Angular v12 increased support for Sass. I learned about Sass quite some time ago, before my recent efforts to relearn CSS. I’ve forgotten much of Sass and how it addresses challenges of plain CSS. I’m going to refresh my knowledge of Sass before I proceed.

Learning Plan for Angular Round 2

Reviewing the TypeScript Handbook was very educational, even if I didn’t understand all of it. It was enough to make me feel confident I have what I need to get more out of revisiting Angular web framework. When I tried to learn Angular the first time, I only had a basic grasp of HTML, CSS, and JavaScript. Because of this weak foundation with weak supports, I didn’t really know enough to put Angular to work. I just ran through the tutorial and didn’t do much with it. Over the past few weeks, I’ve been patching up holes in my knowledge of web development, and I hope to have better results if I visit Angular again. It’s no guarantee of success, and there’s a good chance I’d only learn enough to realize I need to revisit the other topics like CSS and JavaScript again. But even in that case I’d learn more than I know today, and that is itself a win.

So given what I’ve learned recently, here is how I intend to tackle my second round of learning Angular:

  1. Read through Angular introduction again.
  2. Just skim instructions for the StackBlitz-based shopping cart demo without repeating hands-on activity. I like the idea of StackBlitz but its web-based development environment was different enough from a local development environment that I’ve decided I prefer to skip it in favor of practicing local development.
  3. Hands-on follow through the “Tour of Heroes” tutorial for the second time.

After finishing “Tour of Heroes” again, put my recent learning to work enhancing it:

  1. The “Tour of Heroes” tutorial was focused on Angular application framework mechanics, so the visual HTML and CSS is very plain. Put my recent HTML and CSS learning to work and spiff up that site. Including a mobile-friendly layout via media queries.
  2. The “Tour of Heroes” tutorial used a small class as a local proxy substitution for server-side database backend, storing its data in memory using JavaScript collection classes. Remove that proxy and migrate it to run on a Node.js server.
  3. Upgrade backend interface code to a more robust web API implemented using Express.
  4. Upgrade backend store to a MongoDB instance instead of in-memory JavaScript objects.

If I get this far, I would have practiced the entire MEAN stack. However, the MongoDB side would be quite lightweight given the limited demands of “Tour of Heroes”. Fortunately, in the MongoDB University course, we were given several practice databases of nontrivial size. I could build an Angular web app on top of one of those databases.

And if I’m successful with that, I would then have enough skill to tackle a MEAN stack project from scratch.

Tha’s quite a plan with many steps! I’ll likely deviate from this plan as I hit various roadblocks and work to resolve them, and it’ll take at least several weeks. But it feels exciting to have a longer-term plan. But first, a look at the Angular framework to see how it has changed since my first visit.

Notes on TypeScript Handbook

I liked the idea of TypeScript, a tool that makes JavaScript more predictable and manageable. An introduction from Codecademy’s Learn TypeScript course was quite instructive, but I knew that wasn’t the whole picture. To learn more, I decided to read through the TypeScript Handbook. It is a document meant to be shorter and easier to read than the formal TypeScript language definition, at a tradeoff of less precision and skipping over details on edge cases.

The majority of value in TypeScript is in keeping track of code intent by assigning data types to variables. At first glance I thought it would be helpful but not a huge deal, but I was wrong. TypeScript can infer a lot from these type assignments. My favorite example was named “Exhaustiveness checking“, where TypeScript could infer when a switch() statement is missing a case. This is a class of problem I frequently try to make visible in my own code. Unfortunately, I could only log an error and/or throwing an exception in case I fall into default. Which is a runtime solution where my code would come to a screeching halt long after I wrote it. But with TypeScript exhaustiveness checking combined with TypeScript ‘never‘ Type, I could turn such mistakes into compile-time error “is not assignable to type 'never'“. This is huge and this capability alone is enough to turn me into a TypeScript fan.

However, TypeScript can’t solve all JavaScript ills, because TypeScript always maintains full runtime compatibility with JavaScript. This means TypeScript labels like “readonly” only communicates intent for compile-time checking and could not guarantee the value will remain immutable at runtime. It couldn’t solve the fact JavaScript evolution ended up with a very convoluted model on what “this” means. Sometimes TypeScript tries to solve a problem, only for JavaScript to end up with a different solution to the same problem. Such as TypeScript labeling class members as private (intent-only compile time check) and JavaScript’s “#” private marker (actual runtime enforcement?) And if JavaScript changes how inherited fields are initialized, TypeScript must follow suit while doing their best to provide a mitigation for existing code.

Another area where TypeScript had no choice but to follow suit with JavaScript is adopting all the different ways a function could be declared. My eyes started watering as I read through the function section of TypeScript handbook, I had never even seen most of these ways! Designing TypeScript so it could annotate type information on all of these function declaration methods must have been a huge headache. But this was just a taste: there’s a whole “Type Manipulation” section of the handbook describing how to carry type information through all kinds of different convolutions. The author seems proud of this capability, claiming “we can express complex operations and values in a succinct, maintainable way” but I got lost. This is information I could not absorb on the first pass and would have to return frequently as reference.

Since the “easy to read” handbook already lost me on several points, I don’t think I’m quite ready to jump into the full language specification just yet. But there was one more item I wanted to look up: class decorators are used in Angular to create every component, and I didn’t quite understand how that worked. TypeScript reference page for decorators called it an experimentational feature of TypeScript that is also a proposal to JavaScript, which means things might change in the future if JavaScript officially adopts decorators in a way incompatible with what TypeScript does today. Oh well, if that happens, I’m confident the TypeScript people are well practiced at dealing with it. In the meantime, I have to devise a plan for my own TypeScript practice.

Notes on Codecademy “Learn TypeScript”

I want to go back and take another look at Angular web application development framework, because I’ve learned a lot about web development since my earlier attempt. But before I do, I want to review TypeScript, which is what Angular uses to tame some of JavaScript’s wild nature. Conveniently, Codecademy has a “Learn TypeScript” course for me to do exactly that.

As its name implies, TypeScript imposes some of the benefits of data type enforcement to JavaScript’s default data type system, where anything can go anywhere. The downside of JavaScript’s flexibility is that it also allowed many bugs to hide until emerging at very inconvenient times. While it’s always possible to move to an entirely different language if type safety is desirable, the beauty of TypeScript is that it maintains full compatibility with JavaScript so we don’t have to leave that ecosystem (JS runtimes, libraries, tools, etc.) to gain benefits of compile-time type checks. TypeScript accomplishes this magic by performing its checks on TypeScript source files. Once everything has been verified to be satisfactory, that source code is translated to standard JavaScript for execution.

But before that compiler runs, TypeScript syntax gives us a lot of tools to organize our code to catch bugs at “compile” time. (More accurately TypeScript-to-JavaScript transpiling time.) There are static code analysis features to find problems. Starting with simple ones like a mistyped variable name would get caught because it has no declared type. We also get (illusions of) features like enum so we can constrain values within a defined valid set.

However, in order to stay compatible with JavaScript, TypeScript couldn’t offer all the rigorousness of a strictly typed language. There are various middle ground features sprinkled throughout so we don’t have to take all-or-nothing. The type guard of “[property] in [object]” aligns with “duck typing” patterns: checks for the method we care about instead of the exact object type or interface. It was also amusing to see support for generics, which is becoming a feature in strictly typed languages but now we have it in TypeScript as well compiling down to “do whatever you want” JavaScript. That leads to things like Index Signatures with no real counterpart in strictly typed languages, and I credit its existence to JavaScript for being weird. I wouldn’t blame everything on JavaScript, though. I sometimes stumble across TypeScript union types, which lets us support a limited set of types. In one practice exercise, we have an array that can be an array of one of two types. I typed TypeA[] | TypeB[] which made sense to my brain, but that was not acceptable. I had to use (TypeA | TypeB)[] and I still don’t understand why.

This course also exposed me to certain JavaScript things that were not specific to TypeScript. There was a brief mention of documentation comments: /** */ blocks that included markup like @param and @returns. I vaguely recall seeing this before but I no longer remember what this is called and the course didn’t give me a pointer. This course was also the first time I saw JavaScript rest parameters and its counterpart spread syntax. And finally, this is where I learned of number.toFixed() which I will definitely use in the future.

Like all Codecademy courses, this one gives us enough context for us to navigate product document on our own. In this case, the official reference is The TypeScript Handbook. Explanations in the handbook make a lot more sense to me after this Codecademy course than it did before, so I’d say “Learn TypeScript” was worth my time investment.

Circling Back to Angular for Another Look

After spending some time on MongoDB University to learn the basics of the MongoDB NoSQL database, then how to connect to one from Node.js code, I think I have enough of a basic understanding to tackle simple projects. It also completes my basic exposure to the entire “MEAN Stack” for bulding web applications: MongoDB, Express.js, Angular, and Node.js. Emphasis, however, on the “basic”. Going through a bunch of tutorials isn’t the same as being to put tools to work. I went through Angular some months ago, but there were too many unfamiliar topics for me to absorb everything the first time around. But I’ve learned a lot since then. I had a HTML refresher where I learned about semantic HTML, followed by learning more CSS I never learned (or never absorbed) before, and then enough JavaScript courses that the language is actually starting to make sense. I felt missing this knowledge earlier prevented me from usefully deploy Angular.

Part of the problem was that Angular is a big package which is highly prescriptive or “opinionated” on how each part would work with the others. This has advantages for a beginner because I don’t have to think about evaluating and picking from multiple alternatives, but it has the disadvantage that a beginner has to learn it all. With so many tightly integrated components, as my learning started falling behind, my understanding also started to fall apart.

Would I be better off learning another platform now? I contemplated learning React, which has a lot of coverage on Codecademy. I haven’t taken any of those courses yet, but I’ve read React is more modular than Angular. For some components we can start with something simple while we learn why we might want to substitute with more complex and powerful alternatives later. Further on this scale of flexibility is Vue.js, which advertised itself as something tailored for incremental development. It’s not just we can substitute components in Vue.js, we can go without them entirely if the project doesn’t use it.

As tempting as it might be to go after something new and shiny, I feel I will get a lot more out of Angular if I take another look. Or at least, have a better understanding of its tradeoffs before I go after something new and shiny. Reading my notes from earlier, I can tell I already understand some problems better than I used to. Example: Angular’s Tour of Heroes tutorial introduced me to the RxJS library which is Angular’s opinion on asynchronous JavaScript. Initially, I had no idea what I was looking at. But as the tutorial went on, I started seeing its benefits. Now, with my latest JavaScript courses, I understand RxJS was a solution to make asynchronous JavaScript things like Promises easier to work with. Unfortunately, it was a solution that predated official JavaScript adoption of async/await. So RxJS “Observable” mechanism doesn’t quite line up with async/await. This might be one example where Angular’s architecture holds it back: it is tied to pre-async/await RxJS and other platforms (React/Vue/etc.) may have an easier time adapting async/await. Is that important? That I don’t know yet, but at least I’m starting to understand more of the picture.

Before I dive back into Angular again, I have one more hole I thought I should fill: it uses TypeScript to tame some of the wildness of JavaScript. And now with a better understanding of JavaScript, I think I can get a lot more out of TypeScript.

Notes on “Using MongoDB with Node.js” from MongoDB University

Most instructional material (and experimentation) for MongoDB uses the MongoDB Shell (mongosh), which is “a fully functional JavaScript and Node.js 16.x REPL environment for interacting with MongoDB deploymentsaccording to mongosh documentation. Making mongosh the primary command line interface useful for exploration, experimentation, and education like on Codecademy or MongoDB University.

Given the JavaScript focus of MongoDB, I was not surprised there is a set of first-party driver libraries to translate to/from various programming languages. But I was surprised to find that Node.js (JavaScript) was among the list of drivers. If this was all JavaScript anyway, why do we need a driver? The answer is that we don’t use JavaScript to talk to the underlying database. That is the job of BSON, the binary data representation used by MongoDB for internal storage. Compact and machine-friendly, it is also how data is transmitted over the network. Which is why we need a Node.js library to convert from JSON to BSON for data transmission. I started the MongoDB University course “Using MongoDB with Node.js” to learn more about using this library.

It was a short course, as befitting the minimal translation required of this JavaScript-focused database. The first course covered how to connect to a MongoDB instance from our Node.js environment. I decided to do my exercises with a Node.js Docker container.

docker run -it --name node-mongo-lab -v C:\Users\roger\coding\MongoDB\node-mongo-lab:/node-mongo-lab node:lts /bin/sh

The exercise is “Hello World” level, connecting to a MongoDB instance and listing all available databases. Success means we’ve verified all libraries & their dependencies are install correctly, that our MongoDB authentication is set up correctly, and that our networking path is clear. I thought that was a great starting point for more exercises, and was disappointed that we actually didn’t use our own Node.js environment any further in this course. The rest of the course used the Instruqt in-browser environment.

We had a lightning-fast review of MongoDB CRUD Operations and how we would do them with the Node.js driver library. All the commands and parameters are basically identical to what we’ve been doing in mongosh. The difference is that we need an instance of the client library as the starting point, from which we could obtain object representing a database and a collection with it. (client.db([database name]).collection([collection name]) Once we have that reference, everything else looks exactly as they did in mongosh. Except now they are code to be executed by Node.js runtime instead of typed. One effect of running code instead of typing commands is that it’s much easier to ensure transaction sessions complete within 60 seconds.

For me, a great side effect of this course is seeing JavaScript async/await in action doing more sophisticated things than simple straightforward things. The best example came from this code snippet demonstrating MongoDB Aggregation:

    let result = await accountsCollection.aggregate(pipeline)
    for await (const doc of result) {
      console.log(doc)
    }

The first line is straightforward: we run our aggregation pipeline and await its result. That result is an instance of MongoDB cursor which is not the entire collection of results but merely access to a portion of that collection. Cursors allow us to start processing data without having to load everything. This saves memory, bandwidth, and processing overhead. And in order to access bits of that collection, we have this “for await” loop I’ve never seen before. Good to know!

Many Paths to MongoDB Shell (mongosh)

To promote their product, MongoDB has setup their own online learning resource MongoDB University. I was curious to learn more about a database that offers something different from a standard SQL relational database, so I started with their “Introduction to MongoDB” course. Since it was at least partially a marketing tool, I was not surprised the course wanted to take us through a grand tour through all MongoDB products from their cloud-hosted MongoDB Atlas data platform to all the tools we can download and install. I was ready to just ignore and skip over those sales pitches, but then the course would quiz me to make sure I’ve actually installed them on my computer. This annoyed me, especially for the MongoDB Shell (mongosh). It’s how Codecademy introduces us to MongoDB, and it’s what we use in MongoDB University’s Instruqt hands-on labs. There are so many ways to get mongosh I refuse to download and run a full blown application installer package just for a command line tool.

At a minimum, this duplicates work. MongoDB Compass is another item the course wants us to download and install. Compass is a separate application that offers GUI-based methods for interacting with a MongoDB database and/or Atlas cluster. GUI are nice but rarely cover 100% of all scenarios, so developers like the option of dropping to a command line. Which is why clicking at the bottom of MongoDB Compass would bring up an integrated mongosh.

I’ve been using Docker as a tool to avoid installing software directly on my computer. I couldn’t escape installing MongoDB Compass because of its graphics interface, but as a command line tool mongosh is easy to run through Docker. The easiest way is to use the official MongoDB Docker image, which includes mongosh alongside the core database engine.

docker run --rm -it mongo:latest mongosh [connection string]

Doing this means we’re pulling down the entire MongoDB database just for the little mongosh tool. That’s like ordering an entire seven-course meal to eat just the little cherry on top of ice cream dessert. Even in this age of broadband internet, that seems rather excessive. I thought it’d be neat to try setting up a container just for mongosh, see if that’s any smaller.

I found instructions for installing mongosh on an Ubuntu instance. Ubuntu Focal is one of the supported versions so I’ll start there.

> docker run --name mymongosh -it ubuntu:focal

I’ll need some tools not found in this basic Ubuntu container, so I need to populate the package index followed by their installation.

> apt update

> apt install wget gnupg

After that I could follow MongoDB instructions. Slightly modified by removing “sudo” as it was unnecessary: we are running as root in this little world.

> wget -qO - https://www.mongodb.org/static/pgp/server-6.0.asc | apt-key add -

> echo "deb [ arch=amd64,arm64 ] https://repo.mongodb.org/apt/ubuntu focal/mongodb-org/6.0 multiverse" | tee /etc/apt/sources.list.d/mongodb-org-6.0.list

> apt update

> apt install mongodb-mongosh

And voila! I have a docker container “mymongosh” based on the Ubuntu Focal container. Let me see how big it is:

> docker ps --size
CONTAINER ID   IMAGE          COMMAND   CREATED          STATUS          PORTS     NAMES       SIZE
757519a645f8   ubuntu:focal   "bash"    19 minutes ago   Up 19 minutes             mymongosh   278MB (virtual 351MB)

Wow, getting this far meant pulling 278MB on top of 73MB of Ubuntu Focal. This was far larger than I had hoped. While this size still compared favorably with MongoDB image size of almost 700MB, I don’t think my little experiment was worth the effort.

PS C:\Users\roger\coding\PostgreSQL> docker image ls
REPOSITORY                                                        TAG              IMAGE ID       CREATED         SIZE
mongo                                                             latest           2dd27bb6d3e6   7 days ago      695MB

If I want small size, I’d have to learn how to build a minimal Docker image based on Alpine, which isn’t what I want to focus on right now. My next objective is to learn how to use MongoDB from Node.js code instead of mongosh.

Notes on “Introduction to MongoDB” on MongoDB University

I started learning about MongoDB on Codecademy, but there were technical difficulties blocking my progress. So I switched to MongoDB University, the free online learning platform hosted by MongoDB themselves. There was a bit of a learning curve on idiosyncrasies of MongoDB’s learning platform, but I got the hang of it soon enough and could focus on the information covered by “Introduction to MongoDB” course.

Each section of the course starts with a Wistia-hosted video. I prefer to learn by reading at my own pace over watching a video, so this wasn’t my favorite. The video sometimes has captions allowing us to read along with the spoken narrative, but the presence of captions was inconsistent. Sometimes the video is followed by a page of text covering the same information and I thought I could read that text and skip the video, only to find that sometimes the text is missing information covered by the video and vice versa. I end up having to do both video and repetitive text, which feels like a tremendously inefficient way to do things.

Another inefficiency are the hands-on labs powered by Instruqt. It takes several clicks and a few tens of seconds for the lab environment to spin up, which isn’t bad by itself except most of our exercises involve typing out a single mongosh (MongoDB Shell) command and exiting to proceed to the next lab. This implementation means we spend a lot of time twiddling our thumbs waiting for spin-up and tear-down overhead, I would have preferred that we do more in each Instruqt session, so we don’t spend so much time waiting.

As for the course material, it’s not technically just about the MongoDB database itself, the course is also a sales pitch for associated MongoDB products. Mainly MongoDB Atlas, the cloud-hosted (your choice of AWS, Azure or GCP) MongoDB service that cost money for us and generates revenue for the company. I don’t mind a company making sure we know how to give them money, but I don’t care for the fact that MongoDB Atlas features are intermingled with MongoDB core functionality in this course. When we run our own MongoDB instance (which I plan to do for my own projects) we won’t have Atlas functionality, but this course doesn’t always make clear what is core MongoDB versus functionality added by Atlas. I expect the company would say “Don’t need to bother, just use Atlas for your projects, we have a free tier!” and I appreciate that the offer exists. But I’m rather skeptical that their “Free Forever” tier will actually stay free given the discouraging historical record of free tiers.

Instructions in MongoDB mostly concentrate on what we can type into mongosh, which exposes a JavaScript style interface for interacting with a database. That is very different from storing SQL commands in strings as we did in node-sqlite. Compared to SQL syntax, I found it easier to remember and parse mongosh syntax because of its similarity to JavaScript. That said, I still come across things that feel inconsistent to me that catch me off guard. Some commands want us to specify an action first then where to store the results. {$count: "total_items"} Other commands want us to specify the location of results followed by the action to generate it. {"total_items": {$count {}}} Maybe there’s a system and I just haven’t learned them yet, certainly the course never tried to explain them.

At least I could still follow the logic for most of those inconsistencies. The one that completely confused me was an example using geographical location data in the form of { type: 'Point', coordinates: [ 40, -74 ] } I think this is their GeoJSON format but the course didn’t go into detail. The example then sorted by ‘latitude‘, and I don’t see how I could have looked at ‘type‘ and ‘coordinates‘ and decide ‘latitude‘ is available for sorting. To my eye ‘latitude‘ was not defined at all! If I figure this out later, I’ll add a URL here to the appropriate reference.

Here is my super-abbreviated variation of course syllabus:

  • Querying for data with db.[collection].findOne() and find(). Followed by insert with insertOne() and insertMany(). We start with a few basic query operators using comparison operators $gt, $gte, $lt, and $lte. Then logical operators like $and and $or. We can use $elemMatch if we want to peer into values in the form of an array.
  • Modifying data with replaceOne for direct replacement. updateOne() and updateMany() take operators like $set and $push. findAndModify() combines a common pattern of finding a single document, modifying it, and returning the results. Finally deleteOne() to remove documents.
  • Tailor query results with cursor.sort() and limit(). Projection parameter to find() lets us skip information we’re not interested in. And collection.countDocuments() is useful for data exploration.
  • Aggregation is roughly analogous to SQL table joins. We are introduced to operators $match, $group, $sort, $limit, $project, $count, $set, and $out.
  • Index helps us optimize lookup for specific query patterns. Recommend we list the fields in usage order of Equality, Sort, then Range. (But couse didn’t explain why.) Like SQL, there’s always some tradeoff involved for having a database index. The explain() command helps us see if an index is actually as helpful as expected.
  • There’s a whole arena of information on MongoDB anti-patterns. Like how we should be aware of BSON size limit of 16MB which means avoiding things like creating arrays that would grow unbounded.

This course gave me a solid start to using MongoDB in my projects. As I do not intend to rely on MongoDB Atlas staying free, I’m more likely to run the MongoDB Docker container on a test machine at home. Interactions with such a database would likely happen via mongosh and there are many ways to get it.

Notes on MongoDB University Learning Platform

I’ve been learning a lot of interesting things from Codecademy’s course catalog, including the fundamental concepts of the “NoSQL” database software design of MongoDB. However, when Codecademy’s hands-on learning mechanism got stuck, I couldn’t see how those fundamental concepts translated to MongoDB practice. But that’s OK, the Codecademy MongoDB course was built in conjunction with MongoDB themselves, so I can try their own MongoDB University platform for learning online.

The switch does introduce some friction, though. Starting with the online learning platform itself. Codecademy rarely uses video lectures. (Which I appreciate, and more comments about content will come later.) When they do, they embed a YouTube video and let Google figure out the rest. MongoDB University hosts their (more frequent) video lectures on Wistia. (“Where Video Meets marketing”.) Wistia’s video player component has a slightly different interface from YouTube. The most annoying aspect of the Wistia player is lack of memory across sessions. I prefer playing the videos slightly faster than standard speed, and its lack of memory means I have to click the settings button to speed up playback on Every. Single. Video. I also prefer to turn on English captions, which meant more clicking on every video. Not every MongoDB University video had captions available, but I don’t blame Wistia for that. I do wish they followed YouTube’s lead and offer at least the option of imperfect (but far better than nothing) auto-generated captions.

Since I loved Codecademy giving us hands-on interaction with the material, I was happy to see MongoDB University courses also has a hands-on interaction component powered by Instruqt. (“The #1 Hands-on Virtual IT Labs for Product-led Growth”) For these exercises, Instruqt provides a mongosh (MongoDB interactive shell) command line in our browser window. It feels like they’ve spun up at least two Docker instances for each exercise: one container running mongosh, connected to another container running MongoDB itself. This works well as we get a known starting state for each exercise and, after we’re done, undo anything we’ve changed so the next person gets the same starting state. The downside of a browser-based command line is that we don’t get the full set of command-line keyboard shortcuts. I had to use mouse right-click in order to copy and paste because my preferred keyboard shortcuts didn’t work.

Another similarity to Codecademy are quizzes sprinkled throughout the course to test our comprehension of course material. User interface for these quizzes leave something to be desired. The first problem is when I clicked “Show Results”, I saw items I didn’t select displayed as “Incorrect”. I was confused for a few minutes, reading the explanation trying to figure out where I went wrong. Eventually I figured it out: I wasn’t wrong. They’re just showing me all of the explanations. I did not select the incorrect answer and that was the correct thing to do. That was very confusing. The next problem is literally the “Next” button on these quizzes. After finishing one question, I clicked “Next” to proceed with the quiz, only to get disoriented when the course continued with new material. Eventually I figured out there is a “Next” button to continue with the quiz, and it is near a different “Next” button which will abandon the quiz and proceed with the course. I clicked the latter when I should have clicked the former. This was a pretty bad user interface design but once I figured out what was going on, I could deal with it and focus on the course material.

Notes on Codecademy “Learn MongoDB”

Codecademy’s course catalog on SQL databases is thinner than those on topics like web front-end development, and their in-browser learning infrastructure isn’t as polished for those courses either. This has caused me frustration, but I was still learning useful knowledge. Codecademy’s PostgreSQL skill path was packed with information I can use and links to where I could learn more. After that, though, I wasn’t interested in anything else under their SQL umbrella of courses, but that doesn’t mean I’m done with databases because SQL relational databases are no longer the only game in town: A few alternative “NoSQL” database designs have recently arisen, and I had been curious about their design tradeoffs. So, the next step is Codecademy’s Learn MongoDB course, which I learned was launched (or at least promoted) recently via a Codecademy mailing list. Unfortunately its technical immaturity caused problems, more on that later.

This course started well, with a review of databases for those who come into the course without a background in SQL relational databases. With that background established, it proceeded to describe how NoSQL databases (there are several subtypes) like MongoDB (representing the “document database” subtype) go about their business. I loved this section, because it answered my question about why these databases exist and when they might (or might not!) be the right tool for the job.

On the course syllabus it said “Built in partnership with MongoDB” which in practice meant many links to MongoDB’s established portfolio of guides and documentation. After Codecademy’s own explanation of SQL vs. NoSQL, we have a link to MongoDB’s own take. Related to that topic is a presentation that describes MongoDB structures in terms of close analogues in SQL, but also implored experienced database developers to free their mind and think beyond relational database conventions. It seems perfectly possible to set up a MongoDB database so it looks and act like a relational database, but not taking advantage of MongoDB strengths risks incurring all the disadvantages of NoSQL without any reward to balance them out.

The MongoDB advantage that really caught my attention is the ability to start working on a project before we know everything about data access patterns. In a SQL-backed project that is a recipe for disaster because incomplete information would lead to a suboptimal schema, and one that we’d be stuck with towards the end of the project. Over in MongoDB land, our data validation can be loose in early stages of the project and tightened as we go if desired. During the course of development, MongoDB can theoretically adapt to changes much more easily than SQL databases could handle schema updates. I wonder if this means it’s possible for an application to evolve their MongoDB usage and end up in a state where it’d make sense to migrate to a SQL relational database.

These features were all very promising, and I really looked forward to playing with MongoDB. Unfortunately, Codecademy’s hands-on lesson backend is broken today. On the first page of the first interactive lesson, I was told to show all databases in a MongoDB instance by typing in the “show dbs” command, which listed four databases as expected. After this list was shown, I was to click the “Check Work” button to verify my progress before proceeding. But when I clicked “Check Work”, nothing happened. I did not see a successful check, which would have allowed me to proceed. In the absence of success check, I expect to see a red X telling me my answer was wrong and need to try again. But I didn’t see that, either. Nor did I see any sort of an error message. No “Pass”, no “Fail”, and not even a “Oh no something is wrong”.

I’m stuck.

So Codecademy’s Learn MongoDB course was a bust, but as mentioned earlier, MongoDB has their own collection of learning resources. The reading material so far got me interested enough that I want to continue learning MongoDB. Instead of waiting for Codecademy to fix their backend, I will switch to MongoDB’s learning platform.

[UPDATE: Codecademy has fixed their MongoDB course and I could continue its lesson, which is now extremely easy and just a review as I’ve since gone through courses on MongoDB’s own learning platform.]

Notes on Codecademy “Design Databases with PostgreSQL”

After a frustrating experience with the node-sqlite course on Codecademy, I’ve concluded that their in-browser instruction environment is not well set up for teaching SQL. Or at least, this course is far weaker than others on Codecademy, which I had been generally satisfied up until this point. I considered switching to a different topic but decided there were still a few more things I wanted to learn. But from here on out, when I fail an exercise, I’m more likely to decide my answer was fine. (More willing to hit “View Solution” to see the answer and compare.) And more importantly, I’m going to review the course syllabus beforehand and skip those with frustrating “Code Challenge” sections.

Which led me to “Design Databases with PostgreSQL” which is technically a “Skill Path” offering rather than a course. Like my previous skill path in web development, I started this skill path and was immediately at 50% completion due to material that overlapped with courses I’ve already taken. One major difference is that all my Codecademy database courses used SQLite to illustrate general SQL concepts, but this skill path has some PostgreSQL-specific details amongst more general database concepts.

Initially, I was mildly disappointed that the material was shallower than I had expected based on course description. The sales pitch made it sound like we’re going to get into some real detailed nuts-and-bolts, but while the course did indeed to into further depth than other courses to date, there were still many topics that ended with “we’re not going into more depth, but at least now you are aware it exists.” An example concerns database keys. From my earlier courses I had known about primary, foreign, and composite keys. This course mentioned there are also super, candidate, and secondary keys then proceeded to say nothing more about them. As a starting pointer this is fine, I had just expected more.

Once I adjusted my expectations, this skill path was time well spent. We get more information on database schema and that proper design of a schema can make a difference in database performance. Both at development time (make queries easier and less prone to problems) and at runtime (easier updates and faster queries.) Part of this design process is database normalization, which was covered by starting with a poorly designed database. After covering how a poorly normalized database causes problems in use, we are walked through typical normalization techniques to solve those problems.

But those solutions usually have a tradeoff. This course has a recurring theme in the form of database tradeoffs. A competent database engineer has to be able to understand the problem domain and usage patterns to properly prioritize certain constraints versus others. A normalized database has a lot of space, performance, and consistency advantages. But it does tend to make updates and queries more complex by requiring database joins. Similarly, a database index can make queries faster, but maintenance means updates are slower. The index also takes up space on disk.

A light complaint I have about this course is that its illustrative examples were surprisingly poor. One example used an email address as a primary key for a list of people, but a person can have multiple email addresses making it a poor primary key. Another example separated ingredients from recipes, but the ingredient is associated with a fixed amount. It is unrealistic for a cookbook to use, say, the same amount of salt for every recipe.

One of the practice exercises was “Bytes of China”, setting up a database that would track information suitable for a restaurant menu. From the starting directions I had looked forward to an open-ended exercise, because it said to: “Create table with columns that make sense based on the description” This came to a screeching halt when we were given information to add to these tables in the form of SQL INSERT clauses that expect a specific database schema. I had to delete the database schema that made sense to me and rebuild a different schema to suit the exercise data. This was annoying. They could have told us to build to suit their sample data upfront instead of letting us waste time designing our own that wouldn’t work.

Gripes aside, I learned a lot of neat things that I expect to use in future projects that might need a database. I learned how it was possible to represent many-to-many relationships with a “join table” that has a composite primary key that consists of a combination of foreign keys. Beyond “PRIMARY KEY” I learned about constraints like UNIQUE, CHECK, and REFERENCES. In the earlier SQLite course I was dismayed to learn it doesn’t enforce the schema, calling it a flexible feature instead of a bug. PostgreSQL isn’t as free-wheeling but we still need to watch out for times when it becomes inadvertently unhelpful. If I make a mistake trying to put a floating-point number like 1.5 into an integer field, PostgreSQL would round it to 2 without error. Or if I make a mistake putting it into a text field, PostSQL would helpfully convert the number 1.5 to the string “1.5”.

Every bit of SQL instruction I’ve come across before only ever joined two tables, this course was the first to teach me how to join more than two. I can see how this would feel obvious to SQL veterans, but every beginner has to see it at least once:

SELECT table_one.column_one AS alias_one, table_two.column_two AS alias_two, table_three.column_three AS alias_three
FROM table_one
INNER JOIN table_two
ON table_one.primary_key = table_two.foreign_key
INNER JOIN table_three
ON table_two.primary_key = table_three.foreign_key;

I think all of the remaining nifty tricks are PostgreSQL-only, but I’m not sure. The course doesn’t make a lot of distinction between thing we can use in other databases versus PostgreSQL-only. So I don’t know if I can extract just the date from a timestamp (DATE_PART()) with other databases, or if I can make this query to examine constraints on record for a table:

SELECT
  constraint_name, table_name, column_name
FROM
  information_schema.key_column_usage
WHERE
  table_name = 'fill in table name';

Given the pg_ prefix, the following query is likely PostgreSQL specific way to list every index built for a table.

SELECT *
FROM pg_Indexes
WHERE tablename = 'fill in table name';

Also with the prefix is a query to show size of a table, which includes space consumed by storing data and all associated index.

SELECT pg_size_pretty (pg_total_relation_size('products'));

And finally, we get a few starting points for performance analysis. Like prepending EXPLAIN ANALYZE in front of a query to get information on how the database plans out its execution. Or SELECT NOW(); to print out a timestamp before and after an operation so we can see how long it took.

That’s a lot of information packed into a single Skill Path. I wished for more, but I can understand there’s a tradeoff against making the course too long. Maybe this is the perfect length after all, and just enough for me to learn more on my own later. I can spend years learning all the intricacies of relational databases, but right now I’m more curious to explore something a little different.