Web Dev Alphabet Soup: CORS and CSRF

After a helpful comment helped me find documentation on the no-longer-mysterious AS7341 SMUX (sensor multiplexor) I went to learn more about another mystery I stumbled across as a beginner web developer: CORS (cross-origin resource sharing.) Why does CORS policy exist? After a bit of poking around, I believe the answer is to mitigate a type of attack under the umbrella of CSRF (cross-site request forgery.)

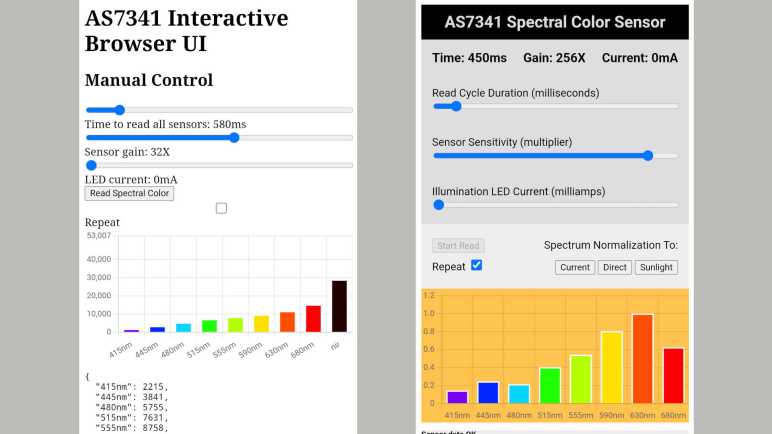
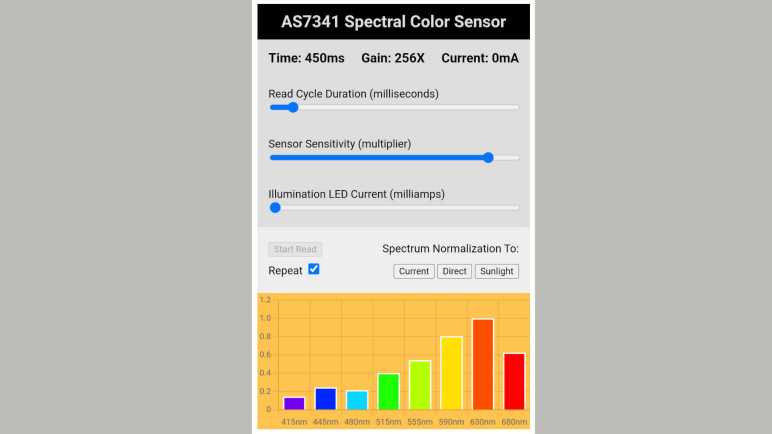
When developing my AS7341 web app, I had the AS7341 accessible via a HTTP GET on my ESP32 and thought I could develop the HTML interface on my desktop machine. But when my desktop-served JavaScript tried to query my ESP32, I was blocked by browser CORS policy. By default, JavaScript served from one server (my desktop) is not allowed to query resources on another (my ESP32.)

Reading various resources online, I learned I could set my ESP32’s HTTP response header “Access-Control-Allow-Origin” to a wildcard “*” to opt out of CORS protection. But that’s merely a “make the error go away” kind of recommendation. I know CORS is security related, but I don’t understand the motivation. What security problem does CORS prevent? Without knowing the motivation, I don’t know what I am opening up by setting “Access-Control-Allow-Origin : *” In my web app, I started out cautiously by only setting that header when I’m developing the HTML UI, serving from my desktop to query my ESP32. In “production”, my ESP32 will serve the HTML and would not need “Access-Control-Allow-Origin : *” in the header to query itself, so that header is absent.

Is that the right thing to do, or is that being overly cautious? I set out to learn more. Curiously, reading MDN and other resources give me information about HOW CORS works, but not a lot about WHY CORS exists. I guess CORS documentation assume the reader already knows! Based on that fact, I know I am looking for a relatively common website security issue that is now considered basic knowledge by network professionals.

Another data point is the fact that CORS is only applicable to HTTP queries from JavaScript running in the browser. From a command line on my desktop, I can use the “curl” tool to query my ESP32 and CORS does nothing to block that. My browser on my desktop can query the endpoint directly and that is not blocked by CORS policy, either.

Things didn’t make much sense until I found a key piece of information: HTTP request sent from a browser’s JavaScript runtime not only sends the URL and its parameters, but the browser would also attach all cookies set by that host. These cookies may contain user authentication (the “Keep me logged in” checkbox) and it makes sense such capability shouldn’t be available to just any piece of JavaScript served by random hosts. Knowing this fact and knowing the kind of abuse such code can cause eventually led me to a category of security attacks known as CSRF (cross-site request forgery.)

Once I understood CORS is here to mitigate a subset of CSRF attacks, I could look at my ESP32 AS7341 access endpoint and decide CSRF is not a problem here. Setting “Access-Control-Allow-Origin : *” does not open me up to security nastiness, so my ESP32 sketch sets that header all the time now not just during development. This is a handy bit of knowledge, but it merely scratched the surface of web security. Another item I found to be big and intimidating is OAuth.


Code for this project is publicly available on GitHub

Rudimentary Stylesheet for AS7341 Web App

Writing a simple web app to interact with an AS7341 sensor, I initially focused on functionality. It didn’t much matter how it looked until I had basic parameter input and sensor value graphing output running. But now that I’ve got basic functionality in place, my attention turned to the CSS stylesheet. Up until this point my only item was to make input sliders full width of the window, as that helped me fine tune parameters and considered part of functionality. Now I’ll fill in the rest purely for aesthetics. I don’t need it to look gorgeous, but I did want to make sure it didn’t look embarrassing.

This was my first opportunity to apply what I learned from Codecademy outside of their CSS course exercises, though I did make this project easier for myself with a few design decisions. I didn’t need to drastically change the layout, HTML’s default top-to-bottom arrangement would suit me just fine. I’m only dealing with a single page, so there’s no concern of site navigation controls. And finally, I decided not to worry overly much about creating separate mobile vs. desktop layouts: everybody gets the same thing. No media queries in my stylesheet. I intended to use this web app on my phone, so I want it to look good in portrait mode. On my desktop, I can easily resize my browser window to match the aspect ratio of phone in portrait mode. The minimalist nature of this app meant there were no additional data I could add to a desktop view anyway.

Hit target size was a concern. Parameter sliders were fine, but I was worried about the buttons selecting normalization curve. Fortunately there were no problems in practice. However, I had some trouble with my “repeat read” checkbox being too close to the “Start read” button, and I think I will eventually need to space them further apart.

This was a good start. A few lines of CSS made the page look much more pleasant to my eye. Enough that I can go back and add a few more bits of nice-to-have functionality.


Code for this project is publicly available on GitHub

Chart.js For Visualizing AS7341 Data

There’s no shortage of web frameworks that help us put pretty things on screen. I’ve been eyeing A-Frame, Three.js, and D3.js for use in the right project but all would be overkill for my AS7341 interface: I just need to plot eight data points and there’s no need for interactive drill-down. Would the web development ecosystem have something that fits the bill? The answer is definitely “Yes” because this is the same ecosystem that gave us “leftpad” and the debacle it caused. Yeah, I could spend a few hours and write my own, but I know I don’t have to.

I went on NPM to search for charting modules and as soon as I typed “chart” I got the suggestion to look at Chart.js. A brief read of documentation told me this fits my needs. Simple, lightweight, and minimal interactivity capabilities that I plan to turn off anyway. No need for fancy graphics of WebGL or DOM interactivity of SVG, Chart.js draws onscreen using HTML Canvas. Canvas was the API I used for my Micro Sawppy browser interface, so I have a rough idea of what Canvas could and could not do.

With my limited needs, I don’t expect to use most of Chart.js capabilities. But I’m happy to incorporate those that are convenient and require minimal/no effort on my part. One good bit of visual polish is its ability to animate updates to chart data, smoothly growing or shrinking bars in my bar chart based on updated AS7341 sensor data. Another bit of convenience was the ability to specify color used for each bar. I could draw the bar for one AS7341 sensor with the color that corresponds to its wavelength, which helps give me an intuitive grasp of the spectrum seen by AS7341. A quick web search found Academo’s interactive wavelength to color converter and I used that to determine colors of each bar F1-F8.

What about the other sensors? I’m completely ignoring the flicker detector right now, and I decided not to draw the clear channel. From my experiments, the clear channel typically has the highest value (which makes sense as it’s the sensor without any color filters blocking input) so I used its value as the Y-axis maximum. I also plotted the near infrared channel, but since it’s invisible I plotted it using an arbitrary chosen dark red color. This seemed to work when I first wrote the code late at night under artificial light. The next morning, I played under natural sunlight and that was an entirely different beast.


Code for this project is publicly available on GitHub

Overkill Options: A-Frame, Three.js and D3.js

After getting input controls sorted out on my AS7341 interface project, it’s time for the fun part: visualizing the output! Over the past few years of reading about web technologies online, I’ve collected a list of things I wanted to play with. My AS7341 project is not the right fit for these tools, so this list awaits a project with the right fit.

At this point I’ve taken most of Codecademy’s current roster of courses under their HTML/CSS umbrella. One of the exceptions is “Learn A-Frame (VR)“. I’m intrigued by the possibilities of VR but putting that in a browser definitely feels like something ahead of its time. “VR in a browser” has been ahead of its time since 1997’s VRML, and people have kept working to make it happen ever since. A brief look at A-Frame documentation made my head spin: I need to get more proficient with web technologies and have a suitable project before I dive in.

If I have a project idea that doesn’t involve full-blown VR immersion (AS7341 project does not) but could use 3D graphics capability (still does not) I can still access 3D graphics hardware from the browser via WebGL. Which by now is widely supported across browsers. In the likely case working directly with WebGL API is too nuts-and-bolts for my taste, there are multiple frameworks that help take care of low-level details. One of them is Three.js, which was the foundation for a lot of cool-looking work. In fact, A-Frame is built on top of Three.js. I’ve dipped my toes in Three.js when I used it to build my RGB332 color picker.

Dropping a dimension to land of 2D, several projects I’ve admired were built using D3.js. This framework for building “Data-Driven Documents” seems like a great way to interactively explore and drill into sets of data. On a similar front, I’ve also learned of Tableau which is commercial software covering many scenarios for data visualization and exploration. I find D3.js more interesting for two reasons. First, I like the idea of building a custom-tailored solution. And second, Tableau was acquired by Salesforce in 2019. Historically speaking, acquisitions don’t end well for hobbyists on a limited budget.

All of the above frameworks are overkill for what I need right now for an AS7341 project: there are only a maximum of 11 different sensor channels. (Spectral F1-F8 + Clear + Near IR + Flicker.) And I’m focusing on just the color spectra F1-F8. A simple bar chart of eight bars would suffice here, so I went looking for something simpler and found Chart.js.

Impressively Long Tail of Android Chrome Updates

I had hoped writing browser-based apps would let me put old phones to productive use, but the effort-to-reward ratio is really bad for my old Windows Phone 8.1 devices. After a short investigation, I will treat WP8.1 as a separate platform with their own (TBD) project focused just on the capability they have. I’m not going to worry about that platform for general-use browser apps like my AS7341 web app. Does this decision also rule out Android phones of similar vintage? I was surprised to learn the answer is “Not Really.” It appears Google keeps Chrome updated for Android phones well after they stopped receiving Android updates.

My data point for this investigation was my Nexus 5 phone, which was my personal successor to my Lumia 920 Windows Phone. The hardware is old enough its battery degraded enough to start puffing up. That was replaced with a buck converter pretending to be its battery so I could continue using the device. I powered it up to answer the question: how out-of-date is the Chrome browser on this thing? After updating everything available from Google Play store, I tapped on “About Chrome” and was amazed to see version 106.0.5249.126 which was released October 13th 2022.

For context, Nexus 5 launched in 2013 with Android 4. It received next two major Android updates and now runs Android 6, which stopped receiving updates in 2017. Due to this fact I had expected Chrome version to date back to a similar timeframe. Contrary to my expectations, Google continued to update Chrome for Android 6 even though the operating system itself stopped receiving updates, continuing five more years all the way to late 2022. But Chrome 106 was the end of the line, my Nexus 5 could not pick up 107.0.5304.54 released a week and a half later on October 25th, 2022. (Annoyingly, this meant Chrome 106 would display a “Chrome update now available!” prompt even though this phone can’t get Chrome 107.)

Looking around for a definitive resource on Chrome support, I found the “Chrome browser system requirements” page. Today it says the minimum Android version is Android 7, which is consistent with my Android 6 phone being left out. Android 7 received its final system update October 2019 yet is still receiving updates to its Chrome browser. This story of Chrome updates far surpassed my expectations and puts my Nexus 5 phone in a far better position than my Lumia 920 phone. Having a 2022-era browser should mean it can run my AS7341 interactive web app with no special treatment at all.


Unknown: Does Apple continue to update Safari for old iOS devices even if they have stopped receiving iOS updates? In a quick web search, I found no information one way or another and I do not have an end-of-life iOS device to check Safari version numbers firsthand.

Windows Phone 8.1 Browser Effectively a Separate Platform Now

For the first draft of my latest browser app, I aimed to write simple JavaScript. Since I didn’t use any feature I considered “fancy” I had expected it to work on older browsers as well. This proved to be false for Windows Phone 8.1 browser. Microsoft took down Windows Phone developer resources years ago, but I could see what went wrong by using developer console of Internet Explorer 11 (close relative of WP8.1 browser) on a Windows desktop. It confirmed what I had suspected: web development state of the art has advanced far enough that it would take a tremendous amount of effort to maintain compatibility with WP8.1 browser/IE11.

When it was new, WP8.1 browser support for mobile-focused websites were pretty good. This was somewhat out of necessity: mobile developers tend to release dedicated iOS and Android apps, leaving WP users to their website, so the browser had to work. Roughly on par with competitors of its day, mobile site authors could support WP8.1 with minimal (or no) additional effort. But the web moved on and WP8.1 did not. Soon support for such browsers became an explicit opt-in that fewer and fewer people chose. With support dropping left and right, Microsoft will soon forcibly remove IE11 from existing installations of Windows.

It hasn’t been practical for several years to “just” keep a browser app project compatible with IE11/WP8.1. Even worse now that IE11 debugging resources are being removed. I still hold hope of using my old Windows Phones in a project of some sort, but it would have to be a dedicated project focused on using just the capabilities it has. It has become effectively a development platform separate from modern web development. Based on my earlier ESP32 Sawppy controller project, I know I still have access to the following: draw to screen with HTML Canvas, touch input with PointerEvent, and communication with WebSocket. This is a tiny subset of the breadth of modern web development, but enough foundation to build something neat. I have to think up a project idea and do it before all IE11-related debugging resources disappear.

In the meantime, I’m going to ignore WP8.1/IE11 compatibility for my AS7341 interactive web app. I will move forward with an improved user interface and only have to worry about how it works on my Android phone Chrome browser.

Desktop IE11 Helps Debug Windows Phone 8.1 Browser but Also Going Away Soon

I’m playing with the AS7341 spectral color sensor and decided to use it as an exercise in browser app development. I’ve learned a lot as I went. Serving the HTML file from my ESP32 was more annoying than I think it ought to be under Arduino IDE, certainly more complex than creating the HTTP API endpoint to begin with, but I’m setting that aside for now. I wanted to revisit another idea: browser apps on Windows Phone 8.1. Since Microsoft has long since shut down the app development platform for Windows Phone, its browser is the only remaining entry point to utilize those old phones rather than dump them in electronics recycle.

I booted up my old Lumia 920 (a decade old at this point) and pointed it at my ESP32. I saw my static HTML input controls render on screen, but none of the interactive features worked. Something is wrong with my JavaScript, but what? I ran into this challenge earlier, trying to get ESP32 Micro Sawppy control working on the same Lumia 920. Debugging the issue was an exercise in frustration because Microsoft had removed all development resources including debugger support. Which meant I was staring at a blank screen with no error message to point me in the right direction. Just tedious trial and error. I knew I must find a better way.

Since then, I had an idea I wanted to try: according to Wikipedia, the Windows Phone 8 browser was built out of Internet Explorer 11 code base. And I still have IE11 on my Windows 10 machines. I had hoped it would give me error messages to guide my debugging, and it did! IE11 Developer Tools console gave me an error message complaining about a backtick as an invalid character. This was because IE11 did not support template literals, and now with an error message I knew to switch to a different way to manipulate strings. The next “invalid character” error was for “=>” and that was because IE11 didn’t do arrow function expressions, again easily addressed.

Then I ran into “Object doesn’t support this action” error pointing at the URL class constructor. Double-checking caniuse.com confirmed IE11 lacked URL class. This would take more effort to address, so I aborted my IE11-friendliness experiment at this point. Before my web app would work on IE11 (and hopefully Windows Phone 8.1 browser) I would have to convert the URL class. I probably also have to switch my input control event listeners from “input” event (which never fired under IE11) to “change“.

But even as I found this solution to debug under IE11, the solution may soon be taken away from me. IE11 reached end of life on 2022/6/15. In a few weeks (2023/2/14 as of this writing) Microsoft plan to forcibly remove IE11 from Windows machines. The official alternative is running Microsoft’s Edge browser to run in Internet Explore mode, but its own developer tools are not available while running in that mode. I have to kick off something called “IEChooser” (%systemroot%\system32\f12\IEChooser.exe) in order to get a debugger experience, and only a partial one at that.

I knew Windows Phone 8.1 itself has long gone off into the sunset, and soon IE11 will follow. Web platforms have been dropping IE11 support for years. For example, Angular stopped supporting IE11 in November 2021 with their version 13. If I am to make use of my old Windows Phone 8.1 devices via a browser app, I could use desktop IE11 to help me debug compatibility issues for now, but probably not for long. With all of its limitations, it might as well be an entirely different platform.


Code changes for this experiment is publicly visible on GitHub

ESP32 Arduino Web Server: No File Upload?

In the interest of data integrity and security, modern web browsers impose constraints on JavaScript code running within that browser’s environment. I ran into two of them very early on: CORS and Mixed Content. They restrict how content from different web servers are allowed to interact with each other, which was a situation I stumbled into by hosting a HTTP endpoint on my ESP32 and hosting my browser UI files on my desktop computer: these are different servers!

The easiest way to avoid tripping over constraints like CORS or Mixed Content is to serve everything from the same server. In my case, that meant I should serve my browser UI HTML/JavaScript alongside AS7341 HTTP endpoint on the same ESP32. Sadly, this isn’t as easy as I had hoped because Arduino doesn’t really have the concept of uploading files to a board. When we choose “Upload Sketch” it will compile and upload executable code, but there’s no way to also send my index.html and script.js files for serving over HTTP. Probably because such support varies wildly across different Arduino-compatible microcontrollers.

For ESP32 specifically, a section of flash memory can be allocated for use like a disk drive via a mechanism called SPIFFS. It is possible to put HTML and JavaScript files in SPIFFS to be served via HTTP. (Example: ESPAsyncWebServer can serve files from SPIFFS.) I implemented this concept for an ESP32-based Micro Sawppy controller, but that was using Espressif’s ESP-IDF framework inside the PlatformIO environment. There’s no direct counterpart for Arduino framework and Arduino IDE. Somebody has written an Arduino IDE extension to upload files to ESP32 SPIFFS, but that was last released in 2019 and as of writing is not yet compatible with latest version of Arduino IDE.

I could embed those files as strings directly in source code, but that means I have to review my HTML and JavaScript to make sure I’m not using any special characters. The most obvious requirement is exclusive use of single quotes and no double quotes. Any backslash would also have special meaning in Arduino source code. This can get annoying very quickly.

An alternative is to treat those files as binary files and embed them in source code as hexadecimal values. I’ve done this for embedding animated GIF data inside an Arduino sketch, and there’s a handy command to do so: “xxd -i index.html index.html.h” This uses xxd, a hex dump command-line utility included in Ubuntu distributions by default. I still have to modify the output file, though:

  1. Add “const” keyword to make sure it goes into flash storage instead of RAM.
  2. Remove “unsigned” keyword to fit with signature for WebServer server.send().
  3. Add a 0x00 to the end of the hex dump to null-terminate the string. (Technically it means I should add 1 to the “length” value as well, but I’m not using that value.)

This works, but still quite cumbersome. I’m not sure it’s better than the hassle of writing HTML and JavaScript in a C string compatible way. There has to be something better than either of these options, but until I find it, I’ll jump through these hoops. Fortunately, I only have to do this when updating files served by my ESP32. Most of the time I’m updating code and seeing how they work served from my development desktop, a much simpler process that made debugging challenges less of a headache than they already are.


Code for this project is publicly available on GitHub

HTML Location Matters for CORS and Mixed Content

I have written a basic browser-based UI to interact with an AS7341 spectral color sensor. I wanted an educational learning project and that’s exactly what I got. My first lesson happened before I could even get anything onscreen! I had my ESP32 translating a formatted HTTP GET request into a call into Arduino AS7341 library readAllChannels() and return the results as JSON. This basic browser-based UI was supposed to query that ESP32 and display results onscreen. In the interest of rapid development, I hosted the browser HTML and JavaScript files on my desktop, and that was my mistake. The HTTP GET action failed with this error message in the browser developer console:

Access to fetch at 'http://esp32-as7341.local/as7341?atime=29&astep=599&gain=8&led_ma=0' from origin 'http://localhost:8080' has been blocked by CORS policy: No 'Access-Control-Allow-Origin' header is present on the requested resource. If an opaque response serves your needs, set the request's mode to 'no-cors' to fetch the resource with CORS disabled.

As a beginner web developer, I had no idea what this error message meant. My journey of enlightenment started by searching for this error message, which led me to this page that unfortunately assumed more knowledge than I had. But this error message did suggest a solution of setting ‘no-cors’ which I tried without understanding what it meant. I no longer got the error message, but I didn’t get any data results, either. I read up on “What is an opaque response?” and confirmed data results were intended to be inaccessible. Well, that’s not going to work for me! So I went to MDN page on CORS. “Cross-Origin Resource Sharing” is something a web server has to explicitly choose to participate in, something my ESP32 Arduino sketch has not done. I decided it’s OK for arbitrary web pages to query my ESP32 and I could declare that with a single additional line added to my Arduino sketch (wildcard for Access-Control-Allow-Origin).

server.sendHeader("Access-Control-Allow-Origin", "*");

Once my ESP32 started sending that in its server headers, I could host browser HTML and JS from my desktop development server and enjoy the rapid code/test/fix/repeat loop of browser JavaScript code. But what about later? It would be a big hassle to require everyone to set up their own web server to play with this code. I thought I had a solution for that: host the browser UI on GitHub pages, but that idea was also a failure. When I tested the idea, I got this error:

Mixed Content: The page at 'https://roger-random.github.io/as7341_webui/' was loaded over HTTPS, but requested an insecure resource 'http://esp32-as7341.local/as7341?atime=29&astep=599&gain=8&led_ma=0'. This request has been blocked; the content must be served over HTTPS.

So much for that! I remember early days of the web when it was common to mix HTTP and HTTPS. My banking site was in HTTPS but used icons and images served over HTTP. This approach meant the server didn’t have to encrypt those images, saving CPU time and its follow-on effects. (Lower electricity consumption, less datacenter cooling, etc.) But it didn’t take long before nefarious geniuses figured out how to cause problems, so mixing HTTP and HTTPS went from commonplace, to triggering a notification, to triggering obnoxious dialogs, and now to complete ban. GitHub Pages would not serve over HTTP, and I’m not going to make everyone jump though the hoops of adding HTTPS to an ESP32 Arduino sketch.

To avoid problems with CORS and with Mixed Content, the best solution is to have my ESP32 Arduino sketch serve the HTML and JavaScript in addition to the AS7341 HTTP API endpoint. This turned out to be more complicated than I thought it would be.


Code for this project is publicly available on GitHub

Basic Browser UI for AS7341

I wrote an ESP32 Arduino sketch that exposes Adafruit AS7341 library readAllChannels() to be accessible via HTTP GET. Now I need to write browser-side code to use it. My first version will be bare bones: plain HTML and as little JavaScript as I can get away with. No consideration will be given for page layout aesthetics, so no CSS will be involved.

Input controls are direct translation of AS7341 parameters: atime, astep, and gain. Output will be JSON returned by my ESP32 sketch, direct with no processing. Making the AS7341 parameters more user-friendly is out of scope for this first version, as is any of the processing and visualization of AS7341 data. I want to do both in the future, but not at first. I wanted to start with this level of direct input/output because I intend to keep this first version around for debugging purposes: when my future fancy version goes awry, I want to be able to bring up this basic version to verify the sensor itself and the network API is still working correctly.

But I deviated from that bare-bones intent pretty quickly, because as soon as I started moving those setting sliders around, I wanted more. I added some JavaScript code to calculate the integration time (in milliseconds) described by atime and astep parameters, and I also added a slider to control milliamps of current to illuminate onboard LED during measurement. (Zero milliamps to turn LED off.) After a few measurements of LED flashing in my face, I added another parameter: whether or not to leave LED illuminated after taking a measurement. A steady-on LED is less annoying than a rapidly blinking one.

Another reason for keeping the user interface bare-bones is to verify all behind-the-scenes infrastructure are working as I expected. They did not! Debugging those failures led me to realize my ignorance with some security-related web development concepts. This is great: I wanted a learning project, and now I’m learning about “CORS” and “Mixed Content”.


Code for this project is publicly available on GitHub

ESP32 WebServer Made AS7341 Accessible via HTTP GET

I’ve decided to build an interactive AS7341 explorer application using web-based technologies, shifting most of the interactive input and visual output to a web browser. But web-based technologies are not able to communicate directly to an AS7341 via I2C, so I still need something to bridge the hardware to the browser. The answer is a small ESP32 Arduino Core sketch using Adafruit’s AS7341 library on one side and a web server library on the other.

In the interest of starting simple, I used the WebServer library included as part of ESP32 Arduino Core. This is a simple implementation of HTTP server that can only handle a single connection at a time, but its limited features also meant simple code. I started with the HelloServer example which does everything I need: parse arguments and send a response. The most informative section is the handler for “HTTP 404 Not Found”, as this is where it prints out all the arguments parsed out of the URI and serves as a handy reference to do the same in my implementation. I wanted to be able to pass in AS7341 parameters “atime” and “astep” to control sensor exposure time, “gain” for sensitivity, and “led_ma” to control brightness of illumination LED. These parameters are passed directly into Adafruit AS7341 API.

My first iteration would turn on LED just for the duration of sensor integration then turn it off. But when I read the sensor continuously in a loop, this would result in an annoying flash between reads. To address this problem, I added a “led_stay_on” parameter to control whether the illumination LED would stay on between reads.

Once sensor integration is complete, I packaged readings for sensors F1-F8, Clear, and NIR into a JSON formatted string and returned it to caller as mime type application/json.

{
  "415nm" : 7,
  "445nm" : 22,
  "480nm" : 31,
  "515nm" : 65,
  "555nm" : 113,
  "590nm" : 175,
  "630nm" : 243,
  "680nm" : 125,
  "clear" : 408,
  "nir" : 28,
  "settings" : {
    "atime" : 10,
    "astep" : 599,
    "gain" : 64,
    "led_ma" : 0
  }
}

In hindsight, using an ESP32 was overkill: an ESP8266 would have been perfectly capable of serving as a HTTP to I2C bridge. But I already had this ESP32 ready to go, so I stayed with it.

If I want capabilities beyond what that simple WebServer library could do, in the future I could swap it out for something more powerful like the ESPAsyncWebServer library. It includes a templating feature so I wouldn’t have to do as much direct string manipulation. It also includes the ArduinoJson library for simpler and more robust JSON formatting instead of the string operations I used. And finally, it includes WebSocket capability which would be very useful if I want to migrate the messy ESP-IDF code I wrote for my ESP32 Sawppy controller.

But for today, simple WebServer should be enough to let get me started on browser side code.


Code for this project is publicly available on GitHub

New Project: AS7341 Interactive Web UI

I’ve modified my ESP32 development board to help me better understand the AS7341 spectral color sensor. I’ve removed provision for Mozzi audio output, added heat-shrink tubing to reduce damage from handling, and covered a worryingly bright power LED on Adafruit’s AS7341 board. That takes care of the hardware, but what about the software?

Here are my goals:

  • Allow interactive adjustments to AS7341 parameters. Right now, I have to edit parameters in code, compile the Arduino sketch, and upload to my ESP32 before I can see how changes in parameters affect output. I want to streamline this process.
  • Better visualize AS7341 sensor data. Right now, I just receive a list of numbers. While sufficient for some fun experiments like Emily’s color organ, they are not the most intuitive presentation of vision-based data.
  • Rapid experimentation for sensor normalization. Every light source has a different spectrum, and every individual filter on the AS7341 has a different response curve. How do I compensate for those variations in a “good enough” way? AMS has an Application Note on precisely calibrating AS7341 results, but that requires domain specific expertise such as CIE color spaces. I want to be able to play with ideas and hope to find something that’s 80% as good for 10% of the effort.

For an ESP32, adding interactive adjustments should be easy. I can solder in a few potentiometers, and an ESP32 has plenty of ADC channels to let me pipe that through. I also have a lot of options for ESP32 display. My most recent Adafruit order (which included my AS7341 breakout board) included a small 1.8″ color LCD which would work well. Where this idea might fall apart is my wish for rapid experimentation. It only takes about thirty seconds for me to compile an ESP32 Arduino Core sketch and upload it to my ESP32 board, but that time adds up if I’m trying a lot of small changes in rapid succession. Wouldn’t it be nice if I could iterate as quickly as web development? In that world, I can make a small change and hit F5 to refresh my browser and see immediate results.

Then I realized: hey, I could totally do that! In fact, it would line up with my desire to practice working with web related technologies. Using HTML controls, I could quickly add points of interactivity. There would be no shortage of display options to visualize AS7341 data on screen, and I get that rapid edit/F5/result loop I wish for. Would this be the best way to interactively visualize AS7341 data? Probably not! But it’s a way for me to build my hardware and software skills simultaneously, making it a great learning project for my purposes. I will start by writing a thin stub running on my ESP32 to interact with AS7341, then I can get my feet wet with browser-side development.


Code for this project is publicly available on GitHub

Notes on Codecademy “Build a Website” Off-Platform Projects

Most Codecademy courses involve interactive learning inside their in-browser learning development environment, but occasionally we are directed to get off Codecademy platform and build something on our own. I have set up nginx as a local development web host (not the best use of nginx) serving files directly off a GitHub repository for these projects. This repository is, in turn, set up to host project content via GitHub pages. After this infrastructure is setup, I dove in to the off-platform project assignments of Built a Website with HTML, CSS, and Github Pages skill path.

The first project was “Dasmoto’s Arts & Crafts”, a relatively simple art shop landing page exercising a beginner’s level of HTML and CSS. We are given the images to use, and a specification of how the site should look. This was a practice exercise intended for us to run directly off local filesystem, without even a web server. But where’s the fun in that? I built this project locally, serving my files via nginx.

The next project was “Tea Cozy”, a more sophisticated tea shop landing page. This was from “Flexbox and Grid” section that pulled in most of the material of Learn CSS: Flexbox and Grid. Again, we are given a set of images to use, and a specification for how the site should look. This layout is far more complex than “Dasmoto’s Arts & Crafts” project, requiring use of (no surprise) flexbox and grid. I enjoyed the challenge of building “Tea Cozy” and I feel I have a much better grasp of flexbox & grid after this project.

Towards the end of the skill path was a project “Excursion”, a coming-soon phone app landing page. In addition to the images, we also had a video to embed. I had thought it be more of a skill practice than “Tea Cozy”, but it turned out to be far simpler with minimal layout challenges. The focus of this exercise was on GitHub Pages, a topic I had already put in the time to learn, so I blitzed through it relatively quickly. My only problem was trying to incorporate the copyright symbol, which wasn’t as simple as copy and pasting the Unicode character. A strange character gets added whenever I try to do so! I decided this problem wasn’t technically a HTML/CSS issue and punted.

And finally, we have a capstone project “Colmar Academy” educational institution landing page. We have a lot of added complexity in this project. This is the first project to require responsive layout, with both desktop and mobile views required. Some of the images provided had corresponding high-resolution desktop and low-resolution mobile versions. There was a video, and we even get a few icons in the form of SVG files. The specification we were given for this project was more loosely defined, with fewer explicit details, and we are to use our design sense to fill in the gaps. For example, it was up to us to decide where our media query breakpoints would be to transition between desktop and mobile views. This project took a lot of time, but it was time well spent because of everything I learned while doing it. At the moment, my biggest unsolved mystery is how to switch between desktop and mobile images from CSS. I couldn’t change the value of src property on an <img> tag from CSS! I ended up using two <img> tags, one with the desktop image and one with the mobile image and using CSS media query to set one of them to display: none; This feels inelegant, and I hope I learn a better way to do this in the future.


My code for these assignments are publicly visible on GitHub.

Notes on Codecademy “Build a Website with HTML, CSS, and Github Pages” Skill Path

After finishing Codecademy’s navigation design course, I thought it had some interesting information but it also spent too much time on CSS tricks I did not expect to be broadly applicable to future projects. Completing that course also meant I had covered majority of Codecademy’s courses under HTML & CSS section of the catalog. However, there are a few items listed that were not “Courses” so I thought I would check out a “Skill Path”. According to Codecademy, a skill path is focused on delivering the knowledge necessary to accomplish certain tasks. I paraphrase it as “Teach me what I need to know to accomplish X” versus a course which is more “Tell me about Y and how I might use it.”

In practice, judging by my first skill path “Build a Website with HTML, CSS, and Github Pages” (Or the shorter “Learn How to Build Websites” as per the URL) a skill path repackages a lot of components pulled from other Codecademy resources. Mostly individual lessons (modules?) but also other resources like their articles and blogs. After taking majority of Codecademy courses on HTML/CSS, going through this skill path was a little disorienting because their backend had tracked which modules I’ve already done. This meant that as soon as I clicked on starting this skill path, my progress was immediately over 50% complete. Looking over the skill path syllabus, I could see what I’ve already done and the gaps I still need to cover.

Most of the gaps were information presented Codecademy articles, covering things like how to set up a code editor like Visual Studio Code. (My personal choice.) Some of the gaps were modules on courses I hadn’t bothered to take, for example the command line course as I was already quite comfortable, but I was able to blitz through quickly.

A surprise was the gap on web accessibility. I thought this was an error as I had taken their Learn CSS Accessibility course, but the database is correct: this was a different course with material I had wished was in the CSS accessibility course. Starting with basic background and on to how to set up a screen reader for us to explore how these features will be consumed. I also appreciated more information on ARIA roles, where I learned we can put down some very fine-grained annotations for accessibility. There are a lot more ARIA roles than there are semantic HTML elements. It’ll take a lot of learning and practice to do ARIA well, but if the spec is too overwhelming, we can start with MDN’s introduction to ARIA.

I was heartened by this coverage of web accessibility but was then disappointed by its coverage of Font Awesome. Which I learned is a huge collection of icons (apparently not fonts as the name implies) available for use in websites. Icons are inherently compact way of visual communication, so we need to pay more attention to their use to ensure they are accessible. Unfortunately, not only did the course not cover how to maintain accessibility, it does not even mention accessibility as a concern when using icons.

One section I’m glad they put in this course is “Documentation and Research”. There’s no way for the course to cover everything, so it needs to teach people how to look stuff up on their own. For web developers, this means the holy trinity of MDN, Google, and StackOverflow. And for beginners who needed the exercise, a broken web site to fix by looking up the problems.

The real star of the skill path, though, are the off-platform projects. I like learning with Codecademy and its embedded interactive development environment. We can get a lesson side by side with sample code we can play with. However, these are all fairly basic fill-in-the-blank types of exercises. To be a web developer we need to be able to build a page from scratch, which is where these off-platform projects come in. We are given the assets (images and occasionally video) and a specification of what to build, but no templates. We had to create our own index.html and style.css from scratch and serve it up to in a browser to see our results. This course covered developing on the local file system, and using GitHub Pages, but I decided to add one more option to the mix: I thought it’d be a good exercise to setup nginx for local development hosting.

Notes on Codecademy “Learn Navigation Design”

I was definitely out of my depth with Codecademy’s color design course, but I was happy to absorb what I can and move on to another topic of novelty: Codecademy’s “Learn Navigation Design” course. Just as color could give subtle hints to the user on how to best interact with the site, so does applying good design to navigation elements. It’s something that we would rarely consciously notice until we encounter a poorly designed page, which is of course how this course started: by showing us an intentionally badly designed page and go up from there.

I was surprised that the first topic was how to show links on a page. After all the link styling in previous CSS courses and speaking of the user agent (browser default) stylesheet as a source of problems, this course presents the other side of the story: Hang on, guys, there are good reason they’re the way they are! And if we arbitrarily toss out all of those traits, site usability will suffer. Hover states are discussed here, and this time we’re reminded of their absence on touchscreen devices. We also get a link to MDN on pseudo-classes, information missing from the color design course!

Moving on from links to buttons, it started with an explanation of skeuomorphism vs. flat design for user interactive elements like buttons. This course covers examples for both styles. I’m personally a fan of the flat school of design. If somebody wants to do skeuomorphism on a button, I demand that they look like keys on an IBM Selectric typewriter.

After buttons the course talked about secondary navigation in the form of breadcrumbs on the page, usually found at the top of a site just before the header block. I appreciate an overview of the concept, but some of the examples get into fancy CSS tricks. I don’t think they’ll be generally applicable to all sites and I’m wary they degrade a page’s accessibility.

This navigation design course barely scratched the surface of User Experience (UX) design, but of course there’s an entirely separate Codecademy course “Introduction to UI and UX Design“. Looking over its syllabus, it doesn’t feel like the material would be useful in my personal tinkering projects. There’s also the fact that course was “Built in partnership with Figma” and the final section of the course is “Prototyping with Figma.” Is this course just an extended ad for Figma? I don’t know and at the moment I’m not terribly interested in finding out. At least Figma offers a free starter tier, if I decide to come back to this later.

Right now, I’m more curious about checking out Codecademy’s “Skill Path” offerings.

Notes on Codecademy “Learn HTML”

Almost seven years ago, I went through several Codecademy courses on web-related topics including their Learn HTML & CSS course, long since retired. The knowledge I learned back then were enough for me to build rudimentary web UI for projects including Sawppy Rover, but I was always aware they were very crude and basic. And my skill level was not enough to pull off many other project ideas I’ve had since. Web development being what they are, seven years is long enough for several generations of technologies to rise in prominence then fade into obscurity. Now I want to take another pass. Reviewing what I still remember and learn something new. And the most obvious place to start is their current Learn HTML course.

As the name made clear, this course focuses on HTML. Coverage of CSS has been split off to its own separate course, which I plan to take later, but first things first. I’m glad to see that basics of HTML haven’t changed very much. Basic HTML elements and how to structure them are still fundamental. The course then moves on to tables, which I had learned for their original purpose and also as a way to hack page layout in HTML. Thankfully, there are now better ways to perform page layout with CSS so <table> can revert to its intended purpose of showing tabulated data. Forms is another beneficiary of such evolution. I had learned them for their original purpose and also as a way to hack client/server communication. (Sawppy rover web UI is actually a form that repeatedly and rapidly submits information to the server.) And again, technologies like web sockets now exist for client/server communication and <form> can go back to just being forms for user-entered data.

The final section “Semantic HTML” had no old course counterpart that I could remember. HTML tags like <article> and <figure> are new to me. They add semantic information to information on the page, which is helpful for machine parsing of data and especially useful for web accessibility. This course covers a few elements, the full list can be found at other resources like W3Schools. I’m not sure my own projects would benefit much from sematic HTML but it’s something I want to make a natural habit. Learning about semantic HTML was a fun new addition to my review of HTML basics. I had originally planned to proceed to a review of CSS, but I put that on hold in favor of reviewing JavaScript.

Notes Of A Three.js Beginner: QuaternionKeyframeTrack Struggles

When I started researching how to programmatically animate object rotations in three.js, I was warned that quaternions are hard to work with and can easily bamboozle beginners. I gave it a shot anyway, and I can confirm caution is indeed warranted. Aside from my confusion between Euler angles and quaternions, I was also ignorant of how three.js keyframe track objects process their data arrays. Constructor of keyframe track objects like QuaternionKeyframeTrack accept (as their third parameter) an array of key values. I thought it would obviously be an array of quaternions like [quaterion1, quaternion2], but when I did that, my CPU utilization shot to 100% and the browser stopped responding. Using the browser debugger, I saw it was stuck in this for() loop:

class QuaternionLinearInterpolant extends Interpolant {
  constructor(parameterPositions, sampleValues, sampleSize, resultBuffer) {
    super(parameterPositions, sampleValues, sampleSize, resultBuffer);
  }
  interpolate_(i1, t0, t, t1) {
    const result = this.resultBuffer, values = this.sampleValues, stride = this.valueSize, alpha = (t - t0) / (t1 - t0);
    let offset = i1 * stride;
    for (let end = offset + stride; offset !== end; offset += 4) {
      Quaternion.slerpFlat(result, 0, values, offset - stride, values, offset, alpha);
    }
    return result;
  }
}

I only have two quaterions in my key frame values, but it is stepping through in increments of 4. So this for() loop immediately shot past end and kept looping. The fact it was stepping by four instead of by one was the key clue. This class doesn’t want an array of quaternions, it wants an array of quaternion numerical fields flattened out.

  • Wrong: [quaterion1, quaternion2]
  • Right: [quaterion1.x, quaterion1.y, quaterion1.z, quaterion1.w, quaternion2.x, quaternion2.y, quaternion2.z, quaternion2.w]

The latter can also be created via quaterion1.toArray().concat(quaternion2.toArray()).

Once I got past that hurdle, I had an animation on screen. But only half of the colors animated in the way I wanted. The other half of the colors went in the opposite direction while swerving wildly on screen. In a HSV cylinder, colors are rotated across the full range of 360 degrees. When I told them to all go to zero in the transition to a cube, the angles greater than 180 went one direction and the angles less than 180 went the opposite direction.

Having this understanding of the behavior, however, wasn’t much help in trying to get things working the way I had it in my head. I’m sure there are some amateur hour mistakes causing me grief but after several hours of ever-crazier animations, I surrendered and settled for hideous hacks. Half of the colors still behaved differently from the other half, but at least they don’t fly wildly across the screen. It is unsatisfactory but will have to suffice for now. I obviously don’t understand quaternions and need to study up before I can make this thing work the way I intended. But that’s for later, because this was originally supposed to be a side quest to the main objective: the Arduino color composite video out library I’ve released with known problems I should fix.

[Code for this project is publicly available on GitHub]

Notes Of A Three.js Beginner: Euler Angles vs. Quaternions

I was pretty happy with how quickly I was able to get a static 3D visualization on screen with the three.js library. My first project to turn the static display into an interactive color picker also went smoothly, giving me a great deal of self confidence for proceeding to the next challenge: adding an animation. And this was where three.js put me in my place reminding me I’m still only a beginner in both 3D graphics and JavaScript.

Before we get to details on how I fell flat on my face, to be fair three.js animation system is optimized for controlling animations created using content creation tools such as Blender. In this respect, it is much like Unity 3D. In both of these tools, programmatically generated animations are not the priority. In fact there weren’t any examples for me to follow in the manual. I hunted around online and found DISCOVER three.js, which proclaimed itself as “The Missing Manual for three.js”. The final chapter (so far) of this online book talks about animations. This chapter had an ominous note on animation rotations:

As we mentioned back in the chapter on transformations, quaternions are a bit harder to work with than Euler angles, so, to avoid becoming bamboozled, we’ll ignore rotations and focus on position and scale for now.

This is worrisome, because my goal is to animate the 256 colors between two color model layouts. From the current layout of a HSV cylinder, to a RGB cube. This required dealing with rotations and just as the warning predicted that’s what kicked my butt.

The first source confusion is between Euler angles and quaternions when dealing with three.js 3D object properties. Object3D.rotation is an object representing Euler angles, so trying to use QuaternionKeyframeTrack to animate object rotation resulted in a lot of runtime errors because the data types didn’t match. This problem I blame on JavaScript in general and not three.js specifically. In a strongly typed language like C there would be an error indicating I’ve confused my types. In JavaScript I only see errors at runtime, in this case one of these two:

  1. When the debug console complains “NaN error” it probably meant I’ve accidentally used Euler angles when quaternions are expected. Both of those data types have fields called x, y, and z. Quaterions have a fourth numeric field named w, while Euler angles have a string indicating order. Trying to use an Euler angle as quaternion would result in the order string trying to fit in w, which is not a number hence the NaN error.
  2. When the debug console complains “THREE.Quaternion: .setFromEuler() encountered an unknown order:” it means I’ve done the reverse and accidentally used Quaternion when Euler angles are expected. This one is fortunately a bit more obvious: numeric value w is not a string and does not dictate an order.

Getting this sorted out was annoying, but this headache was nothing compared to my next problem: using QuaternionKeyframeTrack to animate object rotations.

[Code for this project is publicly available on GitHub]

Notes Of A Three.js Beginner: Color Picker with Raycaster

I was pleasantly surprised at how easy it was to use three.js to draw 256 cubes, each representing a different color from the 8-bit RGB332 palette available for use in my composite video out library. Arranged in a cylinder representing the HSV color model, it failed to give me special insight on how to flatten it into a two-dimension color chart. But even though I didn’t get what I had originally hoped for, I thought it looked quite good. So I decided to get deeper into three.js to make this more useful. Towards the end of three.js getting started guide is a list of Useful Links pointing to additional resources, and I thought the top link Three.js Fundamentals was as good of a place to start as any. It gave me enough knowledge to navigate the rest of three.js reference documentation.

After several hours of working with it, my impression is that three.js is a very powerful but not very beginner-friendly library. I think it’s reasonable for such a library to expect that developers already know some fundamentals of 3D graphics and JavaScript. From there it felt fairly straightforward to start using tools in the library. But, and this is a BIG BUT, there is a steep drop if we should go off the expected path. The library is focused on performance, and in exchange there’s less priority on fault tolerance, graceful recovery, or even helpful debugging messages for when things go wrong. There’s not much to prevent us from shooting ourselves in the foot and we’re on our own to figure out what went wrong.

The first exercise was to turn my pretty HSV cylinder into a color picker, making it an actually useful tool for choosing colors from the RGB332 color palette. I added pointer down + pointer up listeners and if they both occurred on the same cube, I change the background color to that color and display the two-digit hexadecimal code representing that color. Changing the background allows instant comparison to every other color in the cylinder. This functionality requires the three.js Raycaster class, and the documentation example translated across to my application without much fuss, giving me confidence to tackle the next project: add the ability to switch between HSV color cylinder and RGB color cube, where I promptly fell on my face.

[Code for this project is publicly available on GitHub]

HSV Color Wheel of 256 RGB332 Colors

I have a rectangular spread of all 256 colors of the 8-bit RGB332 color cube. This satisfies the technical requirement to present all the colors possible in my composite video out library, built by bolting the Adafruit GFX library on top of video signal generation code of rossumur’s ESP_8_BIT project for ESP32. But even though it satisfies the technical requirements, it is vaguely unsatisfying because making a slice for each of four blue channel values necessarily meant separating some similar colors from each other. While Emily went to Photoshop to play with creative arrangements, I went into code.

I thought I’d look into arranging these colors in the HSV color space, which I was first exposed to via Pixelblaze I used in my Glow Flow project. HSV is good for keeping similar colors together and is typically depicted as a wheel of colors with the angles around the circle corresponding to the H or hue axis. However, that still leaves two more dimensions of values: saturation and value. We still have the general problem of three variables but only two dimensions to represent them, but again I hoped the limited set of 256 colors could be put to advantage. I tried working through the layout on paper, then a spreadsheet, but eventually decided I need to see the HSV color space plotted out as a cylinder in three dimensional space.

I briefly considered putting something together in Unity3D, since I have a bit of familiarity with it via my Bouncy Bouncy Lights project. But I thought Unity would be too heavyweight and overkill for this project, specifically because I didn’t need a built-in physics engine for this project. Building a Unity 3D project takes a good chunk of time and imposes downtime breaking my trains of thought. Ideally I can try ideas and see them instantly by pressing F5 like a web page.

Which led me to three.js, a JavaScript library for 3D graphics in a browser. The Getting Started guide walked me through creating a scene with a single cube, and I got the fast F5 refresh that I wanted. In addition to rendering, I wanted a way to look around a HSV space. I found OrbitControls in the three.js examples library, letting us manipulate the camera view using a pointer device (mouse, touchpad, etc.) and that was enough for me to get down to business.

I wrote some JavaScript to convert each of the 256 RGB values into their HSV equivalents, and from there to a HSV coordinate in three dimensions. When the color cylinder popped up on screen, I was quite disappointed to see no obvious path to flatten that to two dimensions. But even though it didn’t give me the flash of insight I sought, the layout is still interesting. I see a pattern, but it is not consistent across the whole cylinder. There’s something going on but I couldn’t immediately articulate what it is.

Independent of those curiosities, I decided the cylinder looks cool all on its own, so I’ll keep working with it to make it useful.

[Code for this project is publicly available on GitHub]