And Now I’m Up To (Most Of) Five 3D Printers

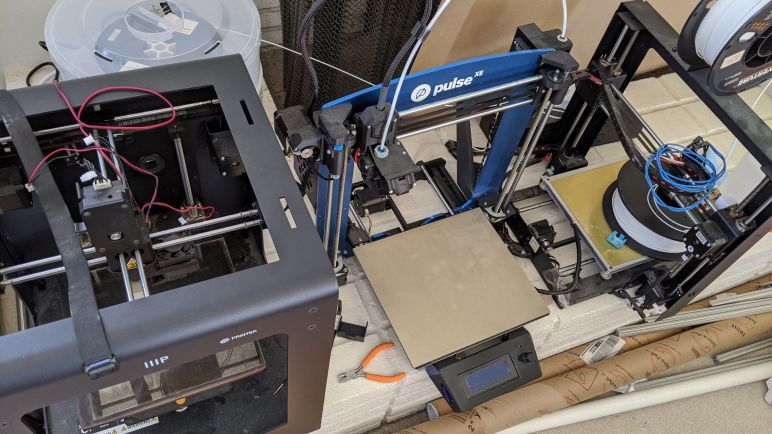
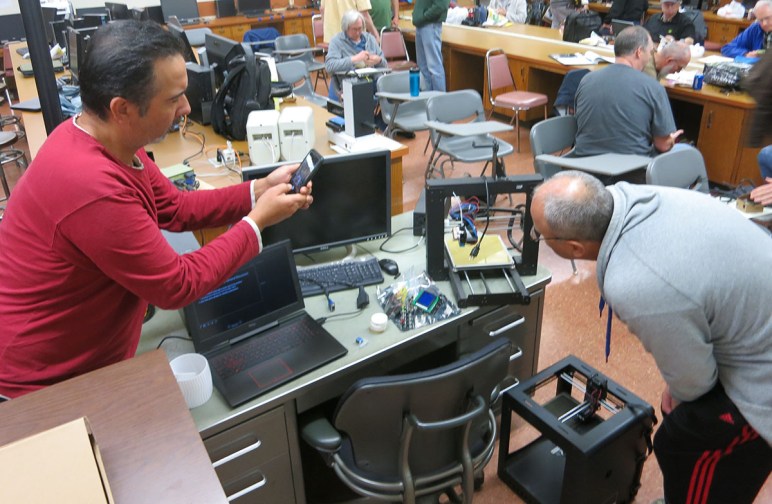
When I first got started in 3D printing, I was well aware of the trend for enthusiasts in the field to quickly find themselves with an entire flock of them. I can confirm that stereotype, as now I am in the possession of (most of) five printers.

My first printer, a Monoprice Select Mini, was still functional but due to its limitations I had not used it for many months. I had been contemplating taking it apart to reuse its parts. When I talked about that idea with some local people, I found a mutually beneficial trade: in exchange for my functioning printer, I traded it for a nearly identical but non-functioning unit to take apart.

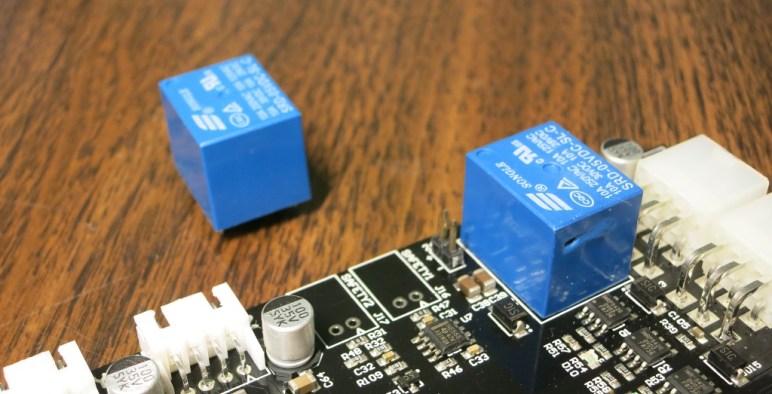
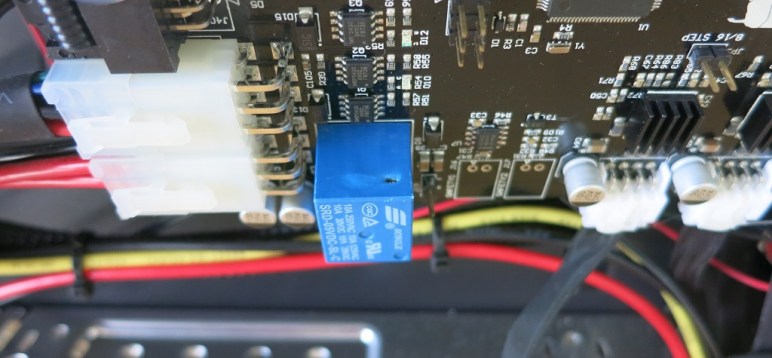
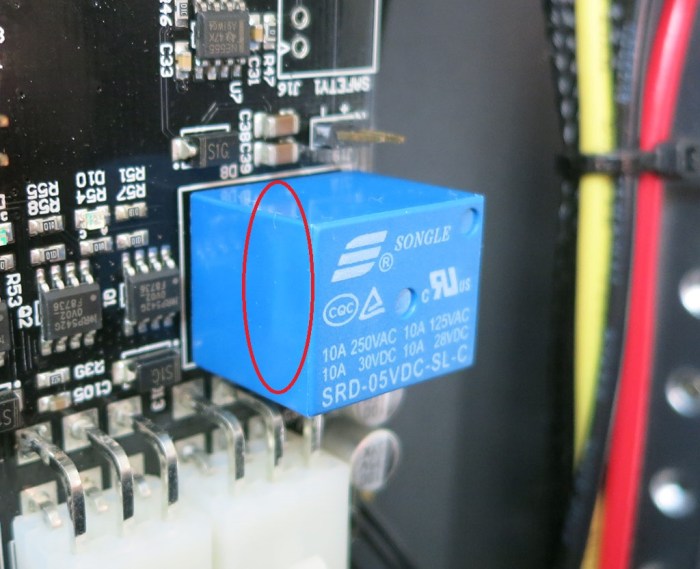
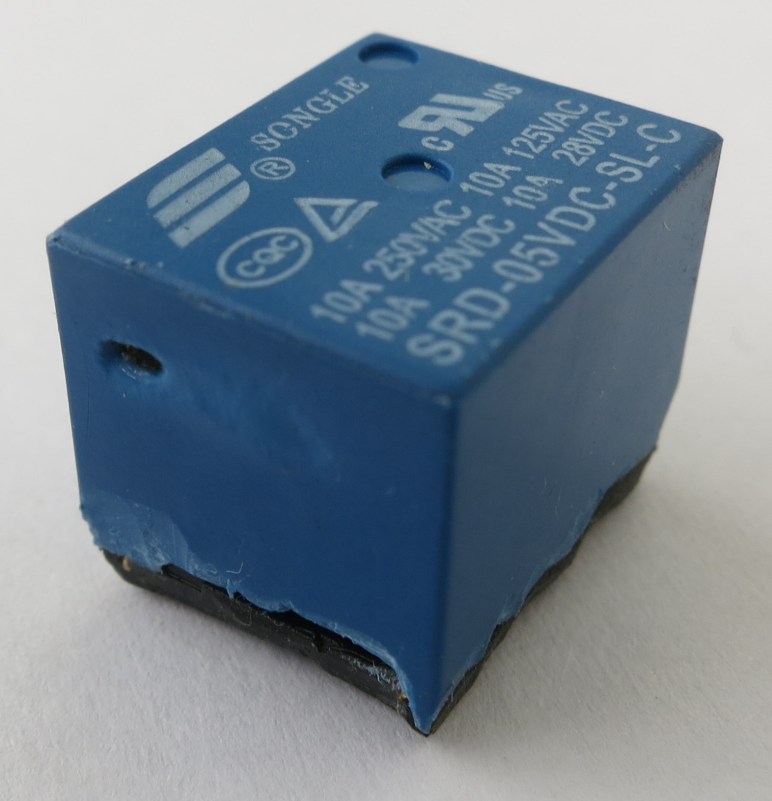
My second, a Monoprice Maker Ultimate, has experienced multiple electrical failures with an infamous relay, and I suspect those failures had secondary repercussions that triggered other failures in the system. It is currently not working and awaiting a control board upgrade.

My third printer, a Monoprice Maker Select, was very affordable but there were trade-offs made to reach that price point. I’ve since had to make several upgrades to make it moderately usable, but it was never a joyous ownership experience.

Those three printers were the topic of the tale of 3D printing adventures I told to Robotics Society of Southern California. One of my parting advise was that, once we get to the ~$700 range of the Maker Ultimate, there were many other solid options. The canonical default choice is a Prusa i3 and I came very close to buying one of my own several times.

What I ended up buying is a MatterHackers Pulse, a derivative of the Prusa i3. I bought it during 2019’s “Black Friday” sale season, when MatterHackers advertised their Pulse XE variant at a hefty discount. Full of upgrades that I would have contemplated installing anyway, it has performed very well and I can happily recommend this printer.

Why would I buy a fifth printer when I had a perfectly functioning Pulse XE? Well, I wouldn’t. I didn’t get this printer because it was better, I picked it up because it was free. I have some motion control (not 3D printing) projects on the candidate list and a retired partial Geeetech A10 printer may prove useful.

Monoprice Maker Ultimate (Wanhao Duplicator 6) Dead Again But This Time It Was Not The Relay

My Monoprice Maker Ultimate (branded variant of Wanhao Duplicator 6) is dead again. This has happened before, but this time is different. Previously, the main 24V relay would die of overwork, and when that happens all stepper motor and cooling fan activity stopped while the display UI thinks it’s business as usual. This time around, the fans turn on but the display was dark.

Since the primary user interface was dark, the first order of business was to see if it’s just a dead display or if the problem went deeper. As a data point I tried an alternate control scheme: I put OctoPrint on my laptop and attempted to communicate with the printer via USB serial. This was only intermittently successful, and even when communication was established, it would quickly disconnect. So it’s not just the display that was dead, but the printer isn’t entirely dead, either.

Suspecting a bad power supply, all voltage output lines were measured and power levels would dip occasionally. Eventually we figured out something was causing the main system board to reset on a regular basis, and upon every reset, there would be a brief spike in power draw.

Diagnostics moved on to unplugging components one at a time from the control board to see which component is overloading the system. The printer powered on and stayed on once I unplugged the wires for the front control panel and display.

Maker Ultimate front panel disconnected

Removing the display and control panel, we took a closer look at the circuit board and found our culprit: component U3 has suffered some calamity that caused the chip inside to burn a hole in its casing.

Maker Ultimate fried U3

Judging by surrounding traces, U3 had some sort of power management role. It has either failed short, or it has failed open causing some other component to trigger a system reset.

With the display and user control panel disconnected, I could control the printer via USB using OctoPrint. However, this did not eliminate the random system resets, it just made it much less frequent. Apparently there was more damage elsewhere on the system. Unless the source could be found and repaired, it will be time for an upgrade of this printer’s main control board.

My Monoprice 3D Printers at February 2019 RSSC Meeting

When I presented the story of my Sawppy rover project last month at the January 2019 meet of Robotics Society of Southern California (RSSC) I made an offhand comment about my 3D printers. Later on, in a discussion on potential speakers, there were people who wanted to know more about 3D printers and I offered to summarize my 3D printer experience in a follow-on talk. Originally scheduled for March, I asked to be rescheduled when I realized the March RSSC meet would take place at the same time as Southern California Linux Expo (SCaLE).

My talk (presentation slide deck) starts with a disclaimer that my experience and knowledge was limited. I started by explaining why I chose Monoprice printers backed by a short history lesson on Monoprice because that sets the proper expectations. Then I ran through my three Monoprice printers: the Select Mini, the Maker Select V2, and the Maker Ultimate. Each of these printers had their strengths and weaknesses.

Monoprice Select Mini

  • Simple low-cost printer that still covers all the basic concepts of FDM printers.
  • Closest we have to a “Fisher Price My First 3D Printer”
  • Recommended for beginners to find out if they’ll like 3D printing.

Monoprice Maker Select

  • Classic Prusa i3 design.
  • Easiest to take apart for modifications and/or repairs.
  • Recommended for people who like to tinker with their equipment.

Monoprice Maker Ultimate

  • Design “inspired by” Ultimaker.
  • Highest precision and most reliable operation.
  • Recommended for people who just want their equipment to work.
  • But price level approaches that of many other good printers, like a genuine Prusa i3.

I brought my printers to the meet so interested people can look them over up close. I did not perform any print demos, because I’ve almost certainly knocked the beds out of level during transit. Plus, I forgot my spools of filament at home. But these are robotics people, they can gain a lot just by looking over the mechanical bits.

Charred Liner Needs To Be Replaced in Monoprice Maker Ultimate (Wanhao Duplicator i6)

I’ve had my Monoprice Maker Ultimate for about a year and a half now. It has been the workhorse behind many, many projects in that time. Including some fairly major projects Luggable PC (both Mark I and Mark II) and Sawppy the Rover. The major projects usually demanded around-the-clock printing for weeks on end, and the only real problem it has given me was the 24V relay that died. Twice.

Towards the end of getting Sawppy to version 1.0, I had been printing in PETG on my Maker Select, leaving the Maker Ultimate mostly unused in the home stretch. After I reached a pausing point for Sawppy, I came back to the Ultimate for a few quick prints because it was still loaded with inexpensive PLA…. and the print failed halfway from insufficient extrusion.

I had thought it was a clogged nozzle which wouldn’t be a big deal, but after clearing the nozzle with the 0.4mm drill bit and running the cleaning filament, the problem persisted. Fortunately, I recognize the symptoms from a hard-learned lesson on the Maker Select – the PTFE liner tube is damaged and needed to be replaced.

This particular liner tube wasn’t abused with high temperature like it was on a Maker Select trying to print PETG fast. But internet consensus seems to be that the liner tube is accepted as a wear-and-tear item that eventually requires replacement even under ideal usage. So – probably not indicative of anything wrong here, it’s just time.

Removing the jammed nozzle the printer immediately unveiled a charred tube.

Liner Charred

It took some heat and persuasion to remove the old tube, which stretched in the process of removal. We can see there was quite a bit of cruft welding the tube to the nozzle.

Liner Removed

Interestingly, there are two distinct and separate areas of browning. The print tip was expected. The middle charred section would be right around the length of the heating block and makes sense as one of the hottest sections this tube had to endure. It’s a bit of a surprise that we still have a little white section between them, though.

Anyway, it’s clear this tube has put in a long and productive career guiding filament into the nozzle, but it’s time for a replacement which brought the printer back up and running.

Monoprice Maker Ultimate (Wanhao Duplicator i6) Kills Another Relay

I was willing to stop at “good enough for now” on modifying my open-box Monoprice Maker Select because I needed printers up and running. In the process of designing and iterating Sawppy‘s 3D-printed components, I kept both printers busy pumping out prototypes to see how the designs in my mind survived the translation into real world pieces.

Sometimes there was enough work to keep printers busy around the clock, and this was too much stress for the control boards inside these affordable printers. It’s an inevitable tradeoff between price tag and robustness. In the case of my Monoprice Maker Ultimate, the weakest point in the chain is the main motor relay that controls power going to all the motors (both stepper motors and fan motors) and heaters.

This relay has failed once before, and under the constant workload, another one has kicked the bucket. It has started failing intermittently which shows up as brief interruption in motor power. Since the electronics are not powered through this path, these brief interruptions ruined prints, making them look like the motor drive belt had skipped a few teeth when the reality was the motors stopping briefly as the electronics continued onwards.

Last time this happened, I kept trying to diagnose belt skipping. Wasting a lot of time looking over mechanical parts that were working well. This time I recognize the symptoms and pulled out the control board before the printer failed completely.

Since it wasn’t completely burned out yet, the relay exterior didn’t look bad – only a minor discoloration that might have gone overlooked if we didn’t know exactly where to look.

Relay exterior discoloration

Cutting away the relay’s blue enclosure exposed a familiar sight: the interior is fried.

D6 Second Failed Relay

It’s always easier to do something the second time, but addressing my second fried relay is still time spent not working on the project itself.

Teardown Monoprice Maker Ultimate (Wanhao Duplicator 6) Failed Relay

This is the main 24V relay on the control board of my Monoprice Maker Ultimate 3D printer, which is a rebadged and lightly modified variant of Wanhao Duplicator 6. An earlier blog post figured out why it died. (Short summary: the printer design drove this relay beyond its rated limit of 10A @ 24V.) Today let’s look closer at how it died.

There were clear visual indication of relay failure in the form of a heat-distorted casing with a hole melted into it. There were no fasteners to release so the case had to be cut free from the base. Once the case was removed, we could see the guts of the relay.

Relay 20 - OpenLooking at the inside of the just-removed case, we can see a lot of heat damage. Black char marks the hottest areas, and discolored white marked the rest.

Relay 40 - Charred Case
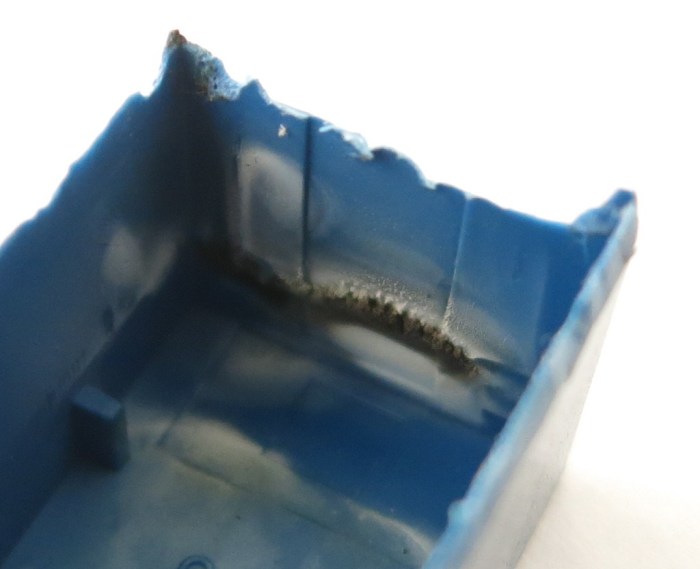
It’s a fairly straightforward relay, with the coil actuating an armature moving between contacts on either the plate above or below it. The armature+contact area is immediately behind the blacked charred bits of the case. And looking at the armature and contacts themselves, we see the relay died an unhappy death.

Relay 30 - Distorted Contact
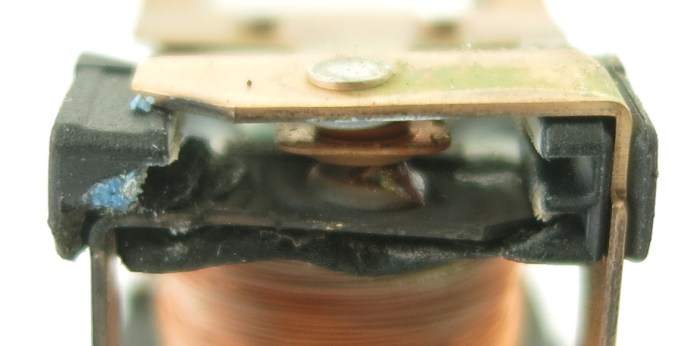
Everything in the contact area is distorted and/or charred. There is a black plastic-feeling piece holding everything in position relative to each other, and it could no longer do its job with heat distorting it and moved things out of alignment. Between the armature and the bottom contact is a blob of melted something that looks vaguely like solder. The bits of blue visible are parts of the blue casing that has melted onto this assembly. While the top contact looks OK in this picture, the side facing the armature is just as blackened and charred as the visible face of the bottom contact. The armature itself is barely visible here but it is actually discolored and distorted near the contacts.

From the Facebook user’s group, I’ve learned more recent revisions of the printer used a relay from the SRU product line to replace this SRD unit. I’m still trying to find a data sheet for the newer relay. I would hope that it is a drop-in replacement rated for at least 15A @ 24V, preferably 20A. And hopefully it would not die like this SRD-05VDC-SL-C relay did.

Relay Replaced Instead of Bypassed on Monoprice Maker Ultimate (Wanhao Duplicator 6)

After the due diligence investigation of my broken Monoprice Maker Ultimate (a rebadged Wanhao Duplicator 6) I determined my unit has indeed suffered the known common failure of the main 24V relay. I was also satisfied as to the cause of the failure – it was the consequence of engineering design decision I disagreed with, driving a relay far above its rated rating of 10 amps. But I was unsatisfied with the internet forum wisdom of bypassing the relay when it fails. I thought it had a useful purpose to serve and should be replaced instead of bypassed.

I ordered a replacement (or more accurately a pack of them (*), since it makes little sense to buy or sell a single unit of something so cheap) and got to work once they showed up. The first order of business was to get out the label machine and label all the wires connected to the control board so I know where everything plugged back in. The wires were held in place with dabs of hot glue to resist them from being shaken loose in transit, those globs had to be removed before I could disconnect the wires. After that’s done, the board came out easily.

Before I started de-soldering anything, I performed a quick verification test on the new relay: I connected 5V across the control pins and heard a reassuring “click”. Multi-meter confirmed that the continuity shifted from the NC (Normally Closed) to NO (Normally Open) pin as expected.

After that, it’s time to heat up the soldering iron. Normally I would label the old component “BAD” before starting on the project, to make sure I don’t de-solder a broken component and inadvertently soldered the bad item right back onto the board. (This is the voice of experience speaking.) But in this case, the melted hole is a pretty good way for me to tell which is the bad one.

It takes some effort to de-solder a component with 5 large pins like this relay, but nothing tricky. It just requires a lot of patience with the de-soldering tools at hand. And once done, the new relay soldered into place easily.

With this replacement, my 3D printer is back in action with all original functionality intact.


(*) Disclosure: As an Amazon Associate I earn from qualifying purchases.

Investigating the Infamous Relay Bypass for Monoprice Maker Ultimate (Wanhao Duplicator 6)

This week my 3D printer stopped working mid-print. All motor movement, heating activity, and cooling fans stopped simultaneously. However, the control panel is still responsive and so is the LED light strip. Time to hit the web and see what I can find.

My printer is a Monoprice Maker Ultimate, which is a rebranded Wanhao Duplicator 6. Which is in turn a knock-off of the Ultimaker design, though not a literal clone of any specific Ultimaker model.

A web search of my symptoms found a known point of failure with this product: the main 24V relay. The popular explanation is that Wanhao cloned somebody else’s circuit board, removed the features that would use the relay, and used a cheap relay that’s always on. So the recommended workaround is to solder a wire to bridge the legs of the relay and bypass it. “It doesn’t do anything anyway.”

I was skeptical of this explanation because if Wanhao is really just cutting costs, they would skip the relay entirely: no relay is cheaper than any relay! There must be more to this story.

But first, a check to see if the relay is indeed the fault. A quick visual inspection confirmed that there’s a problem with my relay, indicated by the melted hole in the side. For additional confirmation, we temporarily bridged the pins as recommended by forum posters. When done with the power on, it brought the always-on heat break and circuit board cooling fans immediately to life. Relay failure confirmed.


What does the relay do?

Turning off this relay cuts power to all 24V components: Motors, fans, and heaters. In normal operation, there’s no situation where the 5V components (micro-controller, display, LED strip) are running without the 24V components, so the answer must be related to abnormal operation. Our best hypothesis: this relay is a safety switch in place to halt the system if the 5V subsystem should fail. If that happens, it makes sense we’d want to shut down all the 24V parts too. And now that we have a plausible description of the relay as a safety feature, bypassing it with a soldered wire seems like a bad idea.

Why did the relay fail?

This part was easier to figure out. When I ran my printer with my Kill-A-Watt meter, it indicated the power draw jumps by over 300 watts when both heaters are active. So even ignoring the cooling fans and motors, the print bed and filament heaters together draw over 12.5 amps from the 24V plane.

Typing in the designation on the relay “SRD-05VDC-SL-C” found its datasheet, which says the relay can handle 10 amps. So the printer was designed such that the relay exceeded its rated capacity anytime both heaters are active. Not exactly a great design. The relay tolerated this overworked condition for many months but this week it could take no more.

The correct solution, then, would be to replace this relay with a higher-rated unit that can handle 15+ amps continuously. (12.5 for heaters + motors and fans + margin.) Unfortunately relays are not standardized in their footprint so I failed to find a drop-in higher-capacity replacement. (I found the Omron G5LE series with the same footprint, but with the same 10A maximum for DC so I’d be no better off.) Hooking up a beefier relay to the circuit board via wires is a possibility but intimidating. 300 watts of electricity is very good at finding minor flaws and turning them into big problems.

What do we do?

To summarize, the candidate solutions are:

  1. Bypass the relay with a wire as per internet forums: Seems like a bad idea to bypass a potential safety feature.
  2. Install an exact replacement: Known to work until it doesn’t.
  3. Install a higher-rated drop-in replacement: Great idea but such a replacement could not be found.
  4. Install a higher-rated unit elsewhere in the box, connect to the circuit board via wires: Adds many points of potential failure and >300W of power is unforgiving of flaws.

I’d love #3 but I couldn’t find a beefier relay with identical footprint. #1 and #4 are asking for trouble. For the immediate future, I choose #2 as the least-bad solution.


UPDATE 1: After the original relay was replaced with an identical unit, I cut open the original relay to see inside the failure.

UPDATE 2: As expected, the identical unit eventually failed in an identical way.