OpenCV AI Kit

For years I’ve been trying to figure out how to do machine vision affordably so I could build autonomous robots. I looked at hacking cheap LIDAR from a Neato robot vacuum. I looked at an old Kinect sensor bar. I looked at Google AIY Vision. I looked at JeVois. I tried to get a grounding in OpenCV. And I was in the middle of getting up to speed on Google ARCore when the OpenCV AI Kit (OAK) Kickstarter launched.

Like most Kickstarters, the product description is written to make it sound like a fantastic dream come true. The difference between this and every other Kickstarter is that it is describing my dream of an affordable robot vision sensor coming true.

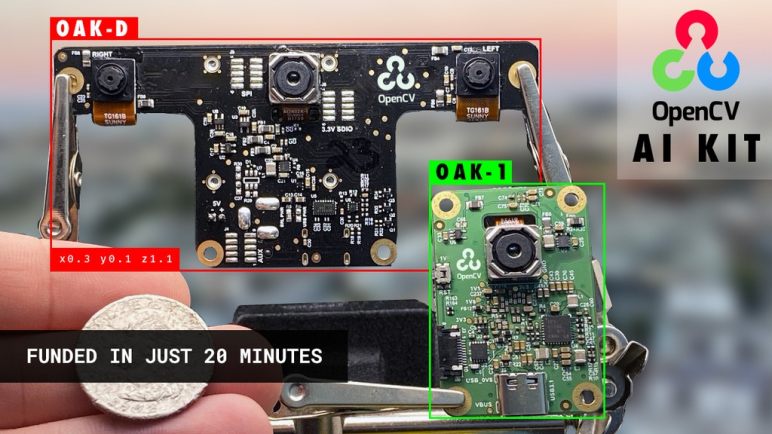
The Kickstarter is launching two related products. The first is OAK-1, a single camera backed by hardware acceleration for computer vision algorithms. This sounds like a supercharged competitor to machine vision cameras like the JeVois and OpenMV. However, it is less relevant to a mobile autonomous robot than its stablemate, the OAK-D.

Armed with two cameras for stereoscopic vision plus a third for full color high resolution image capture, the OAK-D promises a tremendous amount of capability for (at least the current batch of backers) a relatively affordable $149. Both from relatively straightforward stereo distance calculations to more sophisticated inferences (like image segmentation) aided by that distance information.

Relatively to the $99 Google AIY Vision, the OAK-D has far more promise for helping a robot understand the structure of its environment. I hope it ships and delivers on all its promises, because then an OAK-D would become the camera of choice for autonomous robot projects, hands down. But even if not, it is still a way to capture stereo footage for calculation elsewhere, and only moderately overpriced for a three-camera peripheral. Or at least, that’s how I justified backing an OAK-D for my own experiments. The project has easily surpassed its funding goals, so now I have to wait and see if the team can deliver the product by December 2020 as promised.

Notes On OpenCV Outside of Python

It was fun taking a brief survey of PyImageSearch.com guides for computer vision, and I’m sure I will return to that site, but I’m also aware there are large areas of vision which are regarded as out of scope.

The Python programming language is obviously the focus of that site as it’s right in the name PyImageSearch. However, Python is not the only or even the primary interface for OpenCV. According to official OpenCV introduction, it started as a C library which has since moved to a C++ API. Python is but one of several language bindings on top of that API.

Using OpenCV via Python binding is advantageous not only because of Python itself, it also opens access to a large world of Python libraries. The most significant one in this context is NumPy. Other languages may have similar counterparts, but Python and NumPy together is a powerful combination. There are valid reasons to use OpenCV without Python, but they would have to find their own counterparts to NumPy for their number crunching heavy lifting.

Just for the sake of exercise, I looked at a few of the other platforms I recently examined.

OpenCV is accessible from JavaScript, or at least Node.JS, via projects like opencv4nodejs.  This also means OpenCV can be embedded in desktop applications written in ElectronJS, demonstrated with this example project of opencv-electron.

If I wanted to use OpenCV in a Universal Windows Platform app, it appears some people have shared some compiled form of OpenCV up to Microsoft’s NuGet repository. As I understand it, NuGet is to .NET as PyPI is to Python. Maybe there are important differences but it’s a good enough analogy for a first cut. Microsoft’s UWP documentation describes using OpenCV via a OpenCVHelper component. And since UWP can be in C++, and OpenCV is in C++, there’s always the option of compiling from source code.

As promising as all this material is, it is merely the foundation for applying computer vision to the kind of problems I’m most interested in: helping a robot understand its environment for mapping, obstacle avoidance, and manipulation. Unfortunately that field starts to get pretty complex for a casual hobbyist to pick up.

Notes After Skimming PyImageSearch

I’m glad I learned of PyImageSearch from Evan and spent some time to sit down to look it over. The amount of information available on this site is large enough that I resorted to skimming, with the intent to revisit specific subjects later as need arise.

I appreciate the intent of making computer vision accessible to beginners, it is always good to make sure people interested in exploring an area are not frustrated by problems unrelated to the problem domain. Kudos to the guides on command line basics, and on Python’s NoneType errors that are bewildering to beginners.

That said, this site does frequently dive into areas that I felt lacked sufficient explanation for beginners. I remember the difficulty I had in understanding how matrix math related to computer graphics. The guide on rotation discussed the corresponding rotation matrix. Readers got the assurance “This matrix looks scary, but I promise you: it’s not.” but the explanation that followed would not have been enlightening to me back when I was learning the topic. Perhaps a link to more details would be helpful? Still, the effort is appreciated.

There are also bits of Python code that would be confusing to a beginner. Not just Python itself, but also when leveraging the very powerful NumPy library. I had no idea what was going on between tuple and argmin in the code on this page:

extLeft = tuple(c[c[:, :, 0].argmin()][0])

Right now it’s a black box of voodoo magic to me, a sting of non-alphanumeric operators that more closely resemble something I associated with Perl programming. At some point I need to sit down with Python documentation to work through this step by step in Python REPL (read – evaluation – print loop) to understand this syntax. It would be good if the author included footnotes with links to the appropriate Python terminology for these operations.

A fact of life of learning from information on PyImageSearch is the sales pitch for the author’s books. It’s not necessarily a good thing or a bad thing, but it is very definitely a thing. Constant and repetitive reminder “and in my book you will also learn…” on every page. This site exists to draw people in and, if they want to take it further, sell them on the book. I appreciate this obviously stated routine over the underhanded ways some other people make money online, but that doesn’t make it any less repetitive.

Likely related to the above is the fact this site also wants to collect e-mail addresses. None of the code download links takes us to an actual download, they instead take us to a form where we have to fill in our e-mail address before we are given a link to download. Fortunately the simple bits I’ve followed along so far are easy to recreate without the download but I’m sure it will be unavoidable if I go much further.

And finally, this site is focused on OpenCV in Python running on Unix-derived operating systems. Other language bindings for  OpenCV are out of scope, as is the Windows operating system. For my project ideas that involve embedded platforms without Python, or those that will be deployed on Windows, I would need to go elsewhere for help.

But what is within scope is covered well, with an eye towards beginner friendliness, and available freely online in a searchable collection. For that I am thankful to the author, even as I acknowledge that there are interesting OpenCV resources beyond this scope.

Skimming Remainder Of PyImageSearch Getting Started Guide

Following through part of, then skimming the rest of, the first section of PyImageSearch Getting Started guide taught me there’s a lot of fascinating information here. Certainly more than enough for me to know I’ll be returning and consult as I tackle project ideas in the future. For now I wanted to skimp through the rest and note the problem areas it covers.

The Deep Learning section immediately follows the startup section, because they’re a huge part of recent advancements in computer vision. Like most tutorials I’ve seen on Deep Learning, this section goes through how to set up and train a convolutional neural network to act as an image classifier. Discussions about training data, tuning training parameters, and applications are built around these tasks.

After the Deep Learning section are several more sections, each focused on a genre of popular applications for machine vision.

  • Face Applications start from recognizing the presence of human faces to recognizing individual faces and applications thereof.
  • Optical Character Recognition (OCR) helps a computer read human text.
  • Object detection is a more generalized form of detecting faces or characters, and there’s a whole range of tools. This will take time to learn in order to know which tools are the right ones for specific jobs.
  • Object tracking: once detected, sometimes we want an object tracked.
  • Segmentation: Detect objects and determine which pixels are and aren’t part of that object.

To deploy algorithms described above, the guide then talks about hardware. Apart from theoretical challenges, there’s also hardware constraint that are especially acute on embedded hardware like Raspberry Pi, Google Coral, etc.

After hardware, there are a few specific application areas. From medical computer vision, to video processing, to image search engine.

This is an impressively comprehensive overview of computer vision. I think it’ll be a very useful resource for me in the future, as long as I keep in mind a few characteristics of this site.

Skimming “Build OpenCV Mini-Projects” by PyImageSearch: Contours

Getting a taste of OpenCV color operations were interesting, but I didn’t really understand what made OpenCV more powerful than other image processing libraries until we got to contours, which covers most of the second half of PyImageSearch’s Start Here guide Step 4: Build OpenCV Mini-Projects.

This section started with an example for finding the center of a contour, which in this case is examining a picture of a collection of non-overlapping paper cut-out shapes. The most valuable concept here is that of image moments, which I think of as a “summary” for a particular shape found by OpenCV. We also got names for operations we’ve seen earlier. Binarization operations turn an image into binary yes/no highlight of potentially interesting features. Edge detection and thresholding are the two we’ve seen.

Things get exciting when we start putting contours to work. The tutorial starts out easy by finding the extreme points in contours, which breaks down roughly what goes on inside OpenCV’s boundingRect function. Such code is then used in tutorials for calculating size of objects in view which is close to a project idea on my to-do list.

A prerequisite for that project is code to order coordinates clockwise, which reading the code I was surprised to learn was done in cartesian space. If the objective is clockwise ordering, I thought it would have been a natural candidate for processing in polar coordinate space. This algorithm was apparently originally published with a boundary condition bug that, as far as I can tell, would not have happened if the coordinate sorting was done in polar coordinates.

These components are brought together beautifully in an example document scanner application that detects the trapezoidal shape of a receipt in the image and performs perspective correction to deliver a straight rectangular image of the receipt. This is my favorite feature of Office Lens and if I ever decide to write my own I shall return to this example.

By the end of this section, I was suitably impressed by what I’ve seen of OpenCV, but I also have the feeling a few of my computer vision projects would not be addressed by the parts of OpenCV covered in the rest of PyImageSearch’s Start Here guide.

Skimming “Build OpenCV Mini-Projects” by PyImageSearch: Colors

I followed through PyImageSearch’s introductory Step 3: Learn OpenCV by Example (Beginner) line by line both to get a feel of using Python binding of OpenCV and also to learn this particular author’s style. Once I felt I had that, I started skimming at a faster pace just to get an idea of the resources available on this site. For Step 4: Build OpenCV Mini-Projects I only read through the instructions without actually following along with my own code.

I was impressed that the first part of Step 4 is dedicated to Python’s NoneType errors. The author is right — this is a very common thing to crop up for anyone experimenting with Python. It’s the inevitable downside of Python’s lack of static type checking. I understand the upsides of flexible runtime types and really enjoy the power it gives Python programmers, but when it goes bad it can go really bad and only at runtime. Certainly NoneType is not the only way it can manifest, but it is certainly going to be the most common and I’m glad there’s an overview of what beginners can do about it.

Which made the following section more puzzling. The topic was image rotation, and the author brought up the associated rotation matrix. I feel that anyone who would need an explanation of NoneType errors would not know how a mathematical matrix is involved in image rotation. Most people would only know image rotation from selecting a menu in Photoshop or, at most, grabbing the rotate handle with a mouse. Such beginners to image processing would need an explanation of how matrix math is involved.

The next few sections were focused on color, which I was happy to see because most of Step 3 dealt with gray scale images stripped of their color information. OpenCV enables some very powerful operations I want to revisit when I have a project that can make use of them. I am the most fascinated by the CIE L*a*b color space, something I had never heard of before. A color space focused on how humans perceived color rather than how computers represented it meant code working in that space will have more human-understandable results.

But operations like rotation, scaling, and color spaces are relatively common things shared with many other image manipulation libraries. The second half goes into operations that make OpenCV uniquely powerful: contours.

Notes On “Learn OpenCV by Example” By PyImageSearch

Once basic prebuilt binaries of OpenCV has been installed in an Anaconda environment on my Windows PC, Step #2 of PyImageSearch Start Here Guide goes into command line arguments. This section was an introduction for people who have little experience with the command line, so I was able to skim through it quickly.

Step #3 Learn OpenCV by Example (Beginner) is where I finally got some hands-on interaction with basic OpenCV operations. Starting with basic image manipulation routines like scale, rotate, and crop. These are pretty common with any image library, and illustrated with a still frame from the movie Jurassic Park.

The next two items were more specific to OpenCV: Edge detection attempts to extract edges from am image, and thresholding drops detail above and below certain thresholds. I’ve seen thresholding (or close relative) in some image libraries, but edge detection is new to me.

Then we return to relatively common image manipulation routines, like drawing operations on an image. This is not unique to OpenCV but very useful because it allows us to annotate an image for human-readable interpretation. Most commonly drawing boxes to mark regions of interest, but also masking out areas not of interest.

Past those operations, the tutorial concludes with a return to OpenCV specialties in the form of contour and shape detection algorithms, executed on a very simple image with a few Tetris shapes.

After following along through these exercises, I wanted to try those operations on one of my own pictures. I selected a recent image on this blog that I thought would be ideal: high contrast with clear simple shapes.

Xbox One

As expected, my first OpenCV run was not entirely successful. I thought this would be an easy image for edge detection and I learned I was wrong. There were false negatives caused by the shallow depth of field. Vents on the left side of the Xbox towards the rear was out of focus and edges were not picked up. False positives in areas of sharp focus came from two major categories: molded texture on the front of the Xbox, and little bits of lint left by the towel I used to wipe off dust. In hindsight I should have taken a picture before dusting so I could compare how dust vs. lint behaved in edge detection. I could mitigate false positives somewhat by adjusting the threshold parameters of the edge detection algorithm, but I could not eliminate them completely.

Xbox Canny Edge Detect 30 175

With such noisy results, a naive application of contour and shape detection algorithms used in the tutorial returned a lot of data I don’t yet know how to process. It is apparent those algorithms require more processing and I still have a lot to learn to deliver what they needed. But still, it was a fun first run! I look forward to learning more in Step 4: Build OpenCV Mini-Projects.

Notes on OpenCV Installation Guide by PyImageSearch

Once I decided to try PyImageSearch’s Getting Started guide, the obvious step #1 is about installing OpenCV. Like many popular open source projects, there are two ways to get it on a computer system: (1) use a package manager, or (2) build from source code. Since the focus here is using OpenCV from Python, the package manager of choice is pip.

Packages that can be installed via pip are not necessarily done by the original authors of a project. If it’s popular enough, someone will take on the task of building from open source code and make those built binaries available to others, and PyImageSearch pip install opencv guide says that is indeed the case here for OpenCV.

I appreciated the explanation of differences between the four different packages, a result of two different yes/no options: headless or not, and contrib modules or not. The headless option is appropriate for machines used strictly for processing and do not need to display any visual interface, and contrib describes a set of modules that were contributed by people outside of core OpenCV team. These have grown popular enough to be offered as a packaged bundle.

What’s even more useful was an explanation of what was not in any of these packages available via pip: modules that implement patented algorithms. These “non-free” components are commonly treated as part of OpenCV, but are not distributed in compiled binary form. We may build them from source code for exploration, but any binary distribution (for example, use in commercial software product) requires dealing with lawyers representing owners of those patents.

Which brings us to the less easy part of the OpenCV installation guide: building from source code. PyImageSearch offers instructions to do so on macOS, Ubuntu, and Raspbian for a Raspberry Pi. The author specifically does not support Windows as a platform for learning OpenCV. If I want to work in Windows, I’m on my own.

Since I’m just starting out, I’m going to choose the easy method of using pre-built binaries. Like most Python tutorials, PyImageSearch highly recommends a Python environment manager and includes instructions for virtualenv. My Windows machine already had Anaconda installed, so I used that instead to install opencv-contrib-python in an environment created for this first phase of OpenCV exploration.

Trying OpenCV Getting Started Guide By PyImageSearch

I am happy that I made some headway in writing desktop computer applications controlling hardware peripheral over serial port, in the form of a test program that can perform a few simple operations with a 3D printer. But how will I put this idea to work doing something useful? I have a few potential project ideas that leverage the computing power of a desktop computer, several of them in the form of machine vision.

Which meant it was time to fill another gap in my toolbox of solving problems with software: get a basic understanding of what I can and can’t do with machine vision. There are two meanings to “can” in that sentence, both of them apply: “is this even theoretically possible” sense and also the “is this within the reach of my abilities” sense. The latter will obviously be more limiting, and the limit is something I can devote the time to learn and fix. But getting an idea of the former is also useful so I don’t go off on a doomed project trying to build something impossible.

Which meant it was time to learn about OpenCV, the canonical computer vision library. I came across OpenCV in various contexts but it’s just been a label on a black box. I never devoted the time to sit down and learn more about this box and how I might be able to leverage it in my own projects. Given my interest in robotics, I knew OpenCV was on my path but didn’t know when. I guess now is the time.

Given that OpenCV is the starting point for a lot of computer vision algorithms and education, there are many tutorials to choose from and I will probably go through several different ones before I will feel comfortable with OpenCV. Still, I need to pick a starting point. Upon this recommendation from Evan who I met at Superconference, I’ll try Getting Started guide by PyImageSearch. First step: installing OpenCV.