Aftermarket Antenna for Gigabyte Z270N-WiFi

One of the reasons I chose to buy my Gigabyte Z270N-WiFi motherboard is right in its name – it has built-in WiFi. Inside the box is a small antenna with two wires. The antenna is on a hinge so it can be tilted at an angle or folded down against the base, which has a magnet on the bottom.

Gigabyte Antenna

I thought this system was well designed for the typical desktop PC. The motherboard ports are usually sitting close to the ground against the wall and not a good place to have antenna stick out. Also, tower cases are typically steel, friendly for magnet attachment. So the bundled antenna and its wires allow the antenna to sit on top of the tower case where it should get a better signal.

My PC, however, is not a typical PC. Steel sheet metal is currently beyond my capabilities, so my case materials will be aluminum extrusion, laser-cut acrylic, and 3D-printed plastic. None of which are magnetic! Also, the placement of the motherboard meant the ports plate is top and center of the case, which is actually an idea location for an antenna.

Thanks to help from Tux-Lab, I learned the WiFi connector on my motherboard plate is of type RP-SMA. Given this information, it was trivial to find all the connectors for sale by Amazon vendors world-wide. I quickly noticed some of them only claimed to support the 2.4GHz band. A quick check on the spec sheet confirmed my motherboard WiFi is a dual-band unit so I need to look for dual-band antenna.

I eventually decided to try this item (*), a simple dual-band design with relatively high gain of 7 dB. After its arrival, I took a few measurements with the iwconfig tool.

  • No antenna: Link Quality=32/70
  • Original bundled antenna: Link Quality = 60/70
  • New aftermarket antenna: Link Quality = 70/70

Fewer wires, simpler design, higher link quality, I think this is a win!

And on a completely silly note, I’m amused by the fact they made my Luggable PC Mark II look like an old-fashioned TV with rabbit-ear antenna.


(*) Disclosure: As an Amazon Associate I earn from qualifying purchases.

Bare Skeleton for Component Fit Test

After all the research and purchasing the parts, it’s time to put them all together to make sure they fit and work together. This first draft is only a test of component fit using a minimalist bare skeleton. It would not yet be a PC that I can lug around.

In addition to the aforementioned GPU mount, I had to design and 3D print a few other parts. The SFX12V PSU needed its own mounting bracket. As did the screen: I had the metal plate mating surface liberated from the monitor stand, but I needed to design and 3D print a part the metal bracket will attach to and in turn attach to the rest of the skeleton.

The skeleton itself is built out of Misumi HFS3 aluminum extrusions, which is 15mm by 15mm in cross section and well-suited to work with M3 screws and nuts. The nuts are the best feature of HFS3 – all I needed were standard M3 nuts. In contrast, HFS5 needed special Misumi M5 nuts that cost way more than standard M3 nuts.

The design of the skeleton is nothing special – a simple functional design that resembles the Yamakasi Catleap + HP Z220 luggable frame built several weeks ago at Tux-Lab.

I needed a laser-cut sheet of acrylic to tie everything together, so I packed up all the bits and pieces in their original enclosures for the trip to Tux-Lab.

Luggable PC Mark II parts

One laser-cut sheet of acrylic and a few hours of assembly work later, I have the first draft for Luggable PC Mark II! The components are left open and vulnerable but that’s not the point of this first draft. It’s just to make sure all the parts fit. Some minor fit issues were encountered but nothing terribly major.

I declare the fitness test a success. Onward to further refinements!

Luggable PC Mark II first draft

Researching PCI Express Extension Cables

Building Luggable PC (Mark I) determined that a direct GPU connection to the motherboard takes up a lot of space. For Mark II, a simple riser card would not fit. That leaves us with using a PCI Express extension cable.

A flexible cable allows significantly more freedom in placement. Given this freedom, I wanted the GPU cooling intake to face the same direction as the CPU fan cooling intake. This is better than a simple riser card, which would result in the two fan intakes facing opposite directions. To flip the GPU (and its intake) around, I’ll need a longer cable to take the circuitous S-turn.

One word of caution: most extension cables are sold to crypto-currency miners (*), who want the flexibility to pack as many GPUs into one computer as possible. Miners are not concerned with bandwidth and latency over the PCIe bus, but I am!

Hunting in the sea of products aimed at miners, my next task is to determine how much I need to pay for a decent quality cable. Amazon vendors sell cables for anywhere from $7 to $70. Some of the reviews left on the $7 cable (*) warned of destroyed components, making me jittery about going cheap. This cable has the potential to destroy a multi-hundred dollar GPU, a multi-hundred dollar CPU+Motherboard, or possibly both! I climbed up the Amazon price ladder until I found a $30 unit by “EZDIY” (*) with a significant number of reviews, none of which complained about destroyed components.

Then it came time to mount everything. The freedom of placement given by the extension cable also takes away the structural connection to the motherboard. I will need to design my own GPU mounting bracket with zero structural help from the motherboard mount.

The PC interface slot standard, built up over decades tracing back to the old ISA expansion cards, is quite a challenge to deal with. Optimized for mass-production with sheet metal, it is not very friendly to hobbyist 3D printing. But it’s a problem solvable with enough creativity in Fusion 360 and multiple test prints on the 3D printer.

Once it was all set up, I tested the configuration of both the extension cable and the 3D-printed custom GPU mount to verify everything works. It was a little jarring to see my GPU sitting on top of the box instead of its usual home inside.


(*) Disclosure: As an Amazon Associate I earn from qualifying purchases.

Researching PCI Express Riser Cards

When I take my Luggable PC (Mark I) around, I sometimes attract attention from like-minded PC builders who look over what I’ve done and offer helpful suggestions. I’m incorporating the Greatest Hits into construction of Mark II. We’ve covered two of them already: (1) Use a Mini-ITX motherboard and (2) use a smaller power supply. Now let’s cover (3) Use a PCI Express riser or extension.

The motivation comes from the fact standard PCI-Express GPU placement is very inconvenient for compact packaging. The motherboard and the GPU are placed at right angles to each other taking up tremendous amount of space. In Mark I I packaged components around the GPU the best I can, but it was far from ideal.

We need more freedom to rearrange these components and that can only come from putting in an intermediary between the PCI Express slot on the motherboard and the GPU connector tab, something that changes the nature of the connection.

First option is a PCI riser card like this unit (*) on Amazon. It gives us a 90-degree turn which is commonly used in servers to fit cards within a rack-mounted enclosure. Rack-mounted servers don’t usually need powerful GPUs, so these customers don’t run into the problem we have: Full power GPUs are two slots wide, the turn means it can only be used at the very edge of the motherboard or else the card will collide with the motherboard. For Mini-ITX boards, this presents an additional challenge because the GPU’s metal bracket, when turned 90 degrees and inserted to the one and only slot on a Mini-ITX board, will also run into the motherboard ports back plate.

Since a simple riser card wouldn’t work for this project, let’s look at extension cables next.


(*) Disclosure: As an Amazon Associate I earn from qualifying purchases.

Researching Small PC Power Supplies

A major goal of Luggable PC (Mark I) was to use components I already had on hand, which meant a full-sized ATX power supply unit (PSU) because I’ve never bought anything else before. For Mark II, I’m opening up the project budget to buy a compact power supply for the system.

There are plenty of small proprietary PC power supplies available in the aftermarket but low-production items will have limited selection and may be difficult to replace. The only units that were remotely interesting were the PSU for high-volume small form factor PCs of large manufacturers like HP or Dell. But they tend to be low powered units rated at 250W or less and also lack the power plugs needed to feed a power-hungry full size GPU.

So I started looking at the standardized PSUs. In the ATX power supply specification I found online (revision 1.31 dated April 2013) I learned there was a significant step in the evolution of ATX power supplies that shifted original focus from the 3.3V and 5V rails over to the 12V rails. This explains the “12V” suffix on some of these specifications – when a manufacturer names their ATX PSU as a “ATX12V” power supply, they declare 12V focus on power capability.

However, the first three letters still describe the physical form factor. I didn’t find many CFX12V or LFX12V units available. TFX12V and FlexATX12V are more common but they are equivalent to those HP/Dell PSUs with low wattage rating and no PCI-Express card power plugs. We want something smaller than ATX12V, so that leaves SFX12V.

Thankfully there seems to be a healthy SFX12V niche in the ecosystem. They do tend to be lower in power rating than full sized ATX12V but I expect 450-600W to be plenty. And they have most of the power plugs of a full ATX12V unit, including those valuable PCI-Express power plugs.

The power plugs actually present a bit of a problem: any wires I don’t use in my system is dead weight and taking up space. In theory this can be resolved with a SFX12V PSU with modular plugs and wires. I ended up getting one modular (Corsair SF450) and one non-modular (FSP Group FSP450) SFX12V PSU to experiment with.

On the physical form factor specification, SFX12V was only a few centimeters smaller in each dimension relative to ATX12V. But those numbers understate the reduction in physical volume. When I pulled them out the box I was quite pleased at how compact they were. This is going to be a tremendous help in keeping Mark II slim.

IMG_5201
ATX12V and SFX12V power supply units side by side illustrating difference in volume.

Lenovo L24q-20 Monitor: Core of Luggable PC Mark II

Once I decided the Luggable PC Mark II project will be built around a retail available 24″ monitor with QHD (2560×1440) resolution, it narrowed down the list of screens I need to keep an eye open for deals. A few weeks after the decision, a promising candidate popped up: Best Buy put the Lenovo L24q-20 on sale for $170, a 15% discount from its usual $200 price.

The specifications look promising. The panel type is IPS, which is great as I had expected to find only the TN panels in the lower price range. The physical dimensions are impressively minimal, with a very thin bezel on the top and sides. More than half of the back side is flat, making it easy to pack computer components in that space. The shipping weight is light, implying either the screen is lightweight (good) or that they really skimped on packaging (not as good).

The monitor had few inputs (one HDMI port and one DisplayPort) but I only need one so that’s fine. I was less thrilled with the fact all the plugs (video and power) stick straight out the back instead of pointing downwards. The latter would have made it easier to package everything in a slim enclosure.

The other disappointment is the lack of standard VESA mount points. Their presence would make chassis integration straightforward, but it is not itself a deal-breaker. It depends on whether I can work with the nonstandard mount.

Having done all the research I could over the web, I went into the local Best Buy for a look at the display unit to learn things they don’t put on the spec sheet.

Item #1: Power. I could tell the monitor uses an external power converter, but the specifics were not listed. Ideally the monitor can run on 12V DC because then I could rewire it to draw that 12V from the computer power supply. Sadly this Lenovo takes 19V. On the upside, its DC power converter is very small so I think I can package it in my enclosure.

Item #2: Mount. The final make-or-break factor… how the monitor is mounted to its stand. Again, not something listed on the spec sheet. I turned the Best Buy display unit around, found the release latch, and separated the monitor from the stand. I saw the mating surface of the stand is a metal bracket fastened by 7 Philips screws. I can remove those 7 screws and use the metal bracket in my own chassis as attachment point for the monitor.

Yes, I can work with this! I put the display unit back together and grabbed a box to take home. I bought what turned out to be the last new unit in stock.

IMG_5200
Lenovo L24q-20 monitor stand with the metal mounting bracket removed to show the 7 fastener locations. 4 machine screws into metal, 2 on the left and 2 on the right. In between them, 3 self-tapping screws into plastic. The bottom two round objects are not screw locations – they are posts to help locate the mounting bracket.

New Project: Luggable PC Mark II

I’ve been using my Luggable PC for about four months. It was originally built with retired computer parts, but the concept worked so well I transplanted the guts of my main desktop tower into the enclosure and now it is my only computer. I use it at home connected to my Monoprice 28″ UHD monitor (predecessor to the current Monoprice 28″ UHD monitor) and when I want a computer on the go, I close the screen and take it with me.

1454021491161140759
Luggable PC Mark I

Unfortunately that means leaving the UHD (3840×2160) monitor behind. While the built-in 17″ screen (with the flip swivel hinge I’m proud of) is a respectable 1920×1200 resolution, it feels quite cramped when I’m spoiled by a UHD screen at home.

So that became the motivation for a sequel: the Luggable PC Mark II. The main thrust of the project is a larger, higher resolution screen. And this time, I want to build the chassis around a monitor available at retail, instead of a salvaged laptop panel like the Mark I. Being specific to a salvaged panel is not very friendly for others to build their own. Tailoring Mark II to a monitor people can buy would be better.

So the next question is size. Tux-Lab experiments with the Yamakasi Catleap monitor taught me 28″ is too big to be easily portable. Looking over the computer monitor market for sizes between 17″ and 28″, the 24″ size seems to be the best one to experiment with. It is a popular size with a wide selection of makes and resolutions up to and including UHD if the budget allows for it.

And while external dimensions vary, they are mostly less than 14″ high and 22″ wide. Why these dimensions? They are the limits for carry-on luggage at United Airlines, which seems roughly representative of (or possibly more restrictive than) most airlines. I still hold the dream a Luggable PC can fit in an overhead compartment. (Assuming I can get it past TSA.)

There’s no point in a 24″ FHD (1920×1080) monitor since that’s no better than the screen I already have.  My project budget is not daring enough to jump straight into a 24″ UHD monitor price tag. So the hunt is on for a 24″ QHD (2560×1440) monitor that I should be able to find for well less than half the price.

SGVLUG: Custom Computer Projects

Last night I had the opportunity to present my Luggable PC, FreeNAS Box, and Portable External Monitor projects to the San Gabriel Valley Linux User’s Group. Though the projects themselves have only minimal relation to Linux, the spirit of customization and project sharing fits well with the Linux open source ethos.

SGVTalkTitle

I hauled in all the latest versions of my projects. Plus all the earlier drafts and revisions that have yet to be disassembled and pitched. More visual aids is always better than less and they proved quite popular after the talk concluded and people came up to look over the projects up close.

Some of the audience found the topic engaging and stayed after the talk discussing aspects that didn’t make it into the talk and offered ideas for future exploration. Some of those ideas were already on my to-do list and some are novel ideas I should explore.

A few people left early, whether they had other obligations or they got bored I might never know.

I don’t have a lot of public speaking experience so this was a great opportunity for me to get some practice in a low-pressure environment in front of a like-minded crowd. At the moment I’m not planning to go work in a mega corporation again. I might not need good presentation skills in a small business, but if I want to get entrepreneurial and start my own business, I will definitely need presentation skills.

This was good practice, building up the public speaking skill one bit at a time.

Much like my design and fabrication skills.


Luggable PC Wireless Module Installation

The point of the Luggable PC project is to build a mobile computer out of commodity desktop parts instead of more expensive specialized laptop parts. The upsides come from component choice, ability to upgrade piecemeal, and customization. One downside is that desktop components won’t have some of the parts taken for granted on modern laptops. Like today’s topic: wireless Ethernet.

The motherboard I currently have in the Luggable PC chassis (Intel DH87MC) does not have wireless Ethernet out of the box. I had been using a small USB wireless network dongle to provide wireless connectivity. The compact size is handy, but the compact size also restricts the antenna size, which in turn restricts performance.

The driver for the Realtek device isn’t anything to cheer about, either. It works OK in Windows, but it frequently fails in Ubuntu. I would frequently find myself without network access in Ubuntu and have to reset the USB adapter by unplugging it and plugging it back in.

I knew that my motherboard had a mini card slot for a wireless card. I also knew I had salvaged wireless cards from laptops I had disassembled for parts. But it wasn’t until today that I finally got around to plugging a wireless module into the Luggable PC.

I had also salvaged the matching antenna modules from the laptop. They formerly resided in the laptop lid, and now they are taped to the inside of the 3D printed enclosure.

Intel Wireless Card

Thanks to these two large(r) antennae, I now have stronger wireless signal and better data throughput. And the driver for this Intel-made wireless module has been far more reliable. And on top of all that, I’ve freed up a USB port.

One win for salvaged parts!

Gigabyte Z270N-WiFi and its F1 Firmware

When I embarked on the Luggable PC project, the primary goal was to build a computer using components I already had on hand. This translated into the requirement to accommodate full-sized desktop PC components. Now that I’ve used it for a while and started to like carrying my full-time computer around, I’m building up for an upgrade. This time, instead of building a chassis around components I already had, I will buy smaller components with the intent of assembling a new luggable chassis.

First up: The motherboard. Out of all the commodity form factors, the best balance of small size, computation power, and reasonable price is the Mini-ITX form factor. I’ve already worked with a few boards of that form factor, but none with leading edge components. This changes with the purchase of a Gigabyte Z270N-WiFi.

GigabyteZ270N-WiFi
Image by Gigabyte

The specifications of the motherboard looked great on paper. In additional to the small Mini-ITX form factor, the features important to my project are:

  • Support for Intel’s latest Kaby Lake generation of processors
  • M.2 slot for SSD
  • PCIe x16 slot for full-power GPU
  • Wireless networking

Factors that were not critical, but used as tie-breakers against its competition:

  • Dual-port Intel gigabit wired Ethernet
  • 6 SATA ports
  • USB-C port
  • Bluetooth

Looks great on paper! Sadly in reality the motherboard made a very poor first impression due to the onboard firmware. It was heavy on flashy looks and light on usefulness. I ran into many problems with basic functionality.

Example 1: The USB mouse support was useless: I could move the cursor around with the mouse, but clicking has no effect.

Example 2: Upon startup, it shows a full-screen Gigabyte logo (basically an advertisement) that I find annoying. If I select the firmware option to disable the logo, the motherboard no longer boots: I have to reset the firmware settings via jumper to get back to square 1. This was such an unexpected thing that it took three resets before I determined it was the logo setting that caused the problem.

So the “F1” version of the motherboard firmware was a disaster. Fortunately by the time I bought the board, Gigabyte has released updates and is currently on “F4”. Upgrading allowed me to disable the Gigabyte advertisement and still have a functional computer, in addition to addressing other functional annoyances.

This motherboard was clearly pushed out the door with incomplete firmware and the expectation on users to upgrade. I now have a good motherboard, but there’s a sour taste in my mouth from the bad out-of-box experience.

Luggable Frame Experiment #2

Catleap2The second iteration of the luggable frame experiment addressed the failings of the first version by relying less on acrylic and more on aluminum. The first iteration was a good experiment to see if acrylic was strong enough for the work. Once V1 conclusively proved the weaknesses, it’s time to fall back to the known quantity.

The following changes were made for version 2:

Extrusion upgrade: In the interest of greater rigidity, the extrusions themselves were upgraded from Misumi HFS3 (15mm x 15mm cross section) to HFS5 (20mm x 20mm). The smaller extrusions seemed to be doing the job but they did exhibit some flex. And we had HFS5 conveniently on hand so let’s use it!

Connection upgrade: In V1 the extrusion T-joint at the base of the frame was held together by the side pieces of acrylic. Though it seemed to work, V2 went with a stronger solution by using metal connectors for the joint. (Misumi HBLFSNF5).

Handle upgrade: The V1 handles were part of the acrylic assembly. With the reduction in acrylic usage, there wasn’t enough left to carry the load of the whole frame. So the handle became another aluminum extrusion.

Catleap2-RearPC tray upgrade: This was the first acrylic thing that failed in V1. The PC is now held in place by aluminum structure instead of an acrylic cutout which makes it quite secure. Three of the extrusion right-angle connectors were re-purposed as “claws” to keep the PC case in place.

Catleap2-SideVESA mount upgrade: The worrisome flex in the Catleap monitor enclosure was traced down to the metal threads inside the Catleap enclosure that were longer than the thickness of the enclosure plastic. This meant when the mounting screws fully engaged, there was still a bit of space between the VESA mount plate and the monitor’s rear surface, allowing movement. A spacer plate was added to fill that gap. Now the VESA mounting plate on the frame is fully pressed against the monitor’s rear surface, greatly reducing the flex.

All this additional structure added up to a very secure frame for carrying around the Yamakasi Catleap monitor with the HP Z220 computer. Unfortunately it also added weight which was a concern even before the frame came into the picture. The heft means this is probably the end of the line for the Catleap + Z220 experiments. Frame V2 will serve as a perfectly good workstation albeit not a very portable one.

The idea of building a Luggable PC around a commercially available monitor will continue, with the focus shifting to using smaller and lighter components.

Luggable Frame Experiment #1

Catleap1The dimensions for my Luggable PC project were determined by the components within. The width and height, specifically, were dictated by the LCD screen module. Even though I made the CAD files public for anybody to build their own Luggable PC, in practical terms only people with the exact same LCD module would be able to use the files without modification.

A friend who saw the Luggable PC was interested in generalizing the concept and create a frame for lugging a (not disassembled) screen alongside its (also not disassembled) PC. Relative to my project, it would be easier to build and less specialized to the components within, with a trade-off in larger size and heavier weight.

I thought it was a great idea to explore and joined in the experiment. We each came up with a design, and we built both of them at Tux-Lab to see how the ideas translated into reality.

This blog post is a brief summary of my first experiment.

The Components

The monitor is an Yamakasi Catleap monitor, built around a 27″ IPS panel with 2560×1440 resolution. The specific dimensions don’t really matter, as it will be mounted via the standard 75mm VESA pattern on the back. Any large monitor with 75mm VESA pattern would fit as-is, and only minor modifications would be necessary to accommodate monitors with a different mounting pattern.

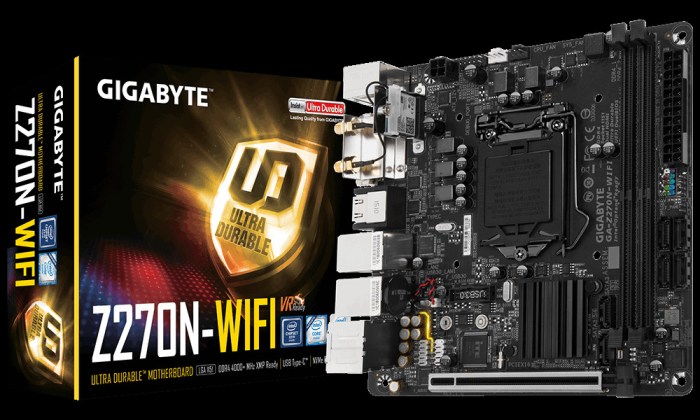
The PC is a HP Z220, small form factor PC from the HP business line available with a range of components to trade off processing power against price. For the purposes of this experiment, the important details are its height of 331mm and depth of 100mm. Thought not a standardized dimension, many small form factor PCs are roughly the same size.

The Construction

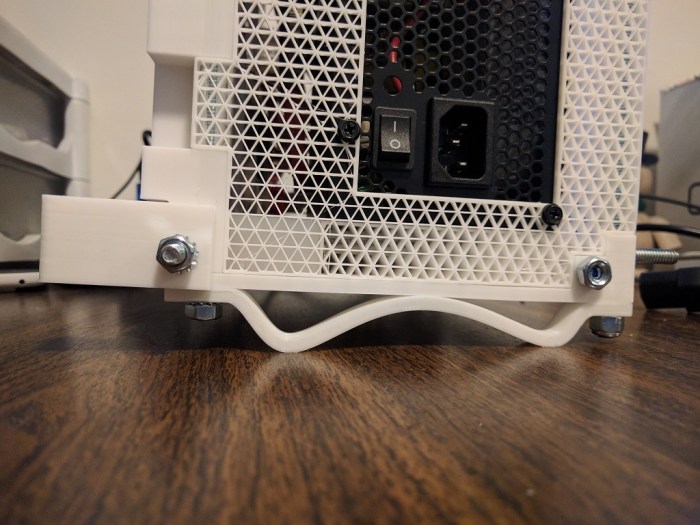
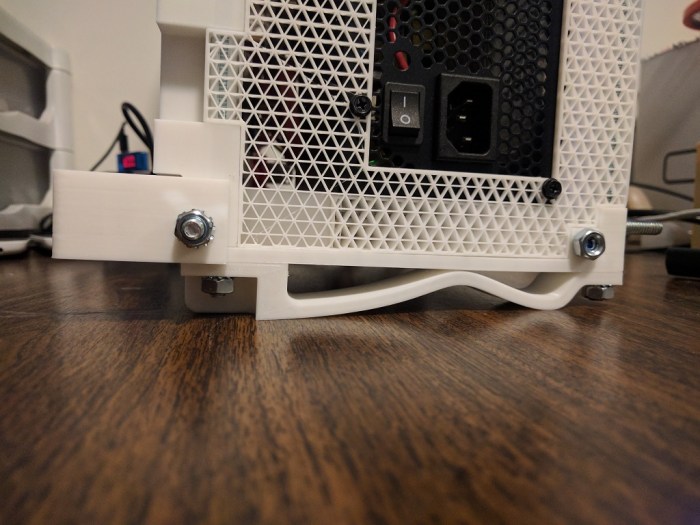
The core of the frame are built from 15mm aluminum extrusions (Misumi HFS3) for strength and the remainder of the frame are made from 6mm laser-cut acrylic fastened to the extrusions via M3 nuts and bolts.

Making the panels from laser-cut acrylic has the advantage of simpler modifications. Many of the critical dimensions in my Luggable PC 3D CAD file has the problem that, when changed, they trigger cascading changes that need to be reconciled. When designing for the 2D tool path of laser laser cutting, it is easier to keep modifications in mind so that a change in one sheet does not cascade to other sheets.

Example #1: The frame has a 331mm x 100mm hole to fit the Z200 case. This can be adjusted to fit any other SFF frame without cascading changes to other components.

Example #2: The monitor mount pattern can be changed, and the mount position can be moved up or down to adjust elevation of the monitor.

The Result

CompleteI had never designed for laser cutting before and was happy for the chance to do something on the Tux-Lab laser cutter. I knew that, having little experience with the material, my first few designs will have some amateurish flaws. So this frame #1 was fairly minimalist just to see what happens.

I didn’t have a good grasp how many fasteners I would need to hold everything together. I laser-cut roughly double the number of fastener positions than what I think I would need, as it is easier to have more options rather than less. For the assembly I only installed fasteners in every other hole.

The screen mount was surprisingly successful. We questioned whether 6mm acrylic would be suitable for holding up the Catleap monitor by its 75mm VESA mounts. When we found some worrisome flex, the suspicion went immediately to the 6mm acrylic but it turned out the Catleap monitor enclosure was the source of the flex.

When attempting to install the PC, we found that the case itself would fit just fine but the rubber feet attached to the side of the case did not. I added cutouts in the CAD file but it seemed wasteful to cut entirely new pieces of acrylic just for the little feet cutouts. For purposes of experimentation, a Dremel tool was used to cut gaps to clear the rubber feet.

After the frame was assembled with the screen and the PC, we started plugging in all the cables and wires and I realized I had forgotten to account for the cables. There’s no good place to coil up the excess so they kind of dangle and stand ready to catch on something inconvenient.

The entire assembly was built in a tiny fraction of the time of my Luggable PC and included a much larger monitor with a much higher resolution. The trade off was almost doubling of the weight. The handle, part of the acrylic assembly, appeared to be sufficient to manage the weight.

I carried it across Tux-Lab and quickly encountered the first failure.

The Failure

Lesson of the Day: Sharp internal corners are bad.

My amateur mistake was cutting a sharply cornered rectangle to hold the PC. The sharp corners concentrated the physical load of the PC into a small point in the 6mm acrylic, which protested the poor design by breaking apart.

The next experiment will incorporate this lesson.

Build, fail, learn, iterate, repeat.
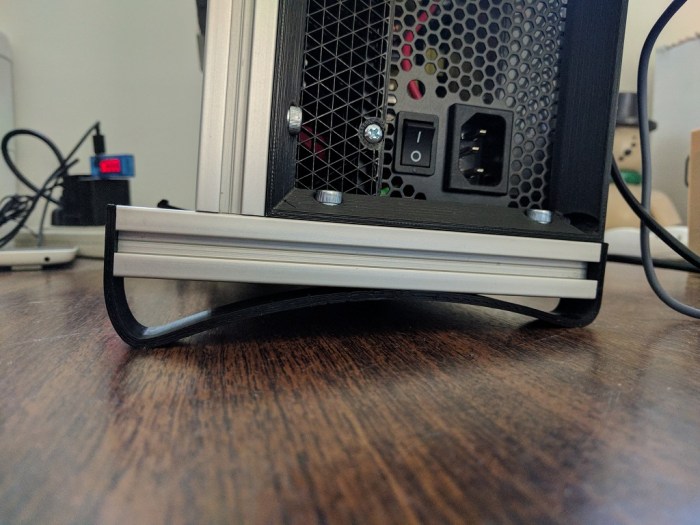
Broken


OpenSCAD for Motion Visualization

Now that I’ve climbed the initial learning curve for OpenSCAD, it’s time to start working towards my goal for doing this: I want to visualize arbitrary motion between components as a rough draft to see how things move in virtual space.

This is not an unique capability in CAD packages. Both Fusion 360 and Onshape have ability to define object hierarchies and visualize their motion. However, they are both focused on the assemblies that have been mechanically defined in CAD. If I wanted to visualize a  hinge-like motion between two objects, I first need to build that hinge in CAD or the software would “helpfully” tell me I’m trying to perform an impossible motion in my design.

In contrast, OpenSCAD does not care. I can place a rotate() operation anywhere I want and it won’t care if there’s no hinge in the design. It is happy to let me rotate about an arbitrary point in 3D space with no hardware around it. This makes OpenSCAD ideal for trying out how wild ideas would (or would not) work in virtual space, before getting down to the nitty-gritty about how to build the mechanisms to implement those wild ideas.

This means some cool-looking ideas would turn out to be impossible to implement, but that’s OK. I wanted something with a lot more freedom than I can get in the CAD packages that limit what I can do for (in their view) my own protection.

But that’s still in the future. For now I’m still climbing the learning curve of moving objects around in OpenSCAD in a way that ties into the built-in animation capability and generating animated GIF to illustrate concepts.

As a learning exercise, I’ve re-implemented the motion of the Luggable PC hinge. Thanks to OpenSCAD flexibility, I didn’t have to spend time building the hinge before I move it!

lug3

Luggable PC Project Complete!

The Luggable PC project page on Hackaday.io has been fully documented for anybody to build their own home-built 3D-printed computer chassis. All the components required for assembly have been listed, and all the steps of assembly documented with pictures taken at each and every step.

I expect to continue to make small tweaks to the design, improving little things here and there, but the machine is usable enough that I should stop tinkering with it and actually start using it. This means no new versions rebuilt from scratch for the foreseeable future. But if inspiration strikes, there will be!

When I’ve taken my Luggable PC to various maker events in the local area I’ve received generally positive reception and appreciation. Now I wait to see if anybody actually takes me up on the information compiled and build their own.

LuggablePCAssembly640

Luggable PC Drive Bay Revisions

Here’s the 2.5″ drive bay in the initial iteration of the threaded-box Luggable PC design. It is a simple, basic place to hold one laptop-sized drive, but not a very efficient use of space.

IMG_20170228_090310 - Copy

The most obvious thing to do is to vertically stack another drives adjacent to the existing drive. Easy to do in CAD, but has problems in the real world.

Problem 1: How do you access the fasteners? The laptop storage market have mostly settled around two basic fastener schemes: four screws on the bottom of the drive, or four screws along the sides. If we use the side fasteners, they would not be accessible for drive replacement without taking the whole case apart. The bottom fasteners would be accessible, except that bracket would be impossible to print on a FDM 3D printer.

Problem 2: How do you connect the wires? While at first glance there is enough space to physically accommodate the drive and its plugs, it fails to take into account the wires. The wires for the existing drive barely clear the edge in the picture. Stacking another drive into that space (even if moving it another cm or two to the right) would demand wires make relatively sharp right-angle turns. This would place strain on the connectors including the fragile unsupported SATA connectors on the drive itself.

After some experimentation with the available space, keeping in mind the requirements above, I decided to angle the two stacked drives:

IMG_20170228_091421 - Copy

Now the Luggable PC has two independent drives: One for Windows 10, and another for Ubuntu Linux 16.10.

This design solves the fastener issue: in this arrangement, it is possible to 3D print the drive bay so both drives are held in place by the shape without use of any screws on the sides or on the bottom. Both drives are held in place by a single 3D printed clamp that is secured with just two screws. The downside is that the design only works when both drives are present. It is unable to hold a single drive in place.

This also solves the initial wiring issue: By angling both drives, the wires do not have to make sharp turns and would not place unreasonable strain on the connectors. However, this comes at a cost of usable interior volume. By angling the connectors, and avoiding sharp turns, the cables consumed more precious interior volume than the previous design.

Going back to the idea of drives stacked in the available volume, we revisit the problem of forcing wires to make sharp turns. The turns can be relaxed if we can find more room for the wires without angling it into precious interior volume. The solution turned out to be… turning the drives instead! By rotating 90 degrees a drive can be positioned to make room for the cables’ turns. It also allows two drives to exist side-by-side, allowing the bay to work with a single drive or dual drives.

This design was incorporated into the following iteration of the chassis, built using aluminum extrusions instead of threaded rods as the metal structure.

DriveBayV3


Luggable PC Feet Design Considerations

After some time using the assembled Luggable PC prototype, I wanted to adjust the screen ergonomics. While the screen has been raised to a height much more comfortable compared to a laptop, after a few hours of use I wished I could tilt the screen upwards a few degrees.

At first glance this would have been impractical – the screen hinge design is already complicated and adding a tilt adjustment mechanism would only make it more so. So instead of tilting the screen, let’s achieve the goal by tilting the entire Luggable PC by adding 3D printed feet that can be bolted to the bottom of the machine.

The easiest approach would have been to print a simple solid wedge with the desired angle, but I decided to be a little more experimental. I played with Fusion 360’s spline tool to sketch out feet that are designed to move and flex a tiny bit. The flexibility adds two features:

  1. Shock absorption: We still need to be careful setting it down on a surface, but the minute bit of flexibility we gain will help cushion the harshest part of initial impact and make it feel less like we’re breaking the machine every time we set it down.
  2. Flatness compensation: With a bit of flexibility in the feet, the Luggable PC can now conform to surfaces that are not perfectly flat. Previously, the solid bottom means it will rock on 3 out of 4 feet on any surface that isn’t perfectly flat (which is most of them.)

Here is the first iteration, which accomplishes the desired goals:

IMG_20170228_173547 - Copy

Unfortunately it also has a problem: by moving the contact points inward, the front feet are now uncomfortably close to the center of gravity. A slight push from the rear will send the whole thing toppling forward. The design needs to be adjusted to have a wider stance… but we are constrained by the fact the fastening nuts still need to be accessible.

In this case, the short-term fix is to move the feet as far front as possible while still allowing wrench access to fasteners.

IMG_20170228_174620 - Copy

The real solution is to redesign the bottom of the case to accommodate the feet while maintaining a sufficiently wide stance. This idea was incorporated into the following iteration of the Luggable PC. As it used aluminum extrusions for backbone instead of threaded rods, the new wider feet were installed on the bottom extrusion.

FeetV3

A Tale of Three Corners: Design Evolution

The use of threaded rods to hold the Luggable PC case together was borne out of necessity: The print volume of the 3D printer is much smaller than the volume of a PC case so it must be printed in pieces then fastened together. A threaded rod provides strength along its length, but how do we best handle the inevitable corners?

The key constraint is the strength of a 3D printed part, especially the adhesion between layers. This is an unavoidable fact of life for FDM-type printers: the part is weakest between layers, so designing for 3D printers must consider the layers similar to how designing for wood must consider the grain.

Version 1: basic asymmetric

In this design (as used in the “Easel PC” iteration) two of the rod axis are aligned with the direction of the layer. Stress along those two axis would mostly be held in check by the strength within each layer, but a fraction of the force would try to push the layers apart. To guard against this, the third axis is orthogonal so its fastening nuts would also try to hold the layers together.

Corner 1 B
Two of the rods are co-planar with the print layer. (Rod pointing left, and rod pointing down.) The nuts fastening the third rod (Rod pointing away) also exerts a clamping force on the layers.
Corner 1 A
Same hinge viewed from a different angle.

The problem with this design is that the corners are asymmetric by nature. Not just in appearance, the loads it can tolerate are also asymmetric.

Version 2: symmetric but space consuming

The goal of a corner that handle loads symmetrically across the plastic layers means finding a way to make sure the plastic grain is equally strong across all three axis. The solution is to print at an orientation that lies at the same angle to all three axis.

CornerCura
The corner laid flat on the print bed for slicing in Cura.
Corner 2 B
Results in a corner that is equally strong across all three axis.

While this design solved the problem of symmetric appearance and strength, it introduced a new problem: by printing this way, the hinge consumes a lot of the enclosed volume making it unusable. When the goal is to pack the computer components inside a minimalist PC case, every cubic centimeter counts!

Corner 2 A
Angle showing the problem with this design – it consumes a lot of space inside the enclosed volume.

This hinge was used in the “Threaded Rod Box V1” and the space it consumed severely hampered the packaging of that layout. It is definitely not the optimal solution so the search continues.

Version 3: Let’s All Huddle Close!

The previous two designs both depended on the plastic to take some part of the load and hold on to a few steel rods. These rods were a few centimeters apart because we needed room for a wrench to tighten the nuts. We needed the nuts to sit inside the corner because…

… um, why do we need them inside? The key for version 3 is the realization that we don’t need that. By offsetting the rods slightly, we can extend the rods past the corner so the fastening nuts are outside of the enclosed volume and not competing for space with the components inside the box.

When the nuts (and the required wrench clearance) are no longer inside the volume, it allows the rods to sit much closer to each other. Now the closest distance between rods are measured in millimeters instead of centimeters. It also means the three sets of fastening nuts help exert a clamping force across all three axis, compressing everything together. This compression means the alignment of the print layers become much less critical allowing significantly more freedom in designing the rest of the case.

This corner design was used successfully in Threaded Rod Box V2 as shown. (In these pictures, some of the threaded rods have yet to be trimmed to length.)

Corner 3 BCorner 3 A

Luggable PC Screen Hinge

In the previous post we have established all the desired traits of the ideal screen layout, and how it’s impossible to meet them all simultaneously. The only solution is to design a mechanism allowing us to convert between two different configurations, each designed to provide the traits desirable for its corresponding condition.

  • Closed: the travel configuration.
    • Compact: We want to be able to lug this around without too much worry of catching on things, so the screen should align with the rest of the case (vertical or portrait orientation.)
    • Protected: To protect the screen, it should be facing inward so the glass surface is less vulnerable to damage.
  • Open: the computing configuration
    • Landscape: Unlike phones and tablets, desktop computer applications are not designed for the possibility of vertical/portrait orientation, so the screen needs to be in horizontal/landscape orientation.
    • Ergonomic: Unlike laptop screens that sit at table height, we can turn our extra heft into an advantage as support to hold the screen up to eye height. Ergonomically superior to the tabletop height of laptop screens.

To transition between these two states, we need movement along at least two axis:

  • Flip: The screen needs to move from facing inward (protected) to facing outward (visible)
  • Rotate: The screen needs to move from vertical/portrait orientation to horizontal/landscape orientation.

My ideal was to devise a mechanism that can execute both of these movements in parallel, so the user sees a single continuous movement from one configuration to another. After quite some thought and experimentation without success, I decided to postpone this ideal for later. For now, I’ll implement a hinge that has two separate degrees of freedom so the two desired axis of movement can be accommodated.

front-open
The open in-use configuration, with the screen offset to the left instead of centered

Originally the open configuration would have the screen up and centered relative to the rest of the body, and I had a few overly complex mechanical linkages attempting to make this happen. But then I realized it isn’t really necessary: the body has enough heft to hold up the screen even if it is not centered left-right. If we accept that the screen can be offset to the left, the rotation axis becomes a very simple hinge, leaving plenty of room to implement the flip axis.

front-closed
The closed travel configuration

This “ah-ha!” moment of realization, letting the screen be offset, greatly simplified the design. With the side bonus of reliability as simpler designs tend to be more reliable.


closelid
Demonstrating the open-to-closed transition. (Animated GIF by Shulie)

In the back of my mind, I will continue to dream of a continuous single degree-of-freedom unambiguous movement between open and closed. Maybe I’ll have another “Ah-ha!” moment to make it happen. I’m happy with this as the first draft.

Luggable PC Screen Layout: Challenges

The previous two posts discussed the design reasoning behind the positioning for the power supply unit and the motherboard. Now we get to the most interesting problem: Where do we want to position the screen?

The easiest approach is to line the screen up with the existing components, so I tried that first. A 17″ screen is almost the same length and width as the ATX motherboard plus PSU. But that means the screen would be at a vertical (portrait) orientation. While common for phones and tablets, it is not a typical layout for a desktop PC. (Historical trivia: The Alto by XEROX PARC, recognized to be one of the first computers with a graphical user interface, uses a portrait orientation.)

threadrodboxisoThe easiest solution to that problem is to rotate the whole works 90 degrees. I tried it for a while and the upright screen sitting at table height level was ergonomically poor.

Laptops also have their screens at table height (one of my peeves against laptops) but at least their screens can tilt. I wanted to do even better than merely tilting: I aim for the OSHA ergonomic recommendation raising the top of the screen to eye height.

space
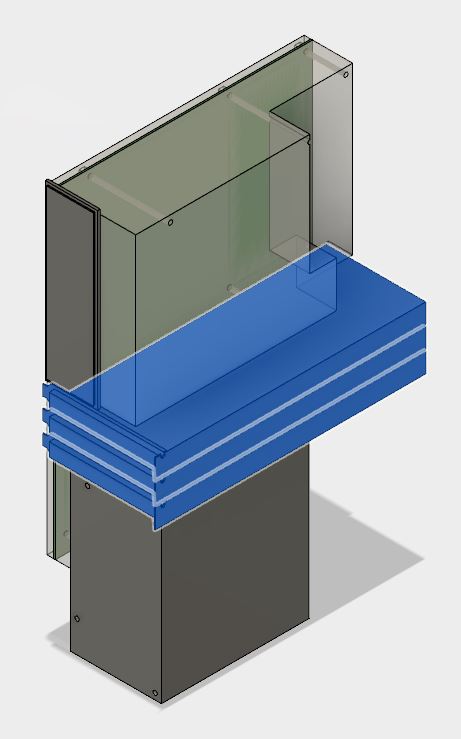
The wasted volume between the screen and the motherboard was another problem exposed by this prototype. The space looked small in CAD because the CAD model blocked out all the volume allocated by ATX spec. Since the actual motherboard consumed only a fraction of the allocated volume, the real world example had far more wasted space.

screenwingsI had the idea to solve both issues by raising the screen high to eye level, oriented horizontally, and tilt it into the empty volume. I never got as far as building it. Looking at the CAD layout, it is quite clear that the horizontally-oriented screen sticks out on either side of the case. This makes for a shape awkward to transport and also leaves the screen extremely vulnerable to damage. The screen height was good, but everything else was bad.

Plus, there was one more problem not addressed by any of these ideas: The screen glass surface is exposed while in transit. Laptops fold closed to protect the glass while travelling, but all these designs leave the glass exposed.

It became clear that no single static arrangement will have all of the desired qualities. Similar to a laptop, we will need some kind of mechanism to switch between two states.

  • Closed: A compact configuration for easy transport while protecting the screen from damage.
  • Open: An ergonomically desirable screen position.

Next post: The mechanism to address these challenges.

Luggable PC Motherboard Layout

The previous post described how I decided to position the PSU (Power Supply Unit). Once the position was decided, the next task is to determine the motherboard position.

The first challenge is my desire to accept a full-sized ATX motherboard. Full-sized boards are the easiest to work on and has the best feature set. They also have highest sales volume, which usually mean less expensive. I knew my project would be easier with a smaller microATX or Mini-ITX motherboard, but I wanted to accept full-size.

However, accepting the full size board doesn’t necessarily mean I intend to use all the expansion slots. In fact, I am happy to block the majority of them, leaving just the primary PCI-Express slot available to the GPU.

selectcards
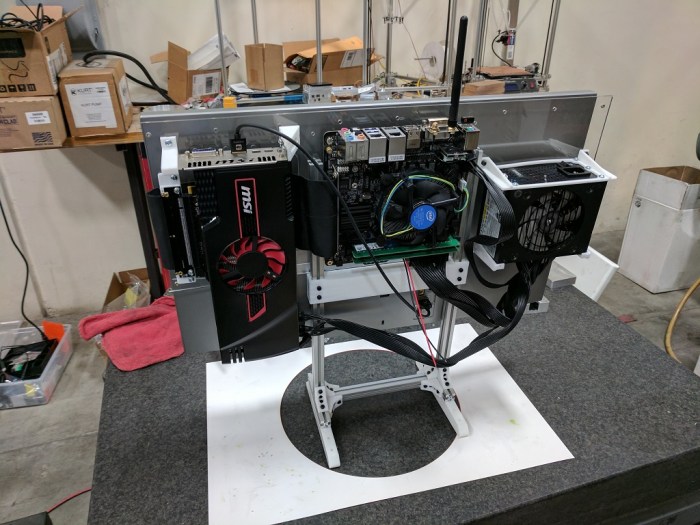
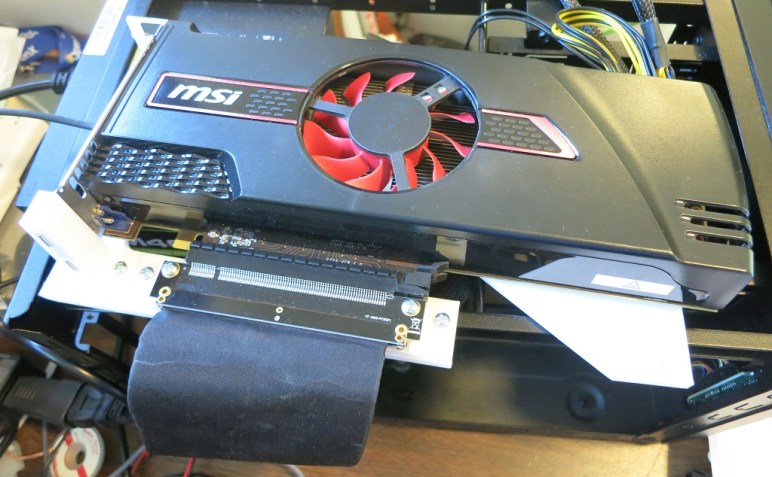
The GPU itself is the next challenge. The primary slot is close to the CPU, which means it is going to stick up in the middle of the board, making the whole assembly awkward to fit. Again, I have an escape if I want it: there are PCIe extension ribbons available for purchase that allows more positioning flexibility for the GPU. They range from $89 well-regarded units from Digi-Key to $7 roll-of-the-dice units via mystery retailers on Amazon (*). I want to make this idea work without use of an extension, and avoid the variable that introduces to the system.

While researching the layout, I learned the primary slot is not in the same position across all motherboards, adding to the challenge. While most boards position them in the slot closest to the CPU (all of the Mini-ITX boards have to by necessity) some of the boards place it in the second position. And since high-powered GPUs are two slots wide, that means I need to allow for three expansion slots worth of space.

selectcomponentsThe GPU in the middle of the board leaves two rectangular volumes on either side: Both volume are candidates for use. One volume sits over the remaining expansion slots, and the other volume sits over the CPU.

The volume over the expansion slots are predictable. ATX spec restricts height of motherboard components in order to maintain clearance for expansion cards. If I’m OK with the absence of cards, that entire volume can be reclaimed.

In contrast, the volume over the CPU is less predictable. While the ATX spec allocated volume to CPU and accessories (most significantly, the CPU cooler) that volume is highly variable. Stock CPU coolers typically take much less volume than allocated, and many fancy CPU coolers exceed the volume.

Given those two choices, it was an easy choice to snug the PSU up against the motherboard in the volume allocated to expansion cards that won’t be there.

The last factor in positioning the motherboard is which direction I wanted the ports to be accessed. Pointing down is inconvenient to access. Pointing up makes ports vulnerable to damage from dropped items. So that leaves pointing left or right. Since the PSU power cable port is already on the right, I decided to face all the ports that way as well so everything the user needs to plug in is facing the same way.

All of the above considerations resulted in the PSU+motherboard layout I used.

Next post: Positioning the screen.


(*) Disclosure: As an Amazon Associate I earn from qualifying purchases.