ESP32 Arduino Web Server: No File Upload?

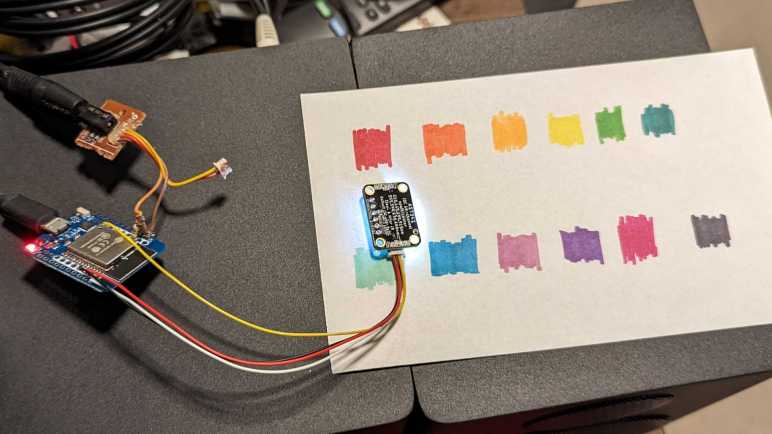
In the interest of data integrity and security, modern web browsers impose constraints on JavaScript code running within that browser’s environment. I ran into two of them very early on: CORS and Mixed Content. They restrict how content from different web servers are allowed to interact with each other, which was a situation I stumbled into by hosting a HTTP endpoint on my ESP32 and hosting my browser UI files on my desktop computer: these are different servers!

The easiest way to avoid tripping over constraints like CORS or Mixed Content is to serve everything from the same server. In my case, that meant I should serve my browser UI HTML/JavaScript alongside AS7341 HTTP endpoint on the same ESP32. Sadly, this isn’t as easy as I had hoped because Arduino doesn’t really have the concept of uploading files to a board. When we choose “Upload Sketch” it will compile and upload executable code, but there’s no way to also send my index.html and script.js files for serving over HTTP. Probably because such support varies wildly across different Arduino-compatible microcontrollers.

For ESP32 specifically, a section of flash memory can be allocated for use like a disk drive via a mechanism called SPIFFS. It is possible to put HTML and JavaScript files in SPIFFS to be served via HTTP. (Example: ESPAsyncWebServer can serve files from SPIFFS.) I implemented this concept for an ESP32-based Micro Sawppy controller, but that was using Espressif’s ESP-IDF framework inside the PlatformIO environment. There’s no direct counterpart for Arduino framework and Arduino IDE. Somebody has written an Arduino IDE extension to upload files to ESP32 SPIFFS, but that was last released in 2019 and as of writing is not yet compatible with latest version of Arduino IDE.

I could embed those files as strings directly in source code, but that means I have to review my HTML and JavaScript to make sure I’m not using any special characters. The most obvious requirement is exclusive use of single quotes and no double quotes. Any backslash would also have special meaning in Arduino source code. This can get annoying very quickly.

An alternative is to treat those files as binary files and embed them in source code as hexadecimal values. I’ve done this for embedding animated GIF data inside an Arduino sketch, and there’s a handy command to do so: “xxd -i index.html index.html.h” This uses xxd, a hex dump command-line utility included in Ubuntu distributions by default. I still have to modify the output file, though:

  1. Add “const” keyword to make sure it goes into flash storage instead of RAM.
  2. Remove “unsigned” keyword to fit with signature for WebServer server.send().
  3. Add a 0x00 to the end of the hex dump to null-terminate the string. (Technically it means I should add 1 to the “length” value as well, but I’m not using that value.)

This works, but still quite cumbersome. I’m not sure it’s better than the hassle of writing HTML and JavaScript in a C string compatible way. There has to be something better than either of these options, but until I find it, I’ll jump through these hoops. Fortunately, I only have to do this when updating files served by my ESP32. Most of the time I’m updating code and seeing how they work served from my development desktop, a much simpler process that made debugging challenges less of a headache than they already are.


Code for this project is publicly available on GitHub

Modifying ESP32 Mini to Focus on AS7341

In order to eliminate Mozzi audio glitches while reading AS7341 spectral color sensor, I was prepared to dive down to learn ESP-IDF I2C API. Fortunately, it turned out Adafruit AS7341 library’s provision for asynchronous read (sensor integration occurs while Arduino code continues running) was good enough to eliminate those popping noises. This brought one project to a rapid conclusion so I can contemplate my next one.

I’ve barely scratched the surface of this AS7341’s capabilities, and I still haven’t quite grasped the meaning of all those numbers that it generated. I don’t have an intuitive grasp of how the set of numbers generated by this sensor relates to how human eyes perceive color. I want to further explore the AS7341 and take it around the house to measure different things, but the contraption I have on hand is quite cumbersome with its STEMMA QT compatible wiring for the AS7341 and a salvaged 3.5mm jack for connecting an audio cable.

To focus on AS7341, I will leave the audio subsystem behind for my next set of experiments. After I unsoldered the 3.5mm jack for audio output, I am much less likely to catch an inconvenient wire and risk damaging my test circuit. I then wrapped the ESP32 mini and wires to the AS7341 sensor inside a bit of clear heat-shrink tube (*) so I am no longer handling bare circuit board. The micro-USB connector would serve as the best metal contact point for grounding purposes, so it was left outside of the shrink-wrapped area as was the reset button that should remain accessible.

(If this is all I wanted to do, and I knew this to begin with, I would have used something like an Adafruit QT Py ESP32 Pico. But I’m sure I will want to do more down the line, and I’m making it up as I go along.)

In addition to a large white LED intended to provide illumination for the color sensor, Adafruit’s AS7341 board also has a bright green LED to indicate power. I’m worried this LED’s green light might distort color sensor results. I like the idea of a power LED indicator, but I would have much rather preferred a dim green glow over this bright beacon. [In contrast, DFRobot’s AS7341 board does not have a bright LED close to the sensor.]

I thought about unsoldering either the LED itself or its adjacent current-limiting resistor, but they are right next to a STEMMA QT connector and I think my hot-air gun would melt and damage its plastic. Then I had a better idea: I put on a small piece of double-sided foam tape. (“Servo tape” from the world of remote-control hobby.) It is an easily reversible modification that blocked majority of green light, good enough to let me contemplate the software side of my next project.

[UPDATE: As of April 26, 2023 Adafruit has updated this product with a cuttable jumper to disable power LED.]


(*) Disclosure: As an Amazon Associate I earn from qualifying purchases.

Performing AS7341 Sensor Integration in Parallel Resolved Mozzi Glitches

I’ve set up an ESP32 development board for interfacing with both an AS7341 spectral color sensor as well as Mozzi audio generation libraries. This is a follow-up to my project doing the same with an AVR ATmega328-based Arduino Nano. On those AVR boards, trying to compile Mozzi with Adafruit’s AS7341 library would fail due to conflict between Mozzi’s twi_nonblock I2C library and Arduino’s Wire I2C library.

[...]\libraries\Mozzi-master\twi_nonblock.cpp.o (symbol from plugin): In function `initialize_twi_nonblock()':
(.text+0x0): multiple definition of `__vector_24'
[...]\libraries\Wire\utility\twi.c.o (symbol from plugin):(.text+0x0): first defined here
collect2.exe: error: ld returned 1 exit status

exit status 1

Compilation error: exit status 1

My earlier project solved that problem by avoiding Arduino Wire library, writing AS7341 interface code with twi_nonblock while using Adafruit’s library as a guide. (But unable to copy code straight from it.) However, twi_nonblock is excluded from non-AVR platforms like ESP32. The good news is that we avoid above compiler error, the bad news is that we’re on our own to find a non-blocking I2C API. For an ESP32, that meant dropping down to Espressif’s ESP-IDF I2C API. I believe that’s within my coding capabilities, but there was an easier way.

Why does as7341.readAllChannels() consume so much time that it causes Mozzi audio glitches? Arduino Wire’s blocking I2C operations are certainly a part of that process, but most of that time is spent in AS7341 sensor integration. as7341.readAllChannels() starts an integration and waits for it to complete before returning results, blocking our Arduino sketch the entire time. But Adafruit foresaw this problem and included a provision in their AS7341 library: we can start an integration without blocking on it. Our sketch resumes code execution, allowing Mozzi to update audio while integration occurs in parallel. Once integration is complete, we can retrieve the values and do all the same things we would do for results of as7341.readAllChannels().

This concept was illustrated in the Adafruit example sketch reading_while_looping, which I thought was promising when I reviewed all example sketches earlier. I couldn’t try it on an AVR due to Wire/twi_nonblock compiler conflict, but I could give it a shot on this ESP32. I started with the reading_while_looping example sketch and converted it over to a Mozzi sketch. First by moving existing code in loop() into updateControl(), leaving just a call to audioHook() inside loop(). For my first test I didn’t need anything fancy, so I just had Mozzi play a steady 440Hz sine wave in updateAudio(). (A440 is the note used by western classical music orchestra to verify all instruments are in tune with each other.)

The first run was a disaster! Audio glitches all over the place, but I knew there was room for improvement. There was an entirely unnecessary delay(500), which I deleted. Interleaved with the parallel integration is a blocking integration to our old friend as7341.readAllChannels(). I don’t understand why the blocking code is in the middle of a non-blocking example, but I deleted that, too. This removed most of the problems and left a little recurring audible click. Looking over what’s left, I noticed this sketch made quite a number of calls to Serial.println(). After their removal I no longer heard glitches in Mozzi audio.

I2C communication is still performed with Arduino Wire library. But this experiment empirically showed the communication is fast enough on an ESP32 that Mozzi does not audibly glitch despite Wire’s blocking nature. This is much easier than dropping down to ESP-IDF I2C API. Also, this approach portable to other non-AVR Mozzi platforms like Teensy.

After this successful experiment, I modified one of Emily’s color organ sketches and the resulting pull request shows the changes I had to make. They were quite minimal compared to rewriting everything with twi_nonblock.

Playing with Mozzi was a fun challenge catering to its timing requirements. But as I proceed to play with AS7341, I’d prefer to shed Mozzi timing constraint and focus on other capabilities of this sensor.


Code for this exploration is publicly available on GitHub

JST-SH (STEMMA QT) and 3.5mm (Headphone Audio) Jack for ESP32 Mini

It was an interesting challenge to write code which talked to an AS7341 spectral color sensor using Mozzi’s twi_nonblock API for I2C communication. I referenced Adafruit’s AS7341 library heavily, but I couldn’t copy much (any?) code directly on account of the differences between Arduino Wire I2C and twi_nonblock. But twi_nonblock is only supported for AVR chips, and Mozzi runs on additional architectures such as ESP32. Can I get AS7341 to play nice with Mozzi on those platforms?

For my earlier AVR adventures, I laid out my hardware components on a breadboard. This time, with a bit more confidence, I’m going to wire the components point-to-point without a breadboard. Which means I am free to use my breadboard unfriendly ESP32 Mini board and equip it for integrating Mozzi with AS7341.

For Mozzi audio output on AVR ATmega328 Arduino Nano, I wired an earbud headphone directly to pin D9. I was comfortable doing this as the ATmega328 is a fairly robust chip tolerant of simple direct designs like this. However, the ESP32 is not designed for similar scenarios, and I should take a bit of effort to make sure I don’t kill my chip. Thankfully Mozzi has a guide on how to connect audio with an RC (resistor+capacitor) filter which should be better than nothing to protect the ESP32 pin used for audio output. According to Mozzi documentation, both GPIO25 and GPIO26 are used. I soldered my resistor to GPIO26.

For audio hardware interface, I used a 3.5mm jack salvaged from a cheap digital photo frame I tore down long ago. (Before I started documenting my teardowns on this blog.) This was technically the video output port with four conductors inside the 3.5mm TRRS jack for composite video, audio left, audio right, and ground. But I only need two of the wires: ground plus one audio signal. The other two wires were left unused here.

For AS7341 interface, I dug up my pack of JST-SH connectors (*) originally bought for a BeagleBone Blue but went unused. This is mechanically compatible with Adafruit’s STEMMA QT connectors on their AS7341 breakout board #4698. However, the wire colors in my pack of pre-crimped connectors do not match convention for how they are used in a STEMMA QT. Testing for continuity, I found the following:

  • White = Ground (GND) should be black
  • Yellow = Power (VIN) should be red
  • Black = Data (SDA)
  • Red = Clock (SCL)

I briefly contemplated popping individual pre-crimped wires out of the connector and rearranging them, then I decided this was a quick hack prototype and I didn’t care enough to spend time fiddling with tiny fussy connectors. (This is why I bought them pre-crimped!) Hopefully this decision wouldn’t come back to bite me later. I soldered I2C data wire (black) to GPIO21 and I2C clock wire (red) to GPIO22. Power and ground went to their respective pins on the ESP32 Mini.

This should be enough hardware for me to start investigating the software side.


(*) Disclosure: As an Amazon Associate I earn from qualifying purchases.

AS7341 Spectral Color Sensor with Mozzi on AVR Arduino

Looks like I will never learn how to build custom configurations for AS7341 SMUX, but at least I have presets I could copy/paste and that’s good enough for my hobbyist level project. The goal is to convert I2C communication from Arduino’s standard Wire library to the twi_nonblock library bundled as part of Mozzi library. Arduino Wire library would block execution while I2C communication is ongoing, which causes audible glitches with Mozzi sketches. Converting to twi_nonblock avoids that issue.

Using Adafruit’s AS7341 Arduino library and sample sketches as my guide, it was relatively straightforward to converting initialization routines. Partly because most of them were single-register writes, but mostly because non-blocking isn’t a big concern for setup. I could get away with some blocking operations which also verified I2C hardware was working before adding the variable of nonblocking behavior into the mix.

To replicate Adafruit’s readAllChannels() behavior in a nonblocking manner, I split the task into three levels of state machines to track asynchronous actions:

  • Lowest level state machine tracks a single I2C read operation. Write the address, start a read, and copy the results.
  • Mid level state machine pulls data from all 6 AS7341 ADC. This means setting up SMUX to one of two presets then waiting for that to complete. Start sensor integration, then wait for that to complete. And finally copy sensor results. Each read operation is delegated to the lower level state machine.
  • High level state machine runs the mid-level state machine twice, once for each SMUX preset configuration.

Once that high level state machine runs through both SMUX preset configurations, we have data from 10 spectral sensors. The flicker detector is the 11th sensor and not used here. This replicates the results of Adafruit’s readAllChannels() without its blocking behavior. Getting there required an implementation which is significantly different. (I don’t think I copied any Adafruit code.)

While putting this project together, my test just printed all ten sensor values out to serial console. In order to make things a little more interesting, I brought this back full circle and emulated the behavior of Emily Velasco’s color organ experiment. Or at least, an earlier version of it that played a single note depending on which sensor had returned highest count. (Emily has since experimented with vibrato and chords.) I added a lot of comments my version of the experiment hopefully making it suitable as a learning example. As a “Thank You” to Emily for introducing me to the AS7341, I packaged this project into a pull request on her color organ repository, which she accepted and merged.

This is not the end of the story. twi_nonblock supports only AVR-based Arduino boards like the ATmega328P-based Arduino Nano I used for this project. What about processors at the heart of other Arduino-compatible boards like the ESP32? They can’t use twi_nonblock and would have to do something else for glitch-free Mozzi audio. That’ll be a separate challenge to tackle.


Code for this project is publicly available on GitHub.

Unrolling Adafruit AS7341 readAllChannels()

After successfully reading an AS7341’s product ID via a non-blocking I2C API, I have gained confidence I can replicate any existing AS7341 library’s actions with the non-blocking I2C API. This way it will play nice with Mozzi library. I decided to focus on Adafruit_AS7341::readAllChanels() because it seemed like the most useful one to convert to non-blocking operation. It was used in multiple examples as well as Emily’s color organ project.

bool Adafruit_AS7341::readAllChannels(uint16_t *readings_buffer) {

  setSMUXLowChannels(true);        // Configure SMUX to read low channels
  enableSpectralMeasurement(true); // Start integration
  delayForData(0);                 // I'll wait for you for all time

  Adafruit_BusIO_Register channel_data_reg =
      Adafruit_BusIO_Register(i2c_dev, AS7341_CH0_DATA_L, 2);

  bool low_success = channel_data_reg.read((uint8_t *)readings_buffer, 12);

  setSMUXLowChannels(false);       // Configure SMUX to read high channels
  enableSpectralMeasurement(true); // Start integration
  delayForData(0);                 // I'll wait for you for all time

  return low_success &&
         channel_data_reg.read((uint8_t *)&readings_buffer[6], 12);
}

Examining this code, we can see it does the same thing twice, differing only in a single boolean parameter to setSMUXLowChannels. This reflects AS7341 architecture where we have more sensors than ADCs so we have to configure SMUX to read a subset then reconfigure SMUX to read remaining sensors.

void Adafruit_AS7341::setSMUXLowChannels(bool f1_f4) {
  enableSpectralMeasurement(false);
  setSMUXCommand(AS7341_SMUX_CMD_WRITE);
  if (f1_f4) {
    setup_F1F4_Clear_NIR();
  } else {
    setup_F5F8_Clear_NIR();
  }
  enableSMUX();
}

Digging into setSMUXLowChannels we see the following actions:

  1. enableSpectralMeasurement disables a register bit to turn off spectral measurement, necessary preparation for SMUX reconfiguration.
  2. setSMUXCommand flips a different register bit to notify AS7341 that a new SMUX configuration is about to be uploaded.
  3. Upload one of two SMUX configurations, depending on boolean parameter.
  4. enableSMUX repeatedly reads a register bit until it flips to 0, which is how AS7341 signifies that SMUX reconfiguration is complete.

Steps 1-3 above are I2C writes and can be done quickly. Step 4 will add complication: not only is it an I2C read, but we might also need to read it several times before the bit flips to zero.

Backing out to readAllChannels, we see spectral measurement bit is flipped back on after SMUX reconfiguration. According to the datasheet, flipping this bit back on is a signal to start a new reading. How do we know when sensor integration is complete? That’s indicated by yet another register bit. delayForData repeatedly reads that until it flips to 1, clearing the way for us to read 12 bytes of sensor data. Representing data from all six ADCs channels, each of which gives us 16 bits (2 bytes) of data.

Unrolling all of the above code in terms of I2C operations, readAllChannels breaks down to:

  1. I2C register write to turn OFF spectral measurement.
  2. I2C register write to notify incoming SMUX configuration data.
  3. I2C write to upload SMUX configuration for ADC to read sensors F1 through F4, plus Clear and NIR channels.
  4. Repeated I2C read for “SMUX reconfiguration” flag until that bit flips to 0.
  5. I2C register write to turn ON spectral measurement. (Starts new sensor integration.)
  6. Repeated I2C read for “Sensor integration complete” flag until that bit flips to 1.
  7. I2C read to download sensor data
  8. Repeat 1-7, except step #3 uploads SMUX configuration for sensors F5 through F8 instead of F1 through F4.

I like this plan but before I roll up my sleeves, I wanted to take a closer look at SMUX configuration.


Code for this project is publicly available on GitHub.

Hello AS7341 ID via Non-Blocking I2C

I’ve refreshed my memory of Mozzi and its twi_nonblock API for non-blocking I2C operations, the next step is to write a relatively simple Hello World to verify I can communicate with an AS7341 with that API. While reading AS7341 datasheet I noted a great candidate for this operation: product ID and revision ID registers.

In order to use twi_nonblock we need to break a blocking read() up to at least three non-blocking steps in order to avoid glitching Mozzi sound:

  1. We start with an I2C write to tell the chip which register we want to start from. Once we set parameters, I2C hardware peripheral can do the rest. In the meantime, we return control to the rest of the sketch so Mozzi can do things like updateAudio(). During each execution of updateControl() we check I2C hardware status to see if the write had completed. If it’s still running, we resume doing other work in our sketch and will check again later.
  2. If step 1 is complete and address had been sent, we configure I2C hardware peripheral to receive data from A7341. Once that has been kicked off, we return control to the rest of the sketch for updateAudio() and such. During each execution of updateControl() we check I2C hardware status to see if data transfer had completed. If it’s not done yet, we resume running other code and will check again later.
  3. If data transfer from AS7341 is complete, we copy the transferred data into our sketch and our application logic can take it from there.

My MMA_7660 sketch tracked above states #1-3 within updateControl(), following precedence set by Mozzi’s ADXL354 example. But that was a simple sensor to use, we just had to read three registers in a single operation. AS7341 is a lot more complex with multiple different read operations, so I pulled that state machine out of updateControl() and into its own method async_read(). The caller can keep calling async_read() on every updateControl() until the state reaches ASYNC_COMPLETE, at which point the process stops waiting for data to be copied and processed. Whenever the caller is ready to make another asynchronous read, they can set the state to ASYNC_IDLE and the next async_read() will start the process again.

As a test of this revamped system, I used it to read two bytes from AS7341 starting at register 0x91. 0x91 is for revision ID and the following byte 0x92 is the product ID. I wasn’t sure what to expect for revision ID, I got zero. But according to the datasheet product ID is supposed to be 0x09, and that matches what I retrieved. A great start! Now I can dig deeper and figure out how to read its sensors with nonblocking I2C.


Code for this project is publicly available on GitHub.

Refresher on Mozzi Timing Before Tackling AS7341

I’ve decided to tackle the challenge of writing a Mozzi-friendly way to use an AS7341 sensor, using nonblocking I2C library twi_nonblock. At a high level, this is a follow-up to my MMA7660 accelerometer Mozzi project several years ago. Due to lack of practice in the meantime I have forgotten much about Mozzi and need a quick refresher. Fortunately, Anatomy of a Mozzi sketch brought most of those memories back.

I connected a salvaged audio jack to the breadboard where I already had an Arduino Nano and my Adafruit AS7341 breakout board. (The AS7341 will sit idle while I refamiliarize myself with Mozzi before I try to integrate them.) After I confirmed the simple sine wave sketch generated an audible tone on my test earbuds, I started my first experiment.

I wanted to verify that I understood my timing constraints. I added three counters: the first is incremented whenever loop() is called. The second when Mozzi calls the updateControl() callback, and the third for updateAudio() callback. Inside loop(), I check millis() to see if at least one second has passed. If it had, I print values of all three counters before resetting them back to zero. This test dumps out the number of times each of these callbacks occur every second.

loop 165027 updateControl 64 updateAudio 16401
loop 164860 updateControl 63 updateAudio 16384
loop 165027 updateControl 64 updateAudio 16401
loop 164859 updateControl 64 updateAudio 16384
loop 165027 updateControl 64 updateAudio 16401
loop 164860 updateControl 63 updateAudio 16384
loop 165028 updateControl 64 updateAudio 16400
loop 164859 updateControl 64 updateAudio 16385
loop 165027 updateControl 64 updateAudio 16400
loop 164858 updateControl 64 updateAudio 16384
loop 165029 updateControl 63 updateAudio 16401
loop 164858 updateControl 64 updateAudio 16384
loop 165027 updateControl 64 updateAudio 16401
loop 164858 updateControl 64 updateAudio 16384
loop 165029 updateControl 64 updateAudio 16400
loop 164860 updateControl 63 updateAudio 16384

Arduino framework calls back into loop() as fast as it possibly can. In the case of this Mozzi Hello World, it is called roughly 165,000 times a second. This represents a maximum on loop() frequency: as a sketch grows in complexity, this number can only drop lower.

In a Mozzi sketch, loop() calls into Mozzi’s audioHook(), which will call the remaining two methods. From this experiment I see updateControl() is called 63 or 64 times a second, which lines up with the default value of Mozzi’s CONTROL_RATE parameter. If a sketch needs to react more quickly to input, a Mozzi sketch can #define CONTROL_RATE to a higher number. Mozzi documentation says it is optimal to use powers of two, so if the default 64 is too slow we can up it to 128, 256, 512, etc.

We can’t dial it up too high, though, before we risk interfering with updateAudio(). We need to ensure updateAudio() is called whenever the state of audio output needs to be recalculated. Mozzi’s default STANDARD mode runs at 16384Hz, which lines up with the number seen in this counter output. If we spend too much time in updateControl(), or call it too often with a high CONTROL_RATE, we’d miss regular update of updateAudio() and those misses will cause audible glitches. While 16 times every millisecond is a very high rate of speed by human brain standards, a microcontroller can still do quite a lot of work in between calls as long as we plan our code correctly.

Part of a proper plan is to make sure we don’t block execution waiting on something that takes too long. Unfortunately, Arduino’s Wire library for I2C blocks code execution waiting for read operations to complete. This wait is typically on the order of single-digit number of milliseconds, which is fast enough for most purposes. But even a single millisecond of delay in updateControl() means missing more than 16 calls to updateAudio(). This is why we need to break up operations into a series of nonblocking calls: we need to get back to updateAudio() between those steps during execution. Fortunately, during setup we can get away with blocking calls.

New Project: Mozzi + AS7341

After looking at Adafruit’s AS7341 library and its collection of example sketches, I will now embark on a new project: make Mozzi play nice with AMS AS7341 sensor. If successful, it would solve a problem for my friend Emily Velasco who got me interested in the AS7341 to begin with. Her project uses Mozzi library to generate sounds but calls into AS7341 API would cause audible pops.

The problem is that AS7341 libraries from Adafruit and DFRobot both use Arduino’s Wire library for I2C communication. (Adafruit actually goes to their BusIO library which then calls into Wire.) These are blocking calls meaning the microcontroller can’t do anything else until the operation completes. This is especially problematic for I2C reads: We have to perform a write to send the register address we want to read from, then start a read operation, and wait for the data to come in. This operation is usually faster than an eyeblink, but that’s still long enough to cause a pop in Mozzi audio.

To help solve this problem, Mozzi includes a library called twi_nonblock. It allows us to perform I2C operations in a non-blocking manner so Mozzi audio can continue without interruption. Unfortunately, it is a lot more complicated to write code in this way, and it only supports AVR-based Arduino boards, so people usually don’t bother with it. Mozzi includes an example sketch, altering sounds based on orientation of an ADXL345 accelerometer. A few years ago, I took that example and converted it to run with a MMA7660 accelerometer instead.

If I could interface with an AS7341 using Mozzi’s twi_nonblock, it would allow color-reactive Mozzi sketches like Emily’s to run on AVR-based Arduino boards without audio glitches. But the AS7341 is far more complex than a MMA7660 accelerometer. I’ve got my work cut out for me but if it works, I will gain a great deal of confidence and experience on the AS7341 as well as a refresher on working with Mozzi.


Code for this project is publicly available on GitHub.

Notes on Adafruit AS7341 Arduino Library Example Code

I’ve purchased an AS7341 breakout board from Adafruit (#4698) and read through their guide (single-page view) on the board. It’s nice to see their library takes care of the complexity of this chip’s internals such as SMUX configuration. Examples that come bundled with a library is always a good overview of capabilities, and this is what I see from its examples directory:

  • basic_counts: “Basic Counts” is a concept described in the AS7341 calibration application note. A bit of math that takes raw sensor counts and compensates for gain and integration time. AMS recommends application logic work with “Basic Counts”. This lets us change gain and integration based on environment and still keep the rest of the application logic unchanged.
  • flicker_detection: Prime concern of flicker detection is with household AC power frequencies of 50Hz or 60Hz however this sensor is not limited to those rates. The datasheet says it can detect flicker frequencies up to 2kHz. This capability feels like a potential project all by itself, I’ll have to think more about it.
  • get_channel: Performs a read of all channels then iterates through 10 spectral sensing channels of 8 visible spectrum + clear + infrared to print their raw counts. (Flicker detection channel is ignored.)
  • gpio_example: Using the “GPIO” pin as a digital output. High for 3 seconds and low for half a second and repeat. Important note: according to board schematic published by Adafruit, the GPIO pin is brought out directly to the headers. There is no voltage level shifting or protection on this pin so be sure to consult datasheet and be nice to this 1.8V part.
  • gpio_input_example: Using the “GPIO” pin as digital input. Samples every half second and prints either “high” or “low” to serial console.
  • led_test: The canonical “blink a LED” test implemented with the LED Adafruit installed on the breakout board connected to AS7341’s LDR pin. Lights up at 4mA for 1/10th of a second, dark for half a second, light up to 100mA for 1/10th of a second, dark for another half a second, and repeat. Note while the AS7341 constant current control register goes up to 258mA, we shouldn’t go that far. According to board schematic published by Adafruit, the onboard LED is an EAHC2835WD6 with recommended ceiling of 150mA and absolute maximum of 180mA.
  • plotter_example: A clever variation on get_channel designed to work with Arduino IDE’s Serial Plotter feature. Five comma-separated sensor values are printed on a line so that when we turn on Serial Plotter, the plotter line drawing colors are close to the color wavelength of that sensor.
  • read_all_channels: This is almost identical to get_channel. The only difference is this sketch passes an array into the call to readAllChannels() and prints from sketch’s own array. get_channel does the exact same thing using the array stored in Adafruit library object.
  • reading_while_looping: Most of these examples call readAllChannels(), which is a blocking call that waits for sensor integration to complete before returning with results. Depending on integration time configuration, delay caused by waiting can be problematic. This sketch illustrates a way to initiate AS7341 integration and yield control so other things can happen until integration is complete. Note: the I2C operations involved are still blocking calls via Arduino’s Wire library.
  • smux_test: I didn’t understand this sketch. It has an empty loop() and I don’t see how setup() tests SMUX in any way.
  • spectral_interrupts: By its name I hoped to see a demonstration of using AS7341 INT pin to generate a hardware interrupt signal for Arduino microcontroller, triggering an ISR (interrupt service routine) for sensor read. I was wrong, the “interrupt” for this sketch is merely a register flag that we read from within loop().
  • synd_mode: By its name I hoped to see a demonstration of using GPIO pin to trigger start of AS7341 sensor integration. This time I think I got my wish! Unlike all of the other examples, this sketch doesn’t use Adafruit’s AS7341 library and was not written by anyone at Adafruit. It uses the Wire library directly and was written by an AMS application support engineer.

Despite mysteries like smux_test, I see a good set of examples here to help me become familiar with AS7341 capabilities. A sensible person would start their exploration with simple modifications to one of these sample sketches. I did not go down that path of sensibility.

Adafruit SSD1305 Arduino Library on ESP8266

Thanks to Adafruit publishing an Arduino library for interfacing with SSD1305 display driver chip, I proved that it’s possible to control an OLED dot matrix display from a broken FormLabs Form 1+ laser resin 3D printer. But the process wasn’t seamless, I ran into several problems using this library:

  1. Failed to run on ESP32 Arduino Core due to watchdog timer reset.
  2. 4 pixel horizontal offset when set to 128×32 resolution.
  3. Sketch runs only once on Arduino Nano 33 BLE Sense, immediately after uploading.

Since Adafruit published the source code for this library, I thought I’d take a look to see if anything might explain any of these problems. For the first problem of watchdog reset on ESP32, I found a comment block where the author notes potential problems with watchdog timers. It sounds like an ESP8266 is a platform known to work, so I should try that.

  // ESP8266 needs a periodic yield() call to avoid watchdog reset.
  // With the limited size of SSD1305 displays, and the fast bitrate
  // being used (1 MHz or more), I think one yield() immediately before
  // a screen write and one immediately after should cover it.  But if
  // not, if this becomes a problem, yields() might be added in the
  // 32-byte transfer condition below.

While I’m setting up an ESP8266, I could also try to address the horizontal offset. It seems a column offset of four pixels were deliberately added for 32-pixel tall displays, something not done for 64-pixel tall displays.

  if (HEIGHT == 32) {
    page_offset = 4;
    column_offset = 4;
    if (!oled_commandList(init_128x32, sizeof(init_128x32))) {
      return false;
    }
  } else {
    // 128x64 high
    page_offset = 0;
    if (!oled_commandList(init_128x64, sizeof(init_128x64))) {
      return false;
    }
  }

There was no comment to explain why this line of code was here. My best guess is the relevant Adafruit product has internally wired its columns with four pixels of offset, so this code makes a shift to compensate. If I remove this line of code and rebuild, my OLED displays correctly.

As for the final problem of running just once (immediately after upload) on an Arduino Nano 33 BLE Sense, I don’t have any hypothesis. My ESP8266 happily restarted this test sketch whenever I pressed the reset button or power cycled the system. I’m going to chalk it up to a hardware-specific issue with the Arduino Nano 33 BLE Sense board. At the moment I have no knowledge (and probably no equipment and definitely no motivation) for more in-depth debugging of its nRF52840 chip or Arm Mbed OS.

Now I have this OLED working well with an ESP8266, a hardware platform I have on hand, I can confidently describe this display module’s pinout.

First Test with Adafruit SSD1305 Library

I feel I now have a good grasp on how I would repurpose the OLED dot matrix display from a broken FormLabs Form 1+ laser resin 3D printer. I felt I could have figured out enough to play back commands captured by my logic analyzer, interspersed with my own data, similar to how I controlled a salvaged I2C LCD. But this exploration was much easier because a user on FormLabs forums recognized the SSD1305-based display module. Thanks to that information, I had a datasheet to decipher the commands, and I could go searching to see if anyone has written code to interface with a SSD1305. Adafruit, because they are awesome, published an Arduino library to do exactly that.

Adafruit’s library was written to support several of their products that used an SSD1305, including product #2675 Monochrome 2.3″ 128×32 OLED Graphic Display Module Kit which looks very similar to the display in a Form 1+ except not on a FormLabs custom circuit board. Adafruit’s board has 20 pins in a single row, much like the Newhaven Display board but visibly more compact. Adafruit added level shifters for 5V microcontroller compatibility as well as an extra 220uF capacitor to help buffer power consumption.

Since the FormLabs custom board lacked such luxuries, I need to use a 3.3V Arduino-compatible microcontroller. The most convenient module at hand (because it was used in my most recent project) happened to be an ESP32. The ssd1305test example sketch of Adafruit’s library compiled and uploaded successfully but threw the ESP32 into a reset loop. I changed the Arduino IDE Serial Monitor baud rate to 115200 and saw this error message repeating endlessly every few seconds.

ets Jun  8 2016 00:22:57

rst:0x8 (TG1WDT_SYS_RESET),boot:0x13 (SPI_FAST_FLASH_BOOT)
configsip: 0, SPIWP:0xee
clk_drv:0x00,q_drv:0x00,d_drv:0x00,cs0_drv:0x00,hd_drv:0x00,wp_drv:0x00
mode:DIO, clock div:1
load:0x3fff0030,len:1344
load:0x40078000,len:13516
load:0x40080400,len:3604
entry 0x400805f0
SSD1305 OLED test

Three letters jumped out at me: WDT, the watchdog timer. Something in this example sketch is taking too long to do its thing, causing the system to believe it has locked up and needs a reset to recover. One unusual aspect of ssd1305test code is that all work live in setup() leaving an empty loop(). As an experiment, I moved majority of code to loop(), but that didn’t fix the problem. Something else is wrong but it’ll take more debugging.

To see if it’s the code or if it is the hardware, I pulled out a different 3.3V microcontroller: an Arduino Nano 33 BLE Sense. I chose this hardware because its default SPI communication pins are those already used in the sample sketch, making me optimistic it is a more suitable piece of hardware. The sketch ran without triggering its watchdog dimer, so there’s an ESP32 incompatibility somewhere in the Adafruit library. Once I saw the sketch was running, I connected the OLED and immediately saw the next problem: screen resolution. I see graphics, but only the lower half. To adjust, I changed the height dimension passed into the constructor from 64 to 32. (Second parameter.)

Adafruit_SSD1305 display(128, 32, &SPI, OLED_DC, OLED_RESET, OLED_CS, 7000000UL);

Most of the code gracefully adjusted to render at 32 pixel height, but there’s a visual glitch where pixels are horizontally offset: the entire image has shifted to the right by 4 pixels, and what’s supposed to be the rightmost 4 pixels are shown on the left edge instead.

The third problem I encountered is this sketch only runs once, immediately after successful uploading to the Nano 33 BLE Sense. If I press the reset button or perform a power cycle, the screen never shows anything again.

Graphics onscreen prove this OLED responds to an SSD1305 library, but this behavior warrants a closer look into library code.

LED Strobing to Fan Speed Signal

The reason I cared about power-on response time of a salvaged LED array is because I wanted to use it as a strobe light shining on a cooling fan pulsing once per revolution. Historically strobe lights used xenon bulbs for their fast response, as normal incandescent bulbs were too slow. This LED array used to be a battery-powered work light with no concern of reaction time, but LEDs are naturally faster than incandescent. Is it fast enough for the job? PC case fan specifications usually range from the hundreds to low thousands of RPM. Using 1200RPM as a convenient example, that means 1200/60 seconds per minute = 20 revolutions per second. Pulsing at 20Hz should be easy for any LED.

For the hardware side of controlling LED flashes, I used a 2N2222A transistor because I had a bulk bag of them. They are usually good for switching up to 0.8 Amps of current. I measured this LED array and it drew roughly 0.3 Amps at 11.3V, comfortably within limits. I just need to connect this transistor’s base to a microcontroller to toggle this light on and off. For this experiment I repurposed the board I had built for the first version of my bedstand fan project. I unsoldered the TMP36 sensor to free up space for 2N2222A and associated LED power wire connector.

This board also had the convenience of an already-connected fan tachometer wire. My earlier project used it for its original purpose of counting fan RPM, but now I will use those pulses to trigger a LED flash. Since timing is critical, I can’t just poll that signal wire and need a hardware interrupt instead. Within Arduino framework I could use attachInterrupt() for this purpose and run a small bit of code on every tachometer wire signal pulse. Using an ESP8266 for this job had an upside and a downside. The upside is that interrupts could be attached to any available GPIO pin, I’m not limited to specific pins like I would have been with an ATmega328P. The downside is that I have to use an architecture-specific keyword IRAM_ATTR to ensure this code lives in the correct part of memory, something not necessary for an ATmega328P.

Because it runs in a timing-critical state, ISR code is restricted in what it can call. ISR should do just what they absolutely need to do at that time, and exit allowing normal code to resume. So many time-related things like millis() and delay() won’t work as they normally would. Fortunately delayMicroseconds() can be used to control duration of each LED pulse, even though I’m not supposed to dawdle inside an ISR. Just for experiment’s sake, though, I’ll pause things just a bit. My understanding of documentation is as long as I keep the delay well under 1 millisecond (1000 microseconds) nothing else should be overly starved for CPU time. Which was enough for this quick experiment, because I started noticing motion blur if I keep the LED illuminated for more than ~750 microseconds. The ideal tradeoff between “too dim” and “motion blurred” seems to be around 250 microseconds for me. This tradeoff will be different for every different combination of fan, circuit, LED, and ambient light.

My minimalist Arduino sketch for this experiment (using delayMicroseconds() against best practices) is publicly available on GitHub, as fan_tach_led within my ESP8266Tests repository. Next step in this project is to move it over to ESPHome for bells and whistles.

Honda CD Spinner Demo

I am at a good stopping point for my exploration of a retired CD player control panel from a Honda Accord. At this point I can interact with all audio control button and knobs, and control what is displayed on its output LCD controlled by Sanyo LC75883 chip. My Arduino sketch toggles through several different modes when I press the “Mode” button (read via LC75883): Turn all segments on, or a “drawing mode” of turning on individual segments selected via the quadrature encoder knob. Very functional, but I wanted to put together something a little flashier before I move on to the next project.

After I figured out the Toyota tape deck, I made a simple Larson scanner. I could do another Larson scanner with this LCD, but I thought I could put together something more interesting. The central attention-getting element of this segmented LCD is a series of 24 segments arranged in a circle. I’ve never seen this LCD work in normal operation, but since it is a CD player, I assume it showed graphics that resembled a spinning CD. A quick test confirmed that I could show a spinning animation, so I will make that the centerpiece for a demo. The next question is what to do with remaining segments.

There are ten 7+ segment displays. Four to the left of the spinner, three above, and four to the right. Some of these have additional segments, likely to display specific subsets of the alphabet. That works for static text, but it rules out scrolling text.

There are two additional segments that appear to be 7-segment numeric display but are not. Above the spinner is apparently a clock, as there are two elements that pretend to be “1” of a 7-segment numeric display but is in fact a single segment. And far to the right is a number that appear to be a 7-segment display but is in fact only three segments and thus extremely limited.

I also have a few miscellaneous elements for describing CD operation. “DISC”, “TRACK” “RPT”, etc. Plus six numbered CDs for the six-disc changer. I haven’t thought of anything useful to do with those beyond a Larson scanner-like animation.

I settled on the following:

  • Focus on center spinning CD animation using its 24 segments.
  • All the individually controllable 7-segment displays will use their outer 6 segments and also display a spinning animation.
  • There will be 12 frames in the animation, which works out evenly for the 24-segment CD and 6-segment outer digit segments.
  • Most of the remaining segments will form a near-vertical section of 1 in 12 bands, they will animate left-and-right in a Larson scanner-like manner.

The animation cycle: CD and digits spins clockwise, and the bands will move in one direction. The motion will slow, then reverse and acceleration. Then it will decelerate and reverse again, and the loop repeats. It didn’t turn out quite as visually interesting as I had hoped, but I’m not going to invest in the time to make a better animation. It is sufficient to show off the fact I have full control all segments independent of this LCD’s original designed purpose.

Source code for this demo is part of the investigation project available on GitHub.

Honda CD Control Detours

After I finally found my mistake reading a Honda CD control panel’s input (I had left the reset pin floating) I think I have a pretty good handle on communicating with it. The CD audio side, at least, as I had no interest in figuring out the HVAC side. But before I wrap up with a summary and demo, this page describes two additional experiments for future reference.

External Quadrature Encoder

Before I realized my problem was a floating reset pin, I wired in an external quadrature encoder to determine if the problem might be with the Honda circuit board or if it was my code. There was an added bonus that this particular quadrature encoder was designed so that every detent would be high/high. I knew the problem of LCD blanking out was related to grounding various controls (buttons or this knob) to ground, so with its four transitions per detent, this knob would quickly blitz through the problematic states as a workaround.

Successful use of the external knob also meant I now know the LCD wasn’t blanking out due to something in my code, or even something in the Arduino as related to a quadrature encoder. The LCD would blank out if the onboard knob was in the wrong position, even if none of its wired connected to my Arduino. This observation was consistent with the actual cause of a floating reset pin. I removed this external knob once the reset pin was no longer left floating, making room for the next experiment.

Boost Converter for LCD Backlight

When I had illuminated the LCD backlight using my bench power supply, it indicated the backlight drew 0.2A at 14.4V ~= 3W. I thought that would be within reasonable range for a USB power bank, so I dug up a DC voltage boost converter (*) from a batch I had bought for an earlier project. I connected the voltage input to Arduino VIN pin and adjusted the converter to 14.4V open-circuit output voltage. But when I connected that output to the LCD backlight, voltage sagged and the USB power bank went into a continuous reset loop consistent with overload response.

I wasn’t sure if the overload was a startup issue, a transient issue, or a continuous power issue. As an experiment I soldered 220μF capacitors to both input and output. This did not change the behavior: the USB power bank still enters a continuous reset loop. I added a USB power meter (*) between my power bank and the Arduino and it said the circuit tried to draw 3 amps. Yikes! That explains the reset when I had expected only 0.6 amps (3 watts / 5 volts) to be drawn.

I’ll revisit the LCD backlight power supply issue later, if I decide to reuse this LCD for something fun. At least this failed experiment let me know boost converter power draw is more complex than (Power) = (Voltage)*(Current). It is also another checkmark next to “I should learn how boost converters work” on my to-do list, I hope with such knowledge I could properly diagnose this failure to verify I understand the situation correctly.


(*) Disclosure: As an Amazon Associate I earn from qualifying purchases.

Reuse Honda CD Connector for Arduino

Once I got over the excitement of lighting up the bulbs and LEDs on a Honda CD control panel, I returned to the original CD player mainboard. The labels on its panel connector gave me the confidence to apply power and expect illumination instead of the smoke of fried electronics. But now I have the labels documented for future reference, I will remove the connector for my own use.

Desoldering was mostly smooth except for the trio of ground pins. They were connected to thick ground traces that dissipated a lot of heat, making it difficult to melt the solder. For the final ground pin, I saw the solder had melted and pulled hard on the connector. Unfortunately, it had not yet melted all the way through so my yank damaged the pin. Well, at least I still have two intact ground pins to work with.

I still don’t know the manufacturer or name for this connector, but it is very similar to the connector I saw on a Toyota tape deck doing the same job. Which meant it shared the pin pitch of 0.1″ (just like a perforated prototype board!) and two rows 0.1″ apart (just like a perforated prototype board!) staggered with a 0.05″ offset. (Just like… oh no! It isn’t.) For the Toyota tape deck project, I gave up on a circuit board and directly soldered wires to connect pins. But I had been thinking about the problem since then and I have an idea I want to try.

I took one of my perforated prototype boards, cut a groove down a row of holes, and snapped it off. This exposed a row of semicircular vias that I could solder to one of the two rows on this connector. For the other row, I would still have to solder to wires directly.

It’s not nearly as solid of a connection as a custom circuit board with the proper pin layout, but it is still far better than nothing. My modified prototype board left just enough space to accommodate an Arduino Nano.

Flipping this assembly over allowed me to solder wires between the Arduino and the salvaged connector.

It is a far more compact and less accident-prone solution than my previous breadboard mess.

Sadly, it did not work straight off the bat. I had to do some debugging to bring it to parity with my breadboard solution, but the debugging session also solved a standing mystery.


Arduino code and other information for this investigation is available on GitHub.

Honda CD LCD Driver Problems

I’ve got the control panel for a Honda Accord’s CD/HVAC and I think I’ve found the electrical connections to talk to the LC75883 LCD driver. The software side was based on my LC75853 test program, which needed a few modifications to fit this LC75883 chip. It can control more segments, so I have to send three CCB messages of 9 bytes each instead of three messages of 7 bytes. Other than that, these two chips both respond to the same CCB addresses: 0x42 to send LCD control bits, 0x43 to read button presses. And they read the same number of buttons so there’s no change necessary there.

I launched the program and… nothing, the screen stayed blank while the Arduino ran. I turned the knob one step to see if my quadrature decoder routine worked, and I saw confirmation on the Arduino serial monitor but I also saw the screen came to life. What’s going on?

I quickly determined that the screen would go blank if one of the quadrature encoder phases are held to ground. The screen also blanks out if I press the button, which grounds a different pin. There’s something wrong with the electrical side, but it wasn’t as simple as a short circuit connecting +5V rail to ground. For one thing, the meter found no continuity between VDD and VSS. And for another, the +5V line stayed up when these events happen, allowing the Arduino serial output to continue running. I suspect I would learn more if I could see the behavior of the LCD partial voltage supplies VDD1 and VDD2 perhaps those voltages collapsed for some reason? But the chip pins were too small for me to get to them, and those pins weren’t brought out to the data connector for me to connect that way.

I can work around this grounding mystery by not pressing the power button and turning the knob two detents at a time. But even then, I have another problem: I could not read buttons with the LC75883 chip. Every time I pushed a button on the circuit board, the LC75883 signals that there’s a key activity to report. My code would go through all the motions to read the 32-bit report, but all bits would be zero. Could the “always low” data line be related to the knob/button grounding problem? Possibly, but at the moment I don’t know how to find it. I just worked around it the best I could to generate a segment map.


It’s not great, but my code to play with a LC75883 is on GitHub.

CL84209 Base Station LCD Segment Map

I have generated a printable lookup chart for the character set of an unknown LCD controller. This chip is embedded inside a black blob along the top edge of an LCD I salvaged from the base station of an AT&T CL84209 cordless phone system. The character set dictates what is rendered in two lines of 15-character alphanumeric text, each character is a dot matrix 5 pixels wide and 7 pixels tall. Below these two lines is a set of custom segmented LCD that can be controlled with 16 bytes, but there appear to be far fewer than 16*8 = 128 segments to control. A segment map will tell us which segments correspond to which bits.

I don’t have the datasheet for this chip, so I don’t know how it numbered its segments. I decided to mostly follow the precedence set by Sanyo LC75853 by numbering both bits and bytes in least-significant-first order. The difference for this map is that while LC75853 started counting from one, I’m going to start counting from zero.

My first attempt at mapping out these segments toggled them on/off alongside the character set data. When displaying characters starting with 0x00, I turned on all the segments whose number has zeroth bit set. For the character set starting with 0x10, I turned on all the segments with the next bit set, etc. In theory I could look at the on/off pattern as it cycled through 0x00 to 0x70 and determine its binary number. I also printed out the bit pattern to Arduino serial console, which looks like this:

0 1 10101010 10101010 10101010 10101010 10101010 10101010 10101010 10101010 10101010 10101010 10101010 10101010 10101010 10101010 10101010 10101010 
1 10 11001100 11001100 11001100 11001100 11001100 11001100 11001100 11001100 11001100 11001100 11001100 11001100 11001100 11001100 11001100 11001100 
2 100 11110000 11110000 11110000 11110000 11110000 11110000 11110000 11110000 11110000 11110000 11110000 11110000 11110000 11110000 11110000 11110000 
3 1000 0 11111111 0 11111111 0 11111111 0 11111111 0 11111111 0 11111111 0 11111111 0 11111111 
4 10000 0 0 11111111 11111111 0 0 11111111 11111111 0 0 11111111 11111111 0 0 11111111 11111111 
5 100000 0 0 0 0 11111111 11111111 11111111 11111111 0 0 0 0 11111111 11111111 11111111 11111111 
6 1000000 0 0 0 0 0 0 0 0 11111111 11111111 11111111 11111111 11111111 11111111 11111111 11111111 
7 10000000 0 0 0 0 0 0 0 0 0 0 0 0 0 0 0 0 

In theory this can work, in practice I quickly got tired flipping through images and decoding binary numbers by hand. That was a lot more work than having a quadrature encoder knob to interactively select segments to activate. I had avoided wiring in extra components out of laziness, but between manual binary decoding and soldering, I decided a bit of soldering was the easier path towards this segment map:

This map clearly showed this particular segment allocation used less than 5/8 of available segments. Starting from position zero, we would have five bits for five segments (0, 1, 2, 3, 4) then three bits that were unused. (5, 6, 7) Then five more segments (8, 9, 10, 11, 12) and three unused bits (13, 14, 15). This repeats until the final set of five (120, 121, 122, 123, 124) which were also unused.

I was surprised that segment 9 (“MSG#” title for message count) was a separate segment from 4, the rectangular border around message count. I had expected them to be a single segment.

I was also surprised and annoyed at segment 27, which lights up all three horizontal lines of the hour tens digit for the clock plus the lower left vertical segment. For a clock it made sense to restrict the tens digit to 1 or 2. But if so, why did they bother with segment 26 which isn’t useful for either of those digits? I had hoped maybe I could use it as a generic numeral display and not a clock, by leaving 65 and 66 (AM/PM) inactive. But segment 27 means I could only display 1, 2, 6, and 8. I have not yet thought of an interesting non-clock usage under those restrictions.

Obtaining a full segment map marks the end of investigating this base station LCD, I will now try to do the same for the handset LCD starting with its disassembly.


Source code for this investigation is publicly available on GitHub.

CL84209 Base Station LCD Character Set

After a look at the similarities and differences between two LCDs salvaged from an AT&T CL84209 cordless phone set, I was ready to start controlling one myself to get more data. Earlier probing indicated that I2C communication on the handset was 3.3V, so I’m going to use an ESP8266 because it is also a 3.3V part. The Arduino platform should be a good (enough) starting point, using its Wire library to recreate the I2C control messages I saw sent to the handset LCD.

After a quick test program to verify things worked as expected, I wanted to dump out the character set built inside this LCD controller. Since the character data is sent one byte per character, there are potentially 256 different characters in the font. Dealing with these powers-of-two numbers, I like to keep such information lined up with their hexadecimal values. The LCD can only print up to 15 characters per line, so I couldn’t print these in 16 characters batches. As a next best thing, I dropped down to 8 characters per line along with their starting hexadecimal value. A for() loop cycled through 16 such screens once per second, so I could see the entire character set cycle through.

This is one of the sixteen steps in the cycle. The first line shows characters from 0x70 to 0x77, and the second line from 0x78 to 0x7F. Using workbench lighting, I had trouble trying to photograph the screen without glare. So, I switched to backlighting the LCD using one of my salvaged LED backlights. I took a picture for each of the 16 sections with the intent to edit them together, but the slightly undersized backlight made it difficult. The center section of the screen is noticeably brighter than the edges, which makes it difficult to set a threshold to generate a nice monochrome reference chart. I had to consult Emily Velasco for some photo-editing tips. (I have now added “burn” & “dodge” to my photo editing toolbox.) After some very informative experimentation in GNU Image Manipulation Program I have a reference sheet suitable for printing. Using this chart, I could see that 0x7F is a solid block that activates all pixels of a 5×7 dot matrix, which I will use to as part of an “turn everything on” program to help map out its adjacent segmented region.


Source code for this investigation is publicly available on GitHub.

Larson Scanner Demo for Tape Deck LCD

I am happy with a sense of accomplishment after I deciphered all the information necessary to utilize this circuit board, formerly the faceplate for a salvaged car tape deck. I started this investigation when I found I could power it up under control of the original mainboard. Now, I can work with the LCD and read all knobs and buttons with an Arduino, independent of the original mainboard. My original intent was just to see if I could get to this point. I thought I would learn a lot whether I succeeded or failed trying to control this faceplate. I have gained knowledge and experience I didn’t have before, and a faceplate I can control.

Now what?

It feels like I should be able to build something nifty with this faceplate, there’s room to be creative in repurposing it. At the moment I don’t have any ideas that would creatively utilize the display and button/knob input, but I could build a simple demo. This LCD is wide and not very tall, so I thought I would make it into a simple Larson Scanner. (a.k.a. Cylon lights a.k.a. K.I.T.T. lights.)

First, I divided the LCD segments into 16 groups of roughly similar size. I started using my segment map to generate the corresponding bit patterns by hand but then decided I should make a software tool to do it instead. I’ve already written code to light up one segment at a time for generating the segment map, it took only a bit of hacking to make it into a drawing tool. I use the knob to move segments as I did before, but now I could press the knob to toggle the selected segment. Every time I pressed the knob, I print the corresponding bit pattern out to serial terminal in a format that I could copy into C source code.

I then added a different operating mode to my Arduino test program. Pressing the Volume knob would toggle between drawing mode and Larson Scanner mode. While in Larson Scanner mode, I would select two of those 16 groups based on scanner position, and bitwise OR them together into my display. This gives me a nice little demo that is completely unrelated to this LCD’s original purpose, and confidence I no longer need this tape deck’s original mainboard.


Source code for this demo is publicly available on GitHub.