Running ESP8266 on Tired Alkaline AA Batteries

I retreated from trying to run a voltage & current sensor node exclusively on solar power. I’ll add some rechargeable batteries instead, but before I tackle the complexity of incorporating charging circuit (and charging logic) I took a side trip. I’m running the circuit on non-rechargeable alkaline AA batteries for a few days. And not even fresh batteries, these were already-weakened batteries from which I wanted to extract some more utility before I put them in a Joule thief LED circuit.

These batteries have open voltage of only around 1.1V, which is very low by standard of alkalines. (Fresh alkaline AAs measure over 1.5V.) And that open circuit voltage drops very quickly when I put it under strain of powering an ESP8266. So I keep usage brief, with sensor measurement and reporting run of just 30 seconds. (I later reduced it to 15 seconds.) Then I put the ESP8266 to sleep for five minutes. That five minutes give the chemistry inside these very weak batteries a chance to balance out and recover a little power before I hit them with another read+report session.

To measure how those batteries held up under the strain, I was going to wire up another voltage divider to the ESP8266 analog pin A0. But then I saw ESP8266 had an existing provision to report its chip input voltage VCC, no additional wiring necessary, and that capability is exposed in ESPHome. I chose this option out of laziness because it meant I didn’t have to warm up the soldering iron again.

The results: these weakened batteries could still give me a few days of readings before they started fading too much. I could see this in the Home Assistant log of reported VCC values.

For the first day or so, the batteries could deliver enough power that the ESP8266 didn’t see any drop in VCC voltage. But on the second or third day, voltage sags below 2.9V towards the end of my read+report session. This is visible as the lower bound of the VCC graph. During the five-minute sleep period, voltage recovers slightly and this is visible as the upper bound of the VCC graph. As the batteries continue to fade, both the upper bound (how much power the batteries could recover) and the lower bound (how low the voltage sags at the end of the session) decline over time. Eventually, VCC sagged to 1.75V and the ESP8266 could not run far enough to go back to sleep. That’s all I could get out of that particular batch of AAs. I’m happy they could run this circuit for a few days. They taught me some limits of running ESP8266 on low power, and gathered some interesting data along the way.

Start Simple with Alkaline AA Batteries

I thought I’d whip up a circuit to run exclusively on solar power. Growing around solar-powered electronics like desktop calculators, I knew it was a solved problem. But after running into obstacles, I have been humbled by the challenges involved and decided to fall back to battery power. A lot of solar power projects have a rechargeable battery somewhere in the mix, and I’m going to follow that precedence in the hopes of simplified energy management.

But as an intermediate stepping stone, I will adapt my circuit to run on batteries without worrying about the charging circuit just yet. I have the components I need on hand: a pile of alkaline AA batteries and a tray for 5*AA batteries in series.

A fresh AA alkaline battery has an open-circuit voltage just over 1.5V, and four of those in series would deliver more than 6V. Plenty for an ESP8266, but I’m not using fresh batteries for this project. My fresh AA batteries go into devices with motors or other high drain use. Once those devices complain the batteries were too weak, I move them into purely electronic devices with lower amperage demands. (TV remote controls, Hackaday badges, Xbox wireless controllers, etc.) When they are deemed too weak again, they go into my pile of AA batteries awaiting Joule thief LED duty. Open-circuit voltage for veteran batteries in this pile hover around 1.1V, thus I needed five of them in series instead of just four.

These 5-ish volts are too low to activate my modified MP1584 buck converter, which would no longer activate until input voltage of at least 13V. But that’s not a problem, because the Wemos D1 Mini clone board I’m using could run on 5V USB power. These batteries are pretty close to that voltage level, so I bypassed the MP1584 and connected the battery tray to existing “5V” pin on this module and used its onboard voltage regulator (which I didn’t trust to handle solar power directly) to deliver 3.3V to the ESP8266 and INA219. This worked pretty well.

Solar Startup Still Tricky

I have modified a second MP1584 buck converter module so that it would not activate until input voltage surpasses 13V, comfortably above the output voltage of 3.3V. I want to connect input pins to a solar panel so the associated components (ESP8266 WiFi microcontroller and INA219 voltage/current sensor) would be powered exclusively by the sun.

First is a test run with my bench power supply. Gradually increasing supply voltage starting from zero volts. Thanks to the modification, there were no odd behavior or sounds of a MP1584 trying to work with too low of an input voltage, which is great. As I increased voltage past the ~13V threshold, I saw the blue LED of my ESP8266 blink and it booted up as planned. This time, it was able to find INA219 on I2C bus, which is further than I got before.

Feeling optimistic, I connected this circuit to my solar panel at night and hoped I would wake up to find the system running. Sadly I woke up to disappointment, as there were no logged messages from the ESP8266. Probing the circuit with my volt meter, I confirmed a 3.3V supply voltage was present, but for whatever reason the ESP8266 failed to boot that morning. I manually disconnected and reconnected the circuit board, and this time ESP8266 booted up fine (now it has full daylight power) and started reporting values measured by INA219.

I don’t know what happened at sunrise. I hypothesize that when the solar panel output voltage rose past 13V, it has still yet to produce enough power to successfully start an ESP8266. So when MP1584 activated, it could supply 3.3V but not enough amperage to supply an ESP8266 through its boot process, putting it in a glitched state that was neither on nor off and stuck there until I power cycled the system. [UPDATE: Further experimentation found this hypothesis was correct, the panel would reach operating voltage well before generating appreciable power.]

I didn’t have my oscilloscope set up to capture the startup waveform to confirm or disprove this hypothesis. It’s clear there are additional subtleties I don’t know about starting up a circuit on solar power. Do I want to invest the time to learn and experiment with this problem domain? After thinking it over for a bit I decided “nah” and abandoned the idea of running everything exclusively on solar power. I’ll retreat to what I know and incorporate batteries into the system instead. Starting simple with household alkaline AA batteries.

MP1584 Modification Did Not Go as Planned

I wanted a DC voltage/current monitor module to be powered by the same solar panel it is monitoring, which meant it shouldn’t start running until the panel started delivering enough power to run the circuit. I modified a MP1584 buck converter module so it would not activate until the voltage rises close to 12V. I wired this MP1584 module back into a monitoring circuit with an INA219 voltage/current sensor and ESP8266 WiFi microcontroller.

Before I powered it up, I used a meter to verify I hadn’t done anything silly like shorting Vcc to GND. This circuit also had a Vin+ and Vin- plus I2C communication lines SDA and SCL. I verified none of these were shorted to any of the others.

I then connected Vin+ and GND input pins to my bench power supply. I started with zero volts and slowly raised it until close to 12 volts, when I saw the blue led on my ESP8266 board blink signifying startup. I opened ESPHome dashboard so I could see the logged output from this ESP8266, and saw that it powered up and connected to WiFi successfully. However, it failed to find the INA219 as an I2C peripheral.

My first hypothesis was that I made a mistake soldering I2C signal wires SDA and SCL. I probed those connections and verified I hadn’t crossed those wires and there is electrical continuity. But ESP8266 still reported no response from an I2C scan.

The next hypothesis was that I used too thick gauge of wire for I2C signal lines and its higher capacitance had degraded I2C signal. I replaced the 22AWG wire with 30AWG wire, verified they had continuity and I hadn’t accidentally swapped SDA and SCL. But still no response on I2C scan.

While looking at the ESPHome YAML file looking for a configuration error, I smelled the distinctive scent of dying electronics. My first act upon turning back to the workbench was to turn off the power supply. Then I saw the INA219 was very obviously quite dead, a hole burned into the top and charred remains surrounding that hole.

I repeated the same basic probe I performed on this circuit before I powered it up, and this time my meter said Vcc is shorted to GND. Not good! I separated the components and measured them separately. The MP1584 power module did not short Vout (a.k.a. Vcc for the other two boards) to GND. The INA219 sensor module did, which is very likely related to why it died. And mysteriously, the ESP8266 microcontroller module reported the same… how the heck did it continue running with its Vcc shorted to GND?

Dumping both the INA219 sensor board and ESP8266 microcontroller board in my box of fried electronics, I took a closer look at my modified MP1584, suspected killer of electronics.

Investigating MP1584 For Solar Power

I am happy with the performance I’ve seen so far of an INA219 DC voltage/current sensor, and it is one step closer to the goal of a homebuilt power output monitor for my Harbor Freight solar array. All the major pieces are now in place: I have a working INA219, driven by an ESP8266, running code generated by ESPHome, with resulting data collected by Home Assistant.

The next challenge I wanted to tackle was to make this system run exclusively on solar power without a battery. The daytime scenario is easy: solar panel power can feed into MP1584 buck converter to power the circuit. The night scenario is also easy: there’s no power and nothing happens. The hard part comes during the transition between those scenarios: gracefully power up around sunrise, and gracefully shut down around sunset. I don’t expect this exploration to be easy as it will have to deal with all the vague parts of the real analog world. Very different from the digital thinking my brain is familiar with.

But before I go into the real world, I can explore a crude simulation on my workbench. I connected the input wires to my bench power supply to see how the system behaves. From zero to three volts nothing appears to happen, which was expected. From approximately five volts and up, the system is up and running. But between three and five volts, I hear a disconcerting screech from the buck converter module, and the ESP8266 seems to startup erratically. There is a blue LED that is expected to illuminate once, for a fraction of a second, during ESP8266 power-up. But when I hear the screech, I also see the LED blink seemingly randomly. Implying that ESP8266 would try to start up but fail, then try again, and repeat.

It looks like I need to better understand the expected behavior for a MP1584 during this borderline scenario, and see how it aligns with my observations.

Exploring Low Power ESPHome Nodes

When I investigated adding up power over time into a measure of energy, I found that I have the option of doing it either on board my ESPHome microcontroller or on the Home Assistant server. I’m personally in favor of moving as much computation on the server as I can, and another reason is because keeping the sensor node lightweight gives us the option of putting it to sleep in between sensor readings.

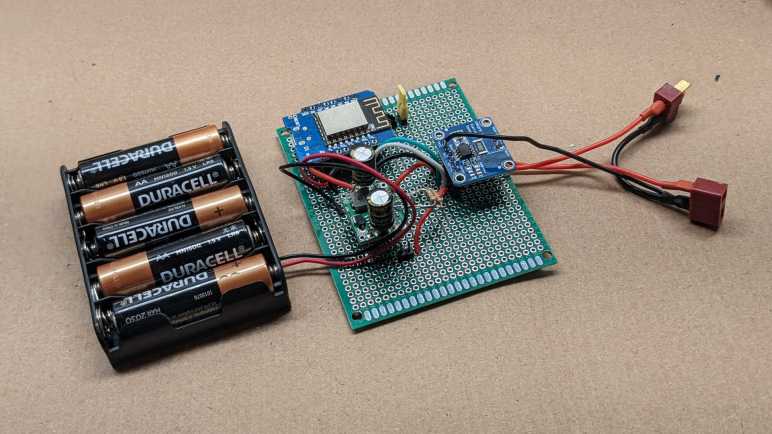
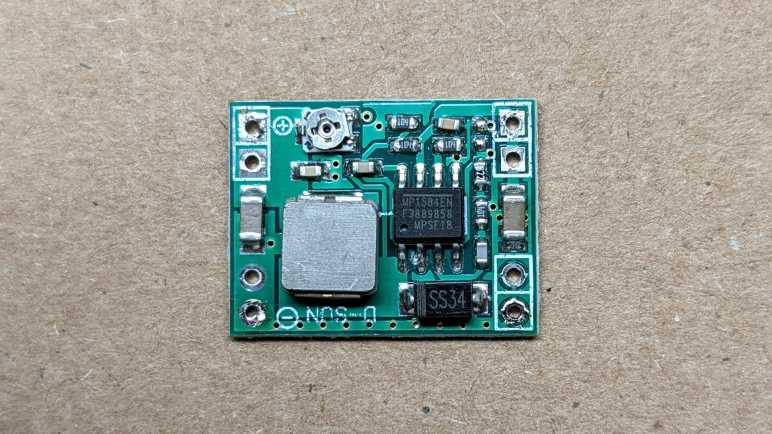
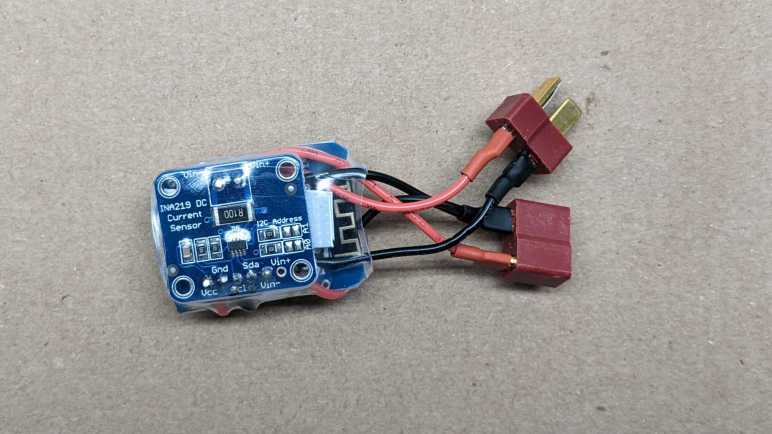
Preliminary measurements put this MP1584EN + ESP8266 + INA219 at a combined average power draw of somewhere around a quarter to a third of a Watt. This is pretty trivial in terms of home power consumption, but not if there is ambition to build nodes that run on battery power. For example, let’s do some simple math with a pair of cheap NiMH rechargeable AA batteries. With a nominal capacity of 2000 mAh and nominal voltage of 1.2V each, that multiplies out (1.2 V * 2 Amps 1 hour * 2 batteries) to 4.8 Watts over an hour. Actual behavior will vary a lot due other variables, but that simple math gives an order of magnitude. Something that constantly draws 0.3 Watt would last somewhere on the order of (4.8 / 0.3) 16 hours, or less than a day, on a pair of rechargeable AA NiMH batteries.

ESPHome has options for putting a node into deep sleep, and the simplest options are based on time like running for X seconds and sleep for Y minutes. For more sophisticated logic, a deep_sleep.enter action is exposed to enter sleep mode. There is also a deep_sleep.prevent action to keep a node awake, and the example is to keep a node awake long enough to upload a code update. This is a problem I’ve tripped over during my MicroPython adventure and it’s nice to see someone has provided a solution in this framework.

The example code reads retained value on a MQTT topic to decide whether to go to sleep or not. I think this is useful, but I also want a locally controlled method for times when MQTT broker is unreachable for any reason. I wanted to dedicate a pin on the ESP8266 for this, with an internal pull-up and an external switch to pull to ground. When the pin is low, the node will go to sleep as programmed. If the pin is high, the node stays awake. I will wire this pin to ground via a jumper so that when the jumper is removed, the node stays awake. And if the jumper is reinstalled, the node goes to sleep.

Such GPIO digital activity can be specified via ESPHome Binary Sensor:

deep_sleep:
  run_duration: 30s
  sleep_duration: 2min
  id: deep_sleep_1

binary_sensor:
  - platform: gpio
    name: "Sleep Jumper"
    id: sleep_jumper
    pin:
      number: 13
      mode:
        input: true
        pullup: true
    on_press:
      then:
        - logger.log: "Preventing deep sleep"
        - deep_sleep.prevent: deep_sleep_1
    on_release:
      then:
        - logger.log: "Entering deep sleep"
        - deep_sleep.enter:
            id: deep_sleep_1
            sleep_duration: 1min

But this is not quite good enough, because on_press only happens if the high-to-low transition happens while the node is awake. If I pull the jumper while the node is asleep, upon wake the pin state is low and my code for high-to-low transition does not run. I needed to check the binary sensor state elsewhere before the sleep timer happens. In the case of this particular project, I also used the analog pin to read battery voltage once every few seconds, so I removed the check from on_press to ADC sensor on_value. (I left on_release code in place so it will still go to sleep when jumper is reinstalled.)

sensor:
  - platform: adc
    pin: A0
    name: "Battery"
    update_interval: 5s
    on_value:
      if:
        condition:
          binary_sensor.is_on: sleep_jumper
        then:
          - logger.log: "Preventing deep sleep"
          - deep_sleep.prevent: deep_sleep_1

This performs a jumper check every time the ADC value is read. This is pretty inelegant code, linking two unrelated topics, but it works for now. It also avoids the problem of digital signal debouncing, which would cause on_press and on_release to both be called in rapid succession unless a delayed_on_off filter is specified.


Ideally, this sensor node would go to sleep immediately after successfully performing a sensor read operation. This should take less than 30 seconds, but the time is variable due to external conditions. (Starting up WiFi, connect to router, connect to Home Assistant, etc.) The naive approach is to call deep_sleep.enter in response to on_value for a sensor, but that was too early. on_value happens immediately after the value is read, before it was submitted to Home Assistant. So when I put it to sleep in on_value, Home Assistant would never receive data. I have to find some other event corresponding to “successfully uploaded value” to trigger sleep, and I haven’t found it yet. The closest so far is the Home Assistant client api.connected condition, but that falls short on two fronts. The first is that it does not differentiate between connecting to Home Assistant (useful) versus ESPHome dashboard (not useful). The second is that it doesn’t say anything about success/failure of sensor value upload. Maybe it’s possible to do something using that condition, in the meantime I wait 30 seconds.

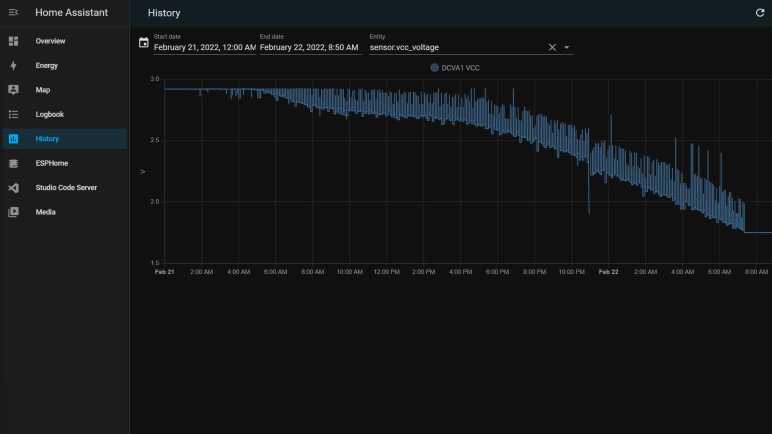
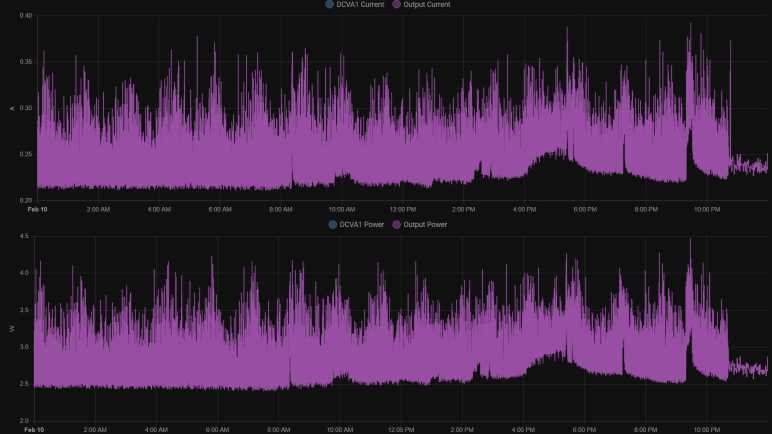
A quick search online found this person’s project also working to prolong battery life for an ESP8266 running ESPHome, and their solution is to use MQTT instead of the Home Assistant communication API. I guess they didn’t find an “after successful send” event, either. Oh well, at least I’m getting data from INA219 between sleep periods, and that data looks pretty good.

Adding Up Power in ESPHome and Home Assistant

Using an INA219 breakout board, I could continuously measure voltage and current passing through a circuit. Data is transmitted by an ESP8266 running ESPHome software and reported to Home Assistant. In order to avoid getting flooded with data, we can use ESPHome sensor filters to aggregate data points. Once we have voltage and current, multiplying them gives us power at a particular instant. The next step is to sum up all of these readings over time to calculate energy produced/consumed. We have two methods to perform this power integration: onboard the microcontroller with ESPHome, or on the Home Assistant server.

ESPHome

The Total Daily Energy component accumulates value from a specified power sensor and integrates a daily tally. (It also needs the Time component to know when midnight rolls around, in order to reset to zero.) The downside of doing this calculation on the controller is that our runny tally must be saved somewhere, or else we would start from zero every time we reset. By default, the tally is saved in flash memory every time a power reading arrives. If power readings are taken at high frequency, this could wear out flash storage very quickly. ESPHome provides two parameters to mitigate wear: we could set min_save_interval to a longer duration in order to reduce the number of writes, or we could set restore to false and skip writing entirely. The former means we lose some amount of data when we reset, the latter means we lose all the data. But your flash memory will thank you!

Home Assistant

Alternatively, we can perform this calculation on Home Assistant server with the unfortunately named integration integration. The first “integration” refers to the math, called Riemann sum integral. The second “integration” is what Home Assistant calls its modules. Hence “integration integration” (which is also very annoying to search for).

Curiously, I found no way in Home Assistant user interface to add this to my instance, I had to go and manually edit configuration.yml as per documentation. After I restarted Home Assistant, a new tally started counting up on my dashboard, but I could not do anything else with the user interface element. I just get an error “This entity does not have a unique ID“.

On the upside, doing this math on the server meant data in progress will be tracked and saved in a real database, kept on a real storage device instead of fragile flash memory. But by default it does not reset at midnight, so the number keeps ticking upwards. Doing more processing with this data is on the to-do list.


Should we do our computation on the microcontroller or on the server? There are certainly advantages to either approach, but right now I lean towards server-side because that lets us put the microcontroller to sleep.

ESPHome Sensor Filters Help Manage Flood of Data

I was happy to find that ESPHome made building a sensor node super easy. Once my hardware was soldered together, it took less than ten minutes of software work before I was looking at a flood of voltage and current values coming in from my ESP8266-based power sensor.

It was a flood of data by my decision. Sample code from ESPHome INA219 documentation set data refresh rate at once every sixty seconds. I was hungry for more so I reduced that to a single second. This allowed me to see constantly updating numbers in my Home Assistant dashboard, which is satisfying in a statistics nerd kind of way, but doing so highlighted a few problems. Home Assistant was not designed for this kind of (ab)use. When I click on a chart, it queries from SQLite and took several seconds to plot every single data point on the graph. And since there are far more points than there are pixels on screen, what I get is a crowded mess of lines.

For comparison, InfluxDB and Grafana were designed to handle larger volumes of data and gives us tools for aggregating data. Working with aggregates for analysis and visualization avoids bogging the system down. I’m not sure how to do the same in Home Assistant, or if it’s possible at all, but I do know there are data aggregation tools in ESPHome to filter data before it gets into Home Assistant. These are described in the Sensor Filters documentation. I could still take a reading every second, but I could choose to send just the average value once a minute. Or the maximum value, or the minimum value. Showing average value once a minute, my Home Assistant UI is responsive again. The graph above was for the day I invoked this once-a-minute averaging, and the effect is immediately visible roughly around 10:45PM.

The graph below was from a later day when once-a-minute average was active the entire day:

It is a cleaner graph, but it does not tell the whole story. I had used this INA219 sensor node to measure power consumption of my HP Stream 7 tablet. Measuring once a second, I could see that power use was highly variable with minimum of less than two and a half watts but spikes up to four and a half watts. When showing the average, this information was lost. The average never dropped below 2.4 or rose above 3.2. If I had been planning power capacity for a power supply, this would have been misleading about what I would need. Ideally, I would like to know the minimum and the maximum and the average over a filtered period. If I had been writing my system from scratch, I know roughly what kind of code I would write to accomplish it. Hence the downside of using somebody else’s code: it’s not obvious to me how to do the same thing within this sensor filter framework. I may have to insert my own C code using ESPHome’s Lambda mechanism, something to learn later. [UPDATE: I learned it later and here’s the lambda/template code.] In the meantime I wanted to start adding up instantaneous power figures to calculate energy over time.

Using INA219 Was Super Easy with ESPHome

Once I had ESPHome set up and running, the software side of creating a small wireless voltage and current sensor node with was super easy. I needed to copy sample code for I2C bus component, then sample code for INA219 component, and… that’s it. I started getting voltage, current, and power reports into my Home Assistant dashboard. I am impressed.

It was certainly far less work than the hardware side, which took a bit of soldering. I started with the three modules. From left to right: the INA219 DC sensor board, the MP1584EN DC voltage buck converter, and the ESP8266 in a Wemos D1 Mini form factor.

First the D1 Mini received a small jumper wire connecting D0 to RST, this gives me to option to play with deep sleep.

The MP1584EN was adjusted to output 3.3 volts, then its output was wired directly to the D1 Mini’s 3V3 pin. A small piece of plastic cut from an expired credit card separated them.

The INA219 board was then wired in a similar manner on the other side of D1 mini, with another piece of plastic separating them. For I2C wires I used a white wire for SDA and green wire for SCL lines following Adafruit precedence. Vcc connected to the 3.3V output of MP1584EN in parallel with D1 mini, and ground wires across all three boards. The voltage input for MP1584EN was tapped from Vin- pin of the INA219 board. This means the power consumed by ESP8266 would be included in INA219’s measurements.

A small segment of transparent heat shrink tube packed them all together into a very compact package.

I like the concept of packing everything tightly but I’m squeamish about my particular execution. Some of the wires were a tiny bit longer than they needed to be, and the shrink tube compressed and contorted them to fit. If I do this again, I should plan out wire my lengths for a proper fit.


Like I said earlier, the hardware took far more time than the software, which thanks to ESPHome became a trivial bit of work. I was soon staring at a flood of data, but thankfully ESPHome offers sensor filters to deal with that, too.

Learned About Home Assistant From ESPHome Via WLED

I thought Adafruit’s IO platform was a great service for building network-connected devices. If my current project had been something I wanted to be internet-accessible with responses built on immediate data, then that would be a great choice. However, my current intent is for something locally at home and I wanted the option to query and analyze long term data, so I started looking at Home Assistant instead.

I found out about Home Assistant in a roundabout way. The path started with a tweet from GeekMomProjects:

A cursory look at WLED’s home page told me it is a project superficially similar to Ben Hencke’s Pixelblaze: an ESP8266/ESP32-based platform for building network-connected projects that light up individually addressable LED arrays. The main difference I saw was of network control. A Pixelblaze is well suited for standalone execution, and the network interface is primarily to expose its web-based UI for programming effects. There are ways to control a Pixelblaze over the network, but they are more advanced scenarios. In contrast, WLED’s own interface for standalone effects are dominated by less sophisticated lighting schemes. For anything more sophisticated, WLED has an API for control over the network from other devices.

The Pixelblaze sensor board is a good illustration of this difference: it is consistent with Pixelblaze design to run code that reacts to its environment with the aid of a sensor board. There’s no sensor board peripheral for a WLED: if I want to build a sensor-reactive LED project using WLED, I would build something else with a sensor, and send commands over the network to control WLED lights.

So what would these other network nodes look like? Following some links led me to the ESPHome project. This is a platform for building small network-connected devices using ESP8266/ESP32 as its network gateway, with a library full of templates we can pick up and use. It looks like WLED is an advanced and specialized relative of ESPHome nodes like their adaptation of the FastLED library. I didn’t dig deeper to find exactly how closely related they are. What’s more interesting to me right now is that a lot of other popular electronics devices are available in the ESPHome template library, including the INA219 power monitor I’ve got on my workbench. All ready to go, no coding on my part required.

Using an inexpensive ESP as a small sensor input or output node, and offload processing logic somewhere else? This can work really well for my project depending on that “somewhere else.” If we’re talking about some cloud service, then we’re no better off than Adafruit IO. So I was happy to learn ESPHome is tailored to work with Home Assistant, an automation platform I could run locally.

Window Shopping: Adafruit.IO

I have an ESP8266 I wanted to use to with an INA219 chip as the voltage and current monitor for my toy solar panel array. The logged data can be visualized for curiosity, or maybe analyzed and that information fed into something in the future. I started with Arduino IDE, then moved to ESP-IDF on an ESP32, and most recently I played with MicroPython. This was a fun trip exploring the foundational elements, but looking towards the future I see a lot of software work to build this into a system and my interest started to fade.

What if somebody else has already built the infrastructure for something like this? Well, since I was on Adafruit’s INA219 page I saw that they had built one called Adafruit IO. Right up on the landing page it says: “We do the hard work so you can focus on the fun stuff.” Hey, I like the sound of that!

And in typical Adafruit fashion, they have great support for the product interoperating with a wide range of hardware. Including the ESP8266 and INA219! (Though via the Arduino platform and not their CircuitPython platform as they’ve dropped support for ESP8266 CircuitPython.) Data is logged, stored, easy dashboards for visualization, and that data feeds into programmable triggers to take action in response to date. Everything I foresaw having to build but is already here and ready to go. And the price is reasonable: free to start with limited functionality, and $10/mo to upgrade for full functionality.

This looks amazing but I decided against it, because I wanted something purely for consumption at home. I wouldn’t call myself averse to internet applications. After all, I’ve put all my code on GitHub and my project notebook is publicly readable. (You’re reading it right now.) Running some things on the internet makes sense when the intent is for access from anywhere, but for my home projects I don’t want that data to leave the house.

Also, Adafruit IO only retains data for a limited time period. From what I can see this was 30 days during the beta and the duration is something they reserve the right to change. I can’t seem to find their current data retention policy but it really doesn’t matter. Their target usage scenario is for “right now” interaction and projects like long-term historical tracking and analysis is out of scope. I want the option to store that data for longer, and to do it at home, so I passed on Adafruit IO and started looking for another solution.

Changing Project Direction to Use INA219 Power Monitor

I’ve had fun playing with MicroPython on an ESP8266, having an exception handling framework was especially welcome. I had originally intended to continue playing with MicroPython, gradually increasing the project complexity at each step, but I’ve changed my plan. The catalyst of this decision was a little breakout board for the Texas Instruments INA219 chip which measures electrical voltage (up to 26V DC), current (variable range depending on shunt resistor used), plus a built-in calculator for power (in Watts) from those two values. I bought mine off Amazon but I’ve since learned it was a knockoff of this Adafruit product so I’ll link to the original.

I had sat down with reference materials in front of me: the INA219 datasheet and the MicroPython I2C library. Then I felt a familiar sensation: that of my attention and enthusiasm fading. I know this sensation well! It stalled many projects in the past, and it is a warning sign I need to change directions fast or this project will stall as well.

I realized I was not enthusiastic about writing a MicroPython library for INA219 from scratch. There is educational value in doing so for sure, but for whatever reason right now I don’t feel the motivation I needed to reinvent this particular wheel. I went online looking for an existing solution and found a MicroPython Forum thread from someone who has done this work, pointing to their GitHub repository for the library.

Side note: Reading documentation for running this library on an ESP8266, I learned something interesting: the ESP8266 may encounter problems translating large MicroPython projects into executable code. The workaround is to use the MicroPython cross-compiler mpy-cross on my desktop and copy the resulting bytecode for execution on board the ESP8266.

If I could get this library up and running, I could see how to report resulting values to MQTT. Then I could perform calculations in Node-RED, and log calculated results into InfluxDB. Then I could start writing the infrastructure to read this data and make decisions on what to do in response. This is going to be a respectably large project and I don’t feel enthusiasm to do that, either! Apparently I’m not in the mood to learn by reinventing wheels, so I started looking to see what others have already done.

ESP8266 MicroPython Exception Handling Helps Robustness

I had to solve a few problems encountered publishing data to MQTT using ESP8266 MicroPython, running into MQTTException raised by the library. On the upside, dealing with MQTTException reminded me that I don’t usually have the luxury of exception handling on microcontrollers.

Exception handling in Python is my favorite part so far of using MicroPython on a microcontroller. I’m no stranger to calling APIs and checking error codes in typical C programming style and I can certainly work in that environment, but I do enjoy using a language like Python with exception handling mechanisms because it allows me to structure code in a way I find much more readable. This is important, especially for small projects where I don’t expect to look at the code on a regular basis. By the time I need to come back and modify the code months or years later, I’m looking at it with essentially fresh eyes. Comments are critical, but a good structure is very helpful too!

If I don’t have any exception handlers, an error would stop execution of my program and break into REPL awaiting diagnosis and repair. This is great while I’m developing the code, but I won’t want that later. During runtime I expect errors to be one of three types:

  1. Failing to connect to WiFi. This could happen if my WiFi router is in the middle of a firmware update, and for such harmless scenarios the best thing is to go to sleep and try again later.
  2. Failing to connect to MQTT broker. This could happen if I took down my Mosquitto docker container, again probably for an update.
  3. Failure to publish ADC data. This could happen if the WiFi router or Mosquitto went down in between connection and data publishing.

For all of these cases, the best thing to do is to try again later. Which for this project is actually the exact same thing I want to do even when everything is successful: go to sleep for a minute and repeat everything upon wake.

My first implementation caught all exceptions and proceeded to deep sleep for retry in one minute, but this is a problem: if I encounter a problem outside of the expected errors, or if I want to break into REPL for any other reason like updating the program with a new feature, I have only a very narrow window of time to do so. In fact, it was too fast for me to catch it awake!

So I actually want to do something different in case of error: keep the ESP8266 awake for 30 seconds or so. Long enough for me to connect a serial terminal and hit Control-C to break into REPL. I could trigger this path by taking down my Mosquitto docker container causing scenario #2 above.

This is an improvement over my first implementation, but I couldn’t upload my improved code. The ESP8266 wakes up, try to report ADC, and immediately go to deep sleep no matter what happens. After some time tearing my hair out trying to break into this narrow time window, I resorted to reflashing the ESP8266 with fresh MicroPython. Now I could actually get into REPL and upload the new code. It’s a good thing I keep these little code projects publicly accessible on GitHub where I could get a copy for my own use if I had to erase it.

I really like what I’ve seen of MicroPython so far, and it’ll definitely be a consideration for future projects. But for this project I’m changing course for no fault of MicroPython.

ESP8266 MicroPython Simple MQTT Client

I’ve got my second voltage monitoring ESP8266 up and running. Power comes from my lead-acid battery array stepped down with a DC buck converter, and data communication is over WiFi. I could work with MicroPython over WiFi using WebREPL, where I confirmed I can obtain a value from ESP8266 ADC. Next step: report that ADC value via MQTT.

The instance of Mosquitto MQTT broker I’ve got running in a docker container is password restricted, so I called docker exec on my running Mosquitto container to obtain a command line inside the container, and from there run mosquitto_passwd tool to create a username and a password for this ESP8266.

Then I have to figure out how to make use of that new name and password. I had assumed there would be a MQTT client library for MicroPython and I was correct. In fact, there were several! One of my top web search results went to a page on Random Nerd Tutorials, which used umqttsimple.py. That probably would have worked, but it hasn’t been updated in three years so I looked for something more recent. Continuing my search, I found a MQTT page on documentation for the mPython board. It’s not the hardware I’m using but from that page I learned MicroPython developers maintain a GitHub repository micropython-lib for useful MicroPython code libraries outside of core MicroPython project. This collection of libraries included a simple MQTT client.

Running the MQTT publish example, an exception was raised when I called connect(). This is a minimalist library so the MQTTException class was equally minimal: only a value of 5 was returned as the error code. It’s not very descriptive but I had guessed it was because the example code didn’t include the username and password I had setup for this client. Putting those in eliminated exception 5, which is good, but now I’m looking at a different exception: 2. I have no further guesses and need to go online for research.

Finding the MQTT specification online, I went to the section describing return code values for MQTT connect. This table listed 5 as “not authorized” which makes sense for lack of username and password. But error 2 is “identifier rejected” which is a puzzle. Officially, the error condition is “The Client identifier is correct UTF-8 but not allowed by the Server” but my client identifier is a straightforward string. Trying a few different client identifier strings didn’t make a difference. Suspecting it’s a problem in my MQTT broker, I tried the Mosquitto public test server and got the same error. What’s going on?

The answer is a known bug in this simple MQTT library, filed as issue #445. Apparently a recent release of Mosquitto tightened up spec compliance requirements and this simple MQTT library does not conform. It has something to do with keepalive and specifying zero is no longer tolerated. Specifying a nonzero value allowed my connection to succeed without error, but I understand it is only a hack because I’m not actually doing any of the other work to actually keep alive at my specified interval. Since this particular project is going to report an ADC value and immediately go into deep sleep, it also means I would immediately disconnect from Mosquitto MQTT broker and disconnect from WiFi. So I don’t think I’ll get in trouble for lying with a keepalive interval, as long as I bail before my lie causes a problem.

But this little adventure with MQTTException reminded me of one advantage of using MicroPython: getting access to exception handling mechanisms!

Second ESP8266 Voltage Monitor is Directly Wired to Buck Converter

Once I got my MicroPython ESP8266 connected to my home network, I expect to continue working with it over the network instead of an USB cable. Which meant it was time for me to take this development board and wire it to a DC voltage buck converter as I did earlier. However, this time I’m going to skip on the perforated prototype circuit board and going for direct wiring. (Sometimes called deadbug style due to folded pins and wires.)

But without the prototype board, I have to handle my own spacing. I cut up an expired credit card and placed the sheet of plastic in between Wemos D1 Mini clone (*) and its MP1584EN DC buck converter (*). Wires looped around the outside of this sheet to carry power lines 3.3V and GND, as well as the pair of 1 Megaohm resistors in series to ADC input pin for measuring voltage.

And relative to the previous iteration, I added one more wire: connecting ESP8266 GPIO16 (labeled D0 on a Wemos D1 Mini board) to the reset (RST) pin. This is required for an ESP8266 to wake from deep sleep, and this requirement is the very first sentence on MicroPython section for ESP8266 deep sleep. I’m going to guess that it is front and center because enough people forgot to do this critical step and their ESP8266 wouldn’t wake from sleep.

Once this package was tested to function over MicroPython WebREPL, I wrapped the whole thing up in clear heat shrink tube(*) (not pictured in title image) for a nice compact package. I could now query ADC value representing input voltage over WebREPL, but that’s not useful until I could report that value via MQTT.


(*) Disclosure: As an Amazon Associate I earn from qualifying purchases.

ESP8266 MicroPython Automatically Remembers WiFi

There were a few speed bumps on my way to a MicroPython interactive prompt, also known as REPL the read, evaluate, print loop. But once I got there, I was pretty impressed. It was much friendlier to iterative experimentation than Arduino on an ESP8266, because I don’t have to reflash and reboot every time. And since the ESP8266 has WiFi capabilities, getting REPL over the network (WebREPL) is even cooler. Now I can experiment while it runs on another power source, completely independent of USB for either power of data.

Before I got there, though, I needed to get this ESP8266 on my home WiFi network. By default, MicroPython sets up an access point for its own network so I need to turn “AP mode” off. Then I turn on “station mode” which allows connection to my WiFi router given its SSID and password.

import network

ap = network.WLAN(network.AP_IF)
ap.active(False)

sta = network.WLAN(network.STA_IF)
sta.active(True)
sta.config(dhcp_hostname='my hostname')
sta.connect('my wifi ssid','my wifi password')

I added one optional element: the dhcp_hostname parameter. This is the name shown to my router and probably other devices on my home network. If I don’t set this, the default name is “ESP-” followed by six hexadecimal digits of the ESP8266’s MAC address. That’s not a particularly memorable name so I wanted something I could remember and recognize.

And then, to my surprise, MicroPython remembered the network settings upon restart. I wrote a piece of Python code to perform this routine that I could run whenever I rebooted the board. But when I set out to test it by rebooting the board, it automatically reconnected to WiFi. This tells me a successful WiFi connection would cause a write to flash memory, which implies I should not run my WiFi connection code upon every startup. I expect to make this board go to deep sleep frequently and, if it writes WiFi information to flash every time it wakes up, I will quickly wear out the flash.

But that is just a hypothesis. As MicroPython is an open source project, it should be possible for me to dig into the code and figure out exactly when MicroPython writes WiFi connection information to flash. Perhaps it isn’t as bad as I feared it would be. Until then, however, I will hold off running my WiFi connection script.

A downside of not running my script is the DHCP hostname, which is not remembered upon reboot and this board reverted back to the default ESP-prefix name. But I can live with that for now, the next step is to set up my hardware for playing with deep sleep under battery power.

A Few Speed Bumps on the Road to ESP8266 MicroPython

I decided to play with MicroPython on an ESP8266 and started with MicroPython documentation page appropriately titled Quick reference for the ESP8266. It was almost (but not entirely) smooth sailing with the inexpensive Wemos D1 Mini clone(*) I had on hand.

I had recently switched desktop computers, with a fresh installation of Windows, so everything had to be reinstalled. Starting with Python, since I need that to run esptool tool to flash Espressif devices. It got its own virtual Python environment with venv and I could start working with the ESP8266.

I verified that flash size matched 4MB as per Amazon product listing with esptool.py --port COM4 flash_id

Then the first step in MicroPython directions: erase whatever might be in flash: esptool.py --port COM4 erase_flash

Followed by flashing the board with MicroPython, version 1.17 was the latest as of this writing: esptool.py --port COM4 --baud 460800 write_flash --flash_size=detect 0 esp8266-20210902-v1.17.bin

esptool.py v3.1
Serial port COM4
Connecting....
Detecting chip type... ESP8266
Chip is ESP8266EX
Features: WiFi
Crystal is 26MHz
Uploading stub...
Running stub...
Stub running...
Changing baud rate to 460800
Changed.
Configuring flash size...
Auto-detected Flash size: 4MB
Flash will be erased from 0x00000000 to 0x0009afff...
Flash params set to 0x0040
Compressed 633688 bytes to 416262...
Wrote 633688 bytes (416262 compressed) at 0x00000000 in 9.4 seconds (effective 537.1 kbit/s)...
Hash of data verified.

Leaving...
Hard resetting via RTS pin...

That looked good! But I thought I’d verify anyway: esptool.py --port COM4 --baud 460800 verify_flash --flash_size=detect 0 esp8266-20210902-v1.17.bin

esptool.py v3.1
Serial port COM4
Connecting....
Detecting chip type... ESP8266
Chip is ESP8266EX
Features: WiFi
Crystal is 26MHz
Uploading stub...
Running stub...
Stub running...
Changing baud rate to 460800
Changed.
Configuring flash size...
Auto-detected Flash size: 4MB
Flash params set to 0x0040
Verifying 0x9ab58 (633688) bytes @ 0x00000000 in flash against esp8266-20210902-v1.17.bin...
-- verify OK (digest matched)
Hard resetting via RTS pin...

This all looked good, but during this process I found communication with my board was unreliable. Occasionally I would fail to connect:

esptool.py v3.1
Serial port COM4
Connecting........_____....._____....._____....._____....._____....._____....._____

A fatal error occurred: Failed to connect to Espressif device: Invalid head of packet (0x08)

The frustrating part is that I don’t know what causes this, all I could do is retry until it worked. I didn’t notice anything I did differently between the times that worked and the times that failed. Is it the ESP8266? Is it the CH340 serial port bridge? Is it my USB cable? I can’t tell. The good news with MicroPython is that, once it is flashed, I could work via serial port without further headaches with esptool.

I remembered that PlatformIO Visual Studio Code had a serial port monitor, and it was indeed able to connect. But as the name stated, it was only a monitor and while I could see a MicroPython prompt I couldn’t type any commands back. Looking around Visual Studio extension marketplace I found a serial terminal extension published by Nordic Semiconductor. This allowed me to type commands into the MicroPython prompt and verify it worked, but frustratingly I could not copy/paste in this terminal. So much for a modern integrated environment! I returned to trusty old PuTTY for my MicroPython serial terminal needs and got to work.


(*) Disclosure: As an Amazon Associate I earn from qualifying purchases.

Next Practice Round: MicroPython on ESP8266

I’ve been running through “Hello World” level microcontroller projects, using my little Harbor Freight solar array as a target subject. I just finished a trial run of programming an ESP32 using ESP-IDF platform and while analog input and power-saving deep sleep worked as expected, GPIO output pins did not. I thought I would use an external peripheral to get around the problem but, if I’m doing that, I might as well fall back to the cheaper ESP8266 used in a batch of Wemos D1 Mini clone(*) I had bought.

An earlier experiment with ESP8266 used the Arduino development platform. This time around, I’m trying MicroPython for the following reasons:

  1. With MicroPython I could modify my code without reflashing the entire ESP8266 as I had to do with Arduino.
  2. My Arduino sketch was a fairly short piece of code, but MicroPython promises to get going with even less code.
  3. Last time I looked at MicroPython I rejected it because it didn’t support a hardware peripheral I wanted to use. (MCPWM of ESP32.) This time I’m using just the ADC, which is supported.

I actually wanted to try CircuitPython, Adafruit’s derivative of MicroPython with changes focused on making things even easier for beginners to play with and something I first encountered on their HalloWing product. However, a part of CircuitPython is exposing the microcontroller as a USB mass storage device and letting us drag-and-drop Python source files onto the board for instant execution. This requires native USB support on the microcontroller, which is present on newer ESP32 variations but not the one I have. There used to be an ESP8266 version without the drag-and-drop but Adafruit stopped supporting that configuration some time ago.

Putting CircuitPython back on the “look at later” list, I changed focus to MicroPython. I brought up documentation for putting MicroPython on an ESP8266. In 15 minutes I had an interactive Python command line over serial port, though there were a few speed bumps.


(*) Disclosure: As an Amazon Associate I earn from qualifying purchases.

Initial Lessons on ESP8266 Arduino Sketch for InfluxDB

Dipping my toes in building a data monitoring system, I have an ESP8266 Arduino sketch that reads its analog input pin, converts it to original input voltage, and log that information to InfluxDB. Despite the simplicity of the sketch, I’ve already learned some very valuable lessons.

The Good

The Arduino libraries do a very good job of recovering from problems on their own, taking care of it so my Arduino sketch does not. The ESP8266 Arduino WiFi library can reconnect lost WiFi as long as I call WiFiMulti.run() periodically. And the InfluxDB library doesn’t need me to do anything special at all. I call InfluxDbClient.writePoint() whenever I want to write data. If the connection was lost since initial connection, it will be re-established and the data point written with no extra work on my part. I’ve had this sketch up and running as I’ve taken the InfluxDB docker container offline to upgrade to newer versions, or performed firmware updates WiFI access point which takes wireless offline for a few minutes. This sketch recovered and resume logging data, no sweat.

The Bad

ESP8266 ADC (analog-to-digital converter) is pretty darned noisy when asked to measure within a narrow range of its full range of voltages as I am. The full range is 0-22V, and I’m typically only within a narrow band between 12-14V. I tried taking multiple measurements and averaging them, but that didn’t seem to help very much.

This noisiness also made it hard to calibrate readings against voltage values as measured by my multi-meter. It’s not difficult to take a meter reading and calculation a conversion factor for an ADC reading taken at the same time. But if the ADC value can drift even as the actual voltage is held steady, the conversion factor is unreliable. Even worse, since the conversion is done in my Arduino sketch, every time I want to refine this value, I had to hook up a computer and re-upload my Arduino sketch.

Since I expect to add more data sources to this system, I also expected to query by source to see data returned by each. For this first iteration, I tagged points with the MAC address of my ESP8266. This is a pretty good guarantee of uniqueness, but it is not very human-friendly. Or at least not to me, as I’m not in the habit of memorizing MAC addresses of my devices.

The Ugly

As typical of Arduino sketches, this sketch is running loop() as fast as it could. Functionally speaking, this is fine. But it means the ESP8266 is always in a state of high power draw, with the WiFi stack always active and the CPU running as fast as it could. When the objective is merely to record measurements every minute or so, I could be far more energy efficient here.

Addressing these issues (and much more I’m sure) will be topic of future iterations. In the meantime, I have some data points and I want to graph them.


[Source code for this project is publicly accessible on GitHub]

Setting Up ESP8266 Arduino Sketch for InfluxDB

I think I’ve got the hardware side sorted out for building an ESP8266 that monitors voltage output of a solar panel, so it’s time to dive into the software side. I want to log this data into InfluxDB as a learning exercise, and the list of client libraries included a pointer to a GitHub repository for an InfluxDB client library for ESP8266 and ESP32 running on their Arduino core.

Arduino is not exactly the most fully featured development environment, so I’ve been doing my Arduino development using PlatformIO plugin of Visual Studio Code. However, this is the first time I’ve had to manually add a third-party library and it’s not the same as Arduino’s Library Manager so I had to go online for a little help like this forum thread. I learned I should go to https://registry.platformio.org/ and search for the desired library. Searching on “InfluxDB” resulted in several results, one of which is the same client library I found earlier but now with instructions on how to install into PlatformIO.

After compiling a simple test sketch, my serial output monitor returned gibberish. The key here is that baud rate must match between my platformio.ini configuration file:

monitor_speed = 115200

And my serial output initialization code in setup() function of my sketch:

  Serial.begin(115200);

Another configuration issue concern information necessary to connect to my home WiFi and my InfluxDB server. This little sketch needs that information to run, but I don’t want to include them in my source code since I intended to upload this to GitHub in a publicly accessible repository. I found a solution on StackOverflow: put my secret information in a separate secrets.h file. After I committed a basic version without any actual information, use the command git update-index --skip-worktree secrets.h to remove it from further Git activity. After that point, I could edit secrets.h and Git would not care to upload that information leaving my local secrets local, which is what I want.

Once all of these setup details were taken care of, I could dive into code and learn some valuable lessons out of the experience.


[Source code for this project is publicly accessible on GitHub]