Honda CD Spinner Demo

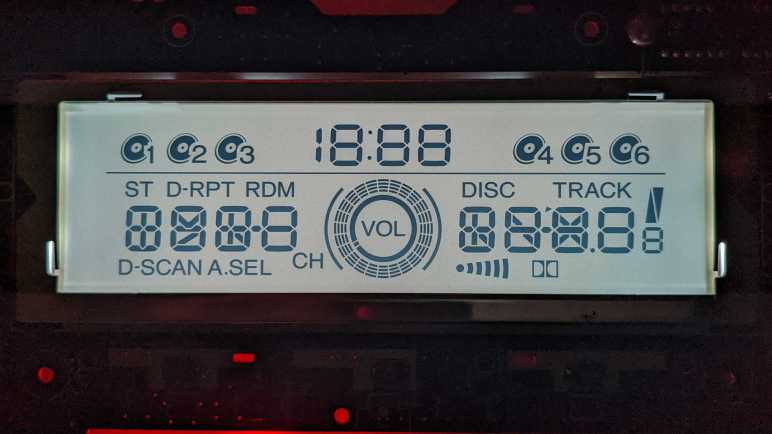
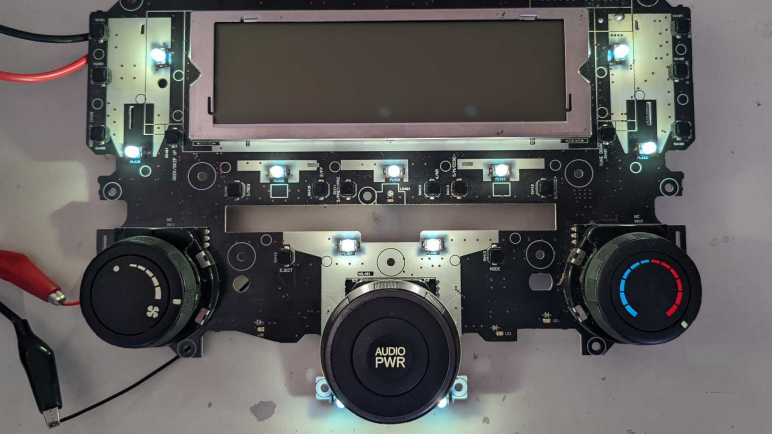
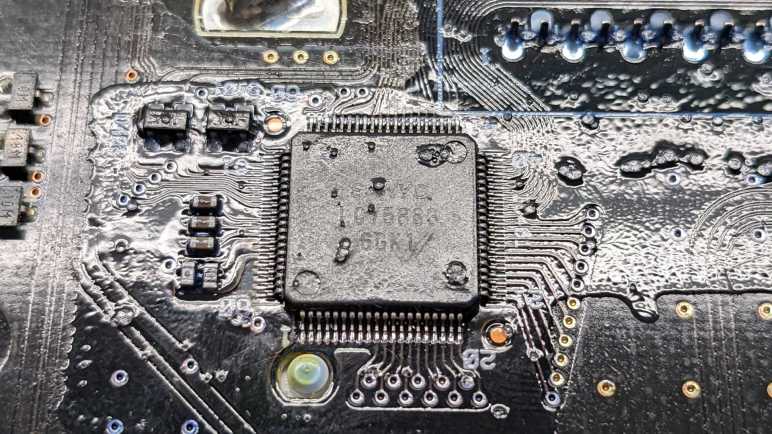
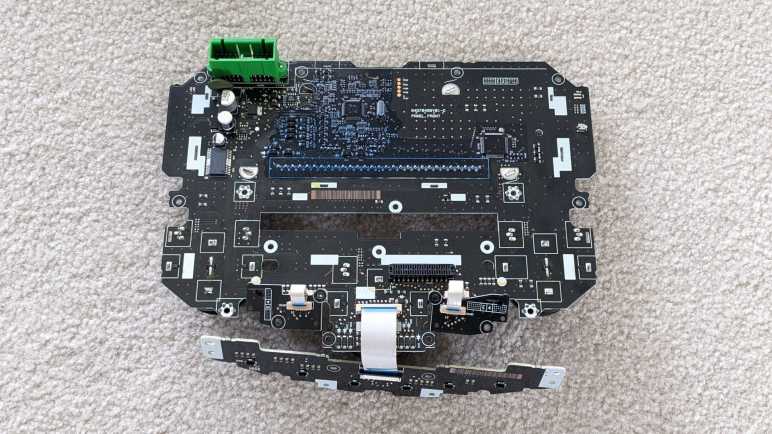
I am at a good stopping point for my exploration of a retired CD player control panel from a Honda Accord. At this point I can interact with all audio control button and knobs, and control what is displayed on its output LCD controlled by Sanyo LC75883 chip. My Arduino sketch toggles through several different modes when I press the “Mode” button (read via LC75883): Turn all segments on, or a “drawing mode” of turning on individual segments selected via the quadrature encoder knob. Very functional, but I wanted to put together something a little flashier before I move on to the next project.

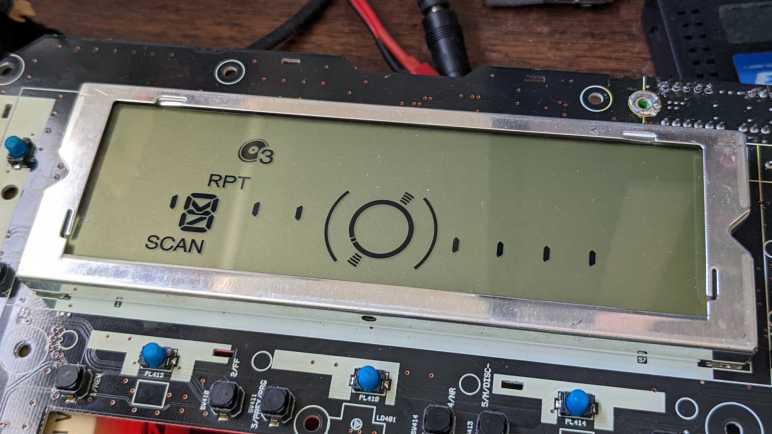
After I figured out the Toyota tape deck, I made a simple Larson scanner. I could do another Larson scanner with this LCD, but I thought I could put together something more interesting. The central attention-getting element of this segmented LCD is a series of 24 segments arranged in a circle. I’ve never seen this LCD work in normal operation, but since it is a CD player, I assume it showed graphics that resembled a spinning CD. A quick test confirmed that I could show a spinning animation, so I will make that the centerpiece for a demo. The next question is what to do with remaining segments.

There are ten 7+ segment displays. Four to the left of the spinner, three above, and four to the right. Some of these have additional segments, likely to display specific subsets of the alphabet. That works for static text, but it rules out scrolling text.

There are two additional segments that appear to be 7-segment numeric display but are not. Above the spinner is apparently a clock, as there are two elements that pretend to be “1” of a 7-segment numeric display but is in fact a single segment. And far to the right is a number that appear to be a 7-segment display but is in fact only three segments and thus extremely limited.

I also have a few miscellaneous elements for describing CD operation. “DISC”, “TRACK” “RPT”, etc. Plus six numbered CDs for the six-disc changer. I haven’t thought of anything useful to do with those beyond a Larson scanner-like animation.

I settled on the following:

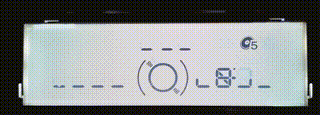
  • Focus on center spinning CD animation using its 24 segments.
  • All the individually controllable 7-segment displays will use their outer 6 segments and also display a spinning animation.
  • There will be 12 frames in the animation, which works out evenly for the 24-segment CD and 6-segment outer digit segments.
  • Most of the remaining segments will form a near-vertical section of 1 in 12 bands, they will animate left-and-right in a Larson scanner-like manner.

The animation cycle: CD and digits spins clockwise, and the bands will move in one direction. The motion will slow, then reverse and acceleration. Then it will decelerate and reverse again, and the loop repeats. It didn’t turn out quite as visually interesting as I had hoped, but I’m not going to invest in the time to make a better animation. It is sufficient to show off the fact I have full control all segments independent of this LCD’s original designed purpose.

Source code for this demo is part of the investigation project available on GitHub.

LCD Driver Pinout for Honda CD

After a few wrong turns, I think I have a good grasp of the interface for talking with the audio (CD player) portion of a Honda Accord dashboard. This circuit board also includes HVAC (heating/ventilation/air conditioning) controls, though I investigated only their knobs and ignored the electronics. This page is a summary of my investigation into interfacing with audio controls.

Electrical

There are at least three independent circuits present.

  1. Panel backlight using small incandescent (filament) bulbs with a blue cover. Draws 0.6A at14.4V DC.
  2. LCD backlight draws 0.2A at 14.4V DC.
  3. Digital communication with Sanyo LC75883 LCD driver chip, which is a 5V part. We can send data to control LCD segment display and use it to read data for most of the button presses.
PinLabelDescription
1LAMP+BPower for panel light bulbs, up to +14.4V relative to LAMP-RET.
2LAMP+BPower for panel light bulbs, up to +14.4V relative to LAMP-RET.
3LAMP-RETReturn for panel light bulbs.
4LAMP-RETReturn for panel light bulbs.
5LCDLAMP+BPower for LCD backlight, up to +14.4V relative to LCDLAMP-RET.
6LCDLAMP-RETReturn for LCD backlight.
7P-GNDGround.
8P-GNDGround.
9P-GNDGround.
10IS BUS FRAMEUnknown.
11IS BUS DATAUnknown.
12CD-LEDUnknown.
13IGN-DETUnknown. (Ignition Detect?)
14SWD-VDD+5V power supply for LC75883.
15D-GND(Digital?) ground.
16LCD-DIData in from LC75883 chip. (Wired to LC75883 DO pin.)
17LCD-DOData out to LC75883 chip. (Wired to LC75883 DI pin.)
18LCD-CLKLC75883 Clock.
19LCD-RSTLC75883 Resets when pulled to 0V. Pull to 5V for normal operation, do not leave floating.
20LCD-CELC75883 Chip Enable.
21ENC VOL-DNOne of two quadrature encoder phases for central audio control knob.
22ENC VOL-UPOne of two quadrature encoder phases for central audio control knob.
23EJECTNormally open, shorts to ground when “Eject” button is pressed.
24PW SWNormally open, shorts to ground when “Power” button is pressed.

Digital

All control for LCD segment and key scanning for most of the buttons are handled by a Sanyo LC75883 chip. It communicates with a Sany proprietary protocol called CCB (Computer Control Bus) that has some resemblance to I2C or SPI but is neither. It listens on address 0x42 for bits indicating which LCD segments should be active, and reports on address 0x43 indicating which buttons were pressed. I have an Arduino sketch (target device: AVR ATmega328P based Arduino Nano) that demonstrates how to interact with the LC75883. Pressing the “Mode” button will cycle between the basic “turn all segments on” program, a bit pattern “drawing” program, and an animated demo.


This Arduino sketch for this investigation is publicly available on GitHub.

Honda CD Control Detours

After I finally found my mistake reading a Honda CD control panel’s input (I had left the reset pin floating) I think I have a pretty good handle on communicating with it. The CD audio side, at least, as I had no interest in figuring out the HVAC side. But before I wrap up with a summary and demo, this page describes two additional experiments for future reference.

External Quadrature Encoder

Before I realized my problem was a floating reset pin, I wired in an external quadrature encoder to determine if the problem might be with the Honda circuit board or if it was my code. There was an added bonus that this particular quadrature encoder was designed so that every detent would be high/high. I knew the problem of LCD blanking out was related to grounding various controls (buttons or this knob) to ground, so with its four transitions per detent, this knob would quickly blitz through the problematic states as a workaround.

Successful use of the external knob also meant I now know the LCD wasn’t blanking out due to something in my code, or even something in the Arduino as related to a quadrature encoder. The LCD would blank out if the onboard knob was in the wrong position, even if none of its wired connected to my Arduino. This observation was consistent with the actual cause of a floating reset pin. I removed this external knob once the reset pin was no longer left floating, making room for the next experiment.

Boost Converter for LCD Backlight

When I had illuminated the LCD backlight using my bench power supply, it indicated the backlight drew 0.2A at 14.4V ~= 3W. I thought that would be within reasonable range for a USB power bank, so I dug up a DC voltage boost converter (*) from a batch I had bought for an earlier project. I connected the voltage input to Arduino VIN pin and adjusted the converter to 14.4V open-circuit output voltage. But when I connected that output to the LCD backlight, voltage sagged and the USB power bank went into a continuous reset loop consistent with overload response.

I wasn’t sure if the overload was a startup issue, a transient issue, or a continuous power issue. As an experiment I soldered 220μF capacitors to both input and output. This did not change the behavior: the USB power bank still enters a continuous reset loop. I added a USB power meter (*) between my power bank and the Arduino and it said the circuit tried to draw 3 amps. Yikes! That explains the reset when I had expected only 0.6 amps (3 watts / 5 volts) to be drawn.

I’ll revisit the LCD backlight power supply issue later, if I decide to reuse this LCD for something fun. At least this failed experiment let me know boost converter power draw is more complex than (Power) = (Voltage)*(Current). It is also another checkmark next to “I should learn how boost converters work” on my to-do list, I hope with such knowledge I could properly diagnose this failure to verify I understand the situation correctly.


(*) Disclosure: As an Amazon Associate I earn from qualifying purchases.

Honda CD LCD Driver Mystery Problems Solved

I’ve been talking to the Sanyo LC75883 LCD driver chip on a Honda CD control panel by soldering wires directly to the board and running those signals to a breadboard. Once I found the correct connector to plug into that board, I transferred my (jumper wires and breadboard) experimental circuit to something a little more compact. But like all projects, it didn’t work at first and needed some diagnosis.

My first problem was a classic electronics problem: “Data In” and “Data Out” lines were reversed. This is a close cousin of the RX/TX problem, where we always have to figure out whose perspective a particular label is using. The RX (receive) line for one component needs to be wired to the TX (transmit) line of the other component, and vice versa. For my circuit, it meant “DO” on the connector pin 17 should go to the LC75883’s “DI” pin. I had connected “DO” to “DO” and “DI” to “DI” which does nothing until I swapped them.

After figuring out my DI/DO lines I was at parity with my breadboard circuit. Which is sufficient for controlling LCD output, but I just like before I still couldn’t read input. I examined the remaining pins looking for things I could try. First experiment was with pin 15, which was labeled D-GND which might mean “Digital ground”. I had been using the trio of pins labeled P-GND for my ground instead. I don’t have a good guess what “P” stood for, but if I had been using the wrong ground that might explain the odd behavior I observed. Sadly, tying D-GND to P-GND made no noticeable difference.

Looking down the list again, I decided to take another look at pin 19 labeled LCD-RST. There was a similar RESET pin on the Toyota tape deck faceplate. I had left that unconnected because the LC75853 driver chip on that board did not expose a reset pin so there was nothing to connect. Due to the similarities between these two chips, I thought I would do the same thing here. But I realized that was a mistake when I reviewed the LC75883 datasheet.

Unlike its sibling, this chip does expose a reset pin (76). Which meant I had been leaving reset unconnected and floating all this time. Not good! I soldered a 1kΩ resistor between pin 14 SWD-VDD and pin 19 LCD-RST in order to tie LCD-RST high, and after that, all input worked as expected. Turning the quadrature encoder knob no longer blanks out the screen at every other detent, and I could successfully read key scan report data to know which buttons had been pressed. And LCD output still worked just as before. This is great! I’m glad I figured out my mistake and frankly, I’m surprised this thing worked at all with a floating reset pin. That’s my silliest mistake so far with this project, the others weren’t as bad.

Reuse Honda CD Connector for Arduino

Once I got over the excitement of lighting up the bulbs and LEDs on a Honda CD control panel, I returned to the original CD player mainboard. The labels on its panel connector gave me the confidence to apply power and expect illumination instead of the smoke of fried electronics. But now I have the labels documented for future reference, I will remove the connector for my own use.

Desoldering was mostly smooth except for the trio of ground pins. They were connected to thick ground traces that dissipated a lot of heat, making it difficult to melt the solder. For the final ground pin, I saw the solder had melted and pulled hard on the connector. Unfortunately, it had not yet melted all the way through so my yank damaged the pin. Well, at least I still have two intact ground pins to work with.

I still don’t know the manufacturer or name for this connector, but it is very similar to the connector I saw on a Toyota tape deck doing the same job. Which meant it shared the pin pitch of 0.1″ (just like a perforated prototype board!) and two rows 0.1″ apart (just like a perforated prototype board!) staggered with a 0.05″ offset. (Just like… oh no! It isn’t.) For the Toyota tape deck project, I gave up on a circuit board and directly soldered wires to connect pins. But I had been thinking about the problem since then and I have an idea I want to try.

I took one of my perforated prototype boards, cut a groove down a row of holes, and snapped it off. This exposed a row of semicircular vias that I could solder to one of the two rows on this connector. For the other row, I would still have to solder to wires directly.

It’s not nearly as solid of a connection as a custom circuit board with the proper pin layout, but it is still far better than nothing. My modified prototype board left just enough space to accommodate an Arduino Nano.

Flipping this assembly over allowed me to solder wires between the Arduino and the salvaged connector.

It is a far more compact and less accident-prone solution than my previous breadboard mess.

Sadly, it did not work straight off the bat. I had to do some debugging to bring it to parity with my breadboard solution, but the debugging session also solved a standing mystery.


Arduino code and other information for this investigation is available on GitHub.

Honda CD Panel Lights and LCD Backlight

When I started this Honda CD control panel investigation, I thought I might still have the CD player mainboard that sat behind the control panel. But when I pawed through my pile of anonymous circuit boards, I didn’t see anything I recognized as related to the CD control panel. After spending time looking at the control panel in detail, I became more familiar with the connector between the control panel and the mainboard. Revisiting the pile with this knowledge, I now recognized the matching connector. But even more importantly, the old mainboard had labels on its connector pins.

Note that both connectors stagger their pins, but confusingly in opposite directions. Pin 1 is lower-right on the mainboard labels, but upper-right on the control board numbering. I hadn’t spent much effort trying to find the pins for control panel illumination, but now that I see these LAMP pins clearly labeled, I wanted to light them up.

The first experiment was to apply +14.4V DC to LAMP+B and ground to LAMP-RET.

When power was applied, all the little incandescent bulbs with blue covers lit up. The color is not as blue as the covers would imply. It actually has a tint of green because those bulb’s natural glow is not white but a warm yellow. If they are supposed to masquerade as blue LEDs, they’re not doing a very convincing job. This collection of 11 bulbs drew 0.6A at 14.4V.

The next test is to put +14.4V DC power to LCDLAMP+B and ground to LCDLAMP-RET.

This illuminated the LCD backlight, drawing 0.2A at 14.4V. It is not very bright, but at least the light is fairly uniform. (Unlike its Toyota tape deck counterpart.) The primary purpose of these backlights is to ensure the display is visible at night. During daylight, these LCDs are legible under ambient sunlight. Lighting these up was fun! This experiment was good reference as I repurpose the connector for my own use.

Honda CD Connector Lost, Connector Found

Examining the fan speed and temperature adjustment knobs from a Honda Accord HVAC (heating, ventilation, air conditioning) control board taught me the existence of rotary encoders that could convey a position from a set of positions within a range of rotation. This was an alternative to potentiometers I had not been aware of, a lesson on top of everything else I learned playing with this module. But all this exploration also meant handling the assembly a lot, eventually breaking something.

This board attached to the main control board via a flexible cable that could only flex so many times before it broke from fatigue. Fortunately, these buttons and lights were associated with HVAC controls, and I hadn’t planned to go figure out that half of the board anyway. And even if these buttons were associated with the CD player, I had no luck so far reading button presses either. Either way, no big loss, and I dropped it in my pile of electronic circuit boards.

When I did so, a shape in the pile caught my eye. A week ago, it was just another electrical connector on a unmarked circuit board I forgot details about. But I now recognize it as the edge connector matching one on the CD/HVAC control board I’ve been exploring. Which meant this circuit board used to be the CD player mainboard that sat behind the dashboard.

Almost as valuable as the connector itself are silkscreened information on the circuit board, labeling the pins. I had puzzled out a preliminary subset just from poking around with a multimeter, but now I have the answer key. I was happy to find confirmation for my guesses and filling in unknowns. Earlier I was puzzled by the hint that multiple pins might be ground, and now I can see there are indeed three pins (7, 8, and 9) all connected to ground. I had traced out a dedicated pin for the power button (24), but I had missed the adjacent one was for eject (23). Things along those lines.

I hadn’t put any effort into figuring out the illumination pins, because I didn’t want to risk making a mistake that would send +14.4V into the wrong place and burning things up. But now that I see lamp pins clearly labeled, I want to light them up.

Honda Accord HVAC Knobs — Electrical

The audio and HVAC (Heating/Ventilation/Air Conditioning) on a 2007 Honda Accord are controlled by a trio of knobs. They each have different range of motion: fan speed sweeps through 120 degrees, temperature sweeps through 270 degrees, and the audio knob is free to spin continuously through 360 degrees without endpoints. However, they all have the same tactile feel through “clicky” detent steps: 13 for the fan speed, 15 for temperature, and 30 per complete revolution of audio. Despite their differences, they appear to use identical Alps ring encoders. How was this done?

My first hint was noticing that each encoder can have six electrical contacts, but the audio knob only used three of them. The other three pins were cut off, never connected to the circuit board. Limited to three pins, the audio knob could express 4 states with the remaining two pins as a quadrature encoder does. Thus these knobs could be configured to act this way, but only as a special case with pins cut off.

To probe the other knobs, I started by arbitrarily number pins. Looking at the encoder’s top side oriented with pins towards me, the left side top to bottom are: 1, 2, and 3. Then the right side top to bottom are 4, 5, and 6. Viewed from the encoder’s bottom side, the pins numbers are like this:

I probed the fan speed knob for electrical continuity. In use we would ground one pin and all the marked pins will also be grounded when the knob is at a particular position.

Fan Speed123456
OffXXX
1XXXX
2XXXXX
3XXXXXX
4XXXXX
5XXXX
6XXX
7XXXX
8XXXXX
9XXXX
10XXX
11XXXX
12XXX

Looking at this chart, it appears either pin 1 or 6 could be the ground reference. Pins 2 through 5 vary depending on knob position. Using 4 pins they could represent up to 16 positions, though only 13 are used. The digital encoding isn’t a straightforward mapping to binary numbers, even if I move the columns around. I don’t recognize it, but I do see a pattern. One attribute of this pattern is that, when moving from one position to the next, only one pin changes state. This may be useful in some way I don’t understand. I don’t see a way to calculate position number directly from the pattern, so if I were to reuse this knob, I would have to use a lookup table. 13 valid positions out of 16 possible positions shouldn’t be a big deal.

I then probed the temperature knob to see how it compares.

Temperature123456
-7 (Coldest)XXX
-6XXX
-5XXX
-4XXX
-3XXXXX
-2XXX
-1XXX
0XXX
1XXXXX
2XXXXX
3XXXXX
4XXX
5XXXXX
6XXX
7 (Warmest)XXX

From here we can tell pin 1 is clearly designed to be the ground reference pin, and we can determine absolute position by reading state of the other five pins. This pattern looks more like a binary number, with pin 4 being the least significant bit and pin 2 as the next least significant bit. But then things fall apart and pin 3 doesn’t fit the pattern for binary number progression. It doesn’t fully follow the “number of transition bits” pattern observed in the fan speed control. Moving from either of the end positions would change one bit. Moving between non-end positions would change two bits. If I were to reuse this knob, I would again use a lookup table, with 15 valid positions out of 32 possible combinations.

These knobs will be interesting to reuse in another project. They take four or five digital input pins instead of the single analog input pin of a potentiometer, but I like their tactile detents which could be useful in specific scenarios. I’ll set them aside and return my focus to digital communication.

Honda Accord HVAC Knobs — Mechanical

I have a retired chunk of Honda Accord interior, a control panel that integrated CD player and HVAC buttons and knobs into a single panel. Once dug into it, though, I discovered that the CD player electronics were actually quite independent of HVAC electronics even though they lived on the same circuit board. I was motivated to figure out the CD player portion because I wanted to play with segmented LCD, but there were no such attractions on the HVAC side. I will remove those HVAC knobs and play with them separately. I wanted to know more about how they worked: mechanically these knobs looked nearly identical to the infinite-rotation quadrature encoder used for audio control. But they have limited travel and their nature requires knowledge of their absolute position, which seems more appropriate for a potentiometer.

First to be removed was the fan speed selector, where I got my first hint at how these are different from visually similar audio knob: they have six electrical contacts instead of three. As soon as I noticed this I went back to the audio knob and saw it had provision for six contacts as well but three on one side were cut. Back to the fan speed knob: I had to desolder those six electrical contacts plus 4 more soldered mechanical mount points.

Once I pulled the knob off, I see a backlight bulb on a pedestal. This bulb would have illuminated the fan speed icons as well as a small piece of translucent plastic visually indicating current fan speed setting.

Looking over the knob, I found no further fasteners. As an experiment I tried pulling, and just a light pull was enough to overcome plastic snaps in this assembly. The rightmost portion in this picture is what actually rotates, attached to a ring on the encoder. The center portion with fan speed icon remains static, mounted to the encoder itself on the left.

After the fan speed knob was removed, I proceeded to do the same for the temperature control knob. Aside from their differences in printed graphics, these two knobs have slightly different range of motion and number of detents. The fan speed knob sweeps approximately 120 degrees, and has 13 total detents: “off” and 12 speeds. The temperature knob sweeps through 270 degrees, and has 15 total detents: 7 levels of cold, 7 levels of warm, plus a neutral position.

In one corner of the encoder body, I saw this logo but no further identifiers. A few searches found the Wikipedia page for Alps Electric, and their current incarnation’s corporate web site Alps Alpine. Digging into their products catalog, the device I have in my hand resembles items in their Ring Encoder product category, but I did not find an exact match. This is either a discontinued product or a Honda exclusive item. I can’t tell in the absence of further identifiers on the device. Perhaps there’s a number inside if I wanted to take it apart further, but I’m more interested in pulling out my multimeter to probe their electrical behavior.

Taking Stock of Honda CD Investigation Progress

When I was given a retired Honda Accord in-dash CD system, I thought its large LCD and tactile knobs might be interesting. After some introductory information and experiments with salvaged LCDs, I took this system out of my pile and started tinkering with it. Building on knowledge gained from earlier projects I was able to talk to this LCD’s Sanyo LC75883 driver chip and generate a segment map.

Segmented LCD units are customized for individual applications, so it was not a surprise to see this display was tailored for what a 6-disc CD changer needs to show. However, I was a little disappointed that seems to be all this LCD could show. This control panel also integrated HVAC control knobs for fan speed and temperature, so I had hoped to see some of that on the LCD. Doing so would have motivated the designer to make things a little more generic, like the alphanumeric text areas I saw on a cordless phone system’s LCD. Other reasons I had hoped to find a general-use text area are to show FM Radio Broadcast Data System or CD-Text information, sadly this system supported none of that.

When I tinkered with the Toyota tape deck faceplate LCD, figuring out how to read input was a nice side bonus. I had hoped to do the same with this panel. It had three knobs with good tactile feedback, and a lot of buttons. Tactile sensation or visual appearance for those buttons were nothing amazing, but they were real buttons on the board and not just copper traces that I’d have to bridge with something else. Sadly, I ran into strange problems trying to interact with the inputs on this circuit board that rendered things unusable.

The good news is that HVAC portions seems to be largely independent from the CD player functionality, which made it easier to figure out LCD and related controls. This is, unfortunately, also the bad news because the temperature and fan speed knobs are separate. I suspect they are handled by another chip on this board, which is also under a blue conformal coating and its surface markings unreadable. Perhaps it reads those knobs and drive HVAC motors directly from this board, as a nearby chip not hidden by conformal coating is a Toshiba TA8083F dual DC motor driver. I’m not inclined to figure out the motor control side of this board, but I’m still interested in those tactile knobs, so I’ll pull them off the board for a closer look.

Honda CD LCD Segment Map

I can talk to the LC75883 LCD driver chip on the faceplate of a Honda Accord CD/HVAC control panel, but I encountered problems using other peripherals. I don’t have the schematics for the circuit board and it would be a lot of work to generate one myself. At the moment I don’t have the motivation to undertake such a project. I have control of its LCD segments and I could generate a segment map for it:

Almost a quarter of the surface area on this LCD are allocated to CD icons 1 through 6, and many segments were consumed by the little circular graphic in the center. I guess that’s supposed to resemble a CD? We can control each pie slice to perform a rotating animation, but I was disappointed to learn the four dashes of each pie slice could not be controlled independently. So it is not possible to do a growing/shrinking circle animation, dashing my hopes of a polar coordinate VU meter. The clock up top is more or less as expected, but the four digits to the left and right of the circle are bizarre. Multiple different patterns that probably allows them to display certain letters in addition to numbers.

At least there weren’t too many segments that mislead us into think they were distinct segments. The most expected one was segment 9, which is actually both segments of the “1” and that makes sense for a clock that only needs to show 10, 11, and 12. Segment 60 includes both left and right brackets around the center, but I couldn’t think of many reasons why we’d want to control them separately anyway. The most bizarre is 134, which occupies 5 out of 7 segments of the right-most sub-sized digit. With it, that digit could only display 5, 6, 8, and 9. How is this useful? If I ever get a chance to play with the stock CD player of a 2007 Honda Accord, I want to see how this thing used to work. Right now, I ponder my next step.

Honda CD LCD Driver Problems

I’ve got the control panel for a Honda Accord’s CD/HVAC and I think I’ve found the electrical connections to talk to the LC75883 LCD driver. The software side was based on my LC75853 test program, which needed a few modifications to fit this LC75883 chip. It can control more segments, so I have to send three CCB messages of 9 bytes each instead of three messages of 7 bytes. Other than that, these two chips both respond to the same CCB addresses: 0x42 to send LCD control bits, 0x43 to read button presses. And they read the same number of buttons so there’s no change necessary there.

I launched the program and… nothing, the screen stayed blank while the Arduino ran. I turned the knob one step to see if my quadrature decoder routine worked, and I saw confirmation on the Arduino serial monitor but I also saw the screen came to life. What’s going on?

I quickly determined that the screen would go blank if one of the quadrature encoder phases are held to ground. The screen also blanks out if I press the button, which grounds a different pin. There’s something wrong with the electrical side, but it wasn’t as simple as a short circuit connecting +5V rail to ground. For one thing, the meter found no continuity between VDD and VSS. And for another, the +5V line stayed up when these events happen, allowing the Arduino serial output to continue running. I suspect I would learn more if I could see the behavior of the LCD partial voltage supplies VDD1 and VDD2 perhaps those voltages collapsed for some reason? But the chip pins were too small for me to get to them, and those pins weren’t brought out to the data connector for me to connect that way.

I can work around this grounding mystery by not pressing the power button and turning the knob two detents at a time. But even then, I have another problem: I could not read buttons with the LC75883 chip. Every time I pushed a button on the circuit board, the LC75883 signals that there’s a key activity to report. My code would go through all the motions to read the 32-bit report, but all bits would be zero. Could the “always low” data line be related to the knob/button grounding problem? Possibly, but at the moment I don’t know how to find it. I just worked around it the best I could to generate a segment map.


It’s not great, but my code to play with a LC75883 is on GitHub.

Preliminary Pinout for Honda CD

I have a Honda in-dash CD (and HVAC) control board and I want to see if I can make its LCD work. After I melted through conformal coating over the Sanyo LC75883 LCD driver chip, I was able to get an electrical connection with my meter so I can test for continuity between the pins (that are too fine for me to solder) to something I can more easily work with. I quickly found that much of the CD player functionality is connected to a small black rectangular connector I noticed earlier. Not just the LCD driver chip’s data communication lines, but also the big central rotary knob and button.

There is a large degree of uncertainty here, because I didn’t find what all of the pins did. I also found two pins that both appear to be ground, and I don’t know if there’s an important distinction between those two pins. This incomplete understanding explains the problems I will encounter later.

Using the numbers on the circuit board silkscreen, the pins are 1 to 24 from right to left. (Silkscreen shows 1 in the upper right, 2 in the lower right, 23 in the upper left, and 24 in the lower left.)

PinPreliminary NameDescription
7Vss (?)Either 7 or 9 is ground, maybe both?
9Vss (?)Either 7 or 9 is ground, maybe both?
14Vdd+5V power supply
16DOCCB Data Out
17DICCB Data In
18CLCCB Data Clock
20CECCB Chip Enable
21AEncoder A, connects to ground when knob is at certain positions.
22BEncoder B, connects to ground when knob is at certain positions.
24ButtonConnects to ground when “AUDIO PWR” button is pressed

Once these connections were made, I could make further progress. That is, running into an entirely different set of headaches.

Soldering Practice with Honda CD LCD Driver

Looking over the control circuit board for a Honda in-dash CD player, I saw an LCD driver chip which is a close cousin of one I worked with earlier in a Toyota tape deck. Even though I’ve never seen this CD control LCD run, and lacking the parts to reassemble the CD player, I think I have a chance to get it running just based on a datasheet and my recent experience. I do have a few obstacles I’d need to resolve first, though.

The first is that this section of the circuit board is coated in a conformal coating that prevents me from making electrical contact. It is also slightly sticky, which made it hard to work in this area. Every action adds debris stuck to this coating. Trying to wipe them off made things worse, as the coating grabbed fibers from my cleaning cloth.

I first tried isopropyl alcohol, which I understood to be the default cleaning solvent for electronics. I had hoped it would dissolve the blue coating but I saw no effect. I have a collection of household cleaning solvents harsher than isopropyl alcohol, but I don’t know which of them would damage electronics. Abandoning chemistry, I turned to heat: I put a small blob of solder on the tip of my soldering iron and touched it to the pins, hoping it will melt through the coating. The good news is that it did, the bad news is that it immediately heated the pins and existing solder and everything blended together into a bridge that connected all the pins I cared about plus many more that I did not. This was because of my second obstacle: these pins has very fine pitch. Datasheet says this SQFP80 package has 0.5mm pitch, which is far denser than the 0.1″ (~2.54mm) pitch I usually work with.

My attention was focused on the following pins:

  • 70: VDD +5V power supply
  • 73: VSS ground
  • 77: DO Data Out
  • 78: CE Chip Enable
  • 79: CL Clock
  • 80: DI Data In

And now I have a large solder blob that gave electrical continuity across all of them. Gah! Unpracticed at this scale, it took me over an hour to get the situation back into some semblance of control. Solder sucker took care of the major blobs, de-soldering braid took care of smaller portions, and a hot air gun melted off lingering whiskers. It was a disaster zone but I’ll be optimistic and call it practice. I still see signs of extraneous solder on the surface, and no guarantee there aren’t any hiding where I can’t see them. On top of that, all the heat to clean up the solder mess may have damaged the chip. Still, I had nothing to lose but time and everything to gain, so I proceeded.

I took the finest, smallest gauge wire I had on hand and soldered the first one to pin 80 DI (Data In.) And clearly this is not going to work: the wire is far too fat. But at least the conformal coating has been removed from these pins. So even if I can’t solder directly to these pins, I can use my meter to probe for another way to connect.

Honda CD Circuit Board

I have a circuit board assembly that appears to be the stock CD player and HVAC control board from a Honda Accord, integrated together instead of separate audio controls in DIN form factor. The front is dominated by a large LCD that I wanted to control as part of my current adventures into segmented LCD units. Unlike the Toyota tape deck, I don’t have the mainboard to get this up and running and probe its internal communication. Would I be able to talk to its built-in LCD driver, or would I have to control the LCD directly by generating my own voltages?

In addition to the large LCD, there were other elements of interest. This panel has three large knobs. The largest center knob is for audio control, the two side knobs are for air circulation fan speed (left) and temperature (right). All three knobs appear to use the same basic (if not identical) rotary encoders mounted to the circuit board, which is curious because they expose quite different user interfaces. The center knob has no end position and can rotate infinitely in either direction, which makes sense for a quadrature encoder. But the two side knobs each have their own distinct left and right endpoints and would need to know their absolute position. I would have expected them to be potentiometers instead of quadrature encoders, but at first glance all three appear identical. This will be interesting to look at later.

I was not surprised to find numerous green LEDs to indicate status of various settings. (LD6 and LD7 visible in above picture.) But I was surprised to discover the little blue background illumination lights (PL422 visible in picture above) were not blue LEDs.

They are actually tiny incandescent (filament) light bulbs underneath a blue cover. I guess this device was designed when blue LEDs were considered desirable but still expensive? If so, it’s pretty hilarious to see itty bitty light bulbs masquerading as blue LEDs.

All the buttons are surface-mounted units (SW7 visible in above picture) instead of the conductive wire trace type frequently seen in consumer electronics including the tape deck I took apart earlier. Small and compact, though their tactile feel is nothing spectacular.

Around the back, I see two electrical connectors. A large and sturdy green unit in the upper-left corner typical of automotive-grade connections, and a smaller black one just below and to the right of center.

This reminds me of the connector for the Toyota tape deck faceplate, but with 24 conductors instead of 16. Pins 1 and 2 are labeled on the right, and pins 23 and 24 are labeled on the left. Unlike the Toyota faceplate, none of the pins were labeled with their functionality.

A row of through-hole pins just above the central CD slot are consistent with all the common/segment pins for a segmented LCD array. These pins and its surrounding area are protected from the environment by a blue conformal coating that will make experimentation annoying. It’s a lot of bad news so far discouraging further exploration, until I followed LCD traces back to their control chip:

Barely readable through the conformal coating is “Sanyo LC75883”, which sounds very similar to the Sanyo LC75853 used on the Toyota tape deck faceplate. I found a datasheet for LC75883 and confirmed it is a sibling chip, speaking the same proprietary Sanyo CCB protocol. This is promising enough for me to try getting past that blue coating.

Next Segmented LCD Challenge: Honda CD

A quick review of my adventure so far: I have several segmented LCD units salvaged from various pieces of electronics. I’ve always thought “I’ll figure them out later” and finally decided to do it. The first one I got up and running was the simplest: a bare LCD with two digits of 7-segment numbers. Followed by a food thermometer LCD with many more number digits. Then I moved on to the realm of LCDs with associated driver chips controllers. I started with an old tape deck faceplate that I could examine while it was running and could find a datasheet. Then a cordless phone system that I could see running but didn’t have a datasheet. For the next challenge, I have an LCD that I’ve never seen running.

Browsing eBay listings, the shape and knobs of this thing matched the stock CD player for a 2007 Honda Accord. The temperature and fan speed knobs make it clear this was an integrated system combining the audio system and in-car HVAC. This type of integration has become more popular in recent model years, as car manufacturers moved away from ISO 7736 standard DIN form factor. I understand the visual appeal of a sound system cleanly integrated into a car’s interior design, but I’m not a fan of the fact upgrades become a huge hassle. For example, it is very popular now to have Android Auto and Apple CarPlay for connecting to our cell phones. It is a popular feature in modern cars’ integrated systems, and for old cars we can add such capability with standard DIN form factor aftermarket head ends. But for cars with non-DIN stock systems lacking Android Auto/Apple CarPlay, they are stuck in an awkward middle.

It’s not entirely impossible to upgrade them, it just takes more effort and money just to end up with something less elegant. An entire aftermarket ecosystem has sprung up to give DIN slots to cars that weren’t designed to have them. For several years I’ve been eyeing the Metra 99-7510HG(*) for my own 2004 Mazda RX-8. Perhaps the previous owner of this Honda Accord CD system thought the same and removed it in favor of a Metra 99-7803G(*) for DIN compatibility. Regardless of the reason, I now have this circuit board and I have nothing to lose by digging in.


(*) Disclosure: As an Amazon Associate I earn from qualifying purchases.