Sawppy Rover Battery Voltage Monitor

Trying to debug a mobile web page without any debug support — no syntax error, no line number, not even console.log() — was extremely frustrating and quite draining. After that experience I was ready for a break from rover work. But before I take that break, I wanted to at least attempt to use the voltage-monitoring provision I wired in to this draft of my Sawppy Rover ESP32 control board.

I encountered a few more mysteries of ESP32 ADC while doing so. I initially set the ADC attenuation at 2.5db, which should have given me a range spanning 1.1V which fits nicely with my 10:1 voltage divider. But the raw ADC values were far below where I thought they should be. My voltmeter read 0.6V on the pin after the divider, which should have been a little more than 2048 out of the ADC’s 12-bit resolution. (0-4095) Instead I got values closer to 1350 and I didn’t understand why yet.

Another mystery was working to convert that value to a voltage reading. I had thought the conversion would be straightforward: look at the raw ADC value, measure the actual voltage with my trusty Fluke meter, and divide them to obtain a conversion coefficient. But I found that the ratio between raw ADC value and voltage measured by the meter was not consistent across the voltage range. The coefficient I calculated from a 5V USB input voltage was different from the coefficient calculated from 7.4V of my 2-cell LiPo battery pack. This was a surprise.

To solve this problem correctly, I should consult Espressif ESP32 ADC documentation on their factory ADC calibration values and how to leverage that work into a more precise value. But what I have today is good enough to roughly monitor battery level. I wanted to keep going and get the rest of the basic infrastructure set up before I ran out of motivation to work on this code.

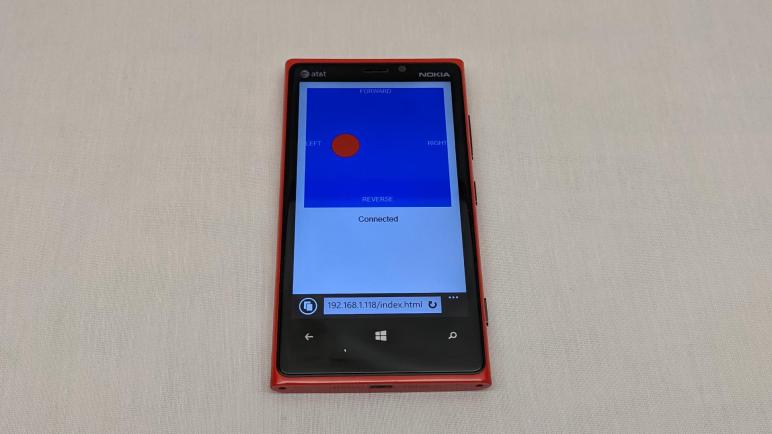
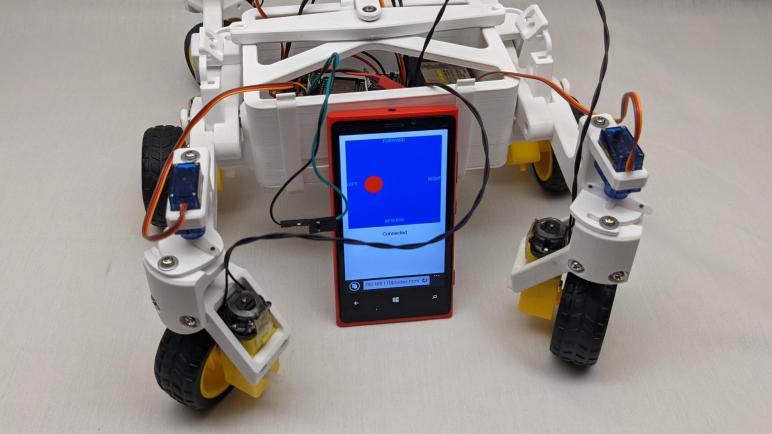
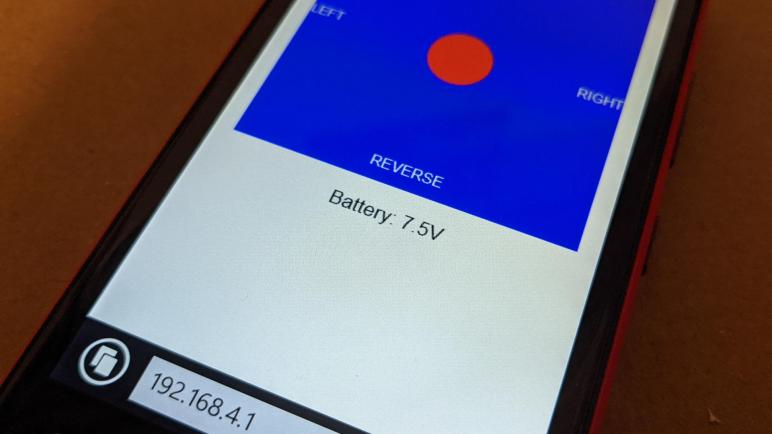
The small bit of ADC conversion code posted a message containing calculated voltage to a FreeRTOS queue, where multiple tasks can make use of that information. I updated the HTTP server code to peek at values on that queue, and send it to the user interface via websocket in the form of a JSON string. The ESP32 HTTP server sent real data, the Node.js stub server only sent a placeholder value. Sawppy’s browser-side JavaScript was then modified to listen to that message, parse that JSON string, and print that data on the status bar.

With these changes, I could monitor battery voltage level from my touchscreen control. This is enough for the moment. I have a few tasks for the future, using this voltage reading at a few other places. Starting with these two:

  1. If the voltage drops below a certain level, the rover should stop. Or at least use a “limp mode” that runs slower, in order to avoid an ESP32 brownout.
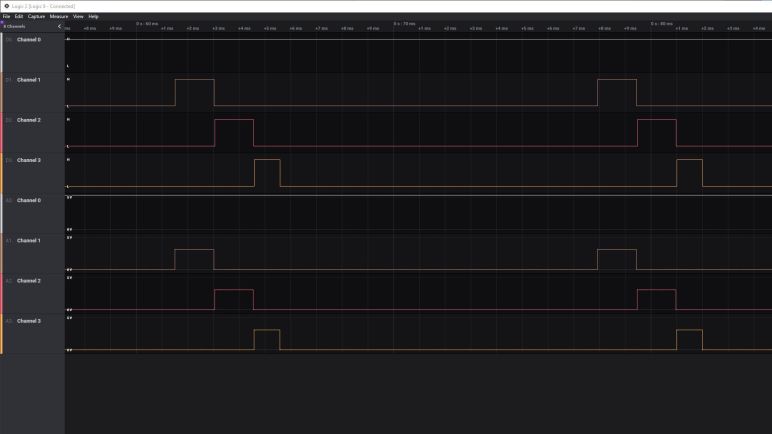
  2. I want the motor control PWM frequency to dynamically adjust according to the battery voltage, with the goal to maintain consistent output voltage to the motors. For example, a command for full speed should always output 6V to the motors. If the battery is drained down to 6V, the PWM frequency would be 100%. If the battery is full, the PWM frequency would be lower than 100% even at “full speed” in order to avoid burning out the motor.

I’ll add those features in a future Sawppy brain coding sprint. Software development will go on pause while I live with the feature set I’ve got on hand for a while. Besides, sometimes you don’t even need the features I already have.

[Code for this project is publicly available on GitHub]

Windows Phone Debug Tools Rode Into Sunset

Organizing and commenting code for my Sawppy Rover ESP32 control project had two sides: the server-side code running on the ESP32 and the client-side code running in a web browser. The MIT license text and general comments went well, but when I tried to improve error handling, I ran into a serious problem with the old Internet Explorer browser built into Windows Phone 8.1: I have no debugging tools.

My only indication was that the page failed to load and all I saw was a blank screen. There were no error messages displayed onscreen, and unlike desktop browsers I couldn’t even look at what’s been printed to console.log(). Just a blank nothing. I backtracked through my code changes and eventually traced it down to a bit of error handling code I added to the JavaScript file.

try {
  // Do potentially problematic thing
} catch {
  // Use alternate approach instead
}

This worked in desktop browsers, this was also accepted in my modern Android phone’s Chrome browser, but it was treated as an error in Internet Explorer. Even though I didn’t care about the specific error thrown, IE didn’t permit omitting the specifier. The following syntax was required:

try {
  // Do potentially problematic thing
} catch(err) {
  // Use alternate approach instead
}

This code change was not, in itself, a big deal. But it took an hour of trial-and-error to find the location of the error (no feedback = no line number!) and figure out what the browser would tolerate. During this time I was operating blind with only a binary “blank screen or not” as my feedback mechanism. I need better tools if I am to tackle more challenging JavaScript programming on Windows Phone IE.

Unfortunately, almost all of the debugging resources for Windows Phone platform have disappeared. Microsoft’s own Visual Studio IDE — formerly the home of Windows Phone app development — don’t even mention the platform at all in its “Mobile Development” feature page. A promising resource titled Diagnosing Mobile Website Issues on Windows Phone 8.1 with Visual Studio (published in 2014) said to best tool to use is the Windows Phone emulator because it was easier. Avoiding all the hoops one must jump through to put a physical Windows Phone device in developer mode for debugging. Today it’s not just a matter of “easier” since the latter is outright impossible: the Windows Phone developer portal has been shut down and I can no longer put any of my devices into developer mode.

But perhaps they’re both equally impossible, as the Windows Phone emulator is no longer an option for installation in Visual Studio 2019. A search for related pages led me to Mobile Apps & Sites with ASP.NET (published in 2011) whose section had a promising link “Simulate Popular Mobile Devices for Testing“. But that link is no longer valid, clicking it merely redirects back to the Mobile Apps & Sites with ASP.NET page. Many search boxes later, I eventually found what claims to be the Windows Phone emulator as a standalone download. I did not try to download or install it because at that point I was no longer interested.

I aborted my intention to organize my browser JavaScript code. Right now everything sits as peers at top-level and globally accessible. I had intended to reorganize the code into three classes: One handles drawing, one handles user input (pointer events), and the third handles server communications (websocket). However It looks like Internet Explorer never supported the official JavaScript class mechanism. I can probably hack up something similar, JavaScript is flexible like that. People have been hacking up class-like constructs in JS long before the official keyword was adopted. But to do that I need debugging tools for when I run into inevitable problems. Doing it without even the ability to see syntax errors or console.log() is masochistic self-punishment and I am not interested in inflicting that upon myself. No debug tool, no reorganization. I will add comments but the code structure will stay as-is.

This frustrating debugging session sapped my enthusiasm for working on Sawppy rover ESP32 control code. But before I go work on something else for a change of pace, I wanted to get a basic voltage monitoring system up and running.

[Code for this project is publicly available on GitHub]

Cleaning Up And Commenting Sawppy Rover ESP32 Code

The rover is now up and running on its own, independent of my home network. I felt this was a good time to pause feature development of Sawppy ESP32 control software. From an user experience viewpoint, this software is already in better shape than my SGVHAK rover software. Several of the biggest problems I’ve discovered since our local rovers started running have been solved. I feel pretty good about taking this rover out to play. More confident, in fact, than rovers running my earlier software.

Before I turn my attention elsewhere, though, I need to pay off some technical debt in the areas of code organization and code commenting. I know if I don’t do it now, it’ll never happen. Especially the comments! I’m very likely to forget if I don’t write them down now while they’re fresh in my mind. The code organization needed to be tamed because there were a lot of haphazard edits as I experimented and learned how to do things in two new environment simultaneously: ESP32 and JavaScript. The haphazard nature was not necessarily out of negligence but out of ignorance as I had no idea what I was doing. Another factor was that I copied and pasted a lot of Espressif sample code (especially in the WiFi area) and I had instances of direct copied text “EXAMPLE” that needed to be removed.

I also spent time improving code robustness with error handling code paths. And if errors are not handled, they should at least be reported. I have many unhappy memories trying to debug some problem that made no sense, and eventually traced it to a failed API call upstream whose error code was never reported. Here I found Espressif’s own ESP_LOG AND ESP_ERROR_CHECK macros to be quite handy. Some were carried over directly from sample code. I’ve already started using ESP_ERROR_CHECK during experimentation, because again I didn’t have robust error handling in place at the time but I wanted to know immediately if something fails.

Since this was my first nontrivial ESP32 project, I don’t think it’s a good idea for anyone to use and copy my amateurish code. But if they want to, they should be allowed to. Thus another bulk edit added the MIT license prefix to all of my source files. Some of them had pieces copied from Espressif example, but those were released to public domain so I understand there would be no licensing conflict.

While adding error handling code, though, I wasted an hour to a minor code edit because I didn’t have debug tools.

[Code for this project is publicly available on GitHub]

Sawppy Rover Independence with ESP32 Access Point

I wanted to make sure I had good visual indication of control client disconnect before the next task on my micro Sawppy rover ESP32 brain: create its own little WiFi network. This is something I configured the Raspberry Pi to do on SGVHAK rover and Sawppy V1. (Before upgrading Sawppy to use a commercial router with 5GHz capability and much longer range.)

All of my development to date have been done with the ESP32 logged on to my home network. This helps with my debugging, but if I take this rover away from home, I obviously won’t have my home network. I need to activate this ESP32’s ability to act as its own WiFi access point, a task I had expected to be more complex than setting up the ESP32 as a client (station mode) but I was wrong. The Espressif example code for software-based access point (softAP) mode was actually shorter than its station mode counterpart!

It’s shorter because it was missing a lot of the functionality I had expected to see. My previous experience with ESP32 acting as its own access point had been with products like Pixelblaze, but what I saw was actually a separate WiFi manager module built on top of ESP32’s softAP foundation. That’s where the sophisticated capabilities like captive portal configuration are implemented.

This isn’t a big hinderance at the moment. I might not have automatic forwarding with captive portal, but it’s easy enough to remember to type in the default address for the ESP32 on its own network. (http://192.168.4.1) On the server side, I had to subscribe to a different event to start the HTTP server. In station mode, IP_EVENT_STA_GOT_IP signals that we’re connected to the access point and it has assigned an IP address. This doesn’t apply when the ESP32 is itself the access point. So instead I listen for a control client to connect with WIFI_EVENT_AP_STACONNECTED, and launch the HTTP server at that point. The two events are not analogous, but are close enough for the purpose micro rover control. Now it can roam without requiring my home WiFi network.

Sometime in the future I’ll investigate integrating one of those WiFi manager modules so Sawppy rover users can have the captive portal and all of those nice features. A quick round of web searching found this one by Tony Pottier, with evidence of several more out in circulation. These might be nice features to add later, but right now I should clean up the mess I have made.

[Code for this project is publicly accessible on GitHub.]

Make Disconnected Client Visually Obvious

Testing my server code to disconnect inactive websocket clients, I learned a behavior I hadn’t known before: when a browser tab is no longer the foreground tab, the page’s scripts continue running. This made sense in hindsight, because we need those scripts to run for certain features. Most web mail clients display the number of unread messages in their tab title, and if a new piece of mail arrived, that number couldn’t be updated unless scripts were allowed to run.

In my scenario, I wanted the opposite. If someone has put my Sawppy rover control page in the background, they are no longer driving and should vacate the position for another. I started looking for HTML DOM events that I could subscribe to and learn if my tab is no longer the foreground, but a few experiments with the “onblur” event didn’t function as I hoped they would. As a fallback I decided to take advantage of a side effect: modern browsers do keep running scripts for background tabs, but they do so at a much slower rate. I “just” have to shorten the timeout interval and that would disconnect clients running slowly just as it does for those who have lost network connection or stopped. This is fragile as it depends on unspecified browser behavior, but good enough for today.

When testing this, I noticed another problem: for the user, it’s not very evident when the server has disconnected from their control client. I have a little bit of text at the bottom saying “Disconnected” but when I’m testing and juggling multiple browsers I started wishing for something more visually obvious. I thought about blanking out the page completely but such a drastic change might be too disorienting for the user. For the best user experience I want an obvious sign but I don’t want to club them over the head with it! I decided to change the color of the touchpad to grayscale in the websocket.onclose handler. The user can see they’re still on the page they expected, but they can also clearly see something is different. This accomplishes my goal.

From an accessibility perspective, this isn’t great for color-blind users. It’ll be fine for certain types of color blindness like red-green color blindness, but not for fully color blind users because it’s all gray to them. Thus I do not see this behavior as replacement for the “Disconnect” text. That text still needs to be there for those who could not see the change in color. And knowing connected/disconnected status will become more important as the little rover wanders away from my home, away from the powerful standalone wireless access point, and have to become its own wireless access point.

[Code for this project is publicly available on GitHub.]

Detect and Disconnect Inactive Web Sockets

Constraining my Sawppy rover logic to only a single rover operator was good, but that code immediately exposed the next problem: a web socket on one side doesn’t always know when it has lost contact with the other end. When this happens to my ESP32 server on the rover, it means the rover doesn’t know its driver is gone. And thanks to the code I just added, it means nobody else can get into the driver’s seat, either.

This is a known failure mode for web sockets, and there’s a prescribed mechanism to deal with it: a web socket heart beat with the “ping” and “pong” control frames. Either end of a web socket can choose to send a ping. Upon receipt of this ping a web socket implementation is obligated to reply with a pong. Doing this on a regular basis lets us check to verify the connection is still alive.

I started writing code to send pings, but then I realized it’s not really necessary. The browser client is obligated to send steer and speed values on a regular basis, and that can serve as my heartbeat. I can set a timer each time the rover receives the steer and speed commands, and if it’s been too long since the last transmission, the rover can proactively terminate the web socket so another rover operator can assume command.

As usual I started with my Node.js server running on my desktop to explore the concept and get an idea of how it’s supposed to work. For JavaScript I start a timer with setTimeout() and every time I receive a client command I call refresh() on that timer to reset the clock. If the timer goes off, it’s been too long and I call terminate() on the web socket instance. Which I need to keep track of now, something I managed to avoid earlier.

Once I understood how it was supposed to work, I moved on to implementation on ESP32. For this task I chose to use a FreeRTOS software timer. With mostly the same semantics as in JavaScript. When a new web socket is accepted, I call xTimerStart(). Every time the rover receives a command, xTimerReset() is called. If a reset does not occur in time, I queue up a web socket control frame set to HTTPD_WS_TYPE_CLOSE to close up shop.

That code took care of the server side logic, but that left a problem on the client side: How can I make it obvious when the server has decided to quit listening to commands from a particular controller?

[Code for this project is publicly available on GitHub]

Sawppy Rover Driver Max Occupancy: One

Steering control precision was something I found lacking in my SGVHAK rover software project. This is my second effort at browser-based rover control and I added code to vary steering rate as a function of speed. Over the next few weeks (or more) I will see if it’s an overall improvement and see if it’s worth keeping. The next problem I wanted to solve with browser-based rover driving is that HTTP was designed to be completely stateless, and a mechanism to serve many clients. This doesn’t work so well for driving a vehicle, where we want to have only one driver at the wheel.

I didn’t know how to solve this problem with SGVHAK rover. Once I had an HTTP web server up and running, it would happily serve rover control UI to any number of clients. And it would happily accept and process HTTP POST submissions from any and all of those clients. In practice this means we can have multiple touchscreen phones all trying to drive the rover, and the rover ends up being very confused with conflicting messages coming in interleaved with each other. Steering servos would rapidly flick between multiple positions, and driving motors would rapidly change speeds. This causes hardware damage.

Switching from stateless HTTP POST to web sockets gave me a tool to solve this problem. Now the server side code can keep a reference to a specific web socket, and any additional attempts to set up a rover driving web socket can be rejected. This allows me to keep the number of rover drivers to at most one.

For my Node.js server, I didn’t even need to keep a global reference. The web socket server class maintains a list of clients, and I can check the number of clients. The trickier part for me was figuring out how to reject additional sockets. I looked fruitlessly in the web socket server for a while, because the answer is actually a little bit upstream: The HTTP server has an “upgrade” event that I can subscribe to, and it is called whenever a web socket client request upgrading from HTTP GET to websocket. This is the location where I can reject the connection if there was already an existing client. With the Node.js server configured to test the scenario on my development desktop, I found a few bugs in my client-side browser code. Once it worked I could continue to my ESP32 code.

For my ESP32 server, it means tracking two things: an identifier for the HTTP server (httpd_handle_t) and a socket descriptor. Together those two values uniquely identify a websocket. The URI handler I registered to handle websocket upgrade requests is given an instance of httpd_req_t. Using that, I can obtain both parts of an unique identifier and compare them against future calls into the URI handler. I process requests if the server handle and socket descriptor matches, and reject them if they don’t. With this code in place, only a single driver is commanding a rover at any given time. But this code also immediately exposed another problem: how to detect if that single driver is gone?

[Code for this project is publicly available on GitHub.]

Variable Steering on Sawppy ESP32 HTML Control

It’s great to see my ESP32-based HTML control scheme for Sawppy rover up and running end-to-end. However, the code to get this far is an extremely rough first draft. I still have a lot of refinement work ahead. The first thing I wanted to tackle was control precision while the little rover is running at high speed. My Spektrum radio gave me extremely precise control over steering angle, but my touchscreen control was comparatively crude. Instead of going in the direction I want, it would dart too far one way, I would over-correct and it dart the other way, and repeat. I noticed this problem with my HTML touch joystick control pad with SGVHAK rover and Sawppy V1 rover, but they were larger rovers that travelled slower so the problem wasn’t as bad. A little hyperactive rover with a much shorter wheelbase suffers far more from twitchy steering. So while it was something I just tolerated on the larger rovers, it became a priority to address on the little one.

I implemented the first idea that came to mind: make the steering range variable as a function of speed. I hope this would feel intuitive relative to everyday cars, since we perform tight turns at low speed and learn to keep steering gentle at higher speeds. The caveat is that it wouldn’t be implemented the same way. In our cars the steering ratio remains constant no matter the speed, we just learn to be gentle and not yank the wheel about on the highway. Now I am going to vary the control ratio and this might be confusing. When car manufacturers started exploring variable-ratio power steering racks on their cars, some early implementations made customers unhappy.

Back to my little rover. The initial implementation mapped the left-right position of my joystick pad directly to a particular turning radius, no matter what speed the rover is travelling. My first experiment is to modify that so the steering ratio would drop and turning radius would widen as speed increased. Meaning it would be very hard to maintain a specific turning radius while varying the speed, but that’s not something I see as a rover driving pattern anyway so maybe it’s OK for that to be difficult.

After I implement the variable ratio, at top speed (joystick pad at the top edge) the left-right steering range is only a fraction of maximum. This allows me to fine-tune rover heading as it runs, and I don’t have to worry about suddenly throwing the rover into a sharp U-turn by accident. This part worked well, but it is tricky to drive the rover while slowly accelerating since steering angle changes as I accelerate. It’s possible this would prove to be a problem worse than the original one I set out to solve, I don’t know yet. I’ll drive with this variable ratio mechanism in place for a while and see how it goes. I’ll also make sure only one person is driving.

[Code for this project is publicly available on GitHub]

Micro Sawppy Beta 3 Running With HTML Control

After I established websocket communication between an ESP32 server and a phone browser JavaScript client, I needed to translate that data into my rover’s joystick command message modeled after ROS joy_msg. For HTML control, I decided to send data as JSON. This is not the most bandwidth-efficient format. In theory I could encode everything into binary with two signed 8-bit integers. One byte for speed and one byte for steering is all I really need. However I have ambition for more complex communication in the future, thus JSON’s tolerance for extra fields has merit from the perspective of forward compatibility.

Of course, that meant I had to parse my simple JSON on the ESP32 server. The first rule of writing my own parser is: DON’T. It’s a recurring theme in software development: every time someone thinks “Oh I can just whip up a quick parser and it’ll be fine” they have been wrong. Fortunately Espressif packaged the open source cJSON library in ESP-IDF and it is as easy as adding #include "cJSON.h" to pull it into my project. Using it to extract steering and speed input data from my JSON, I could translate that into a joy_msg data structure for posting to the joystick queue. And the little rover is up and running on HTML control!

The biggest advantage of using ESP32’s WiFi capability to turn my old Nokia Lumia 920 phone into a handheld controller is cost. Most people I know already have a touchscreen phone with a browser, many of whom actually own several with older retired phones gathering dust in a drawer somewhere. Certainly I do! And yeah I also have a Spektrum ground radio transmitter/receiver combo gathering dust, but that is far less typical.

Of course, there are tradeoffs. A real radio control transmitter unit has highly sensitive inputs and tactile feedback. It’s much easier to control my rover precisely when I have a large physical wheel to turn and a centering spring providing resistance depending on how far off center I am. I have some ideas on how to update the browser interface to make control more precise, but a touchscreen will never have the spring-loaded feedback. Having used a RC transmitter a few days before bringing up my HTML touch pad, I can really feel the difference in control precision. I understand why a lot of Sawppy rover builders went through the effort of adapting their RC gear to their rovers. It’s a tradeoff between cost and performance, and I want to leave both options open so each builder can decide what’s best for themselves. But that doesn’t mean I shouldn’t try to improve my HTML control precision.

[Code for this project is publicly available on GitHub.]

Shiny New ESP32 WebSocket Support

My ESP32 development board is now configured to act as HTTP server sending static files stored in SPIFFS. But my browser scripts trying to talk to the server via websocket would fail, so it’s time to implement that feature. When I did my initial research for technologies I could use in this project, there was a brief panic because I found a section in Espressif documentation for for websocket client, but there wasn’t a counterpart for websocket server! How can this be? A little more digging found that websocket server was part of the HTTP Server component and I felt confident enough to proceed.

That confident might have been a little misplaced. I wouldn’t have felt as confident if I had known websocket support was added very recently. According to GitHub it was introduced to ESP-IDF main branch on November 12, 2020. As a new feature, it was not enabled by default. I had to turn it on in my project with the CONFIG_HTTPD_WS_SUPPORT parameter, which was something I could update using the menuconfig tool.

Side note: since menuconfig was designed to run in a command prompt, using it from inside Visual Studio Code PlatformIO extension is a little different due to input handling of arrow keys. The workaround is that J and K can be used in place of up/down arrow keys.

Attempting to duplicate what I had running in my Node.js placeholder counterpart, I found one limitation with ESP32 websocket support: Using Node.js I could bind HTTP and WS protocols both to root URI, but this ESP32 stack requires a different URI for different protocols. This shouldn’t be a big deal to accommodate in my project but it does mean the ESP32 can’t be expected to emulate arbitrary websocket server configurations.

I also stumbled across a problem in example code, which calls httpd_ws_recv_frame with zero to get length, then allocating the appropriate sized buffer before calling it again to actually fetch data. Unfortunately it doesn’t work for me, the call fails with ESP_ERR_INVALID_SIZE instead of returning filled structure with length. My workaround is to reuse the same large buffer I allocated to serve HTML. I think I’ve tracked this down to a version mismatch. The “call with zero to get length” feature was only added recently. Apparently my version of ESP-IDF isn’t recent enough to have that feature in order to run the example code. Ah, the joys of running close to the leading edge. Still, teething problems of young APIs aside, it was enough to get my rover up and running.

[Code for this project is publicly available on GitHub.]

ESP32 HTTP Was Easy But Sending Files Need SPIFFS

I got my ESP32 on my local home WiFi network, but it doesn’t respond to anything yet. The next step is to write code so it could act as a static web server, sending files stored in ESP32 flash memory to clients requesting them via HTTP GET. The good news is that setting up a HTTP server was really easy, and I quickly got it up and running to serve a “Hello World” string hard-coded in my ESP32 source code.

I briefly considered calling this situation good enough and move on. I could embed my HTML/CSS/JavaScript files as hard-coded strings inside my C files. But doing so meant reviewing those files to make sure they don’t have conflicts with C string syntax, and that’s something I’d have to do every time I wanted to update any of those files. This is quite clumsy. What I really want is to keep those files to be served over HTTP separate from my C code, so that they could be updated independently of code and I don’t have to review them for C string incompatibility.

Doing this requires carving out a portion of an ESP32’s flash memory storage for a simple file storage system called SPIFFS. Allocation of flash storage is declared in a partition file, which is a list of comma-separated values (CSV) of partition information like size, offset, and assigned purpose. PlatformIO ESP-IDF project template includes a default partition file but it had no provision for a SPIFFS partition. I need to add one to my project to override that default. I found an example partition file as my starting point, copying it into my project and making only minor changes. (I didn’t need quite as large of a SPIFFS partition.) If I were using ESP-IDF directly, I believe I would use the menuconfig tool to point to my partition file. But as I’m using ESP-IDF indirectly via PlatformIO, I specified my partition file location using a parameter in the platformio.ini configuration file.

Once I have a partition, I need to put my files in it. Apparently it’s not as simple as using a USB flash drive, I have to build the entire data partition (like building a disk image for a PC) and upload the whole thing. There are ESP-IDF command line tools to build SPIFFS partition, I decided to go with PlatformIO route by specifying the platformio.ini parameter data-dir. I could point it at my Node.js working directory, which is great because that meant I only had one copy of these files in my code repository. Eliminating the task of keeping multiple copies in sync. From the PlatformIO UI I could then use “Platform/Build Filesystem Image” followed by “Platform/Upload Filesystem Image”. I haven’t figured out if this is necessarily separate from code update or if there’s a way to do both at the same time.

Putting files in SPIFFS isn’t useful until I have code to read those files. I followed the links to Espressif code example for reading and writing to SPIFFS. And ugh… I haven’t had to deal with old school C file input/output API in quite some time. I briefly considered the effort to keep things memory efficient by breaking these file I/O actions up into small pieces, but I don’t need that kind of sophistication just yet. In order to simplify code, and because I have RAM to spare at the moment, I allocated a large buffer so all the operations to read from SPIFFS and send via HTTP can be done in a single pass. Which worked well for sending data to the control client, but now I need to listen to control commands coming back.

[Code for this project is publicly available on GitHub.]

Notes On Getting ESP32 On WiFi

I’m working towards a minimal first draft of my Sawppy rover’s HTML-based control scheme. I tackled client side first because that side had more similarity to my earlier SGVHAK rover control project. I got a first draft by using a Node.js server on my desktop as a placeholder for the ESP32, now it’s time to start working on the real server code. The first step is to learn how to activate an ESP32’s WiFi capabilities in software.

There are many options on how to set up networking between an ESP32 and a browser running on a phone. I decided to start with connecting it as a node to my home network, which Espressif documentation calls “station mode“. I expect this to be easier to develop and debug, but obviously it won’t work for a rover roaming away from home. For that the ESP32 will have to be switched to “AP mode” acting as a WiFi access point. In order to accommodate this, I aim to structure my code so setting up a WiFi connection is its own separate FreeRTOS task, so that I can switch between station and AP (or maybe even more?) variants as needed at compile-time. If I ever need the option to switch between modes at runtime, I can integrate one of the available ESP32 WiFi managers.

To learn about setting up an ESP32 in station mode, Espressif’s written documentation is pretty thin. I had to do most of my learning from their station example, and thankfully it was indeed enough to get my ESP32 on my network. Converting the sample code to a FreeRTOS task I can incorporate into my rover project required more than 2 kilobyte of stack, which is what I had been using as a default. A bit of quick experimentation established 3 kilobytes are enough for the new WiFi task. Right now I’m not too worried about RAM footprint, so I won’t spend time pinning down exactly where between 2 and 3 it needs.

One item that I saw and copied without understanding, was a code block initializing an ESP32’s non-volatile storage (NVS) used to store information in key-value pairs. I can infer that ESP32 WiFi stack required some of those values, but I couldn’t find documentation on exactly what was needed. The more obvious WiFi-related pieces of information (like the SSID for my home network and associated password) are in my code, so it must be something less obvious but I don’t yet know what they are.

Events were an aspect of the sample code that confused me for a while. Eventually I figured out my confusion stemmed from the fact I got two items mixed up. One of them is an “Event Group“, which is a FreeRTOS mechanism used here so a piece of code could wait until WiFi initialization completes before they start doing network things. The other mechanism is an “Event Loop” which is an Espressif creation for ESP-IDF. They both had “event” in their name but were completely independent, which was why I got lost trying to understand how the two mechanisms interacted behind the scenes: the answer is that they don’t! So when reading the code it’s important to figure out which “event” we are talking about. The Espressif reference for WiFi initialization events, for example, refers to the event loop.

I’m happy I was successful in connecting an ESP32 to my home WiFi by following example code. Now that it is on the network, I need to make it do something useful.

[Code for this project is publicly available on GitHub.]

Sawppy HTML Canvas and Websocket

After a little bit of research to figure out what parts of HTML I should be able to use in my Sawppy rover control project, I got to work. Some minor parts of the 2D joystick touchpad <canvas> code was copied from the SGVHAK rover project, but the majority did not. One change was that I no longer sent updates upon every user input event, as I’ve learned that generated far too much data for this purpose. The internal calculations will still be made in the input event handlers, but those updated coordinates are not sent to the server except by a polling loop set up to run at regular intervals.

Speaking of the input event handlers, I switched to using standard generalized pointer event API instead of those specific to mouse input or touch input, and a quick test showed it functioned as expected on all the platforms I tried. (Chrome on Windows 10, Chrome on Android, Safari on iOS, and IE on Windows Phone 8.) If there’s a good reason why I didn’t use that earlier for SGVHAK rover, I have yet to encounter it.

Those changes were relatively minor in comparison to the next part: switching to using websocket for communicating steering and speed values to the server. For this I had to modify my Node.js placeholder server, as it was no longer a static file server. I expected to find a Node.js websocket library and was not surprised to find there were actually several to choose from. Based on a quick glance at the getting started examples, ws looks like one I could get up and running fastest for my purposes, and it did not disappoint. It took far less work than I had expected to get websocket communication up and running, albeit only one-way from client browser to server. But this is fine, the Node.js placeholder has done its job, now I have a very rough but minimally functional set of client-side code for Sawppy HTML control. Enough for me to start looking at ESP32 server-side code.

[Code for this project is publicly available on GitHub]

HTML Features For ESP32 Sawppy Rover

I am now running the Node.js static web server node-static in a Docker container, with the help of nodemon I have set up my own infrastructure rapidly iterate HTML/CSS/JavaScript development. I expect this will be very useful during development, much faster than reflashing an ESP32 on every update. Making the interface in HTML lets rover drivers use the touchscreen phone they’re probably carrying around anyway, but I also wanted the option of using older out-of-date phones which meant I can’t use the latest and greatest browser APIs. For my target example I chose Internet Explorer built in to Windows Phone 8 (WP8 IE from now on) mainly because I have a Nokia Lumia 920 just sitting here. It is in great physical condition, so I kept it long after its retirement as I was reluctant to toss it as electronic waste.

To give this old phone a new job as rover driver I need to know what subset of modern web standards are functional in the browser built into a Nokia Lumia 920. To ensure I’m not inadvertently locking myself into proprietary features, I won’t use any Microsoft reference material. Only stuff I find on non-proprietary sites like w3schools, backed up by information from sites like caniuse. I will also verify on an Android phone and iOS tablet as I go.

Drawing on screen

For SGVHAK rover software I used the HTML Canvas drawing API directly, and I thought I would investigate tools that might make that easier. There aren’t very many options, as HTML graphics frameworks have mostly moved on to WebGL. On a lark I checked WebGL support on WP8 IE, and was mildly surprised to see the answer was yes. Well, sort of. The test pages says the browser reports WebGL as an incomplete ‘experimental’ feature, which sounds about right for the browser’s vintage.

Lacking much knowledge in the area, I picked PixiJS as a representative 2D HTML graphics framework that renders to WebGL and automatically falls back to HTML Canvas as needed. This particular framework seems to subscribe to the “move fast and break things” philosophy, as my attempt to follow a learning tutorial quickly aborted due to a breaking change in how textures are loaded. But that doesn’t matter, because PixiJS won’t run on my Nokia Lumia 920 with the error “Requires ES6 Support” so that is out.

Verdict: WebGL was a fun distraction, but I only really need to draw a rectangle and a circle. HTML <Canvas> will be fine.

Receiving User Input

For SGVHAK rover software I had two parallel code paths listening to input events. One path listens to mouse events, another listens to touch inputs, and they work together to call into a shared set of pointer event handlers. Looking at this code in hindsight, I can’t remember why I didn’t subscribe to HTML’s own pointer events that performs this input unification in a standardized way. My requirements for Sawppy control isn’t esoteric, pointer down/up/move and capture are all fairly standard things and they seem to work in WP8 IE.

Verdict: The new project will switch to Pointer Events until I discover (or rediscover?) why I would need to subscribe to mouse and touch events separately.

Communicating with Server

For SGVHAK rover software, my control software submitted user input in the most standard HTML technique I knew for sending data to server: the HTTP POST. Designed for submitting form data on a web page, it was a really inefficient way to submit a user’s control input multiple times a second. When I described my amateurish approach to people with knowledge of actual web programming, their faces usually turn to open horror.

But the good thing with honesty about being an amateur and open to learning is that I received advice to investigate something called WebSocket. Thankfully, just like WebGL above, someone has set up a page to check if a browser supports WebSocket. I was happy to discover that it was supported in WP8 IE. A quick check on Espressif documentation confirmed there is some level of WebSocket support, good enough for me to go explore the possibility.

Verdict: Stop using HTTP POST and switch to WebSocket.

Notes After Node.js Introduction

After I ran through the Docker Getting Started tutorial, I went back into the docker container (the one we built as we progressed through the tutorial) and poked around some more. The tutorial template was an Express application, built on Node.js. Since I had parts of this infrastructure in hand, I thought I will just run with it and use Node.js to build a simple web server. The goal is to create a desktop placeholder for an ESP32 acting as a web server, letting me play and experiment quickly without constantly re-flashing my ESP32.

The other motivation was that I wanted to get better at JavaScript. Not necessarily because of the language itself (I’m not a huge fan) but because of the huge community that has sprung up around it, sharing reusable components. I was impressed by what I saw of Node-RED (built on Node.js) and even more impressed when I realized that was only a small subset of the overall Node.js community. More than a few times I’ve researched a topic and found that there was an available JavaScript tool for doing it. (Like building desktop apps.) I’m tired of looking at this treasure trove from the outside, I want this in my toolbox.

Node.js is available with a Windows installer, but given my recent knowledge, I went instead to their officially published Docker images. Using that to run through Node.js introduction required making a few on-the-fly adaptations to Node.js in a container, but I did not consider that a hinderance. I consider it great container practice! But this only barely scratches the surface of what I can find within the Node.js community. Reading the list of Node.js Frameworks and Tools I realized not only have I not heard about many of these things, I don’t even understand the words used to describe them! But there were a lot of great information in that introduction. On the infrastructure side, the live demo code was made possible by Glitch.com, another online development environment I’ll mentally file away alongside Cloud9 and StackBlitz.

Even though Google’s V8 JavaScript engine is at the heart of both Chrome browser and Node.js server, there are some obviously significant differences between running in a server environment versus running in browser. But sometimes there are concepts from one world that can be useful in the the other, and I was fascinated by people who try to bring these worlds closer together. One example is Browserify which brings some server-side component management features to browser-side code. And Event Emitter is a project working in the other direction, bringing browser-style events to server-side code.

As far as I can tell, the JavaScript language itself was not explicitly designed with a focus on handling asynchronous operations. However, because it evolved in the web world where network latency is an ever-present factor, the ecosystem has developed in that direction out of necessity. The flexibility of the language permitted an evolution into asynchronous callbacks, but “possible” isn’t necessarily “elegant” leading to scenarios like callback hell. To make asynchronous callbacks a little more explicit, JavaScript Promise was introduced to help improve code readability. There’s even a tool to convert old-school callbacks into Promises. But as nice as that was, people saw room for improvement, and they built on top of Promises to create the much more easier-to-read async/await pattern for performing asynchronous operations in JavaScript. Anything that makes JavaScript easier to read is a win in my book.

With such an enormous ecosystem, it’s clear I can spend a lot more time learning Node.js. There are plenty of resources online like Node School to do so, but I wanted to maintain some resemblance of focus on my little rover project. So I went back to the Docker getting started tutorial and researching how to adapt it to my needs. I started looking at a tool called webpack to distill everything into a few static files I can serve from an ESP32, but then I decided I should be able to keep my project simple enough I wouldn’t need webpack. And for serving static files, I learned Express would be overkill. There’s a Node.js module node-static available for serving static files so I’ll start by using that and build up as needed from there. This gives me enough of a starting point on server side so I can start looking at the client side.

Docker Container as Placeholder For ESP32 Web Server

To control my micro Sawppy rover, I want to present a HTML-based control pad that works even on older phones like my Nokia Luma 920 running Windows Phone 8.1. This will require that I revisit the world of HTML development and this time I’m trying to avoid client-side frameworks like jQuery. Eventually, these HTML files will be served from an ESP32 on board the rover, but I didn’t want to use an ESP32 while I’m focused on client-side development. The most obvious reason is that I didn’t want to upload a new ESP32 image every time I made a change in my client-side code. Fortunately, the nature of Jamstack-style web development meant that my HTML (& associated files) sent to the browser are all static files. So I could use any static file web server to act as a placeholder for the ESP32 while I work on the HTML side of things.

But given my recent experience installing development frameworks, I was squeamish about installing another one on my desktop without some way of keeping it isolated from the rest of my system. Again I turned to solutions already developed for the web world and decided to use Docker containers. I’ve dabbled with Docker on a few prior occasions, and this project is a chance for more experience.

Once Docker Desktop for Windows was installed, the opening screen invites me to run the docker/getting-started container. This is a Docker tutorial on multiple levels. Not only does it take me through an increasingly complex set of scenarios on how Docker can be used, it is itself a container that has a web server hosting the tutorial content. (For those that want to take a look before installing Docker, a substantially similar tutorial is on docker.com.) So after running through the tutorial, I understood enough to come back and poke around inside the getting-started container to see how it was done. Which was very useful for me, because a container acting as a web server is exactly what I want to do right now.

As neat as Docker looks, there are a few problems preventing me from using it for everything. The major limitation for me, at least on Windows, is the lack of hardware access. This rules out all the projects that need access to a USB port. So while I could run ESP-IDF inside a container, I wouldn’t be able to flash the resulting image to a ESP32 nor would I be able to use JTAG debugging. Docker is most closely associated with network applications, not hardware, so it’s best to stick with its strengths as I use it to solve my project problems.

Windows Phone 8 As Sawppy Rover Controller

I wanted to reduce the cost of a micro Sawppy rover by using a HTML-based WiFi control system. This allows control by any web-enabled device like touchscreen phones that many people already carry. However, since it would be against the cost-reduction theme to require expensive new flagship devices, I’m aiming at the opposite end of the spectrum: if people don’t want to use their everyday phone, they should be able to use their old retired phone for rover driving duty. As a representative example for development, I will be using my old Nokia Lumia 920 running Windows Phone 8 (updated to WP8.1.)

Microsoft stopped supporting these phones in 2017, which includes shutting down their app store. (Which never grew to the scale of iPhone or Android app stores.) Any new functionality would thus have to come in via its mobile-optimized version of Internet Explorer. Which, by accounts of the day, made a respectable implementation of web standards of the era. Unfortunately, mobile sites of the time were too frequently written explicitly for Safari on iPhone or Chrome for Android. Mobile-friendly web standards existed at the time and was supported by all the platforms, but not yet as widely adopted by sites as they are today. This was a problem that also hampered Firefox’s attempt at a phone OS.

Since this is not an iOS device, nor an Android device, I expect any web-based code that runs on IE for WP8 would be neutral and will run across many older devices. Or if they do not, at least I hope starting from this neutral ground means any necessary modifications would be minimal.

I actually had the intention of making my original SGVHAK rover code friendly to old phones as well, which was part of why I adopted jQuery on the client-side. It is a relatively old HTML framework, which I thought would give me the best chance of working on older phones. So when it failed to work reliably on my Lumia 920 I was grumpy! But I didn’t understand enough about these frameworks (Flask on the server side, jQuery on the client side) to debug what went wrong. This time I will start at a more fundamental level and build upwards, testing on my Lumia 920 as I go. Which meant I would greatly benefit from setting up an environment that will let me experiment and iterate quickly.

Sawppy ESP32 HTML Control Project

Giving my little Sawppy rover an interface with radio control equipment was a fun project, but that capability was always going to be a side show and never my main attraction. One of the reasons I chose the ESP32 is because of its wireless networking capabilities, and I had always planned to use that instead of external radio gear. Eliminating that equipment is also critical on cost grounds, as my Spektrum DX3E transmitter and SR300 receiver combo itself cost more than my $100 USD target for rover parts cost. Today Spektrum offers lower-priced entry level models, but they’re still going to cost money. By using ESP32 wireless capability directly, I hope to avoid that expense.

So the next project is to give my ESP32-based Sawppy brain a HTML browser-based control scheme using ESP32’s WiFi hardware. This will be similar to what I created for SGVHAK rover which has performed satisfactorily for several rover projects to date, including Sawppy V1 and Micro Sawppy Beta 1. But while the concepts will be similar, I don’t plan on using very much of the same code for two main reasons.

The first reason is due to downscaled rover hardware. SGVHAK rover software ran on a Raspberry Pi and was written with a Python-based web framework called Flask. This class of infrastructure will not be available on a microcontroller like the ESP32, which is far less powerful than a Raspberry Pi. So instead of using a web server platform that is built on dynamic server-side template transformations, I intend to create a system where the server only has to send out static files and leave script execution to the client’s web browser. This follows the Jamstack philosophy and I see this as a project for me to try implementing it firsthand.

The second reason is my target client platform. I want the client browser code to be very basic, because I didn’t want to require an expensive recently-released phone. As part of keeping rover costs low, I wanted people to have the option of using their old out-of-date phones. My representative out-of-date device runs Windows Phone 8.

Micro Sawppy Beta 3 Running With Spektrum Radio Control

I had to iron out a few bugs, but I now have a FreeRTOS task running on my ESP32 interpreting radio control receiver signals. It uses the RMT peripheral to count duration of servo control signals sent by my Spektrum SR300 radio control receiver. This allows me to use my Spektrum DX3E transmitter to send commands to an ESP32. From there it was a relatively straightforward translation to the ROS-ish joystick message format I used on this project. Once everything was connected and working, I could drive Micro Sawppy Beta 3 (MSB3) and watch that little rover scoot along.

The potentiometers on my DX3E are far superior than those on the wired joystick I used for testing earlier. Not a surprise given their price difference was two orders of magnitude. The cheap wired joystick was practically a digital on/off direction pad like an old Atari 2600 joystick, making it very difficult to make gradual adjustments. In contrast making tiny changes in a DX3E is trivial, and I could finally explore MSB3 partial steering and partial throttle response.

The good news is that proportional steering worked well. Even though MSB3 is capable of turning about arbitrary radii, including a zero-radius turn in place, I’ve found that confused people on Sawppy V1. So the human-operated joystick drive logic on MSB3 constrained minimum turning radius to pivoting about one of the middle wheels. I have yet to verify its capability to steer inside that radius, a task for the future via autonomy operation. But right now, with the DX3E I found it easy to control turning radius of MSB3 and it appears all my Ackermann steering calculation code and their execution are working correctly. This is great.

The bad news is that proportional throttle control did not work well. I had some preliminary results on TT gear motor speed ranges that made me worried, but that was done individually instead of all six wheels working together like they would be on MSB3. I had hoped that six wheels working together will exhibit better low speed behavior than I saw individually, and sadly I have proven this is not the case. Trying to get a bit more usable torque, I dropped the PWM frequency down to 1Hz. It gave the rover an audible whine and while it improved low end torque slightly, this rover is never going to be a rock crawler. The minimum sustainable speed is far faster than scale, and hampers the ability for this chassis to climb obstacles.

But despite that disadvantage, MSB3 still does quite well running across the uneven surface of my back yard. Including its ability to drop down to tile pavers and then climbing back up onto grass. This freshly-edged transition presented a cliff almost the diameter of a TT gear motor wheel. In the department of rough terrain capability, MSB3 still has quite a big of advantage over other robots driven by TT gearmotors, thanks to the rocker-bogie suspension geometry inherited from the bigger Mars rovers.

Driving MSB3 using my Spektrum radio was fun, but this is not the main goal of the project. The goal is to use ESP32’s wireless communication capabilities directly, without support of external radio equipment.

Spektrum SR300 Signals Under Saleae Logic 8 Analyzer

Since several Sawppy V1 builders modified their rovers for control via classic radio control transmitters, I wanted to explore doing the same with Micro Sawppy Beta 3. I don’t intend it to be the main, or even recommended, way to control a little rover. But I wanted it available as an option. Besides, I’m curious what such work would entail and thought it would be fun to try, this novelty is why I tackled the challenge first.

In preparation for this project, I modified my Spektrum SR300 radio receiver so it is easier for me to plug other things into it, not just official RC servos and speed controls. Immediately after reassembly I verified I didn’t break it with a quick test. Using affordable commodity micro servos which didn’t have the special beveled plugs. I couldn’t plug them in before, but now I could.

Eventually I’ll have wires connecting this servo to the ESP32 brain of my micro Sawppy rover, but before I do that I wanted to understand exactly what I will be working with. Having worked with hobby servo motors for many projects, I have a fair idea what their control signals are like. But all of my previous projects were about emitting these control signals, this is the first time I will listen to signals generated by another device.

This is a task that can be done several different ways. One way is to use an oscilloscope, which can plot out the signal waveforms. But to my understanding, the best tool for this job is a signal analyzer. This is a tool I’ve wished I had on my workbench. I’ve been saving up for a Saleae Logic 8 and this is the first chance to put one to use. Taking a peek at the servo control signals of a SR300 is a breeze for a Logic 8, it’s just a simple Hello World to help me get my feet wet using this piece of equipment.

I powered the SR300 receiver with four AA batteries, and connected Saleae probes as follows:

  • Channel 0 on the positive voltage supply pin, to monitor any fluctuation of battery power.
  • Channel 1 on the steering servo signal pin.
  • Channel 2 on the throttle servo signal pin.
  • Channel 3 on the auxiliary channel servo signal pin.

Walking through traces of me fiddling with the DX3E transmitter, I found the following:

  • Pulse width of each control high signal ranged from 1 to 2 milliseconds, exactly conforming to RC convention.
  • The pulses are coming in faster than I had expected. Standard convention is for RC control pulses to arrive every 20 milliseconds, which translates to 50Hz. SR300 pulses are arriving every ~16.4 milliseconds, which translates to a bit over 60Hz. The ~16.4 milliseconds is measured from rising edge to rising edge of the steering signal, this matters because of the next item.
  • Pulses arrive sequentially. Steering first, then throttle, then aux. The throttle control signal rising edge doesn’t start until shortly after the steering signal’s falling edge. This means if the steering signal is short, the throttle signal may start a little sooner than 16.4ms after the previous throttle signal. (At least for that one frame.)
  • There is no measurable dip in input voltage. Unsurprising but comforting to confirm the receiver draws minimal power and does not drag down battery voltage as it sends out pulses.
  • Pulse high is three volts. This was a surprise to me, I had expected the control IC to toggle a bank of transistors which will send out pulses at the same voltage level as the battery supply voltage. I had a feeling my expectation was wrong when I disassembled the SR300 and looked over its circuit board, and now I have confirmation on the Saleae trace: battery supply voltage of over five volts still generated control signal of a rock-steady three volts.

The last bullet is great news. I had planned to build a voltage divider out of resistors for the ESP32 to read these control pulses, and I wanted to measure pulse high in order to calculate the appropriate resistance values. The fact these are rock steady three volt signals meant that work is unnecessary, I could wire these control signal pins directly to input pins of an ESP32 without exceeding its maximum input voltage of 3.3V.

Is thee volt pulse high common across all RC receivers? That I don’t know. Anyone else who wants to wire a RC receiver to their micro servo should also measure the pulse high voltage to see if they need to drop the signal voltage. But for now it means I have confidence I have the hardware in place and can work on software.