AU Optronics B101EAN01.5 Backlight Power

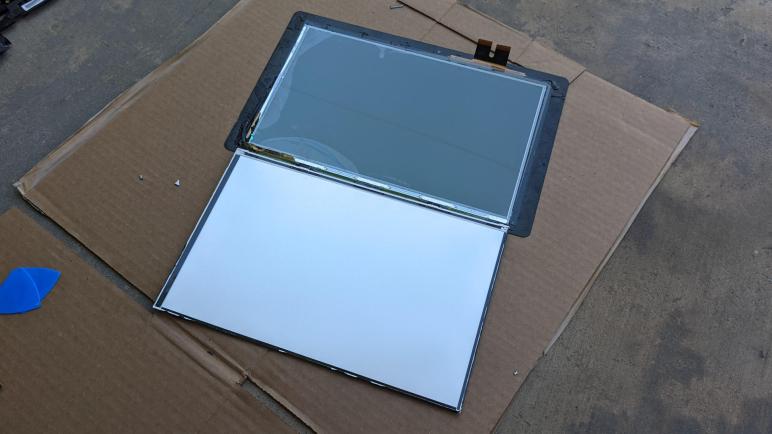
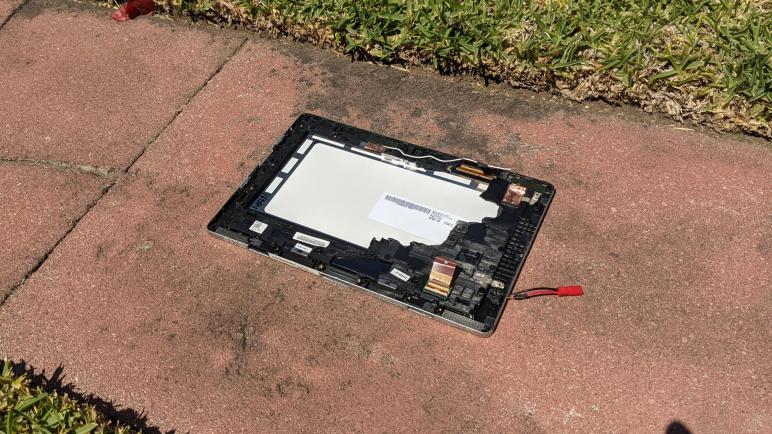
I’ve pulled the LED backlight illumination panel out of an AU Optronics B101EAN01.5 LCD panel, which was in turn salvaged from an Acer Aspire Switch 10 (SW5-012) tablet/laptop convertible. I want to see if I can get it to light up. Using my multimeter I found test points corresponding to all six control lines on the backlight, and soldered wires to all of them. The next task is to determine what these wires are.

The other end of those wires were crimped and assembled into a six-pin connector with 0.1″ spacing. I first arranged them in whatever happened to be convenient, but then I changed my mind and rearranged them to be in the same order as that on the backlight cable. From top to bottom: Power, ground, FB1, FB2, FB3, and FB4.

This gave me something suitable for breadboard exploration. I have two hypothesis about what the FB connectors are. Since power and ground were already identified, I thought maybe these are control lines (gates) for MOSFETs in line with each string, which implies I could turn on a LED string by pulling its signal high. But if I look at precedence set by the LG LP133WF2(SP)(A1) panel I took apart earlier, these could be four current sinks for four LED strings.

To test both concepts simultaneously, my breadboard exploration wired one string to a pull-up resistor in case FB is a MOSFET gate, and another string to a pull-down resistor in case it is LED current sink.

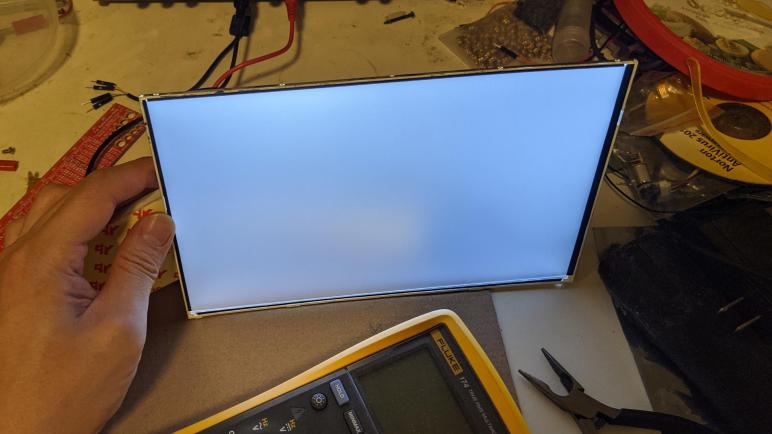
I started seeing a dim glow when I turned the power supply up to 17V. To determine which hypothesis was correct, I removed the pull-down resistor and it went dark. So FB1 through FB4 are current sinks for four strings. As a double-check, I calculated voltage drop across the pull-down resistor and calculated the current flow to be 1.4mA. This is far too high for a MOSFET gate but completely consistent with current-limiting resistor for a dimly lit LED.

Hooking up a current-limiting resistor to each of FB1 through FB4, the backlight has dim but usable illumination starting at about a 15.6V drop across an individual LED string. Whenever I find a project for this light, I will need to either solder more permanent current-limiting resistors, or find an intelligent LED controller with a more efficient current-limiting control scheme.

There is one remaining mystery: If the VOUT wire is voltage source, and FB1 through FB4 are current sinks, why is there a line connected to the ground plane on the control circuit board? It feels like there’s another aspect of this backlight I have yet to discover. Or possibly destroyed by clumsy overvoltage on my part. Either way, it doesn’t seem to be critical for illuminating this backlight, so I’ll leave that mystery for another day.

AU Optronics B101EAN01.5 Backlight Wiring

I have a broken Acer Aspire Switch 10 (SW5-012) that I have taken apart. Among the pieces I salvaged was the screen, an AU Optronics B101EAN01.5 whose 1280×800 resolution is not terribly interesting in this era when even cell phones have higher resolution displays. So I decided the most interesting thing to do is to liberate its LED backlight for potential future projects.

The backlight connector has six visible conductors. Two conductors are wider than the rest, which imply power and ground to me. There is a test point labeled VOUT adjacent to this connector, and my meter confirms it corresponds to the topmost wide conductor. The meter also confirmed the second wide conductor has continuity to the ground plane of this circuit board, so power and ground confirmed.

What does that mean for the four remaining thin conductors? Looking around the backlight control IC, I looked for a likely group of four test points and found FB1, FB2, FB3 and FB4. Meter confirms they correspond to the remaining four conductors on the backlight cable. “FB” probably doesn’t mean Facebook in this context, but I’m not sure what it would represent. I’m just glad they were numbered.

As for the backlight control IC itself, the large AUO letters say it is something AU Optronics produced for internal consumption. The earlier LG panel project found a TI TPS61187 chip with publicly available documentation, but here I found no documentation for an AUO L10716 controller. Since the chip is so tiny it’s pretty probable I’ve misread the numbers, but no search hits on the variations I could think of either: LI0718, L10216, etc. If I had found a test point labeled PWM I would be tempted to see if I can get it running with an Arduino PWM signal, but I saw test points labeled SCL and SDA telling me this is an I2C peripheral and my skill level today isn’t good enough to reverse engineer it without official documentation of its I2C protocol.

So instead of trying to interface with the existing backlight control chip as I did on the LG backlight, here I will interface with the backlight LEDs directly. I found test points corresponding to all six wires on the backlight connector and soldered wires to all of them. Then I used hot glue to help hold them down and relieve strain, as I don’t want to lift a pad again!

With the wires securely attached, I need to figure out what they actually do.

Acer Aspire Switch 10 (SW5-012) Backlight Removal

While I took apart the base unit of this dead Acer Aspire Switch 10 (SW5-012) tablet/laptop convertible, the main display had been left under the punishing direct heat of southern California summer sun. I don’t like fighting glue, but heat at least helps reduce their tenacious grip. I pulled out my prying tools from iFixit and plunged into the seam between gray and black plastic surrounds holding its AU Optronics B101EAN01.5 screen in place.

The double-sided adhesive foam tape was thickest around the left and right sides, gripping tightly enough that I broke the frame on both sides trying to peel them off. There were slightly less of it across the top, and surprisingly little across the bottom.

I had hoped the LCD module would pop free once the touchscreen digitizer glass had been freed from its frame, similar to how an Amazon Fire tablet was put together. But no such luck, there appears to be more adhesive involved.

Once I pushed a pick into the gap between the digitizer glass and the LCD polarizer, I realized the bad news: they have been glued together across the entire visible front surface of the screen. It’s going to take a lot of effort to separate them and I don’t see how it could possibly be worth the effort.

My objective here is the LED backlight, so just as I did for the Chromebook cracked screen and the Amazon Fire screen, I peeled back the black tape holding the LED backlight to the LCD. Starting with the bottom section to expose the integrated driver board.

I am starting to recognize the signs of a LED backlight power connection: a few connectors separate from the high-density connectors used for controlling LCD pixel data. An inductor and a diode for voltage boost conversion, and an IC controlling it all.

The black tape holding this display module together is much more difficult to remove than those encountered on previous screen backlight salvage projects. The glossy substrate is weaker than the adhesive, causing it to easily stretch and break. Now that I’ve identified the portion I cared about for my project, I pulled out a blade and cut the rest of the tape allowing me to open up this display module.

Once the backlight folded away from the LCD pixel array, I can see I’ve already cracked at least one LCD glass layer in my effort to pry it from the front digitizer glass. I’m not even going to try to salvage the polarizer filter from this one, so my blade continued its work cutting all pixel data lines to free the backlight for further examination.

Acer Aspire Switch 10 (SW5-012) Hinge

A laptop’s keyboard may be the main interface point with the user, but the hinge mechanism of a laptop computer is an often overlooked critical mechanism that can make or break the entire ownership experience. The challenge is even more profound for tablet/laptop convertibles like this Acer Aspire Switch 10 (SW5-012) since it had to detach as well. Digging into this mechanism as part of my teardown unveiled a very intricate but also extremely robust piece of mechanical engineering.

The first challenge is, of course, figuring out where to start opening it up. I pried on the back plate hoping it would pop loose. It did, sort of, in a irreversible and destructive way.

But with it open, I could tell there’s an angled metal spine to this hinge and there are probably fasteners hiding under the rubbery material that cushions the main display unit when it is attached to this base.

The two rubbery cushions were held with double sided tape. Once peeled off, each exposed two screws that helped hold the top plate in place. They’re not the only fastening mechanism, though, there were many other places where the top plate held on for its life and it did not come loose willingly. I ended up breaking it into several pieces.

Top plate removal exposed many more fasteners, several of which held the backplate.

And the remaining fasteners held the metal spine to the bottom section. This is easily the highest density of screws in this machine holding everything together, reinforcing the critical nature of this component.

I finally freed the nine-conductor pogo connector that was one of my objectives for taking this retired computer apart. There are also a few magnets that held the display module in place as a simple and elegant “Acer Smart Hinge”. They will also be salvaged for potential future fun.

And now with the hinge thoroughly taken apart, I retrieved the main module which had been baking in the sun in preparation for fighting annoying glue.

Acer Aspire Switch 10 (SW5-012) Keyboard

There were two high density circuit boards in the base of an Acer Aspire Switch 10 (SW5-012) tablet/laptop convertible. One handled general connectivity to the main display unit of the computer, and another purely focused on touchpad input. The third, while technically a circuit board as well, is less dense and is the array of switches that implement the keyboard of this machine.

Typing on this keyboard has been a good experience, at least as far as membrane keyboards go. Key travel felt good, and the scissor mechanism sturdily held actions crisp. Even though this is a thin and light (very much so for its day, and still respectably so today) convertible, it never felt flimsy. As I dig inside, I could see what gave it such a solid feel: metal structural plates and lots of mounting points.

The sheer number of mounting points make it rigid, but they are not held with removable fasteners. They are held with plastic rivets probably for cost of manufacturing, but this also meant there’s no way to nondestructively replace the keyboard module. I start by peeling the keyboard surround from the metal chassis plate. Pop, pop, pop, went those rivets as I pulled.

Once the keyboard surround was removed, I could see a magnet that I can harvest (below where the right arrow key used to be) and the remainder will become plastic landfill. The keyboard itself is held to the metal plate by even more plastic rivets, and once I pop them off to remove the keyboard the metal plate should be clean enough for general scrap metal.

Here is a closeup of the control key in the lower left corner, and the numerous gray plastic rivets holding the keyboard module in place.

I popped off the control keycap to take a closer look at the scissor mechanism on this keyboard. I imagine there are only a few major suppliers/styles for this mechanism, unless there’s a product differentiation I’m ignorant about motivating keyboard makers to custom design their own. In any case, my interest was seeing if I can cannibalize the scissor mechanism to repair a missing key on the HP Mini (110-1134CL) netbook from NUCC.

Sadly while the two scissors mechanisms are very similar to each other, they are not identical. Perhaps someone skilled with modifying watchmaker–level mechanisms can hack the pieces to fit, but that is beyond my skill level today. I’ll leave this keyboard alone for now and switch focus to this computer’s robust hinge mechanism.

Acer Aspire Switch 10 (SW5-012) Base Circuitry

When I looked at the reinforcement rib network on the bottom plate I just pulled off, I saw it was not symmetric. The reason became clear when I looked at the internal circuitry of this keyboard base, those asymmetric gaps in reinforcement ribs were to make room for a circuit board and the data cables connecting it to the keyboard array.

Two large connectors dominate the center of this board, one with four conductors and another with five. These nine conductors directly connect to the nine pogo pins connecting to the main unit of this computer. If there were only four conductors I would have been tempted to see if it was direct USB, but there are nine conductors and I don’t have a good idea what might be going on.

I thought the USB hypothesis had merit when I found one of the ICs on board is a USB hub controller. It would have been a valid way to implement this keyboard base: turn the keyboard, the touchpad, and the USB port into individual USB devices connected to a common hub. But USB isn’t a protocol I’ve worked with, it works at far higher speed than any diagnostics tools I have on hand, and I’m not particularly motivated to get this running because if I did, what would I get? A keyboard and a mouse pointer device. I already have enough of those.

So I continued to merrily tear things apart looking for interesting sights as I went. The other circuit board in the base is entirely dedicated to the touchpad. The controller IC on this board is from Synaptics, a very popular supplier for touch hardware. The metal frame came apart in two separate pieces.

It works as a hinge to act against a physical button handling taps on this touchpad. I’m amused that there’s only a single button, they must correlate this button with finger positions in order to infer left or right click.

Flipping it over, I see the cosmetically perfect top surface of the touchpad.

As is typical of touchpads, that top surface is merely a façade covering a network of electrical wires that is used by the Synaptics IC to sense finger position. This is analog voodoo I don’t understand in the least, and neither do most other people, which is why companies like Acer pay Synaptics to figure out. The façade is a sticker that I could peel off to expose the circuit pattern below.

Yep, it’s an array of repeated patterns. Yep, the individual elements will help determine position of our fingers. Beyond those generalities, I have no clue. I’ve taken apart many laptop touchpad like this, and no two has used the same pattern on their circuit boards. Voodoo, I say! Thankfully, with its array of on/off switches, a keyboard is more straightforward than the analog magic of a touchpad.

Acer Aspire Switch 10 (SW5-012) Bottom Plate

The Acer Aspire Switch 10 (SW5-012) was a Windows 8 convertible tablet/laptop that easily separated into two parts. For my teardown purposes, this meant I could work on the keyboard base while the main display module is sitting in the sun to soften the glue holding it together.

When this computer is in laptop mode, the main module communicates with its keyboard base through these robust-looking pogo connectors. I’m not sure I can find a good way to reuse them, but I’m definitely trying to salvage them intact so I’d have the option in the future. It was pretty trivial to pull the top part, and extracting its counterpart from this base is my current objective.

I flipped the base over and saw several straightforward Philips screws. Laptop fasteners are usually hidden, or require an annoying esoteric tool, so this was a delightful surprise. I pulled out a screwdriver, removed (almost) all of them and pulled off the base plate.

A loud crack announced the fact that there were actually two more screws hidden under a gray strip of plastic, and pulling the base apart destroyed plastic around these hidden screws. I’m glad I have no intention of putting this thing back together into working order.

Flipping the bottom plate over, we can see the internal structure. It has a surprising complex of reinforcement ribs. Interestingly, the network is not symmetric. Not top-bottom, and not left-right, yet it speaks to a clear purpose that was not obvious from just looking at this piece.

In any case, these reinforcement ribs reminded me that this laptop, as small and thin as it was, never felt flimsy or gave the impression it would flex and break apart in my hands. Credit goes to reinforcement ribs like these and other thoughtful touches scattered throughout the design of this tablet.

There are two pieces of shiny metal that appear to serve no immediate purpose, my guess is that they are counterweights like I tend to see in other tablet/laptop convertibles. The one on the right has a thin strip of plastic as electrical insulation so it doesn’t short out the circuitry, and those circuit boards are likely the reason why reinforcement ribs are not symmetric.

Acer Aspire Switch 10 (SW5-012) Teardown

With the successful relight of a salvaged Amazon Fire tablet backlight, I’m ready to begin the final chapter of my journey with this Acer Aspire Switch 10 (SW5-012). I’m not the original owner of this machine, so it was never my day-to-day computer. It was retired when it would no longer power-up, and the charger has been lost in the time it was sitting around gathering dust. That nonworking state was how I got it as something to play with.

I diagnosed the power-up problem to a loose cable, and I worked around the lost charger with a hacked-up power connector. That was enough for me to power this system back up. I found it didn’t want to run Linux, but it could run modern Windows 10 surprisingly well. And I didn’t even have to buy another Windows license, as the Windows 8 license embedded in hardware seemed to work just fine. And I undertook some projects like removing its webcam module for security. Because no hacker on the internet can activate a webcam that’s sitting detached in a zip lock bag in another room.

But a computer that runs modern Windows 10 “surprisingly well” for its age is not the same as a computer that runs it well in a useful sense. It’s still an old computer showing its age across the board. Limited RAM, cramped storage, and most personally unsatisfying for me, a low resolution screen. The CPU is not the ill-fated Clover Trail series, but it is still quite slow and is a 32-bit only CPU cut off from modern features of 64-bit operating systems. 32-bit support has already been dropped by MacOS, Ubuntu, even Chrome OS is 64-bit only nowadays.

Finally the system failed again, with the familiar symptom of failing to power up when the power button is pressed. However, this time it was not the loose cable and I failed to find another explanation. It was then retired and I performed a partial disassembly, pulling out its mainboard for a play with a hot air rework station.

I think it is time for me to finish the teardown the rest of the way. The battery pack has already been freed and I think that two-cell lithium ion pack has a future in another project down the line. That leaves the screen, whose low resolution makes it uninteresting as a display but now with two backlight projects under my belt I’m going to see if I can salvage this backlight. Then I’ll see what else might be interesting to salvage from this machine.

Most of what’s left on this convertible laptop main unit were glued together, and I hate fighting glue which is why it halted my earlier teardown. But I have to do it if I want that backlight, so I started thinking about heating up the module to soften the glue. I used to do this with a heat gun, and with the Amazon Fire tablet I used the heated print bed of a retired 3D printer. But we’re now entering the uncomfortably hot phase of Southern California summer. So there’s no need to consume electricity: I can just set this thing out on a brick and let it warm up in the sun and turn my attention to the base section.