Install Other OS on Toshiba Chromebook 2 (CB35-B3340)

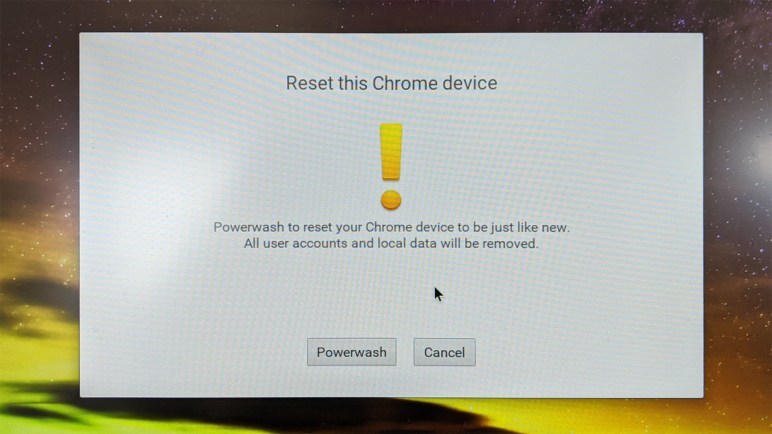
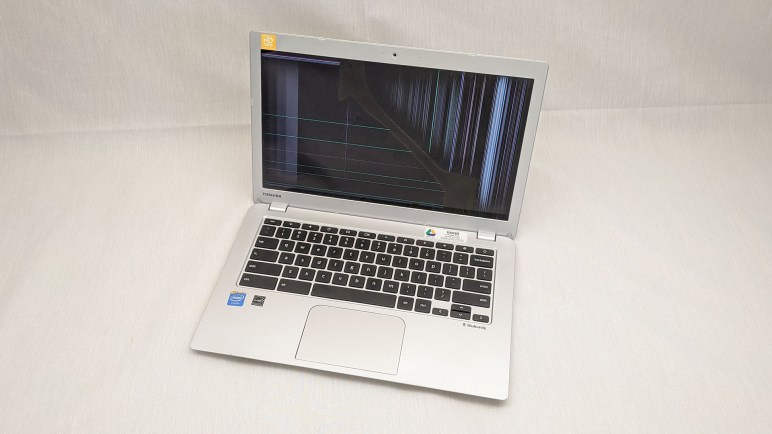
When I received a broken Chromebook to play with, I had assumed it was long out of support and my thoughts went to how I might install some operating system other than ChromeOS on it. Then I found that it actually still had some supported lifespan left so I decided to keep it as a Chromebook for occasional use. That supported life ended in September 2021, now it very bluntly tells me to buy a newer model: there will be no more Chrome OS after 92.

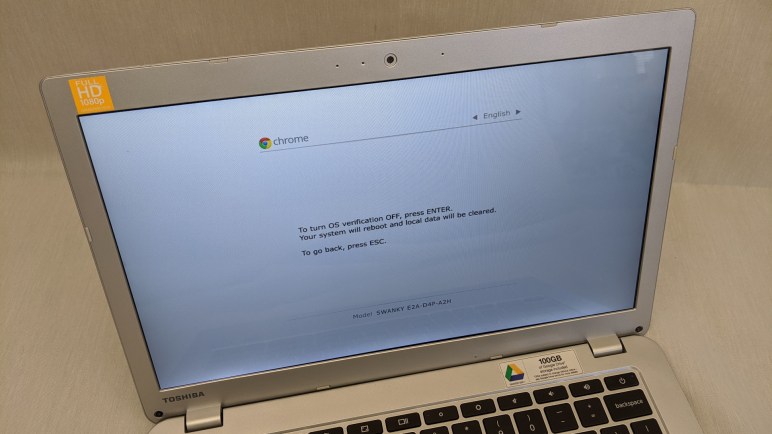
Time again to revisit the “install other OS” issue, starting with the very popular reference Mr. Chromebox. Where I learned newer (~2015 and later) Chromebooks are very difficult to get working with other operating systems. I guess this 2014 vintage Chromebook is accidentally close to optimal for this project. Following instructions, I determined this machine has the codename identifier “Swanky” and I have the option to replace default firmware with an implementation of UEFI, in theory allowing me to install any operating system that runs on this x86-64 chip and can boot off UEFI. But first, I had to figure out how to deactivate a physical write protect switch on this machine.

The line “Fw WP: Enabled” is what I need to change to proceed. Documentation on Mr. Chromebox site said I should look for a screw that grounds a special trace on the circuit board. Severing that connection would disable write protect. I found this guide on iFixit, but it is for a slightly different model of Toshiba Chromebook with different hardware. That is a CB35-C3300 and I have a CB35-B3340. The most visible difference is that CPU has active cooling with a heat pipe and fan, but the machine in front of me is passively cooled.

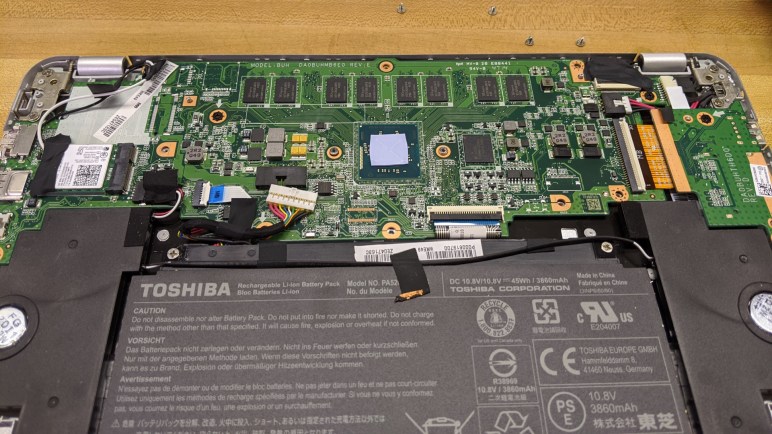
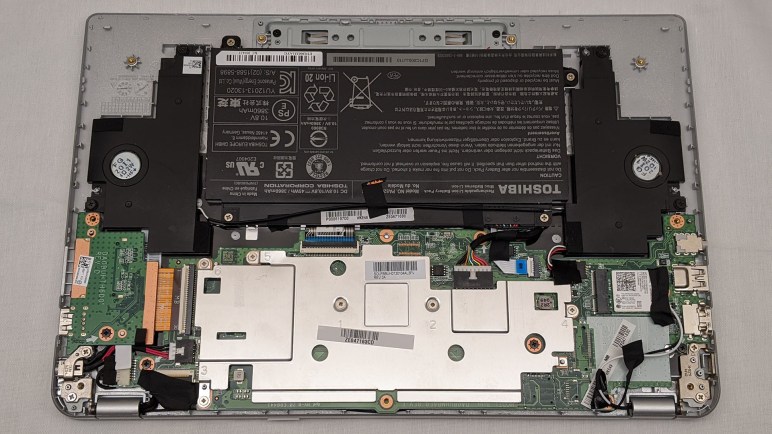
So I will need to find the switch on my own. Starting with looking up my old notes on how to open up this machine and get back to the point where I could see the metal shield protecting the mainboard.

With the bottom cover removed, I have a candidate front and center.

This screw has a two-part pad that could be grounding a trace, though there is an unpopulated provision for a component connected to that pad. This may or may not be the one. I’ll keep looking for other candidates under the metal shield.

A second candidate was visible once the metal shield was removed. And this one has a little resistor soldered to half of the pad.

I decided to try this one first.

I took a thin sheet of plastic (some random product packaging) and cut out a piece that would sit between the split pad and the metal shield with screw.

That was the correct choice, as firmware write-protection is now disabled. I suspect candidate #1 could be used for chassis intrusion protection (a.k.a. “has the lid been removed”) but at this point I have neither the knowledge or the motivation to investigate. I have what I want, the ability to install UEFI (Full ROM) Firmware.

What happens now? I contemplated the following options:

  1. Install Gallium OS. This is a Linux distribution based on Ubuntu and optimized for running on a Chromebook.
  2. I could go straight to the source and install Ubuntu directly. Supposedly system responsiveness and battery life won’t be as good, and I might have more hardware issues to deal with, but I’ll be on the latest LTS.
  3. Or I can stay with the world of Chrome and install a Chromium OS distribution like Neverware CloudReady.

Looking at Gallium, I see it purports to add hardware driver support missing from mainline Ubuntu and stripping things down to better suit a Chromebook’s (usually limited) hardware. There were some complaints that some of Ubuntu’s user-friendliness was trimmed along with the fat, but the bigger concern is that Gallium OS is based on Ubuntu 18 LTS and has yet to update to Ubuntu 20 LTS. This is very concerning as Ubuntu 22 LTS is expected to arrive soon. [UPDATE: Ubuntu 22 LTS “Jammy Jellyfish” has been officially released.] Has the Gallium project been abandoned? I decided to skip Gallium for now, maybe later I’ll decide it’s worth a try.

I already had an installation USB drive for Ubuntu 20.04 LTS, so I tried installing that. After about fifteen minutes of playing around I found a major annoyance: keyboard support. A Chromebook has a different keyboard layout than standard PC laptops. The Chromebook keys across the top of the keyboard mostly worked fine as function keys, but there are only ten keys between “Escape” and “Power” so I didn’t have F11 or F12. There is no “Fn” key for me to activate their non-F-key functions, such as adjusting screen brightness from the keyboard. Perhaps in time I could learn to navigate Ubuntu with a Chromebook keyboard, but I’ve already learned that I have muscle memory around these keys that I didn’t know I had until this moment. It was also missing support for this machine’s audio device, though that could be worked around with an external USB audio device like my Logitech H390 headset. (*) It is also possible to fix the audio issue within Ubuntu, work that Gallium OS supposedly has already done, but instead of putting in the work to figure it out I decided on the third option.

It’s nice to have access to the entire Ubuntu ecosystem and not restricted to the sandbox of a Chrome OS device, but I already have Ubuntu laptops for that. This machine was built to be a small light Chromebook and maybe it’s best to keep it in that world. I created an installation USB drive for Neverware CloudReady and returned this machine to the world of Chrome OS. Unlike Ubuntu, the keyboard works in the Chrome OS way. But like Ubuntu, there’s no sound. Darn. Oh well, I usually use my H390 headset when I wanted sound anyway, so that is no great hardship. And more importantly, it puts me back on the train of Chromium OS updates. Now it has Chromium OS 96, and there should be more to come. Not bad for a Chromebook that spent several years dumped in a cabinet because of a broken screen.


(*) Disclosure: As an Amazon Associate I earn from qualifying purchases.

Key Press Timeline For Entering and Exiting Developer Mode on Toshiba Chromebook 2 (CB35-B3340)

When I got my hands on this Toshiba Chromebook 2 (CB35-B3340) its primary screen was cracked and unreadable. I was happy when I discovered I could use it as a Chromebox by an external HDMI monitor, but I quickly found the limitation of that approach when I tried to switch the device into developer mode: those screens were only visible on the screen I couldn’t read.

Google has published instructions for putting a Chromebook into developer mode, but they weren’t specific enough for use with an unreadable screen. It doesn’t say how many menus are involved, and it doesn’t say how much time to expect between events. Probably because these details vary from device to device and not suitable for a general document.

I looked around online for information from other sources and didn’t find enough to help me navigate the procedure. Most irritating are the sites that say things like: “And from this point just follow the on screen prompts” when the whole point was I couldn’t read those prompts at the time.

Now that I’ve installed a replacement screen, I can see what happens and more importantly, I can now document the information I wished I was able to find several weeks ago. The most surprising part to me was that it took roughly seven minutes to transition into developer mode, but less than a minute to transition out of it. Since all user data are erased in both of these transitions, I’m curious why the times are so different.

In any case, I’ve captured the process on video (embedded below) and here is the timeline for putting a Toshiba Chromebook 2 into developer mode even if the screen is not readable. Times are in (minutes:seconds)

  • Preparation: power down the device.
  • (0:00) While holding down [ESC] + [REFRESH], press [POWER].
  • (0:15) Press [CONTROL] + [D] to enter developer mode
  • (0:25) Press [ENTER] to confirm
  • (0:36) Press [CONTROL] + [D] to confirm
  • (6:52) Two beeps warning user the Chromebook is in developer mode.
  • (7:25) Chrome OS booted up into developer mode and ready to be mirrored to external monitor.

Following power-ups while in developer mode:

  • (0:00) [POWER] button as normal (no other keys needed)
  • (0:10) Press [CONTROL] + [D] to bypass 30-second developer mode warning screen, also skipping the two beeps.
  • (0:20) Chrome OS booted up into developer mode and ready to be mirrored to external monitor.

Exiting Developer Mode:

  • Preparation: power down the device.
  • (0:00) [POWER] button as normal
  • (0:08) Press [SPACE] to re-enable OS verification.
  • (0:15) Press [ENTER] to confirm
  • (0:48) Chrome OS booted up into normal mode and ready to be mirrored to external monitor.

Life with a Chromebook

Ever since I started looking at this Toshiba Chromebook 2 (CB35-B3340) I had been focused on how I can break out of constraints imposed by Chrome OS. Although I had occasionally acknowledged the benefits of a system architecture focused on the most popular subset of all computing activities, I still wanted to know how to get out of it.

Now that my research got far enough to learn of a plausible path to removing all constraints and turning this Chromebook into a normal Ubuntu laptop, I’m satisfied with my available options and put all that aside for the moment. I took the machine out of Chrome OS Developer Mode so I could experience using a Chromebook for its original intended purpose and seeing how well it fills its designated niche.

Reviewing all the security protections of Chrome OS during the course of my adventure made me more willing to trust one. If I didn’t have my own computer on hand and needed to use someone else’s, I’m far more likely to log into a Chromebook than an arbitrary PC. Chrome OS receives frequent updates to keep it secure, raising the value of continued support. Since my original session to fast forward through four years of updates, I’ve received several more just in the few weeks I’ve been playing with this machine.

On the hardware side, this lightweight task-focused machine has lived up to the expectation that it would be more pleasant to use than a bulky jack of all trades convertible tablet of similar vintage. Its secondhand replacement screen‘s visual blemishes have not been bothersome, and the keyboard and trackpad had been responsive to user input. Its processing hardware is adequate, but not great. During light duty browsing the estimated battery life stretches past eight hours. But if a site is loaded down with ads and tracking scripts, responsiveness goes down and battery life estimate quickly nosedives under 4 hours.

The biggest disappointment in processing power comes from the display department. This machine was the upgraded model with a higher resolution 1920×1080 panel instead of the standard 1366×768. The higher resolution made for more pleasantly readable text, but constantly updating those pixels was too much for the machine to handle. It couldn’t sustain web video playback at 1080p. Short clips of a few seconds are fine, but settling down to watch something longer would be frustrated with stutters unless the video resolution was lowered to 720p.

And finally, there’s the fact that when the network connection goes down, a Chromebook becomes largely useless. This is unfortunately more common than I would like at the moment as I’m having trouble with my new router. In theory Google offers ways for web sites to remain useful on a Chromebook in the absence of connectivity (like Progressive Web Apps) but adoption of such techniques has not yet spread to the sites I frequent. So when the router crashes and reboots itself, the Chromebook becomes just a picture frame for showing the “No internet” error screen. This is not a surprise since network connectivity is a fundamental pillar of Chrome OS, but it is still annoying.

All things considered, a Chromebook is a nice lightweight web appliance that makes sense for the right scenarios. Its focused scope and multilayered security provisions mean I would heartily recommend one for the technically disinclined. If they learn enough technology to find Chrome OS limiting, there’s always Mr. Chromebox. If I should buy one for my own use, I would want a high resolution panel, and now I also know to get a more powerful processor to go with it.

Chrome OS Alternatives On Toshiba Chromebook 2 (CB35-B3340)

If I couldn’t solve the challenges getting ROS up and running with Ubuntu 18 under Crouton in Chrome OS, there is yet another option: erase Chrome OS completely and install Ubuntu in its place. I understand this would remove the developer mode warning and menu, and the software startup can go straight into ROS via an Ubuntu service just like any other Ubuntu machine.

The internet authority for this class of modification is Mr. Chromebox. I don’t know who this person is, but all my web searches on this topic inevitably points back to some resource on https://mrchromebox.tech. Starting with the list of alternate operating system options for a Chromebook. Ubuntu is not the only option, but for the purposes of a robot brain, I’m most interested in the option of a full UEFI ROM replacement allowing me to install Ubuntu like any other UEFI computer.

In order to install Mr. Chromebox’s ROM replacement, the hardware must on the list of supported devices. Fortunately the Toshiba Chromebook 2 (CB35-B3340) is represented on the list under its Google platform name “Swanky” so it should be eligible for the firmware utility script that makes the magic happen.

Before running the script, though, there are some hardware modifications to be made. Firmware replacement can undercut security promises of a Chromebook, even more than developer mode, so there are protections that require deliberate actions by a technically capable user before the firmware can be replaced. For “Swanky” Chromebooks, this hardware write-protect switch is in the form of a screw inside the case that makes an electrical connection across two contacts on the circuit board. Before the firmware can be replaced, that screw must be removed and the two pads insulated so there is no longer electrical contact.

Having a hardware component to the protection makes it very difficult for a Chromebook to be compromised by software bugs. Yet the screw + PCB design is a deliberate provision allowing modification with just simple hand tools. Such provisions to bypass hardware security is not found in many other security-minded consumer hardware, for example gaming consoles. I appreciate Google’s effort to protect the user, yet still offer the user an option to bypass such protection if they choose.

For the moment I am not planning to take this option, but it is there if I need it. In the near future I took this opportunity to get some first hand experience living with a Chromebook with its originally intended (non developer) use.

First Few Issues of ROS on Ubuntu on Crouton on Chrome OS

Some minor wrong turns aside, I think I’ve successfully installed ROS Melodic on Ubuntu 18 running within a Crouton chroot inside a Toshiba Chromebook 2 (CB35-B3340). The first test is to launch roscore, verify it is up and running without errors, then run rostopic /list to verify the default set of topics are listed.

With that done, then next challenge is to see if ROS works across machines. First I tried running roscore on another machine, and set ROS_MASTER_URI to point to that remote machine. With this configuration, rostopic /list shows the expected list of topics.

Then I tried the reverse: I started roscore on the Chromebook and pointed another machine’s ROS_MASTER_URI to the IP address my WiFi router assigned to the Chromebook. In this case rostopic/list failed to communicate with master. There’s probably some sort of networking translation or tunneling between Chrome OS and an installation of Ubuntu running inside Crouton chroot, and that’s something I’ll need to dig into and figure out. Or it might be a firewall issue similar to what I encountered when running ROS under Windows Subsystem for Linux.

In addition to the networking issue, if I want to embed this Chromebook into a robot as its brain, I’ll also need to figure out power-up procedure.

First: upon power-up, a Chromebook in developer mode puts up a dialog box notifying the user as such, letting normal users know a Chromebook in developer mode is not trustworthy for their personal data. This screen is held for about 30 seconds with an audible beep, unless the user presses a key combination prescribed onscreen. How might this work when embedded in a robot?

Second: when Chrome OS boots up, how do I also launch Ubuntu 18 inside Crouton chroot? The good news is that this procedure is covered in Crouton wiki, the bad news is that it is pretty complex and involves removing a few more Chromebook security provisions.

Third: Once Ubuntu 18 is up and running inside Crouton chroot, how do I launch ROS automatically? My current favorite “run on bootup” procedure for Linux is to create a service, but systemctl does not run inside chroot so I’ll need something else.

And that’s only what I can foresee right now, I’m sure there are others I haven’t even thought about yet. There’ll be several more challenges to overcome before a Chrome OS machine can be a robot brain. Perhaps instead of wrestling with Chrome OS, I should consider bypassing Chrome OS entirely?

Ubuntu 18 and ROS on Toshiba Chromebook 2 (CB35-B3340)

Following default instructions, I was able to put Ubuntu 16 on a Chromebook in developer mode. But the current LTS (Longer Term Support) release for ROS (Robot Operating System) is their “M” or Melodic Morenia release whose corresponding Ubuntu LTS is 18. (Bionic Beaver)

As of this writing, Ubuntu 18 is not officially supported for Crouton. It’s not explicitly forbidden, but it does come with a warning: “May work with some effort.” I didn’t know exactly what the problem might be, but given how easy it is to erase and restart on a Chromebook I decided to try it and see what happens.

It failed failed with a hash sum failure during download. This wasn’t the kind of failure I thought might occur with an unsupported build, download hash sum failure seems more like a flawed or compromised download server. I didn’t understand enough about the underlying infrastructure to know what went wrong, never mind fixing it. So in an attempt to tackle a smaller problem with a smaller surface area, I backed off to the minimalist “cli-extra” install of Bionic which skips graphical user interface components. This path succeeded without errors, and I now have a command line interface that reported itself to be Ubuntu 18 Bionic.

As a quick test to see if hardware is visible to software running inside this environment, I plugged in a USB to serial adapter. I was happy to see dmesg reported the device was visible and accessible via /dev/ttyUSB0. Curiously, the owner showed up as serial group instead of the usual dialout I see on Ubuntu installations.

A visible serial peripheral was promising enough for me to proceed and install ROS Melodic. I thought I’d try installation with Python 3 as the Python executable, but that went awry. I then repeated installation with the default Python 2. Since I have no GUI, I installed the ros-melodic-ros-base package. Its installation completed with no errors, allowing me to poke around and see how ROS works in this environment.

Developer Mode and Crouton on Toshiba Chromebook 2 (CB35-B3340)

Having replaced a cracked and illegible screen with a lightly blemished but perfectly usable module, I can finally switch this Toshiba Chromebook 2 (CB35-B3340) into developer mode. It’s not a complicated procedure, but the critical menus are displayed only on the main display and not an external monitor. With the earlier illegible screen, there was no way to tell when I needed to push the right keys. I might have been able to do it blind if I had a timeline reference… which is a potential project for another day.

Today’s project was to get Crouton up and running on this Chromebook. Following instructions for the most mainstream path, I went through a bunch of procedures where I only had a vague idea of what was happening. Generally speaking it’s not a great idea to blindly run scripts downloaded from the internet, but Crouton is fairly well known and I had no personal data on this Chromebook, something enforced by Chrome OS.

Until I put this Chromebook into developer mode myself I hadn’t known that user data is erased whenever a Chrome OS device transitions into or out of developer mode. This meant whatever data is saved on a Chrome OS device can’t be snooped upon in developer mode. Also, any tools or utilities that might have been installed to view system internals in developer mode are erased and no longer usable once the machine is in normal mode. This policy increased my confidence in privacy and security of Chrome OS. I’m sure it’s not perfect as all software have bugs, but it told me they had put thought into the problem.

What it meant for me today was that everything I had put on that Chromebook was wiped before I could start playing with Crouton. Whose default instructions quickly got me up and running on Ubuntu 16 (Xenial) with the xfce desktop. Running two full user-mode GUI on top of a single kernel noticeably stresses this basic machine, with user response becoming a little sluggish. Other than that, it felt much like any other Ubuntu installation except it’s all running simultaneously with full Chrome OS on the exact same machine.

Raw performance concerns aside, it seemed to work well. And the wonder of chroot meant it’s pretty easy to erase and restart with a different configuration. Which is what I’ll tackle next, because ROS Melodic is intended for Ubuntu 18 (Bionic).

Secondhand Replacement Screen for Toshiba Chromebook 2 (CB35-B3340)

Once I discovered the support window for a Toshiba Chromebook 2 (CB35-B3340) extended longer than I had originally anticipated, I was more willing to spend money to bring it back to working condition. While I was shopping for a replacement screen earlier I saw several offers for new units and a few scattered offers for secondhand units. I presume these were salvaged from retired machines and resold, which is fine by me as it came at a significant discount. $47 with taxes and shipping (*), as compared to $75 (before taxes & shipping) for a new unit.

That ~40% discount also came with a caveat: I clicked “Buy” on a unit that was rated “Grade B: Fully functional but with visible blemishes.” It was a bit of a gamble, but my primary requirement is only to see enough to enter developer mode, so I decided I would tolerate visual blemishes to save a few extra dollars. There was also a bit of a gamble in shipping. from my disassembly efforts I knew this panel is very thin and fragile. This time around, I did not mind the extensive packaging of Amazon orders.

I saw no physical blemishes on the panel during installation. Once installed, I was happy to see Chrome OS boot up and run. I had to work hard to see the visual blemishes that earned this panel its Grade B rating. I had to set the screen to full black, and artificially increase contrast in a photo editor, before we can see the magenta smudges: Two light horizontal smudges, and two dots one of which look a bit smeared.

Toshiba Chromebook 2 CB35-B3340 used replacement screen defects

I’m not familiar with failure mode of LCD display modules so I have no idea what’s going on here. Perhaps these were manufacturing defects? In any case, these flaws are only visible if I strain to look for them and there is no physical damage to the screen so I’m satisfied with my purchase.

Toshiba Chromebook 2 CB35-B3340 recovery screen now readable

The visual blemishes are not at all bothersome in normal usage. This level of performance was more than good enough to be used as a normal Chromebook if I wanted to use it as such. But the reason I got the screen was to access Chrome OS recovery menu to enter developer mode, so I will try that first.


(*) Disclosure: As an Amazon Associate I earn from qualifying purchases.

Old Chromebook Lifespan Longer Than Originally Thought

A cracked screen seemed to be the only problem with this Toshiba Chromebook 2 (CB35-B3340). I found no other hardware or software issues with this machine and it seemed to be up and running well with an external monitor. The obvious solution was to buy a replacement screen module, but I was uncertain if that cost would be worthwhile. I based my opinion on Google’s promise to support Chromebook hardware for five years, and it’s been five years since this model was introduced. I didn’t want to spend money on hardware that would be immediately obsolete.

I’ve since come across new information while exploring the device. This was the first Chrome OS device I was able to spend a significant time with, and I was curious about all the capabilities and limitations of this constrained-by-design operating system. While poking around in the Settings menu, under “About Chrome OS” I found the key quote:

This device will get automatic software and security updates until September 2021.

I don’t know how this September 2021 time was decided, but it is roughly seven years after the device was introduced. At a guess I would say Google estimated a two year shelf life for this particular Chromebook hardware to be sold, and the promised five year support clock didn’t start until the end of that sales window. This would mean someone who bought this Chromebook just as it was discontinued would still get five years of support. If true, it is more generous than the typical hardware support policy.

Whatever the reason, this support schedule changes the equation. If I bought a replacement screen module, this machine could return to full functionality and support for a year and a half. It could just be a normal Chromebook, or it could be a Chromebook running in developer mode to open up a gateway to more fun. With this increased motivation, I resumed my earlier shopping for a replacement and this time bought a salvaged screen to install.

A Tale of Three Laptops

This is a summary of my research project enabled by the National Upcycling Computing Collective (NUCC). Who allowed me to examine three retired laptop computers of unknown condition, evaluating them as potential robot brain for running Robot Operating System (ROS).

For all three machines, I found a way to charge their flat batteries and get them up and running to evaluate their condition. I also took them apart to understand how I might mechanically integrate them into a robot chassis. Each of them got a short first-pass evaluation report, and all three are likely to feature in future projects both robotic and otherwise.

In the order they were examined, the machines were:

  1. HP Split X2 (13-r010dx): This was a tablet/laptop convertible designed for running Windows 8, an operating system that was also designed for such a dual-use life. Out of the three machines, this one had the longest feature list including the most modern and powerful Intel Core i3 CPU. But as a tradeoff, it was also the bulkiest of the bunch. Thus while the machine will have no problem running ROS, the mechanical integration will be a challenge. Its first pass evaluation report is here. For full details query tag of 13-r010dx for all posts relating to this machine, including future projects.
  2. Toshiba Chromebook 2 (CB35-B3340): This machine was roughly the same age as the HP, but as a Chromebook it had a far less ambitious feature list but that also gave it a correspondingly lighter and slimmer profile. It is possible to run a form of Ubuntu (and therefore ROS) inside a Chromebook, but there are various limitations of doing so. Its suitability as a robot brain is still unknown. In the meantime, the first pass evaluation report is here, and all related posts (past and future) tagged with CB35-B3340.
  3. HP Mini (110-1134CL): This was a ~10 year old netbook, making it the oldest and least capable machine of the bunch. A netbook was a simple modest machine when new, and the age meant this hardware lacks enough processing power to handle modern software. While technically capable of running ROS Kinetic, the low power processor could only run the simplest of robots and unable to take advantage of the more powerful aspects of ROS. The first pass evaluation report is here, and all related posts tagged with 110-1134CL.

While not the focus of my research project, looking over four old laptops in rapid succession (these three from NUCC plus the refurbished Dell Latitude E6230 I bought) also gave me a perspective on preparing old laptops for computing beginners.

Toshiba Chromebook 2 (CB35-B3340): First Pass Evaluation

Taking apart this Chromebook immediately after taking apart the HP Split was a very instructive contrast in varied approaches taken when building a laptop. Even though the two devices were only 2-3 years apart, they ended up at very different destinations reflecting the philosophy of the software they were designed to run.

HP Split was built for Windows 8, together they positioned themselves to be all things to all people including ability to convert between tablet and laptop modes. And as a result the overall package is big and bulky. It tries to do everything, but it’s not especially great at any single task.

A Chromebook runs Chrome OS, which is a thin shell built around the Chrome web browser. It does not try to be anything else, and its simplicity in software was also reflected in a thin lightweight laptop built for a singular purpose and doing just that one thing well.

Windows 2-in-1 machines have evolved a lot since the first generation of devices like the HP Split, and while the penalty for compromises have been greatly reduced, they still exist in the form of weight, space, cost, or some trade off between them. In contrast, Chromebooks have remain thin and light machines in terms of software, hardware, and price tag.

If I wanted to turn this Chromebook into a robot brain computer, though, I need to break out of the Chrome OS sandbox and put it into developer mode. Unfortunately that menu is only visible on the primary display, which is broken. I could spend money on a replacement screen, but it seems wasteful just to use it to toggle the developer mode switch. A robot brain computer would not need a screen! So if I am to buy the screen, I should probably use it as a Chromebook laptop. The cost/benefit for that isn’t great, because Chrome OS may drop support for this hardware platform pretty quickly. When that happens,  security upgrades stop coming. [UPDATE: I returned to this machine and found a pleasant surprise on Chrome OS support.]

I will set this machine aside while I debate what to do. In the immediate future I have the third and final machine to examine in this research project.

Toshiba Chromebook 2 (CB35-B3340): Hardware Internals

While I contemplate buying a replacement screen to bring this Chromebook back to function, I removed the bottom panel as well, just for a look. Ten screws held the bottom panel in place, two of which were hidden under two rubber feet. (Top two as shown in this picture):

Toshiba Chromebook 2 CB35-B3340 bottom

Once removed, we could see the surprisingly roomy interior.

Toshiba Chromebook 2 CB35-B3340 internals

This was a relatively thin laptop for its age and screen size, so I had expected components to be packed densely. The battery, a single large module in the center, dominated the volume as expected. On either side are speakers, each with the luxury of the largest enclosures than I’ve ever seen in laptop speakers. Far larger than the volume allocated to speakers within the HP Split. I’ve read that interior volume for audio tuning is at an extreme premium, with sound designers fighting for millimeters, so it was a surprise to see this. And even with that use of volume, there are still room left unused near the corners.

Electronics occupied the area close to the hinge. They covered less than half of the available surface area and far less than half of the available volume within this laptop. Most of the main circuit board was covered by a metal shield, so I removed it to see components underneath. (In this picture, the machine was rotated 180 degrees relative to previous picture.)

Toshiba Chromebook 2 CB35-B3340 internals without EM shield

I see the CPU, RAM, and flash storage are all tightly integrated and soldered on board. No RAM or storage upgrades for this machine, which is consistent with the Chromebook ethos. About the only core component not soldered down is the commodity WiFi card, which I interpret to mean there was little to no cost savings to integrate an unit.

I had known about Chromebook’s concept of reduced complexity, but it was mostly in terms of software and maintenance. Since Chrome OS was running a Linux kernel under the hood, I expected the hardware to be just as complex as any other laptop. But apparently not this one, which I found very interesting. Now I’m curious if all Chromebooks have electronics guts simpler than equivalent full PC laptops. If I have the opportunity to take apart more Chromebooks in the future, I’ll keep an eye open to see if this is actually common across all Chromebooks or maybe the simplicity of this model is just good work on the part of the Toshiba Dynabook team which designed this Chromebook.

This was an interesting and instructive look inside the machine, time to put it back together and take stock of the current situation.

Toshiba Chromebook 2 (CB35-B3340): Replacement Screen Shopping

I have an old Chromebook that was pretty obviously retired due to a broken screen and I freed the damaged module for a closer look. I had no expectation that I could repair the display module, as there’s a visible crack. Interestingly the crack is inside the glass and not present at the outer-most surface. There’s also discoloration surrounding the crack hinting at more severe damage underneath. I could probably go online and find information on the display module used in this particular Chromebook, but getting the make and model is only a secondary objective. Before I contemplate a replacement, I wanted to first make sure I could install the replacement with low risk of damage. Hence the removal exercise to verify the lack of an impenetrable wall of glue or similar impediments.

It turned out getting to the actual module label was useful because this device was apparently sold in multiple configurations. There’s at least one variant with a minimal 1366×768 low resolution panel, and this device was an upscale version with a 1920×1080 panel. A search on Amazon marketplace found replacement new LP133WF2(SP)(A1) available for roughly $75 (*) and eBay sellers in a similar price range.

The price was the last piece of information I needed, now I need to make a decision about this project. $75 isn’t a terrible price to pay to bring a laptop computer back up and running, but it doesn’t compare very favorably to what else that money can be spent on. Even if we limit ourselves within the Chrome OS ecosystem.

New Chromebooks can be had for a little over $100 with the occasional sale, though at that price point we’re limited to 1366×768 resolution displays. I’ve seen 1920×1080 resolution Chromebooks at around $150 on sale, or roughly double the cost of a replacement panel. A new Chromebook would have access to newer developer features like Crostini that this Chromebook does not. A new Chromebook will also receive Chrome OS updates for at least five years, where support for this 2014 vintage ‘swanky’ Chromebook would end considerably sooner. Even if I put Ubuntu on this machine via Crouton, it is still dependent on Chrome OS for Linux kernel security updates.

At $75 for a new replacement panel, the economics is a tough call. I may contemplate buying salvaged panels which are available for less. (As of this writing, as low as $47.) I’ll keep thinking about this for a while. In the meantime, I want to look at the rest of this Chromebook out of curiosity.


(*) Disclosure: As an Amazon Associate I earn from qualifying purchases.

Toshiba Chromebook 2 (CB35-B3340): Screen Removal

If I wanted to turn this Toshiba Chromebook 2 into a robot brain, I need to put it into developer mode to install software outside of Chrome OS. Unfortunately the menu to put it into developer mode is only visible on the primary display which is damaged and illegible. Time to explore what it would take to bring the screen back.

The screen bezel are held in place by two screws and a lot of plastic clips. Once the screws were removed, I could go around the perimeter and pop loose all the plastic clips.

Toshiba Chromebook 2 CB35-B3340 screen bezel screws

After the bezel was removed, I noticed a small magnet held inside. This allows the base to detect if the lid is open or closed via a Hall effect sensor. If we end up going without the screen and need to spoof lid state, this is where we would place a magnet.

Toshiba Chromebook 2 CB35-B3340 screen bezel magnet

The lid had heat-set inserts that looked like they could be used to help fasten the screen in place, but no fasteners. I thought maybe someone had investigated screen replacement before me and just didn’t put the screws back, but as it turns out, screws wouldn’t have done anything.

Toshiba Chromebook 2 CB35-B3340 heat set insert but no fastener

This screen is held by four adhesive pads, one at each corner. Perhaps a different model used a different screen with metal brackets that would have been held using screws, but this screen was held by sticky pads.

Toshiba Chromebook 2 CB35-B3340 screen freed from adhesive pads

Once freed from the four pads, the final point of attachment was the electrical connector. The plastic tag is actually adhesive tape, helping to keep two sides of the connector together together. Once plastic is peeled away from metal, it was easy to unplug the connector.

Toshiba Chromebook 2 CB35-B3340 screen cable

Disconnecting that connector freed the screen, and we can take a closer look.

Toshiba Chromebook 2 (CB35-B3340): Developer Mode

The upside of a Chromebook is that the user never has to worry about hardware specifications, applications minimum requirements, or any of the typical headaches of computer ownership. It’s all handled through the Chrome browser. The downside of a Chromebook is that the user is not allowed to install traditional computer applications. Or at least, not by default. Under the hood, Chrome OS runs a Linux kernel, and it’s possible to use that as a foundation to extend computing experience outside the walled garden of Chrome OS. I started learning about Crouton, a project using chroot capability of Linux kernel to allow a variant of Ubuntu or Debian to run on Chromebooks.

Documentation for Crouton referenced the Crostini project, a way to get a Linux shell and container support without putting a Chromebook into developer mode. It sounds like a great thing to try first! But unfortunately this particular Chromebook is not supported. More specifically, this Chromebook hardware generation with the code name ‘Swanky’ does not meet the hardware virtualization support required for Crostini.

Especially frustrating is the explanation that, while the Intel spec sheet says the Celeron N2840 has the required hardware virtualization support, ‘swanky’ Chromebooks actually use a special variant of the chip without such support. I guess it saved them some money at the time? Keeping in mind the original intent of Chromebooks, it made sense to cut out virtualization support. But that decision now cuts this laptop off from Crostini.

So no Crostini for this machine, back to looking at Crouton. And the next critical step is to switch this Chromebook into Developer Mode. Holding down ESC + Refesh then pressing power, I can see the broken display is illuminated but the external monitor is not. It appears the recovery/developer mode menu is shown only on the built-in display, which I can’t read. And unlike the power wash menu earlier, the screen mirror key combination has no effect on the developer mode menu.

I searched online for a complete procedure to put this Chromebook into developer mode. Unfortunately all I found were”press control-D from recovery screen and follow menus” which isn’t helpful when I can’t read the screen!

It appears if I want to venture outside the Chrome OS sandbox, I have to look into screen replacement and the first step is investigating its removal.

Toshiba Chromebook 2 (CB35-B3340): Hardware Specifications

The old Chromebook retired due to cracked screen has been updated to latest Chrome OS, so I started searching for its technical specifications. I stumbled right out of the gate, failing to find anything on toshiba.com. Eventually I learned Toshiba sold a majority share its laptop business to Sharp and the new company (does that make it a joint venture?) is called Dynabook.

This would explain why every single product support page for the CB35-B3340 I found was under the Dynabook domain. There is not a lot of detail here, as a Chromebook is supposed to be low maintenance and they carried that concept through to reduced number of things a user has to worry about. A Chrome OS user shouldn’t ever have to worry about gigahertz or gigabytes.

But I did get some useful information implying this machine meets requirements for running robot operating system (ROS). The Intel Celeron N2840 processor is 64-bit capable. The maximum clock speed is up to a very respectable 2.58GHz. But it is constrained to run under 7.5 Watts, so it’s still an open question whether it has enough processing power in practice. Typical web browsing only need CPU power in short bursts: render a web page, then wait for the user to read the page, before rendering the next page. But robot intelligence puts a consistent high workload and if the machine needs to stay under 7.5 Watts it might have trouble sustaining maximum clock speed.

Its 4GB of memory and 16GB of flash storage meet bare minimums for even contemplating an Ubuntu installation. I’m not sure if 16GB storage is enough for the full suite of ROS nodes, but it can certainly run the subset necessary to operate a particular robot. And just like how CPU operating pattern differs between Chrome OS and ROS, the storage I/O pattern will be very different between typical Chrome OS and ROS. There’s a risk the flash storage will wear prematurely, a concern to keep in mind.

But first, we have to get this system to a point where we can install ROS, because ROS doesn’t install on bare Chrome OS.

Toshiba Chromebook 2 (CB35-B3340): Reset and Restart

I have a Chromebook with a damaged screen. Fortunately I could connect an external monitor via HDMI and mirror the primary display. It makes the machine usable, which is an improvement, but I have to command display mirroring every time there is a change in state. I have to press the magic key combination after every boot-up, every user log-in, and every user log-out. It is rather less than ideal but at least I can proceed.

The first order of business is to erase the system. The Chrome OS login screen showed the image of someone’s Google profile. I don’t know who it is, and I don’t care. This person’s data is none of my business and, since it is a Chromebook, I know all their data is still available online with Google.

Chrome OS has a “Log in as Guest” option, which allowed me to access the system settings menu. I thought this was where a system reset could be commanded, but after coming up empty handed I went online for more research and learned a Chrome OS reset is actually triggered by a particular key combination upon power-up. I was worried the reset process would be restricted to the primary monitor, fortunately I could mirror that display to initiate the reset process which someone at Google decided to call a powerwash. Cute.

Once up and running on a blank slate, the next order of business is to update the system. There’s no telling how long it has been since this machine received a security update.

Chromebook 44.0.2403.156

This model Chromebook launched in 2014. Chrome OS 44.0.2403.156 was released August 19, 2015. Since Chrome OS auto-updates itself, it appears this particular machine lasted less than two years in use, possibly far less, before its screen was damaged. This makes me feel bad for the original owner.

Chromebook 53.0.2785.154

Update was a multi-stage process, I assume due to its age. I’m not familiar with Chrome OS development history but each of these steps probably transition across large architectural changes. The first round of update only took it to 53.0.2785.154 (October 2016).

Chromebook 72.0.3626.122

Another round brought it to 72.0.3626.122 (March 2019) This update resulted in a very different looking user interface and many items were moved around.

Chromebook 79.0.3945.123

Yet another round of updates brought it to 79.0.3945.123 (Jaunary 2020) which is the latest available. This is a pleasant surprise, as I had not expected this device to still be supported but it looks OK on the Developer Information For Chrome OS Devices page. This model launched in 2014, and Google only guarantees Chrome OS support for 5 years, so this device is probably living on borrowed time.

We’ll worry about that later. Now that we are up and running with latest Chrome OS, time to start looking at technical information.

Toshiba Chromebook 2 (CB35-B3340): Cracked Screen

By the time I wrapped up investigation of the HP Split tablet/laptop convertible, the Targus type I adapter arrived. I needed it to charge the battery in the remaining two machines of my research assignment from NUCC. I set aside the HP Split and started charging the Toshiba Chromebook. Once the charge LED turned from orange to white, I turned it on and the answer to “why was this machine retired?” was immediately apparent.

Toshiba Chromebook 2 CB35-B3340 screen detail

There is a large diagonal crack across the middle of the screen. Sometimes when a screen is damaged we could still read the content around the crack, but not here. The entire screen is illegible. Turning the machine on and off a few times, I saw the content is not consistent between runs. Either Chrome OS is booting to a dynamic splash screen every time, or what’s visible just have no correlation with the intended content.

Fortunately, this Chromebook has a HDMI video output port. Plugging it into a monitor, I see a very pretty picture of a night time landscape. This is probably a background picture, but without any controls, it is merely the secondary screen. The login prompt is still on the primary display I can’t read.

Since this was my first Chromebook, I didn’t know if there was a key combination I could press to toggle from this “extended” mode to “mirrored” mode where the login screen is sent to both displays. A little bit of research implied that there was, and a few minutes of fumbling found the magic keystroke: control plus an icon that might be maximizing a window or possibly going full screen.

Chromebook keyboard closeup

I’m not sure if it’s common to all Chromebooks or specific to this model, but at the moment it doesn’t matter. I can see the ChromeOS login screen on my external monitor, time to get down to business.