Several years ago I bought a box of eight solar lawn lights and installed them in my backyard. At the same time (or soon afterwards) I bought a second box of identical units and stored it away for replacement. I guess I expected their lifetime under the southern California sun to be short, and that I expected difficulty in finding exact replacements later. It turns out I was right on both counts and I’m happy my past self left me a box of replacements. My back yard has been dark for a while, but now I can try to bring these lights back online.
The functional evaluation steps were:
Fully charge a NiMH AAA battery cell for testing.
Remove a lawn light’s solar+LED module with a 1/4 turn counter-clockwise. The module may break apart if plastic has turned brittle.
Open battery compartment door. The latch may break if plastic has turned brittle.
Remove old tired NiMH AAA battery cell for proper recycling.
Inspect battery compartment and clean any corrosion built up on terminals.
Insert charged NiMH AAA battery cell.
Cover solar cell, the LED should turn on and illuminate.
If the LED does not illuminate, the circuit board is dead and the entire unit must be replaced. If the battery compartment door is in good shape, keep the door for use with another unit.
Expose solar cell to sunlight, the LED should turn off.
If LED does not turn off after 5-10 seconds of direct sunlight exposure, the solar cell is dead and the entire unit must be replaced. Again the battery compartment door, if in good shape, can be used in another unit.
If all tests pass up until this point, install one of the salvaged NiMH battery cells and reassemble so the battery can charge via solar power.
Using these steps I determined out of the eight original units, half of their solar cells had failed. A fifth unit had a functioning solar cell, but its structure was brittle and broke apart when I removed it from the light. That leaves three of the original units still functioning well enough to get replacement NiMH batteries, one of them also getting a replacement battery compartment door from one of the dead units. New units replaced the failed lights. Now I have back yard night illumination again, and I still have a few new-in-box replacement units ready to go in the years ahead. I’ll reevaluate my lawn light situation once they run out.
I have solar lawn lights in my back yard that has failed after sitting in the harsh outdoor environment for several years. Their weakest point appear to be their NiMH batteries which I’m willing to replace. But some of them also have failed solar cells or crumbling internal structure, and replacing a battery won’t bring those back. I’ll have to buy new replacements. I went online shopping for solar lawn lights and failed to find an exact match. I expected this but it was worth a few minutes to look. If I wanted to maintain a consistent appearance, I should have bought a second box at the time and stash it away.
As soon as I had that thought, an echo of memory came up in the back of my head. I went looking in the cabinet where I might keep such things and… yes! I had that same thought earlier, bought a second box, and forgot about it until now.
Putting an old sun-beaten unit next to a fresh one out of the box provided quite the contrast. Both in their painted metal surfaces and in the condition of their solar cells.
Here’s a close-up view of a fresh solar cell. I now know the clear top section is not glass, but I don’t know much else beyond that. Someone more knowledgeable about solar cell construction can probably look at this and foresee all the ways it will break down with age and exposure.
What I have now reflects real world long duration outdoor exposure. The clear top layer has yellowed and developed a rough surface texture. And I can’t tell if the outer edges have eroded or if the clear layer material has shrunk. I don’t know if the white visible patches are in the clear top material or in the solar cell underneath. I do know this solar cell stopped producing power some time back and will have to be replaced by a new one.
I have eight solar lawn lights in my yard, and sitting under the sun for several years has taken its toll. Even though they’re basically disposable, I thought I would play with them before throwing any away. I tried to retrofit one with a super capacitor and the attempt taught me several problems not the least of which is that those supercapacitors I bought were too big fit inside. I had better results from my first experiment swapping out a NiMH battery. For the foreseeable future, I think that’s the way to go.
Since my capacitor test light turned out to have a dead solar cell, I used my bench power supply set to 2V as the power source. I charged it up during the day, then disconnected power at sunset to see how long it ran. It shut off a little over six hours later which is roughly the runtime I want out of these lights. It’s also on par with what I get out of running these lights on salvaged NiMH batteries past their prime.
I had contemplated trying my supercapacitor test again with smaller capacitors that would easily fit inside, but physically smaller capacitors would have less energy storage capacity as well. Which means they can’t run as long, and my light would go out sooner. I could compensate for this by wiring several smaller units in parallel, distributed around the light’s interior instead of one big cylinder, but then cost would go up.
The capacitors I bought were advertised as 500F. Given the realities of no-name Amazon vendors I doubt that number is accurate, but it is a starting point for comparison. There are smaller capacitors available roughly the size of my salvaged NiMH cells, which I know would fit with minimal trouble. Maybe even a pair of them. The highest-capacity units I found at that size (*) were advertised as 100F and cost more than my “500F” units. If it runs the lights for 1/5 as long, the lights would only illuminate for a little over an hour before going out. Even a pair working in parallel would go dark in less than two hours, and that’s too short.
I would expect supercapacitors to withstand daily charge/discharge for many years with minimal degradation. But as things stand I would have to pay a price premium and give up significant runtime and even then the solar cell may die first. I don’t think that tradeoff makes sense so I’ve decided to stay with NiMH batteries for now and possibly reevaluate supercapacitor price/performance again in a few years. Especially since I discovered past me had stashed a batch of lights I can use today.
(*) Disclosure: As an Amazon Associate I earn from qualifying purchases.
I’m playing around with some old tired solar lawn lights I have in my back yard. I discovered their energy storage was in the form of AAA NiMH batteries, and as an experiment I was able to resurrect one lawn light with a salvaged NiMH battery cell. I expect it to die again soon, though, because this is a very stressful application. First, a solar ornament sitting under the summer sun gets really hot, near the top end of NiMH operating temperature range, if not beyond. And second, I discovered these lights use 2V solar panels and would pass that all the way to battery terminals for charging. This also exceeds the recommended NiMH voltage range. Excess power would be dissipated as heat, which aggravates the temperature issue.
Given the limited expected lifespan of NiMH battery in this application, I thought it was a good opportunity to play with a supercapacitor. A relatively new branch of the capacitor family tree, they offer several orders of magnitude more energy storage capacity than other capacitor types though still less than commodity batteries. The types I can realistically purchase and play with can comfortably operate at summer heat temperatures, and their maximum voltage of 2.7V has a comfortable margin over solar cell output. Another key capacitor advantage over batteries are their tolerance for high charge and discharge rates, but that’s not important here. Most importantly, prices have dropped enough for me to pick up a batch to play with. I went on Amazon and bought the highest Farad-per-dollar listing I found that day. (*) Once it arrived, I selected another lawn light for this capacitor experiment.
Electrical Failure: Solar Cell
Having established that the YX805 chip at the heart of these lights won’t do anything when the battery is below 0.9V, I used my bench power supply to charge my capacitor up to a NiMH-emulating 1.25V.
I un-soldered the battery compartment wires and soldered them to the YX805 circuit board. The LED illuminated. This is good! Since my solar panel was facing downwards, this is appropriate behavior for a dark environment with energy in the battery.
I then moved the assembly to a bright sunlit spot, and the LED continued shining. This is bad! It was supposed to go into battery-charging mode. Probing with my volt meter, I established the solar cell is not delivering any power so the YX805 chip thinks it’s always dark.
Mechanical Failure: Brittle Plastic
Even if the solar cell was still functioning, I would not have been able to put this light back together. The plastic bracket directly underneath the solar cell had degraded under heat.
There were four screws fastening the bottom and top covers together. When I started turning those screws, three of these corner posts crumbled apart. That left only one superficially intact, but the threads crumbled during removal so that final fourth post is just as useless as the rest. I can’t install a replacement solar cell, as the dead cell and mounting posts were held with this glob of gray epoxy. Which, inconvenient for me, is still holding strong. If the solar cell was still good and I wanted to repair this mounting mechanism, I would have to design, 3D print, and epoxy something that sits apart from this crumbled assembly.
Mechanical Failure: Not Enough Room
The good news: a dead solar cell and broken mount meant I was free to experiment with fitting a capacitor inside. This capacitor is slightly larger than a D-size battery cell, and I’m trying to fit it in a device designed for AAA-sized cells.
I took a chisel and cut out the battery tray, which also took out two of the four mounting screw holes, but they had nothing to fasten to anyway. This tray is made of plastic and almost as brittle as the top bracket. Pieces of plastic crumbled under the chisel as I went.
I quickly made a hole big enough for the capacitor to fit, but not enough for the two halves to close together. I started an iterative process of “make hole bigger” and “test fit” then repeat. I made the hole larger and larger until it started encroaching upon the LED hole in the center. To make room, I turned the LED circuit board 180 degrees and drilled a small hole for LED to shine from an off-center position.
By the time I can close the two halves together, the capacitor was about half-exposed to the outside. Moving it further center would make the problem worse, because the solar panel bracket assembly would force the capacitor further away so more than half of it would be exposed out the bottom. And as it happens, I would need to move further center: I had put the capacitor too close to the outer edge, cutting into volume required for the glass component beneath. Fail! Fails all around, ah well. But it was fun to try. Now I know enough to decide I should stick with NiMH batteries.
(*) Disclosure: As an Amazon Associate I earn from qualifying purchases.
Years ago I bought an 8-pack of solar lawn lights. They were fun for lighting up the back yard for a few hours after sunset, and I was curious how long they’d last. The answer was about five years, plus or minus a few years, depending on your standards because they gradually fade out. Both in terms of shorter duration after sunset, and in terms of dimmer illumination.
Now only one of the original eight offer any visible illumination, for less than half an hour after sunset. This behavior implies whatever internal energy storage device has degraded over years, and I wanted to take a look to see if I can confirm my hypothesis.
Solar lawn lights are very inexpensive now, and it’s much easier to just buy a new set. The reason I wanted to try reviving these lights is because their center clear section is glass, not clear plastic as many current products use.
Glass won’t yellow and fail after years of southern California sunshine, which is not something I can say for whatever non-glass material was used for the solar cell’s top layer. The paint is also very visibly damaged by sunlight. I can repaint if I want to, but condition of that solar cell looks bad.
Flipping the lid over, I was surprised to see a battery compartment door. I had expected a “no user serviceable parts inside” arrangement. I opened the door and the molded plastic latch broke, brittle from years of baking under the sun.
Inside the door is a AAA NiMH battery cell, literally roasted by the sun while it lived inside a black enclosed compartment. After removing the battery, I took a multimeter and measured the open-circuit battery compartment terminals under sunlight. My meter read 2.095 volts. Yikes! That’s a lot higher than the 1.25V nominal level for a NiMH battery cell. Are NiMH batteries expected to take this kind of abuse? I know NiMH batteries can handle over-voltage better than lithium chemistry batteries, but I didn’t know to what degree. While excess energy can be dissipated as heat, it’s hard to shed energy as heat when it is already very hot from sun. Between the high voltage and high temperature, these cells lived a harsh life.
Looking in my pile of NiMH batteries, I found two AAA-sized units and installed one of them. The LED lit up when I covered the solar panel to simulate night, so I decided the old battery must be completely dead. To my surprise, it wasn’t! When I connected it to my “Joule Thief“, the LED lit up and stayed illuminated for days. The battery isn’t completely dead, but not well enough to run this solar lawn light. Connecting it to my bench power supply, I find the LED turns off when battery voltage drops below about 0.9V. In comparison, my Joule Thief will run all the way down to about 0.4V, which is much more demanding on the battery and a bad idea for longevity.
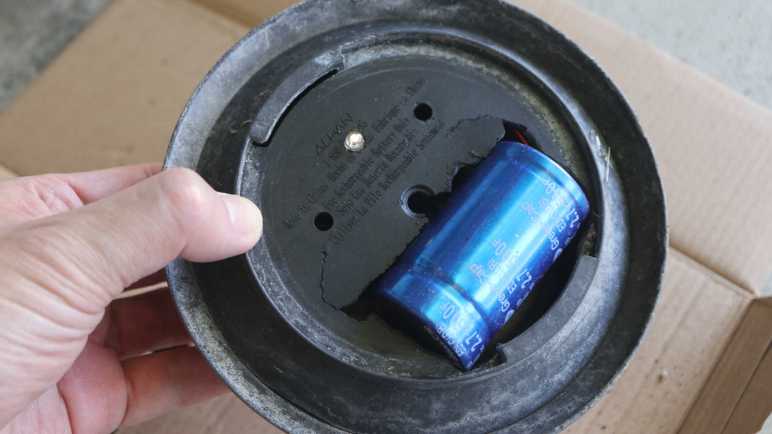
I don’t have many NiMH AAA batteries on hand. I could buy some more, but I don’t particularly relish the thought of buying new batteries just to sentence them to a quick and hot death. I decided to open up the light to see inside. There wasn’t much: the solar panel is well-sealed by a blob of dark gray epoxy, and there’s only a tiny circuit board inside.
The back of the circuit board shows all the signs of something left out in the elements.
As does the front, which showed a YX805 chip in charge of the operation. An online search found a Simplified Chinese datasheet which explained it was specifically designed to run solar lawn lights. Machine translation claimed battery over-discharge protection as a feature, explaining the deactivation at 0.9V. There’s also mention of adjustable battery charge rate, but nothing about over-voltage protection. Either the machine translation missed it, or the designers decided it was OK for a 1.25V nominal voltage NiMH battery cell to face 2.095V charging input. Or perhaps the 2.095V I measured was just an artifact of an open circuit that fails to trigger the battery charge rate limiter?
Given its corroded condition implying it may fail elsewhere in short order, I’m not eager to spend money on new batteries. I have plenty of NiMH cells on hand, though, just not in AAA size. The biggest of which are from Neato battery packs. They’re too old and tired to run a robot vacuum, but perhaps they can run a solar lawn light. I cut the spot-welded tabs in half and soldered to the half-tabs, sparing battery cells from heat of my soldering iron.
Sadly many of those old cells were too weak to get up over that 0.9V minimum bar, but a few of them were good enough to run a solar lawn light (though dimly) for a bit after sunset. Perhaps my solar lawn lights will be my way of giving some old NiMH battery cells yet another life, even if a hot and short one. Or I can use it as motivation to explore another technology: supercapacitors.
A small solar cell doesn’t get much power with indoor lighting. As far as consumer electronics go, I haven’t seen much beyond a solar-powered desktop calculator. I had thought there’d never be enough power for an indoor solar mechanical device, but a few years back little solar-powered pendulum toys started showing up. I usually see them as little waving cats (maneki-neko) like the teardown and analysis posted to Hackaday.
This device is a variation of the same basic idea. Instead of waving a cat’s arm, the pendulum swings the body. An additional sophistication in this design is a second linkage that swings the head in the opposite direction of the body, creating a dancing duck. It was purchased for a buck and a half from Daiso Japan, so we’re looking at something produced for raw material cost somewhere a quarter (if even that much.) It was an impulse buy and wasn’t expected to last very long, but it actually ran for years before suffering mechanical issues and frequently getting stuck. It was then moved to a window ledge, where it could occasionally swing its head and hips under power of direct sunlight. But the sun that gave it a second life also took away its shine: brightly colored plastic started fading rapidly and became brittle. Finally, an unfortunate fall from that window ledge ended this duck’s performance career.
Poor duck broke its neck in the fall. The neck linkage was lost, but we can see the head’s pivot point inside the neck, where plastic shaded from direct sun is a visibly more vibrant shade of yellow.
I think the bottom of the base was originally glued in place, but that glue has weakened with age (or sun) and could be easily pried apart.
A small solar cell feeds into a circuit board, home to just two components: an electrolytic capacitor and a chip under a blob of epoxy. A coil wound from super fine copper wires is attached to this board as well. As explained in the Hackaday link above, this coil is both input and output: for sensing position of the magnet and for creating a magnetic field to boost the magnet’s swing.
The coil looked off-center, so I broke off the rear side of the base and reinstalled it to verify the coil is indeed off center when the magnetic pendulum (black plastic with black magnet on the bottom) is at rest. There is only about a millimeter of air between the coil and the magnet, a much closer distance than found in the cat mentioned in the Hackaday post.
This old dancing duck has a bit of arthritis and could not self-start under indoor light. I gave the pendulum a small tap and it started rocking but halted again after a few seconds. We can see the problem in the pivot point, which was designed to minimize friction. The pendulum axle has a triangular profile, so only a tiny sharp point touches the circular hole in the base. Years of dancing in the sun has worn both components. The triangular wedge’s sharp edge has been rounded off, and the hole perimeter is no longer circular. Together these two parts presented too much friction for the pendulum to overcome.
Daiso has long since stopped carrying this device, and I had no luck finding an exact replacement. There is no shortage of solar-powered dancing ducks for sale, but they all looked different from this cute little thing. Some are the opposite of cute, and a few looked downright scary! I have to say goodbye to this dancing duck now, it gave its all for dance and was quite an entertaining $1.50 spent.
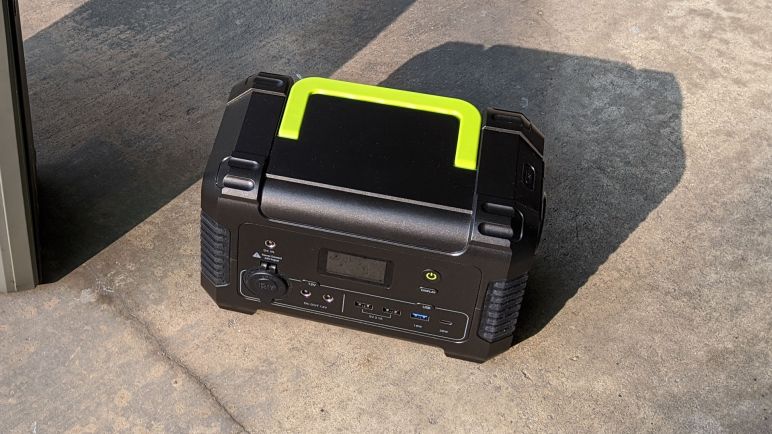
I had been using a Monoprice PowerCache 220 to store and use power generated by my small Harbor Freight solar array. Due to its degrading battery and erroneous thermal protection circuit, I bought a Paxcess Rockman 200(*) to replace it. Thanks to its lithium chemistry battery, the Paxcess is far smaller and lighter than the Monoprice unit it replaced. Which made a good first impression as something I noticed before I even opened the box.
Two means of charging were included with the Rockman 200, giving users two choices of power source. Either use an automotive “cigarette lighter” power socket adapter, or use a household AC voltage power adapter. But I intended to charge from solar power, so I had to fashion my own charging adapter. Fortunately the Rockman 200 used commodity barrel jacks (5.5mm outer diameter, 2.1mm inner diameter) so it was easy to build one from my most recent purchase(*) of such connectors. This was much easier than the hack I had to do for my Monoprice.
Once up and running I was indeed able to charge from my Harbor Freight solar array. The maximum no-load open circuit voltage of these panels were around 21V, lower than the 24V maximum input voltage limit of the Rockman 200. The Rockman 200 had a far more informative display than the very limited one on board Monoprice PowerCache 220. I like to see how many watts the solar array is delivering, and seeing the number of watts being drawn by anything I had plugged in. Unfortunately, there were two disadvantages relative to the PowerCache 220.
It is not possible to use the AC power output while charging. Like the Monoprice, 12V DC and USB DC power output can be used while charging. But while the Monoprice was willing to deliver AC power while charging, the Paxcess is not.
When drawing DC power while charging, the cooling fan always comes on. I suppose this is some sort of DC voltage conversion process. In contrast the Monoprice stays silent if it can stay cool enough. Or at least it used to, before the thermal sensing system broke down.
Neither the Monoprice or the Paxcess attempts to perform maximum power point tracking (MPPT). I realize this means the panel is not operating at maximum efficiency, but a MPPT controller (*) cost significantly more money than their non-MTTP counterpart (*). Given that a standalone controller costs almost as much as the array, or the Paxcess itself, I don’t fault the Paxcess for not doing MPPT.
However, the Paxcess is even more non-MPPT than the Monoprice. The Monoprice pulls the voltage level down to whatever level its internal lead-acid battery is at, which is usually in the range of 11-13 volts. In contrast, the Paxcess drags the voltage all the way down to 9.5 volts, which is even further away from the maximum power point, as seen by varying power input wattage on the information display.
The display also shows a charge percentage for its internal battery. This allows me the option to stay within the 30% – 80% range if I want to minimize stress on the battery. Lithium chemistry batteries have a different care and feeding procedure than lead acid batteries. Speaking of which, with the new battery storage unit in hand, I opened up the old one to try to fix it.
(*) Disclosure: As an Amazon Associate I earn from qualifying purchases.
A little over two and a half years ago, I bought a Monoprice PowerCache 220 (Item #15278) to help store power generated by my cheap Harbor Freight solar array and also to utilize that power by the way of AC inverter and USB power converters. When new, the PowerCache was quite capable of gathering up the day’s solar generation and using that energy to charge various battery-powered devices around the house. Up to and including charging an Apple MacBook Air (2014).
I expected this battery to wear down, I just didn’t know how quickly. Battery University has a capacity loss chart, but that is for lead acid batteries held on standby for long periods of time (like in an UPS) showing the capacity would fade to about 85% after two and a half years. However, this battery was cycled on a daily basis for most of the past 2+ years. And while the charge controller does perform an occasional top-off charge, it’s probably not as much as the battery desires.
As a result of this stressful usage pattern, the battery inside my PowerCache 200 has degraded to a point where it could barely hold enough energy to charge a cell phone. That by itself was not a disaster, as I had anticipated battery degradation and was prepared to revive the machine with a new lead-acid battery. Unfortunately the machine has developed another problem: the thermal protection system has gone amok. Within five minutes of the PowerCache starting up (when everything is still room temperature) the “overheating” warning triangle starts blinking and soon the thermal protection routine kicks in and shuts everything down.
So instead of shopping for a replacement lead-acid battery for the PowerCache 220, I started looking at replacing it entirely. I was pleasantly surprised to see that the cost of lithium based batteries have dropped significantly within the past two and a half years. As of right now, lead-acid based systems are still cheaper, but the price premium for going lithium-ion is now small enough to convince me to make the switch. I’ll pay a little extra, but I’ll get something that’s far smaller and lighter. Thus I bought a Paxcess Rockman 200 Portable Power Station (*) to see how it handles my usage scenarios.
[UPDATE: I opened up the PowerCache 220 with the intent to fix it, but things took an ugly turn and ended up as a full teardown.]
(*) Disclosure: As an Amazon Associate I earn from qualifying purchases.
I wanted to have a screen in my house displaying current location of the international space station. I love ISS-Above but didn’t want to dedicate a Raspberry Pi and screen, I wanted to use something in my pile of retired electronics instead. I found ESA’s HTML-based ISS tracker, tested it on various devices from my pile, and decided the Samsung 500T would be the best one to use for this project.
One of the first device I tried was a HP Mini (110-1134CL) and I measured its power consumption while running ESA’s tracker. I calculated my electric bill impact to keep such a display going 24×7 would be between one and two dollars a month. This was acceptable and a tablet would cost even less, but what if I could drop the electric bill impact all the way to zero?
Reading the label on Samsung 500T’s AC power adapter I saw its output is listed at 12V DC. The hardware is unlikely to run on 12V directly, since it also has to run on batteries when not plugged in. It is very likely to have internal voltage regulators which should tolerate some variation of voltage levels around 12V. The proper way to test this hypothesis would be to find a plug that matches the AC adapter and try powering the tablet from my bench power supply. But I chose the more expedient path of beheading the AC adapter instead and rewiring the severed plug.
A quick test confirmed the tablet does not immediately go up in flames when given input voltage up to 14.4V, the maximum for lead-acid batteries. Whether this is bad for the device long term I will find out via experience, as the tablet is now wired up to my solar powered battery array.
This simple arrangement is constantly keeping tablet batteries full by pulling from solar battery. This is not quite optimal, so a future project to come will be to modify the system so it charges from solar during the day and runs on its own internal battery at night. But for now I have an around-the-clock display of current ISS location, and doing so without consuming any electricity from the power grid